
In this article, you will find an extended overview of all the new features right after the release.
If you would like to receive an email notification with an extended features overview a few days before the upcoming release, please fill in the PPM Express Release Notification Form.
Release Notes 27.4 @July 22, 2026
Working Hours & Task Time Display Enhancements
Time display based on your regional settings:
Regional Format Setting on the Tenant Settings page will now include the hour format (12-hour or 24-hour). Working hours will be displayed using the time format that matches your selected region. Also, this setting is applied consistently throughout the application (e.g., activity log time, last modified, created date, sync date, etc.).

Working times editor:
Working hours will now be displayed as time ranges instead of only total hours:
- Define multiple working times during the day (for example, from 8 to 12, from 13.00 to 17.00 (with a lunch break)). These settings are available on the Calendar Settings page, the Resource dashboard, and the Calendar Exceptions section.

- Adjust start and end times in 15-minute increments.

After the release, existing working hour configurations will be automatically converted to the new visual format. The previous time values will be preserved and mapped to the new structure (for example, values such as 01.12 will be preserved); no manual action is required. New working times will need to be configured according to the new format (for example, 01.15).
Optional task time display:
Project tasks will now include a Show Time with Date option that displays task start and finish times alongside task dates. When enabled:
- Time is shown across all supported task views.
- Time is shown for the task Start and Due Dates.
- The setting is remembered per user and project.

- Task times are automatically derived from the configured working calendar. Task times are informational and cannot be edited directly from the task. To change task times, update the associated working calendar and click Calculate -> Apply Calendars for the selected tasks, or wait for the automatic re-calculation if the project setting 'Calendar-based schedule calculation' is enabled.
Improved support for external systems:
Where supported by the connected system, task times will be imported and displayed for external projects. Availability depends on the capabilities of each integration.
Project Publisher compatibility update:
To support the new task time functionality, this release also includes an updated Project Publisher:
- When publishing or linking projects, task start and finish times are preserved and synchronized from Microsoft Project (.mpp files).
- When importing projects into PPM Express, task times are automatically calculated based on the project's Global Calendar, including configured working week hours and calendar exceptions.
Please install the latest Project Publisher version after the release.
CSV exports now include time:
Task exports to CSV will now include both dates and times. The exported time format follows your regional settings. Task times are informational and cannot be edited via CSV. Existing CSV files generated before this release remain fully compatible.
Release Notes 27.3 @July 16, 2026
Introducing Standard Approvals for Project Process Stages.
PPM Express introduces Standard Approvals for project process stages, providing an additional governance mechanism for organizations that require formal approval before projects can progress through their lifecycle.
With this feature, administrators can configure individual process stages to require approval before a project can transition to the next stage. Once an approval request is submitted, the project remains in its current stage until all assigned approvers approve the request. If any approver rejects the request, the project stays in the current stage until the project manager addresses the feedback and submits a new approval request.
What's new:
- Configure Standard Approval individually for selected process stages.

- Assign one or more approvers for each project in the new Process Approvals view available in the Process section.

- Submit approval requests directly from the project process.
- Review and approve stage transition requests in the Approval Center under the new Project Stages tab.

- Support multiple approvers. A project advances only after all assigned approvers approve the stage transition.
- Projects that do not use Standard Approvals continue to follow the existing behavior without changes.
For more details, please refer to the Configuring Standard Approvals article.
Legacy Process Disabling:
If you started using PPM Express before the Process Management release, this update applies to you.
Right now, the Legacy Project Process remains editable even when it's used in projects.
Starting July 16, 2026 the Legacy Project Process will become read-only.
If you need to make changes to your Legacy Project Process, please review and update it before it becomes read-only.
For more details, please refer to this article.
Release Notes 27.0 @June 11, 2026
Assignments by day: daily workload distribution and calendar-aware scheduling.
With the next release, we will enhance project scheduling and workload visibility in PPM Express by introducing Workload View and calendar-aware schedule calculations.
Workload Project Task view provides a day-by-day breakdown of task workload and progress.
You can analyze:
- Effort
- Completed Work
- Remaining Work
- Baseline Effort
Values can be shown at both the task and assignment (resource) levels when a task is assigned to one or more resources. Unique metric icons are displayed throughout the view to help distinguish workload values and simplify inline editing.

The way the workload is distributed depends on your project configuration:
- Progress Calculation method (Effort, Story Points, or Average Progress)
- Task mode (Auto or Manual)
For projects that use Effort + Auto Tasks, Completed Work is distributed sequentially from the task Start Date, filling each day up to the planned Effort value. If synced from the Time Tracker, it uses the exact distribution from Time Tracker. The Remaining Work is calculated based on Effort minus Completed Work.
For projects that use Effort + Manual Tasks, Story Points, or Average Progress, workload values are distributed evenly across the task duration.
Baseline Effort is always distributed using Baseline Start Date, Baseline Due Date, and Baseline Duration, and is displayed only at the task level.
A new project setting, Calendar-based schedule calculation, controls whether workload distribution and scheduling should respect resource and project calendars.

For existing projects, this setting is disabled by default, preserving the usual flow. For newly created projects, it is enabled by default. Enabling calendar-aware schedule calculations may affect task schedules, workload distribution, and calculated completion dates.
If you would like to evaluate how the new scheduling logic impacts your project before applying it to production data, we recommend creating a project copy (clone option) and testing the feature first.
This allows you to compare workload distribution and scheduling results under different configuration options without affecting your active project.
Before this release, users could report time to tasks where they were not assigned in the My Time module, and the reported time was synced to the task’s Completed Work field. With this release, time reported to tasks where the resource is not assigned will no longer be synced to the Completed Work field.
For detailed information about workload calculations, distribution rules, task modes, and calendar behavior, refer to the Workload View article.
Release Notes 26.11 @May 4, 2026
Introduced Cross-Project Dependencies (for PPM Express tasks).
We’ve introduced Cross-Project Dependencies, enabling you to link PPM Express tasks across different projects using external predecessors. This new capability improves coordination and visibility across your project portfolio by allowing one PPM Express task’s schedule to depend on a task in another project.
External predecessors follow the same logic as standard task dependencies and support all dependency types (FS, SS, FF, SF), along with lag/lead time. They can be added and managed from the Predecessors tab in the task editor.

The predecessors are visually represented in task views and timelines with detailed tooltips.

To maintain control over scheduling, updates to tasks in other projects do not automatically affect dependent tasks. Instead, users with appropriate permissions must review and accept changes before they are applied. At least Collaborate permission for the project is required to manage dependencies.
For more details, please refer to the Cross-Project Dependencies article.
Release Notes 26.9 @April 7, 2026
Introduced Attachments for projects.
This release introduces a new Attachments capability at the project level, allowing users to store and manage files and external links directly within a project.
Attachments can be added from the new Attachments project section. Users can upload files from a computer or add links to external resources such as OneDrive, SharePoint, Google Drive, and others.

Additionally, attachments can be added from the project header (once at least one attachment is added), and the project’s More menu.

The Attachments section provides a centralized view of all project-related files and links, with support for sorting, filtering, tagging, and column configuration. Users can preview images and PDFs in the browser, while other file types are downloaded.
Attachments can also be pinned for quick access and are surfaced in the Recent Attachments menu in the project header.

The feature includes bulk actions, drag-and-drop upload, duplicate handling (replace or keep both), and inline editing of key fields such as name, tags, and description.
Storage is managed at the tenant level based on the subscription plan, with usage automatically updated as files are added or removed.
In addition, a new Images section is available for Projects, allowing users to display image attachments in a gallery format. It includes only image-type files (.jpg, .jpeg, .png, .gif, .webp) that are already uploaded to the Attachments section. Users can select several images at once. Images are shown in the order they are selected.

The Images section is directly linked to Attachments:
- Removing an image from Attachments removes it from the Images section
- Renaming an image updates it in the section automatically
- Removing an image from the section does not delete it from Attachments

File Integration links (previously added to the project) will be migrated to Attachments after the release.
For more details, please refer to the 'Attachments in PPM Express' article.
Release Notes 26.8 @March 26, 2026
1. Added an expanded view mode to the Tasks pane for better visibility.
This release introduces the ability to expand and collapse the task panel (including both internal and external tasks).

The panel state is saved per user. The displayed fields now dynamically adjust based on the Project Settings > Progress Calculation method (e.g., Effort or Story Points), with non-relevant fields grouped under More fields.
2. Enabled sending multiple Project Story reports from PPM Express.
PPM Express users can now share Project Story Reports via the new Share report option in the project header. Reports can be sent to tenant users or external email addresses, either as a single PDF or separate files.

The feature is available only when the user has edit permissions for all selected projects and none of them are private. A maximum of 10 projects and 10 recipients can be selected.
Release Notes 26.7 @March 18, 2026
We are introducing a more flexible way to manage resource cost and rate values in PPM Express.
Until now, fields such as Standard Cost and Standard Rate were typically maintained as fixed values. With this update, you will be able to define these values by effective period using Cost Rate tables.
This means you can set one value for one period and another value for a future period, and PPM Express will automatically use the correct value based on the selected date.
With this release:
- new fields are introduced: Cost Per Use and Charge Per Use
- cost and rate values can be configured using effective periods
- several Cost Rate tables can be created and managed
- Resource Plans can use the selected table to calculate values for the current period
- the system can automatically reflect cost and rate changes over time
- Max Units and Non-Project Work values can now also have flexible values, allowing a resource’s capacity to change over time
- users who currently rely on Charge Rate are encouraged to transition to using Standard Rate values from Cost Rate tables, as Charge Rate is planned to be deprecated by the end of 2026
These changes give you more control over how resource costs and rates are maintained and applied in calculations. This is especially useful when values change over time and need to be reflected more accurately in planning.
At the same time, users who prefer the old approach can still continue working with a single constant value and do not have to set up periods if they do not need them, they can continue using one constant value. In that case, the behavior remains simple and familiar.
For more details, please refer to these articles: How to configure effective costs and rates and How to create and manage Cost Rate tables.
Release Notes 26.6 @March 5, 2026
We are introducing Timesheet Approvals, a new feature that enables organizations to review and approve reported time before it becomes final. This functionality helps ensure accurate time tracking and provides additional control over project and administrative time reporting.
Timesheet Approvals introduce a structured workflow where users submit their timesheets for review, and designated managers can approve or reject the reported hours.
Timesheet Approvals are available for tenants on the Enterprise Ultra plan.
The feature is enabled in Time Tracking Settings and is disabled by default. Tenant administrators must enable it manually when they are ready to start using the approval workflow.

Once the feature is enabled, users can submit their reported time for approval directly from the My Time page.

Approval requests are sent to the appropriate managers depending on the type of reported time:
- Project/Non-Project time is sent to the Project Manager assigned to the project.
- Administrative time is sent to the Direct Manager assigned to the resource.
- Administrators can see and process all requests.
A new Approval Center page is introduced for reviewing timesheet approval requests.

From the Approval Center page, approvers can:
- View all approval requests assigned to them
- Review reported time details
- Approve or reject requests
- Add comments to their decision
For more details, please refer to the Timesheet Approvals article.
Release Notes 26.5 @February 25, 2026
We are introducing Time Reporting Periods to provide better control and structure over time tracking in PPM Express. This enhancement prepares the system for the release of the Timesheet Approvals.
Previously, users could report time continuously without being restricted to a defined reporting window. With this release, time must be reported within configured reporting periods.
Time Reporting Periods allow administrators to define specific date ranges during which users can report their time. These periods help control when time can be entered, edited, and locked.
If no reporting period is created, time reporting will not be available. Users will not be able to log or submit time until at least one reporting period is configured.
Time Reporting Periods will be configured in the Time Tracking Settings -> Time Reporting Settings section.

When creating reporting periods, they must follow a continuous timeline. Periods cannot overlap and cannot contain gaps between them. The maximum length of a single reporting period is 366 days.
Each reporting period can be either open or closed. While a period is open, users can log and edit their time entries normally. Once a period is closed, it becomes locked, and no new time can be posted, and existing entries cannot be modified.

Behavior for Existing and New Tenants:
- For existing tenants that already have time tracking data, the system will automatically generate 7-day reporting periods covering all previously reported time entries. Later, an administrator must create the time-reporting periods. For tenants where time tracking has not been used before, no periods are created automatically.
- For new tenants, or tenants that have not used time tracking before, no reporting periods are created automatically. An administrator must create the first reporting period before time reporting can begin.
Release Notes 25.10 @December 22, 2025
1. Introduced a Bulk Apply Process action for easier and faster stage management.
The Bulk Apply Process functionality allows users to select multiple projects and apply a new process to all of them in a single operation.

The Bulk Apply button is only available when the user has Edit permissions for all selected projects. If even one of the selected projects is available to the user in read-only mode, the Bulk Apply Process button becomes disabled.
When a process is applied in bulk, each selected project will automatically be moved to the first stage of the newly assigned process.
The system automatically validates project compatibility with the selected process:
- If the user selects a project that already uses the process they intend to apply, the Bulk Apply Process button will be disabled for that selection.
- When multiple projects are selected, and some already use the target process, the Bulk Apply action remains available, but those projects will be skipped during execution. Only the projects requiring an update will receive the new process.
Release Notes 25.7 @December 4, 2025
We are introducing a comprehensive Activity Log capability that provides full visibility into changes made across Portfolios, Programs, Projects, Resources, and other entities in PPM Express.
The Global Activity Log can be accessed from the gear menu and shows all changes made across the entire tenant.

A new Activity Log button will become available in the header on Portfolio, Program, Project, and Resource pages. Clicking this button opens the Activity Log automatically filtered to show changes related to the specific entity type you are viewing. For example, only project-related events will be shown when opened from a Projects page.

You can also open the Activity Log for a specific item (such as a particular Portfolio, Program, Project, etc.) directly through the three-dot menu.

The Activity Log captures both user-initiated actions and system-generated changes:
- User actions (e.g., creating a task, editing fields) appear under the user’s name.
- System actions performed by PPM Express (such as auto-calculations, recalculated statuses, updated progress, triggered processors, etc.) are marked as changes made by the PPM Express System.
This makes it easy to distinguish manual edits from automated system updates.
For each change, the Activity Log displays:
- Item name (e.g., Task name)
- Previous value
- New value
- Full list of fields affected during the change
- Timestamp and the user who triggered the update
For example, when a task is created, you’ll see an entry with the initial field values. When a field is later updated, such as Start Date or Status, a new entry will appear showing the old and new values.

Every event, whether from a user action or system process, is recorded chronologically, allowing teams to:
- Trace who changed what
- Understand why a field changed
- Review the detailed information regarding the changes
- Diagnose unexpected updates
Release Notes 25.4 @November 11, 2025
1. Added residual and inherited risks, along with corresponding risk scores.
Applies to: Risks in Projects, Programs, Portfolios, and Ideas.
We’ve introduced new fields and concepts to help you manage and assess risks more accurately in PPM Express.
- Inherited Risk: The level of risk that exists before any mitigation or control measures are applied. It represents the baseline risk based on the probability and impact of the event without intervention.
- Residual Risk: The level of risk that remains after mitigation or control measures have been applied. It reflects the adjusted risk after planned actions have been implemented.
Updated and New Fields for Risks
Existing fields:
- Impact: The potential severity of the risk’s consequences after mitigation (Residual Impact). Recommended range: 1 (low) to 10 (high).
- Probability, %: The likelihood of the risk occurring after mitigation (Residual Probability). Scale: 0-100%.
New system fields:
-
Residual Risk Score: Calculated as Residual Risk Score = (Probability, % * Impact) / 100.
This field represents the risk level after mitigation. This field is system-calculated and cannot be edited manually on the UI, via CSV import, sync, or via API. - Inherited Probability, %: The likelihood of the risk occurring before mitigation or control. Scale: 0-100%.
- Inherited Impact: The potential severity of the risk’s consequences before mitigation. Recommended range: 1-10.
-
Inherited Risk Score: The initial risk score is calculated as (Inherited Risk Score = (Inherited Probability % * Inherited Impact) / 100, representing the risk level before mitigation.
This field is also system-calculated and cannot be edited manually, via import, sync, or API. - Mitigation Plan: Describes measures implemented to reduce the probability or impact of a risk.
- Contingency Plan: Outlines the response actions if the risk occurs.
Release Notes 25.2 @October 9, 2025
1. Support for Stages in Cancelled and Suspended Process Phases.
It will now be possible to use the stages added to the Cancelled and Suspended process phases.
A dropdown menu will be available for these phases in the Process Project section, allowing users to select the appropriate stage when cancelling or suspending a process.
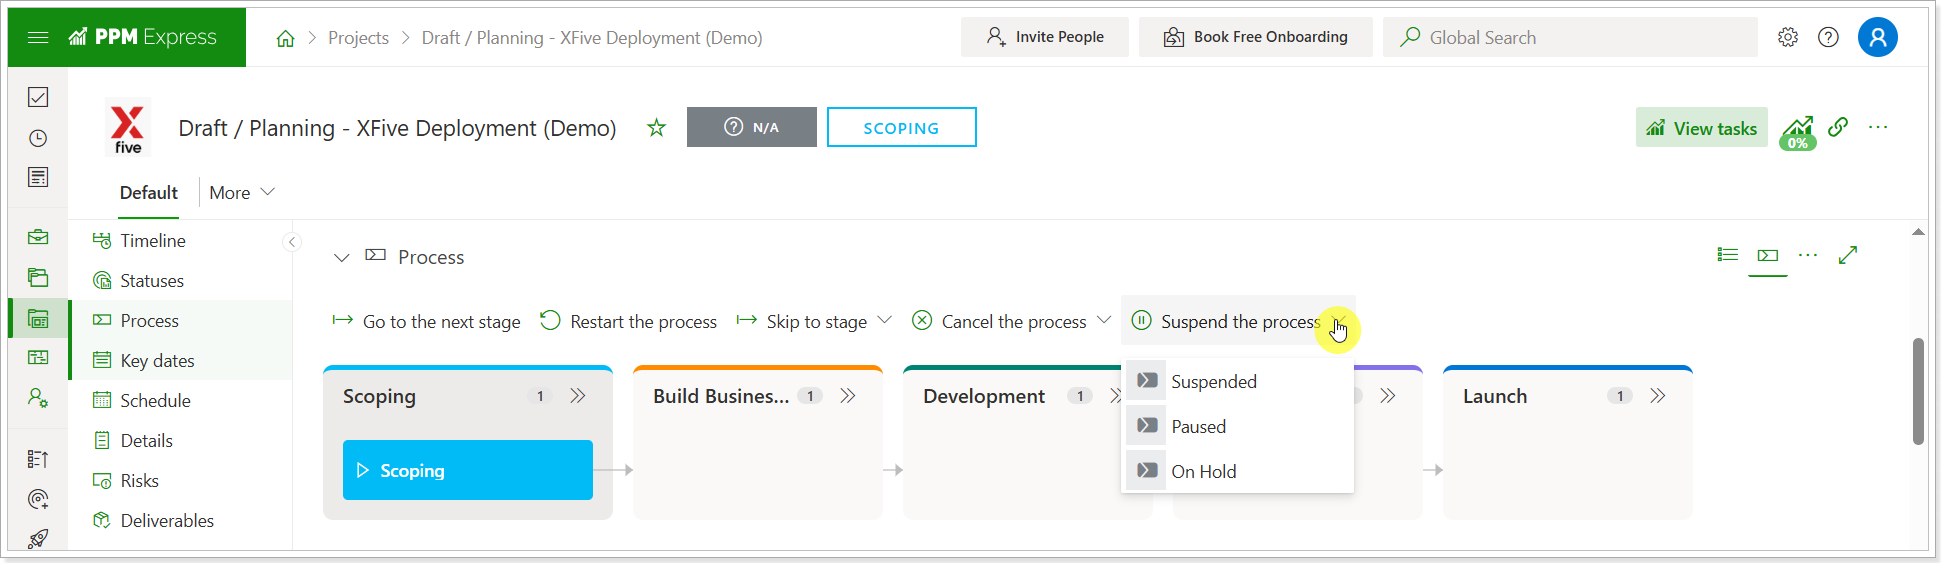
If the Project Stage field is synchronized from an external system (when a mapping is configured for the Project Stage field synchronized from Azure DevOps, Planner Premium, or Project Online), the corresponding stage will now be automatically applied to the Cancelled or Suspended phase.
Additionally, the stage for these phases can also be modified via the API.
2. Configurable Start Day of the Week.
A new global setting will be added, allowing administrators to define the first day of the week for their tenant. This setting will become available on the Tenant Settings page under the Global Settings section and is named “Start of the Calendar Week.”

By default, all existing and new tenants will continue using Sunday as the start of the week.
Changing this setting updates all calendar-based views across the product, including:
- My Space weekly views
- My Time page, the start of the week
- Date pickers, counters, date fields, weekly filters, and timelines
- Resource planning grids
Once updated, all weekly calculations, views, and counters are automatically recalculated according to the new start day (for example, from Sunday to Monday).
Please note: For the Budget and Benefits sections, these changes will not be applied.
Release Notes 25.1 @September 29, 2025
1. Update Progress setting.
In the upcoming release, a new setting “Update Progress” will appear on the Tenant Settings page, under the Default Project Settings section. This setting controls automatic synchronization of the Progress field with the Project State.
- On existing tenants, the setting will be disabled by default.
- On newly created tenants, the setting will be enabled by default.

How It Works:
- When the setting is on, the system updates the Progress field in all existing projects to match the Project State. This includes Completed, Canceled, and Suspended projects. Archived projects are excluded.
- The Progress field is updated automatically whenever the Project State is updated.
- Users can still update the Progress field manually, but any later change to the Project State will automatically override the Progress field.
- If a project is created from a CSV file or via the API, the system sets the first stage in the process by default.
- If the Stage is synced from an external system, the Project State will update, and the Progress field value will update automatically.
Release Notes 24.12 @September 4, 2025
1. We’re introducing an option to update the Project Stage field automatically during synchronization with an external system.
This applies to integrations where PPM Express project-level fields can be mapped to fields in the external system, including:
- Azure DevOps (if linked to a work item)
- Project Online
- Project for the Web / Planner Premium
Currently, the Project Stage field is read-only and updated only when a user moves the project to a different stage in the Process section. Manual updates are not available.
With this release, a new dropdown will be added to the Configure Mapping → Project Field Mapping screen.

How It Works:
You can select any out-of-the-box or custom field from the external system to map to the Project Stage field in PPM Express.
The stage will be synced from the external system only if a matching stage name exists in the Process.
If multiple matches are found, the first match in the Process will be used.
To sync stages with different names, use transformation rules to map values between the external system and PPM Express Process stages.

Sync Behavior and Rules:
If the Process contains stages that require approval, these approvals will be skipped during sync.
You can still move between stages manually in the Process section, but if the Project Stage field is mapped, it will be overwritten during the next sync.
The stage will be updated based on the mapping regardless of the PPM Express Process flow.
- Moving backward will reset later stages to Not Started.
- Moving forward will mark skipped stages as Complete.
Important: Canceled or Suspended Stages:
If the project enters a stage in the Canceled or Suspended phase, sync will be paused.
The project manager will receive an email notification.
Scheduled syncs will be skipped, but manual sync will remain available.
To resume:
- Move the project out of the Canceled/Suspended stage in the external system and trigger a manual sync in PPM Express, or
- Change the Project Stage manually in the Process section — this will allow syncing to resume on the next scheduled run.
2. PPM Express Insights AI Updates and Improvements.
Settings Relocation & Enablement:
- The PPM Express Insights AI settings have been moved to the Tenant Settings page.
- The feature is now enabled via the Features and Modules section. Once enabled, AI Settings will appear in the list of available tenant settings.

UI Enhancements:
- Introduced a table view in the PPM Express Insights AI section for improved data visibility.
- Renamed the "View" button to "Navigate" for clearer functionality.
- Removed the "Regenerate" button from the UI.
- Added Priority labels to each card to indicate their relative importance.
- Included info hints on each card to provide contextual guidance.

Release Notes 24.11 @August 28, 2025
The new Bulk Skip to Stage action lets you update the stage for several projects at once from the Projects page.
The action appears on the Projects page in Table and Timeline views when at least one project is selected.

Who can use it:
- Non-Admin users - the action is enabled only if all selected projects meet all of the following:
- All selected projects have the same Process set.
- This Process has no stages that require approval.
- You have Edit permission for all selected projects.
- Admin users - the action is enabled only if all selected projects meet both of the following:
- All selected projects have the same Process set.
- You have Edit permission for all selected projects.
Disabled state:
If the required conditions are not met, Bulk Skip to Stage will be disabled, and a corresponding hint will be shown on hover.

How to use:
Select one or more projects on the Projects page, then choose Skip to Stage in the toolbar.
Choose a target stage from the dropdown. The list includes all stages from the shared Process except Canceled and Suspended.
Confirm the change in the dialog. For one project, the dialog mentions how forward and backward moves will be applied. For multiple projects, the dialog shows the number of selected items and the same rules for forward or backward moves.
What happens after confirmation:
1. Projects already at the chosen stage are not changed. All current details stay as is.
2. Skipping forward:
- All skipped stages, including the current one, are marked Completed.
- Their Start and Finish Dates are set to the action date (the date you run Skip to Stage).
- Their Last Modified By is set to the user who performed the action.
- The new active stage gets Start Date = action date and Last Modified By = that user.
3. Skipping backward:
- All stages after the new stage are set to Not Started.
- The new active stage gets Start Date = action date, Finish Date cleared, and Last Modified By = that user.
4. If the project is in Canceled or Suspended:
- It is reset to the first stage, then moved to the chosen stage.
- The forward skip rules above apply.
Release Notes 24.4 @June 26, 2025
We’re introducing a more flexible and granular approach to Resource Management Permissions, available exclusively in the Enterprise Ultra plan. All other plans will continue using the existing single-permission model, where the Manage Resources permission grants full access to all resources.
What’s New?
1. New Permissions Structure
The Administrate App permission is now visually separated, as it automatically includes all General and Resources permissions.
-
A new Resources section includes two distinct permissions:
Manage Resources
Manage Resource Planning
-
Each of these permissions now offers two scope options:
All Resources
Designated Resources

Understanding the New Roles
We’re introducing new roles—Direct Manager, Resource Manager, and Allocation Manager—along with the corresponding multi-select fields of the User type in the Resource Details section.
- Direct Manager (existing field)
- Resource Manager (new field)
- Allocation Manager (new field)
Please note: All existing values in the Direct Manager field will be preserved after the update. If a user is assigned in this field but lacks necessary permissions, a warning message will be shown. To resolves this grant the user appropriate permission or remove from the manager field.
These roles can be assigned:
- In the Resource Details section
- Via Bulk Edit on the Resources page
- Using .csv import

The Direct Manager and Resource Manager roles provide the same level of access to resources. The distinction between the two is business-related and allows for role-based clarity. Users assigned as Direct Manager or Resource Manager should be granted the Manage Resources – Designated Resources permission.
On the Resources page, users with the Manage Resources – Designated Resources permission will see and manage only the resources where they are explicitly assigned as a Direct Manager or Resource Manager.
The Allocation Manager role provides limited permissions and allows to update the Resource Plan for specific resources without the access to the Resources page.
Users assigned as Allocation Manager should be granted the Manage Resource Planning – Designated Resources permission.
Permissions Breakdown
-
Manage Resources – All Resources: Equivalent to the old “Manage Resources” permission. Grants full access to all resources and includes Manage Resource Planning automatically.
-
Manage Resources – Designated Resources: Allows managing only the resources where the user is assigned as a Direct Manager or Resource Manager.
- Manage Resource Planning – Designated Resources: Allows users to manage the Resource Plan only (e.g., add, allocate, remove resources) without access to the Resources page, dashboards, or timesheets. Especially useful for Project Managers who need planning access but should not manage resource profiles.
What Happens After the Update?
Existing users with Manage Resources will be automatically transitioned to Manage Resources – All Resources.
If the existing permissions configured before the release meet your current needs, no action is required.
If you would like to take advantage of the more granular permission model introduced in this update, please follow these steps:
- Administrators should assign appropriate permissions on the People Management page.
- Assign users to the relevant roles (Direct Manager, Resource Manager, Allocation Manager) in the Resource Details section (manually, via Bulk Edit, or by importing data using a .csv file).
Release Notes 24.0 @June 5, 2025
1. Introduced a new Rich Text field type, allowing users to add formatted content.
Before: There was one field of the Text type, which can be configured as either a single-line or multi-line field using a toggle option.
We have improved this functionality by introducing two separate field types:
- Text – A single-line text field.
- Rich Text – A multi-line text field that supports both plain text and formatted content, allowing users to apply formatting as needed.
Now: Any fields that previously had the Multiline toggle enabled will be automatically converted to Rich Text. Field names and existing content will remain unchanged, and no action is required on your part.

After this release, to create a new multi-line text field, you will need to select Rich Text as the field type.
Once a Rich Text field is created (this also applies to existing Rich Text fields), you can access formatting options by clicking the field and entering Edit mode.

The available formatting options include:
- Font size
- Bold
- Italic
- Underline
- Strikethrough
- Font color
- Highlight
- Bulleted list
- Numbered list
- Insert a hyperlink
- Clear format
You can enter text and choose to leave it unformatted. Alternatively, you can apply formatting as needed. Depending on the length of the text, a portion of it may be collapsed, and a Show more button will appear.
In Table and Timeline views, Rich Text content is displayed without formatting.
- In the Timeline view, the text cannot be expanded, but the full content is visible when you hover over the Rich Text field value.
- In the Table view, you have two options:
- Click Show more to expand the full text
- Hover over the field value to preview the full content
Important change: Editing multi-line text directly in the Table view is no longer supported.

Release Notes 23.6 @March 27, 2025
1. A new option to automatically calculate Project Start and Finish dates based on the Primary Schedule was added.
The Project Start and Finish setting determines whether project start and finish dates are set manually or automatically updated based on the selected Primary Schedule. This setting was added to the Project Settings -> Calculated Automatically section.

When turned ON: The project's Start Date and Finish Date are automatically rolled up from the primary schedule.
When ON, users can still edit the Start Date and Finish Date, but these values will update automatically if:
- The primary schedule is modified.
- The primary schedule is changed to a different one.
- If the primary schedule does not contain start/finish dates, the manually entered dates will remain unchanged.
When turned OFF: Users must manually set the project’s Start Date and Finish Date.
When OFF, users control the dates manually. If the setting is later turned ON, the project’s start and finish dates will be overwritten based on the primary schedule.
This setting is configured on a per-project basis, but PPM Express Administrators can define its default state for all newly created projects at the tenant level. To do this, navigate to: Tenant Settings → Default Project Settings.
Release Notes 23.0.1 @February 11, 2025
Introducing Process Management in PPM Express
We are excited to introduce the Process Management module, enabling Stage-Gate capabilities in PPM Express, providing a structured and flexible approach to project management. This new capability allows administrators to define, customize, and manage project processes, phases, and stages, ensuring that each project follows a consistent and structured workflow tailored to organizational needs.
Key Benefits & Features
Automated & Customizable Process Selection
- Each Project in PPM Express is assigned a process upon creation (a Process section is now available on the Project dashboard)

- If no process is manually selected, the default process is automatically applied.
- Different projects can follow different processes, allowing for greater flexibility in workflow management.
- Once the project is created, the first project stage is automatically applied.
- Users can transition through project stages using the available actions available in the Process project section.

- It is also possible to configure Approval for Transition (By default, "No Approval" is set for stages. If an API feature is enabled for the tenant, API-based approvals can be configured. This determines whether approval is required to transition from this stage to the next one. For API-based approvals, an external approval workflow must be created.)
Administrators have full control over process configurations, with actions including:
- Review and modify processes via the Process Management page.
- Create new processes (Enterprise & Enterprise Ultra plans only).
- Set a default process for new projects.
- Deactivate a process.
- View Related Projects using a process.
- Edit, Delete, or Clone a process (Note: The default process cannot be deleted or deactivated).

Process Configuration
Each process consists of two main sections:
- Details – Modify the process name, status, and description.
- Stages – Define workflow phases and stages, assign project layouts, etc.

Phases & Stages Customization
Each project process consists of phases, and each phase can include multiple stages.
Phases can be renamed and recolored but cannot be deleted, added, or reordered. Stages can be fully customized.
A flowchart view is available within the Stages section. From this view, users can add new stages and configure phases in a visual format.

Process Management Availability for Existing and New Tenants
For Existing Tenants
Old Subscription Plans (Portfolio Management, Product Management, etc.)
- Only one process, "Legacy Project Process," is created (it can be edited as needed)
- It includes existing stages and is applied to all existing projects.
- There is no possibility of cloning or creating new processes.
Projects Plans (Projects Monthly/Annually, Projects Unlimited)
- Similar to old subscription plans, only one process, "Legacy Project Process," is created.
- It includes existing stages and is applied to all existing projects.
- No possibility to clone or create new processes.
Enterprise & Enterprise Ultra Plans
- Three processes are automatically created:
- Legacy Project Process (Applied to existing projects with existing stages).
- Project Process (PMI).
- Stage-Gate Process.
- Users can create and clone new processes.
For all existing tenants, "Legacy Project Process" is set as the default process.
For New Tenants
Projects Plans (Projects Monthly/Annually, Projects Unlimited)
- Only one process, "Project Process (PMI)," is created during tenant setup.
- There is no possibility of cloning or creating new processes.
- If demo data is deployed, an additional demo data process will be created.
- Total: 2 out-of-the-box (OOB) processes.
Enterprise & Enterprise Ultra Plans
- By default, only "Project Process (PMI)" is created.
- Users can create and clone new processes.
- If demo data is deployed, two additional processes will be created:
- Stage-Gate Process.
- PMI Demonstration Process.
- Total: 1–3 out-of-the-box (OOB) processes.
For all new tenants, "Project Process (PMI)" is set as the default process.
The "Process" project section will be added to all projects if the Details section is included in the layout/view and the "Project Stage" field is added to the Details section.
Release Notes 22.6 @January 7, 2025
1. Role, Department, and Tags columns have been added to the People Management page.

How Do They Work?
1. Resource-Level Fields:
- The Departments and Roles field values are configured at the resource level from Resource details.
- New Tags values can be created directly on the People Management page by simply typing a new value for a user.
2. User-Resource Synchronization:
- User values are synchronized with their linked resources, and vice versa.
- You can add, edit, or delete these values either for the resource or the user, and changes will be reflected in both.
- Values can be updated from the User Settings pane or inline.
3. Azure AD Resource Integration:
- Role, Department, and Tags are automatically populated during Azure AD Resource synchronization if mapping is configured. To properly synchronize Roles and Departments, corresponding values must first be created in PPM Express.
4. Invite New Users:
- When inviting a new user, these fields are not available in the "Invite People" pane.
- Once the invitation is sent, these fields will be populated in the User Settings pane if the user is linked to an existing resource.
- If a new resource is created for the invited user, these fields will remain empty.
5. Sorting, Filtering, and Search:
- You can now sort and filter users by Roles, Departments, and Tags, as well as use the recent Search feature.
Release Notes 22.4 @December 18, 2024
1. Introduced Search functionality across all main pages and sections, enhancing navigation and user experience.
The search functionality in PPM Express provides an efficient way to locate items across various pages and sections, enhancing navigation and saving time compared to scrolling or configuring new filters.
- Quick and convenient: Search is designed to work alongside filters for quicker navigation and reduced scrolling.
- Case-insensitive: The search is not case-sensitive and works from the first character of the input.
- Availability: Accessible on the Timeline and Table views.
- Column-based: Search works across default and custom columns, and users can define which columns to include.
- Flat and hierarchical views: Returns flat lists for non-hierarchical data and supports viewing hierarchies for structured data.

The search functionality is accessible across all major pages and specific sections of PPM Express.
To initiate the search option, click the Search icon in the toolbar to expand the search bar. Begin typing your query to filter results.

You can define the search columns according to your request. The columns available and the search results are based on the currently applied filter.

Release Notes 22.3 @December 11, 2024
1. New controls were added to the Time Tracking Settings: Report Time on Unassigned Tasks and Enable Custom Time Entries.
Report Time on Unassigned Tasks
- 'ON': Allows users to report time on tasks where they are not assigned (requires at least 'Read' permission). Supports collaboration by enabling time tracking on shared tasks.
- 'OFF': Unassigned tasks are hidden from the My Time page, and users cannot report time on them. Previously reported tasks remain editable but cannot be updated or cloned.
Enable Custom Time Entries
- 'ON': Enables time reporting on non-scheduled project activities, which are added as new lines in the Timesheet.
- 'OFF': Users can still import time entries from M365, and Resource Plan suggestions remain available. Existing custom entries are preserved but cannot be updated or cloned.

2. Import External Activities as PPM Express Time Entries is now available for Enterprise Plans (via API).
This feature allows users to import external time tracking suggestions created via the API into PPM Express as Time Entries. External suggestions, including project tasks, custom tasks, and administrative tasks, provide a streamlined way to integrate time tracking data directly into the platform.
Key Details:
- API-Driven: Suggestions must first be created using the API.
- Enterprise Plans Only: This functionality is exclusive to Enterprise plan users.
- Time Tracking Settings: The 'Import External Time' setting must be enabled for suggestions to appear on the My Time page.
- Pre-Filled and Adjustable Data: Certain details, such as suggestion dates and preselected projects, are automatically populated and non-editable, while other fields can be adjusted as needed.
This feature enhances time tracking efficiency by enabling seamless integration of external activities into PPM Express.

3. Fixed an issue where a project could not be published via the Project Publisher due to the introduction of a new ‘Date Time’ field.
Please note that updating to the latest version of PPM Express Project Publisher is necessary following the release to ensure continued functionality.
Release Notes 22.2 @December 4, 2024
1. Behavior Update for Parent and Child Tasks.
New Rule:
It is now not possible to create a dependency between a parent and their child's tasks in both directions (including root tasks).

Key Restrictions:
Indent/Outdent Options:
- Dependencies that violate this rule cannot be created using the Indent or Outdent options.
- For example, if there is a dependency created between 2 tasks, it is not allowed to perform Indent/Outdent in case one of the tasks will become a parent or child of another one.
Link/Unlink Options:
- The same restriction applies to the Link functionality.
- Dependencies can only be created between tasks that comply with this rule. Any invalid links will be ignored.
Drag-and-Drop:
- When using drag-and-drop functionality, an invalid dependency is supposed to be created, and the action is canceled.
- Only valid dependencies will be established during this action.
Handling Existing Dependencies for Existing Invalid Dependencies:
- If there are already dependencies in the system that violate this rule, users will encounter an error message when opening/saving the successor task in the affected dependency.
- In order to save the successor task, the affected dependency must be removed.
Adding a Predecessor to a Summary Task:
- If a user adds a predecessor to a summary task, the summary task Start/Due dates will not be calculated from the related Predecessor because the Summary task dates are rolled up from its child tasks.
Key Details:
- No automatic changes will be made to existing configurations after the release. Your current dependencies will remain as they are.
- However, please note: if you attempt to interact with a parent or sub-tasks that already have dependencies or try linking them to each other, an error will occur.
Action Required:
- We recommend reviewing and updating your parent-child and child-parent task dependencies to align with the new system requirements and to avoid errors when working with tasks. This change will need to be addressed eventually, whether immediately or over time, to ensure smooth operation.
Release Notes 22.1 @November 27, 2024
1. Users will now be linked automatically with resources in PPM Express.
We are pleased to announce new functionality: user and resource linking, aimed to improve system integrity and user experience.
With automatic linking of users to corresponding resources — whether through invitation or Active Directory synchronization — the system automatically associates them with a matching resource. For example, if a resource already exists and you invite a new user, upon accepting the invitation, the user will be automatically linked to that resource.
These enhancements are designed to streamline user and resource management, ensuring consistency and preventing unintended deletions or deactivations.
Please review the key features and rules for resource linking:
1. Automatic Resource Creation: Each user should now have a dedicated resource linked upon creation (via invitation, Active Directory (AD) synchronization) If a user's linked resource was previously deleted, the system will automatically generate a new resource to maintain the one-to-one relationship.
After the release, existing users will be linked to the resources according to the rules below.
In PPM Express, resource linking follows a prioritized sequence to ensure accurate associations:
- User ID: The system first attempts to link resources based on matching resource and user IDs from an Office 365 connection.
- Email Address and Name: If no match is found by user ID, it proceeds to link resources using the email address and name.
- Email Address: If neither the user ID nor the email address and name fields match, the system then considers the user's email address for linking. In this case, the existing resource name will not be changed, and the display name on the People Management page for the user will be the same as the one for the linked resource.
- By Name (relates only AD sync): The user will be linked with the resource in case neither resource nor the user doesn't an email.
- Status: If there are two identical resources by name and email, but they have different statuses (active/inactive), the one with the active status will be selected for linking.
- Linked systems: If there are two identical resources by name, email, and status, the link resource will be selected based on the number of linked systems (the one with more connected systems will be selected for linking).
- By created date: If there are two identical resources by name, email, status, and the number of linked systems (or their absence), the resource for linking will be chosen according to the created date (the earliest created date).
2. New fields are now available on the Resource dashboard:
- User Logon Account: A read-only field is added to the Resource dashboard displaying the associated user's logon account. If no user is linked, this field remains empty.
- Linked User: A read-only field of the 'Person Info' type showing the associated user's information. This field is empty if no user is linked (this field is included in the default view).

3. A new field is now available on the People Management -> User Settings Panel:
- Linked Resource: A read-only field displaying the name of the associated resource, which links directly to the Resource dashboard. The field can be empty if the invite is sent but is not accepted by the user.
4. Resource deactivation/activation rules:
- Resources without an associated user can be deactivated/activated as usual.
- Resources linked to a user cannot be deactivated. Attempting to do so will prompt a notification indicating the association.
- Resources scheduled for deactivation via AD Resource Sync will remain active until their associated user is deactivated.
5. User deactivation/activation rules:
- Deactivating/activating a user will automatically deactivate/activate the linked resource, whether done manually or through AD User Sync.
6. Resource deletion rules:
- Resources without an associated user can be deleted, provided they are not assigned in any 'Assigned To' fields.
- Resources linked to a user cannot be deleted, regardless of their assignment status. Attempting deletion will result in a notification about the existing association.
7. User deletion rules:
- Users can be deleted together with the linked resource or without it from the People Management page.
8. Resource merging rules:
- When merging multiple resources, if any resource is linked to a user, it will be auto-selected as the primary resource for the merge. This selection cannot be changed. A notification will inform users that the selected resource has a linked user, and other resources will be merged.
9. Future Enhancements
- Automatic Resource Merging: In upcoming phases, PPM Express resources and those synchronized from external systems will be automatically merged if their emails match exactly. In cases where names differ, the PPM Express resource name will be prioritized.
Release Notes 22.0 @November 13, 2024
1. Inline editing has been added for PPM Express entities.
This functionality is designed to streamline and accelerate work with items by reducing the need for additional clicks and navigation.
The new inline editing feature allows users to edit items directly on the main pages for Projects, Portfolios, Programs, Resources, Tasks, Objectives, Ideas, and Roadmaps without needing to open the details page.
An edit (pencil) icon appears next to the title fields, allowing users to quickly modify the tilte directly. For other fields, users can simply click on the field line to select or type in a value. To save changes, press Enter; to exit without saving, press Escape.

With numerous fields available in the Details panel, inline editing makes it easier than ever to find the necessary fields and update values. Users can create custom views with specific fields, then quickly switch to these views to edit relevant fields without even opening each item individually.
If a user has permissions to edit an item on the project dashboard, they will also have access to inline editing. Conversely, if the user lacks editing permissions, they will not be able to make inline edits. Additionally, fields that are non-editable for example, due to settings like auto-calculation will also remain non-editable in inline mode.
Please note that inline editing is not currently supported for the My Space, Insights, People Management, Resource Planning and Utilization, and Priorities pages.
Release Notes 21.11 @November 05, 2024
1. Time Tracking Module: A new Microsoft 365 connector allows users to import time entries from their Microsoft 365 activity into Timesheets (My Time page).
With this new functionality, users can seamlessly import their Microsoft 365 activities—such as events, tasks, and other items—directly into PPM Express as time entries, making it easier to track and report time spent across projects.
To start using this feature, you need to add the Microsoft 365 connection from the My Time page using your Microsoft 365 account.

Here’s an overview of how the feature works and the options available for managing your imported activities:
Quick Access to Microsoft 365 Activities
From the My Time page, you can access the new Import from M365 option under Actions. This opens an import panel where you’ll see all relevant Microsoft 365 events and activities based on the current time period selected on your Timesheet. Activities are conveniently grouped by day, helping you quickly locate the time blocks that matter.

Optimized Navigation with Icons and Filters
Each Microsoft 365 activity is equipped with unique icons for easy identification, helping you find tasks or meetings at a glance. Additionally, a search function and custom filters make it simple to locate specific activities, ensuring smooth navigation even with extensive schedules.
Detailed Time and Project Association
Once you find an activity to import, you need to input the hours spent on that activity and link it to the appropriate project. For Outlook events, the time is automatically pre-filled based on the event duration, while other activities require manual time entry.

Direct Import and M365 Identification Icon
Imported activities are added as custom tasks in PPM Express and marked with a distinct M365 icon, indicating that the task originated from Microsoft 365.

Copying imported activities
Imported activities can be copied as custom time entries, similar to other time entries in PPM Express. However, if a task is copied, it will lose the M365 icon. The icon is preserved only on the original imported entry for the period in which it was first added.
This new feature simplifies the integration of Microsoft 365 activities into PPM Express, making it easier to log and manage time across your tools, ensuring a smooth experience for teams tracking their daily activities.
2. A new status calculation option was added to the PPM Insights Settings page.
This option is located on the PPM Insights page.

The new option 'Define description manually' enables automatic status calculation for projects, programs, and portfolios, while allowing manual entry of status descriptions.
The logic for the "Allow to override status and description manually" option remains unchanged; however, it has been renamed and incorporated as an additional setting under the "Calculate statuses automatically" toggle. With this option users can override the automatically calculated status and set the required status manually, and select the period of time for which the status set manually will be set. After this period of time (3, 5, 7, 10 days) the status set manually will be overridden by the status calculated automatically. Users can also add/edit the status description.
Release Notes 21.8 @October 01, 2024
1. The "Export to CSV" option is now available on the Reported Time page.
With this new option, you can export data to a CSV file for all resources on this Reported Time page for the selected period.
You can group the data by Resources or Projects and select the data for export accordingly, either by project or by resource.

For example, if you group the data by Resource and select one resource for data export, the CSV file will include data for the selected resource across all projects where that resource has reported time within the chosen period.
On the Export to CSV page, you can choose the desired time period manually or apply predefined time period options to narrow the exported data. If you select 'All project time entries', all data for the chosen resources for all dates where selected resources have reported time for projects will be included in the CSV file.

2. Enhanced the "Extensions" section on the Tenant Settings page, allowing the addition of various extension types to different PPM Express pages and sections.
The Extensions feature allows PPM Express Administrators to add or embed custom content directly into PPM Express pages, enhancing functionality and user experience. For example, you can replace the default Quick Start page with embedded content or add a link on the Portfolios page to open an external site.

Key functionality:
- Create custom content or embed external sites/apps (e.g., web pages, Power BI reports).
- Types of extensions:
- Embed Content (display embedded content within PPM Express).
- Trigger Action (initiate external flows or actions).
- Open in New Tab (open a URL in a new browser tab).
- Display options: Normal, Small, Large, or Fullscreen.

- Placement control: Choose where the extension appears (e.g., Actions menu or View section).

Permissions:
- Only Administrators can create extensions.
- Users with Edit or Collaborate permissions can launch them.
- Viewers cannot access extensions.
Extensions can be easily created, edited, or removed, offering customization for various use cases.
Release Notes 21.7 @September 19, 2024
1. Multiple categories will be added to the Project Stage field of the Details project section.
Current functionality:
Currently, the Project Stage is a field of the select type where users can choose the appropriate stage for their project.
Post-release functionality:
After the update, the Project Stage field will categorize each project stage under a specific category. There will be a predefined set of stage categories that cannot be renamed or modified:
- Initiating
- Planning
- Executing
- Monitoring and Controlling
- Closing
- Suspended
- Canceled
Managing Project Stages:
- Users can add project stages to these categories using the Add Stage button.
- Stages can be reorganized between categories via drag-and-drop functionality.
- Project stage names and colors can be customized as needed by users with Manage Configuration permission.

Default Stage Grouping Post-Release:
After the release, the current project stages will be automatically grouped into the following categories:
- Initiating: Idea, Pipeline
- Planning: Planning
- Executing: Execution
- Monitoring and Controlling: (empty by default)
- Closing: Closing
- Suspended: Suspended
- Canceled: Canceled
Custom or Renamed Stages:
If your organization has created custom stages or renamed any of the default stages, they will be automatically placed into the Initiating category after this release.
What you need to do:
We kindly ask all users to review their project stages after the update to ensure they align with your organization's needs. To verify and adjust the stages and their categories, navigate to:
Project dashboard -> Details section -> Configure -> Project Stage -> Edit.

Important for Future Releases:
Proper categorization of project stages will be crucial for using the upcoming Stage Gate module, which is currently in development.
2. A Roadmap section was added to the Project/Portfolio/Program/Business Challenges/Idea dashboard.
We will take Project dashboard as an example, but it works the same for all other ones.
The new Roadmap section will display the selected existing Roadmap on the Project dashboard directly. To add Roadmaps, users must have View or Edit permission for the original Roadmap.
Only Administrators and Project Managers can import Roadmaps to the Default view of the Project Dashboard. To add the Roadmap to the custom view, users should have Edit and Manage Configuration permission.

The imported Roadmap will be available in read-only mode on the Project Dashboard.
- The Configure option allows users to select a different Roadmap.
- The Open Roadmap option will open the original Roadmap page in a new tab.
- The Clear option will remove the Roadmap from this section.

Release Notes 21.5 @August 29, 2024
1. The ‘Configure Columns’ and 'Configure Fields' panel for all PPM Express items now includes field grouping. Fields are divided into ‘Fields in this view’ (enabled fields) and ‘Available fields’ (which include all custom and system fields).

'Fields in this View' section contains enabled fields. For the Details and Decision Matrix sections, there are two columns: Coulmn 1 and Column 2. This helps organize the fields and makes their presentation in the Details and Decision Matrix sections convenient.
All the enabled fields are moved up to the Column 1 by default. You can use drag-and-drop functionality to move fields to Column 2 if needed.

For all other sections where the ‘Configure Columns’ or 'Configure Fields' panel is available, the 'Field in this View' will display all enabled fields as one list.
'Available Fields' section contains disabled fields, organized in groups by topics (system fields and custom fields). You can enable any field from this section and it will be added to Column 1 or to the 'fields in this View' directly.
The Details and Decision Matrix sections include additional grouping for the 'Available fields'.

All other sections include only the System fields and Custom fields groups for the 'Available fields'.
For more details, please refer to the 'Dashboard configuration article'.
2. You can now visually separate fields into two columns in the Details and Decision Matrix sections of Project, Program, Portfolio, Roadmap, Resource, Business Challenge, and Idea Dashboards.

3. New options were added to the Time Tracking Settings for the Enterprise plans.
'Enable Resource Plan Smart Suggestions' allows adding smart suggestions to the Timesheet for all Projects where a Resource has Planned hours and where the resource is added to the Resource Plan in the Committed mode. Also, the selected time period on the Resource Plan should overlap the time reporting period for the smart suggestion to appear on the My Time page.
A timeline entry called 'Project Work' will be created for these Projects on the My Time page, marked with a custom time entry icon.
'Record Reported Time to Resource Plan Actuals' defines if Resource Plan Actuals (in the Resource Plan project section) are recalculated using the time reported by users on the My Time page. If enabled, it will affect all Projects where the time was reported and overwrite all values in Actuals.

Billable and Cost Type Synchronization settings define if users can edit the Cost Type and Billable Type field values. Also, it is possible to define if the Cost Type and Billable Type field values will be synchronized from the corresponding Task level field or Project level field to the Timesheet entry.

Release Notes 21.3 @August 8, 2024
1. An option to create Private Projects was added to PPM Express. This feature is available by default in the Enterprise Ultra plan.
In PPM Express, Project Managers can create and manage private projects that are accessible only to specific users, making them "invisible" to others.
Private Projects are created in the same manner as public projects, but there are key differences in access and visibility.
When creating a private project, it will automatically be labeled as "Private" and will only be visible to users who have been granted access. To create a Private Project, users should have "Create" permission for Projects.

Private Projects have special permissions that differ from public projects, here are some main key points:
- Private projects are excluded from the View All, Collaborate on All, and Edit All permissions for projects on the People Management page. So, PPM Express Administrators cannot assign Private Projects to users in the Projects View/Collaborate/Edit settings globally.
- To grant access to a Private Project, you must use the Share Project panel (on the Project Dashboard or Projects page by the ellipsis button next to the project). Only the project manager, users with "Edit" permission for the private project or an admin can share a private project with other users.

- Private projects cannot be added to portfolios, programs, or roadmaps. They are also excluded from roadmaps, key dates, and risk imports.
- Task assignments, action items, change requests, issues, and risks from private projects will only be visible to users with access to those projects on the My Space page.
- Time Tracking is disabled for Private Projects. Users cannot see Private Projects or tasks assigned to them within these projects on the Time Tracking page.
- Private projects cannot be archived or cloned. These options are disabled, with corresponding hints explaining the restrictions.
For more details about the Private Project projects and full list of permissions/restrictions, please refer to the PPM Express Private Projects article.
Release Notes 21.2 @July 31, 2024
1. Baseline and variance fields on a Project Level for PPM Express and Global Rollup fields were added.
Baseline and Variance fields for the internal PPM Express Tasks and for the Project fields were added to the Project Details section.
PPM Express Task baseline and variance fields are now rolled up to the Project level, allowing the Project manager to quickly review the summary of the baseline schedule.
Variance fields are calculated using the formula shown in the hint for each field. These fields need to be added to the Project view to be displayed in the details section.

Also, the global roll-up baseline and variance fields are added to the Project level.
These fields are currently empty if an external system schedule is selected as the Primary Schedule in the Project Settings, rather than the PPM Express schedule. If the PPM Express schedule remains selected as the Primary Schedule, these fields will mirror the rolled-up values of the PPM Express Schedule fields.
With the upcoming release, if an external system schedule is selected as the Primary Schedule, these fields will display the rolled-up values from the external system schedule.
This enhancement will ensure that the baseline and variance fields accurately reflect the primary schedule's data, whether it is from an external system or PPM Express.

Also, there are three Project-related fields: Baseline Start Date, Baseline Finish Date, and Baseline Set Date (date when the baseline is set). Clicking on the ellipsis button, select the 'Set Project Baseline' option.

With this option, it is also possible to set a baseline for all PPM Express Tasks and Key Dates at once.
Please note that if you have already set the baseline for tasks or key dates, this option will overwrite it.

These fields are available in the KPI Project section. Also, it is possible to create a custom view with these fields included on the Projects page and review the information in bulk.
These fields are available in the CSV file as well, but they are read-only.
Release Notes 21.1 @July 23, 2024
1. We are excited to announce the launch of user experience improvements with redesigned views and layouts in PPM Express.
These updates enhance usability, providing a more intuitive and convenient user interface experience.
We will review the Views and Layouts on the Project Dashboard but these changes will take place on all pages with views and layouts.
From now on, views and layouts will be a part of the project header. The Timeline section was removed from the header and is now presented as a project section that can be included/excluded to/from the project view.
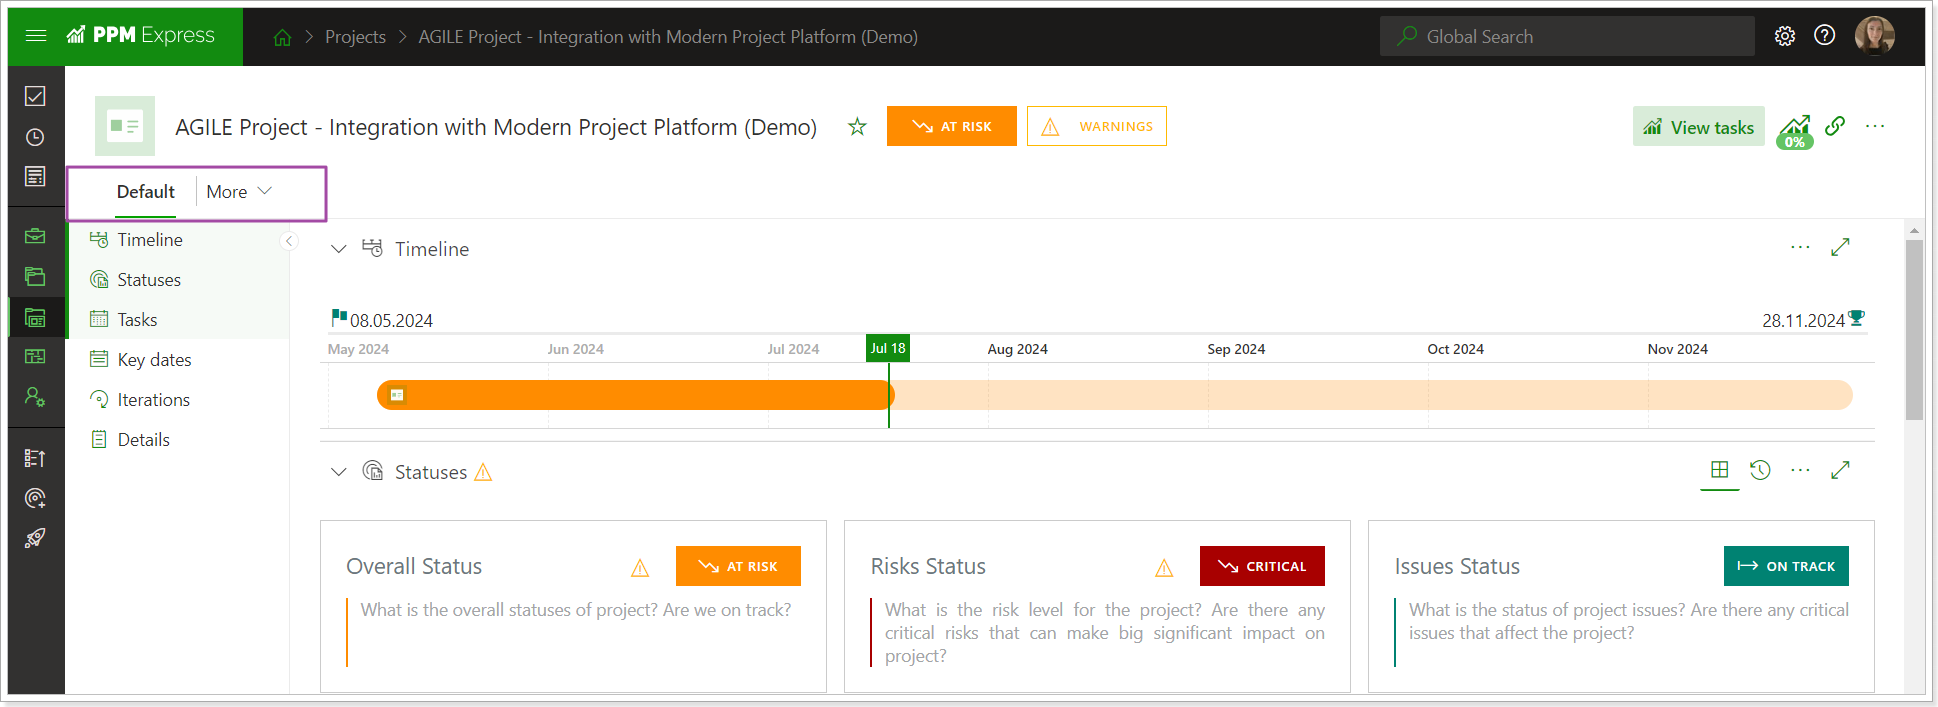
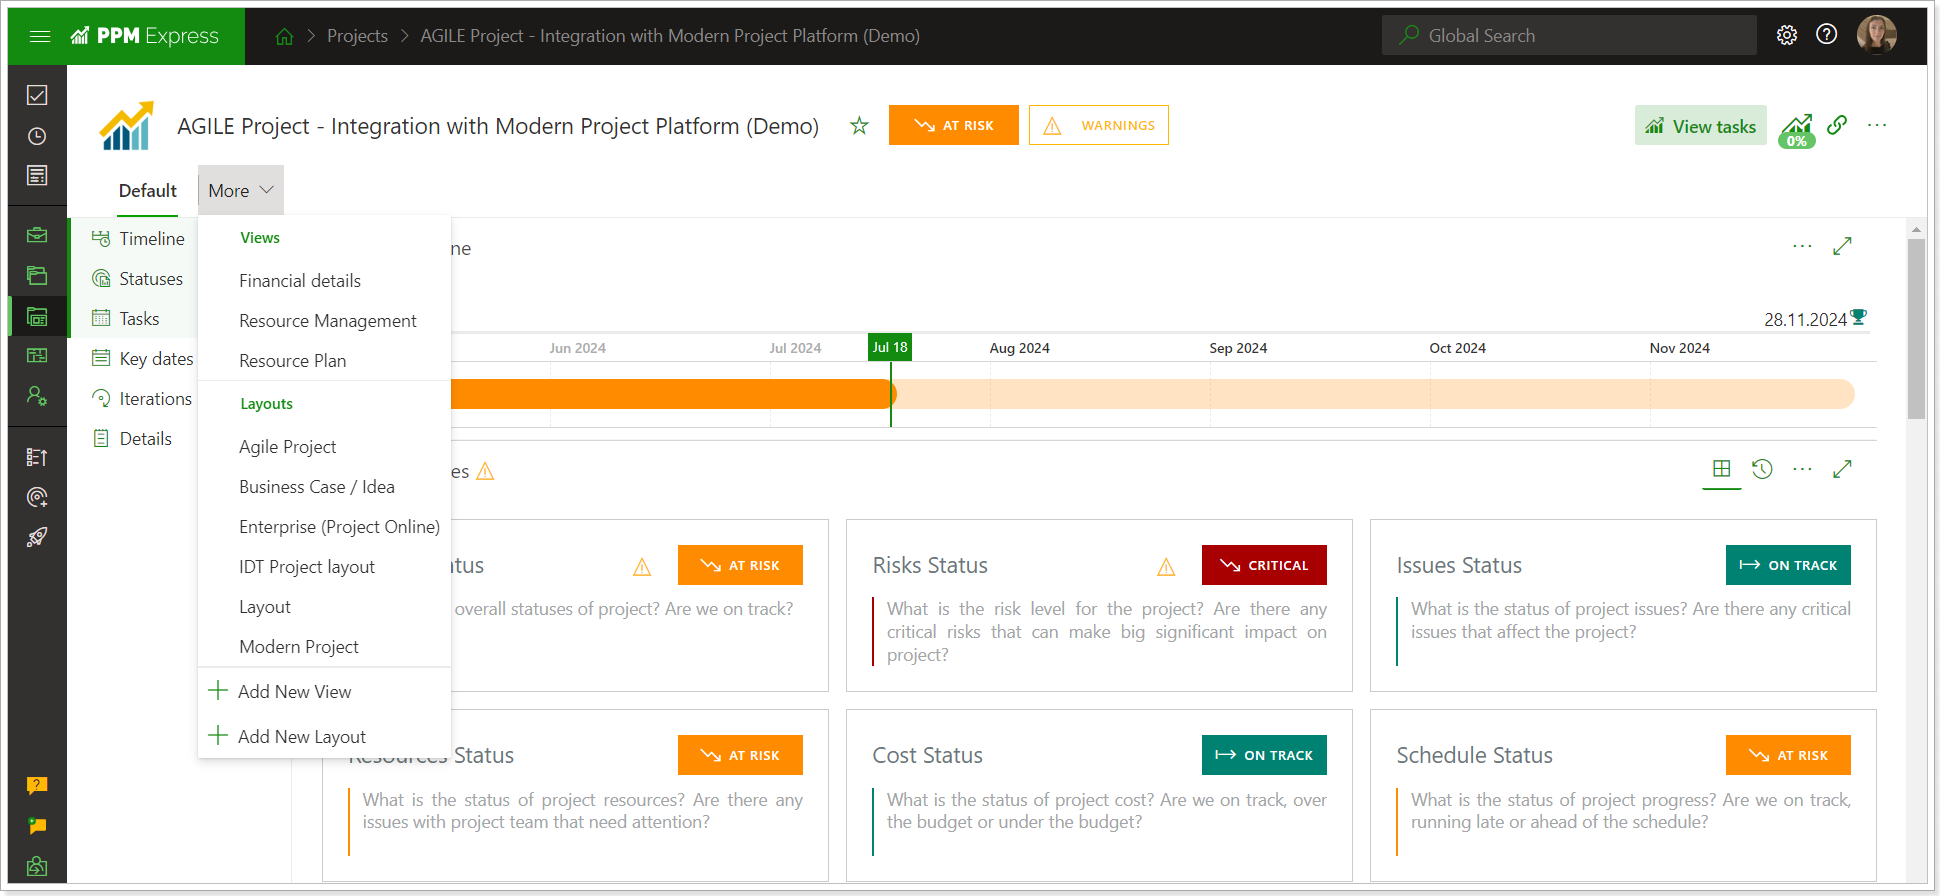
To add a view to the project dashboard, click More and select the required view from the drop-down.
When the view is selected, a set of actions become available by clicking on the view:
- Rename
- Configure Sections
- Clone
- Pin
- Save as Layout
- Delete
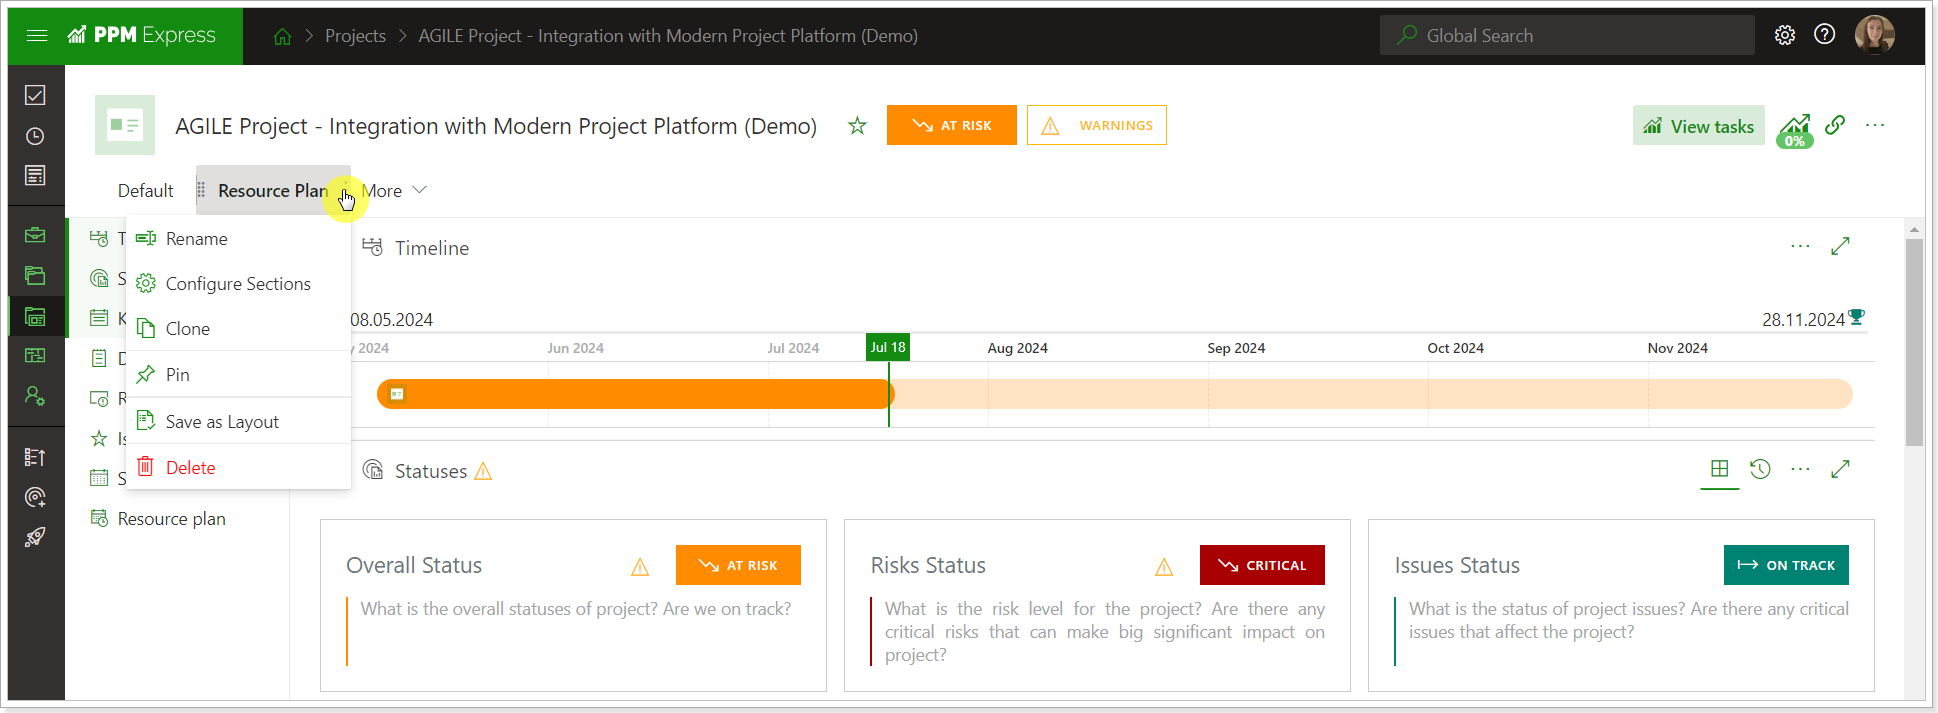
A new feature allows you to pin views to the project header. When a view is pinned, all users with access to the project can switch between the pinned views, unless a specific view is set for a user on the People Management page or in the 'Share' panel. This feature is available per project, the views can be pinned by the Project Manager per project, this setting is not shared between projects.
The Layouts are also located under the More drop-down now, however the use of the Layouts remained unchanged.
Nothing will change regarding the permissions for the views and layout. The concept will remain the same.
2. The Share panel will be redesigned for a better user experience.
These changes will take place on all page where the Share option is available, but we will review on the Project dashboard as an example.
We are introducing a new Filter option that allows you to filter users in the list by their project permissions or by their user names. This feature enables Project Managers to quickly find information about a specific user's permissions or review the number of users who have Edit or Collaborate permissions for the project.
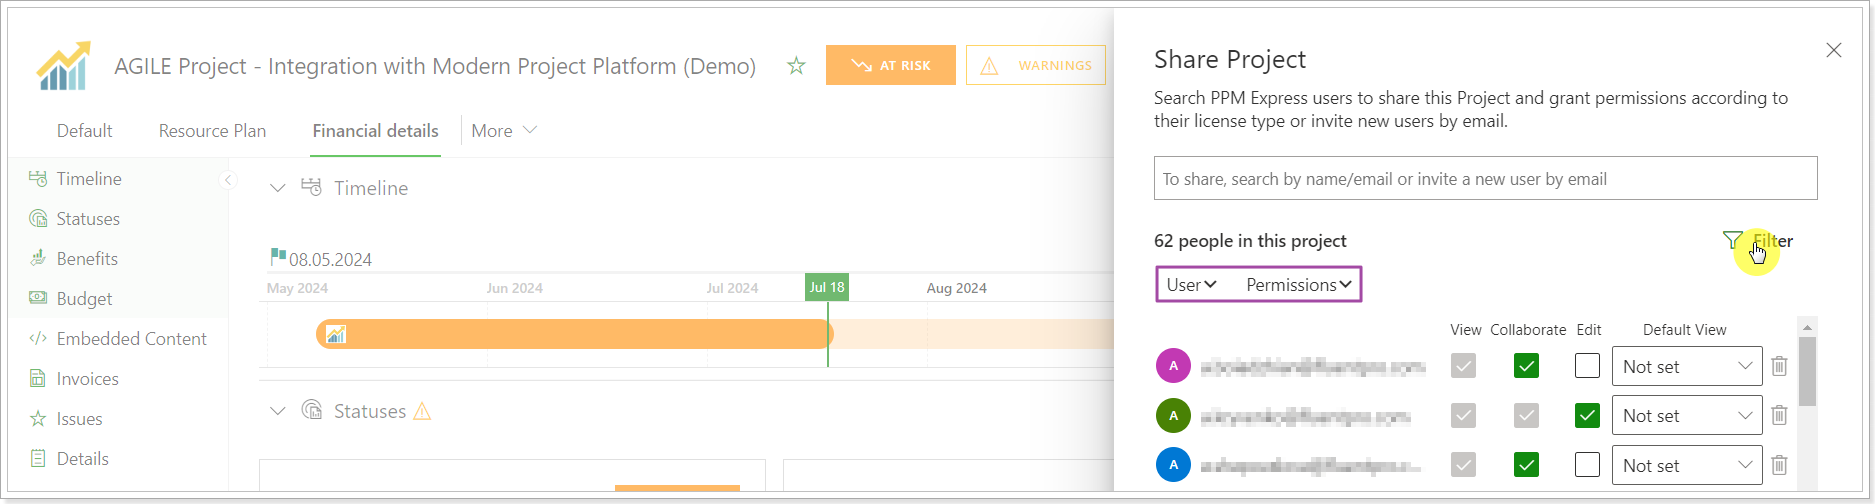
If you type in the user name in the search box and the user has not been added to the PPM Express tenant yet, you can invite this user from the Share panel by typing in your full email address and clicking Invite. This user will be added to the list of users below with the NEW status. This NEW status will disappear as soon as you click Confirm.
Release Notes 21.0 @July 10, 2024
1. New PPM Express subscription plans.
We are ready to announce the launch of our newly updated subscription plans with this release.
When users sign up for PPM Express, the Projects Plan and Enterprise Plan ara available for selection. When the trial period is over, users can select from the following plans on the Billing Settings page:
- Projects Plan: Simple to use, AI-enabled Modern Work and Project Management with Integrated Time Tracking.
- Projects Unlimited Plan: ALL-IN-ONE Platform for Modern Work and Project Management with AI and Integrated Time Tracking for the entire organization (Unlimited Users).
- Enterprise Plan: ALL-IN-ONE Platform to manage strategy, ideation, portfolios, programs, and projects across multiple project management tools and departments.
- Enterprise Ultra: ALL-IN-ONE Platform to manage strategy, ideation, portfolios, programs, and projects across multiple project management tools and departments with advanced features and capabilities.
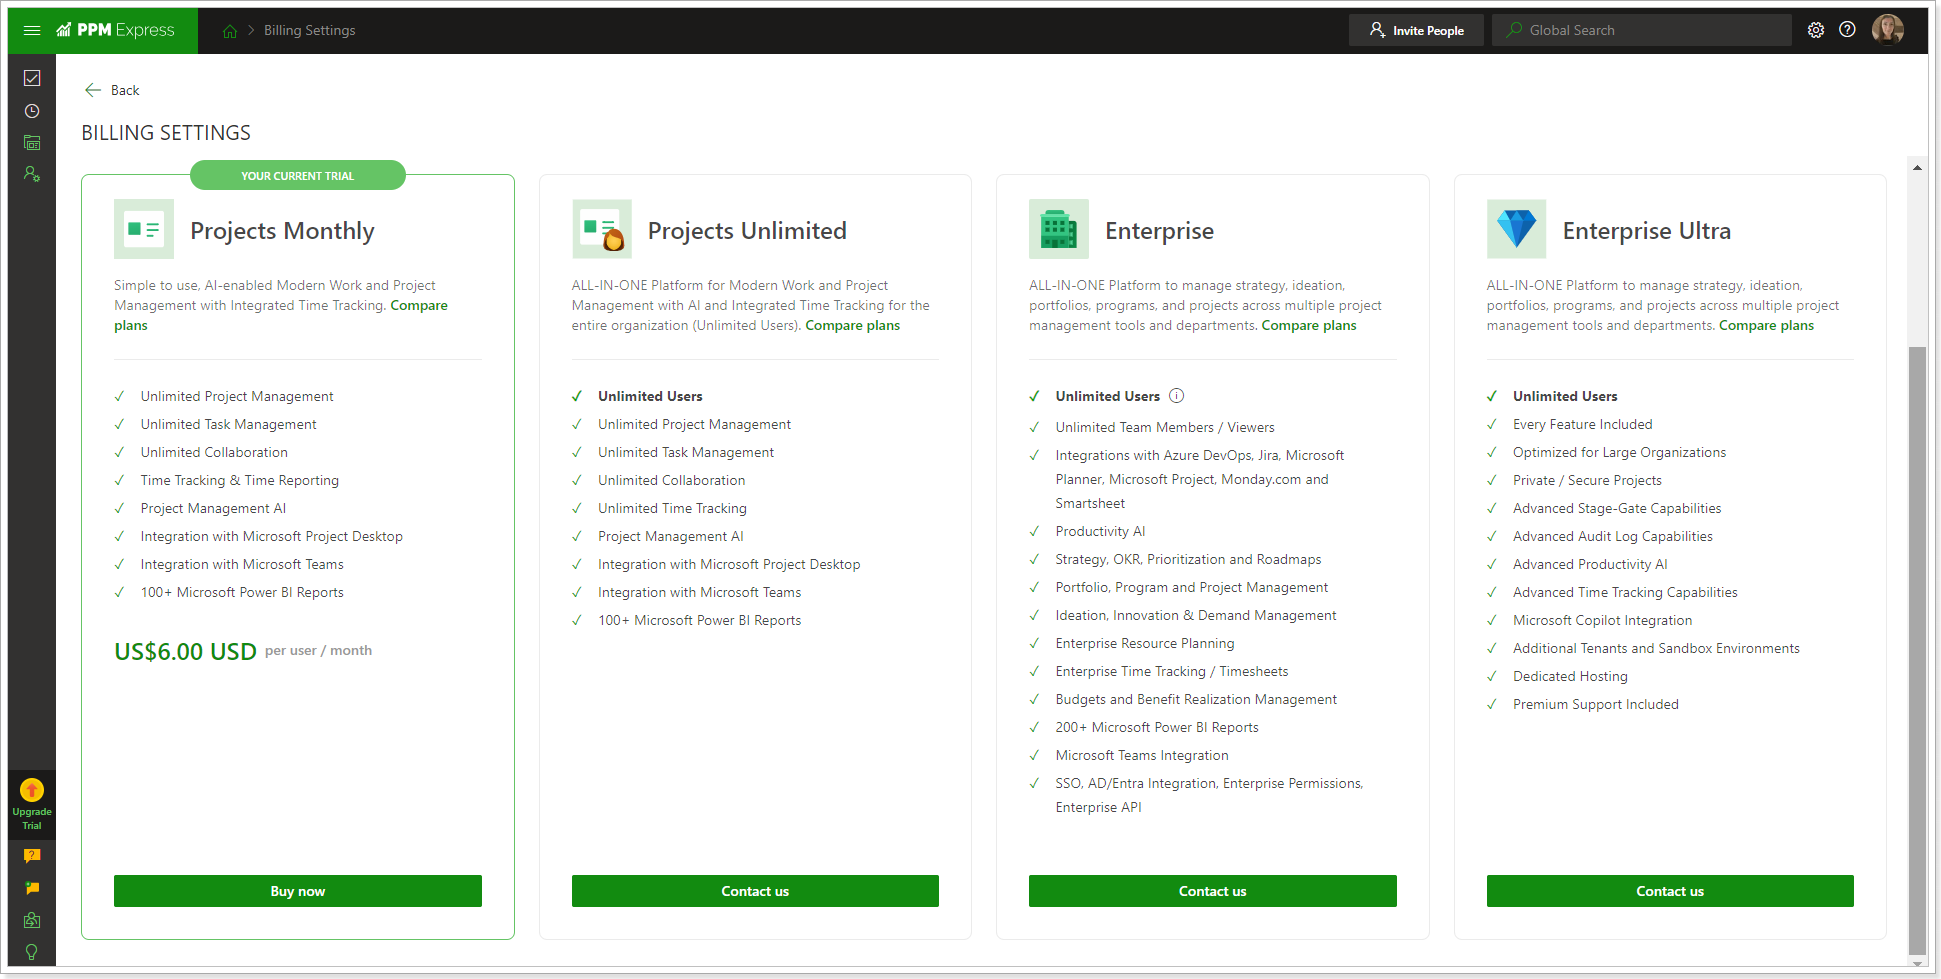
For our current customers on the Portfolio or Product Management plans, there are no changes. They can choose to stay on their current plan or switch to a new plan through Customer Success. Our Customer Success team will contact all customers regarding this and provide detailed information about the new plans.
2. We are thrilled to announce the release of the Time Reporting module.
This functionality will become available for all new plans.
Time Tracking Settings will be added for PPM Express Administrators and users with the Time Tracking permission to set up general rules and decide on the Administrative Time Categories.
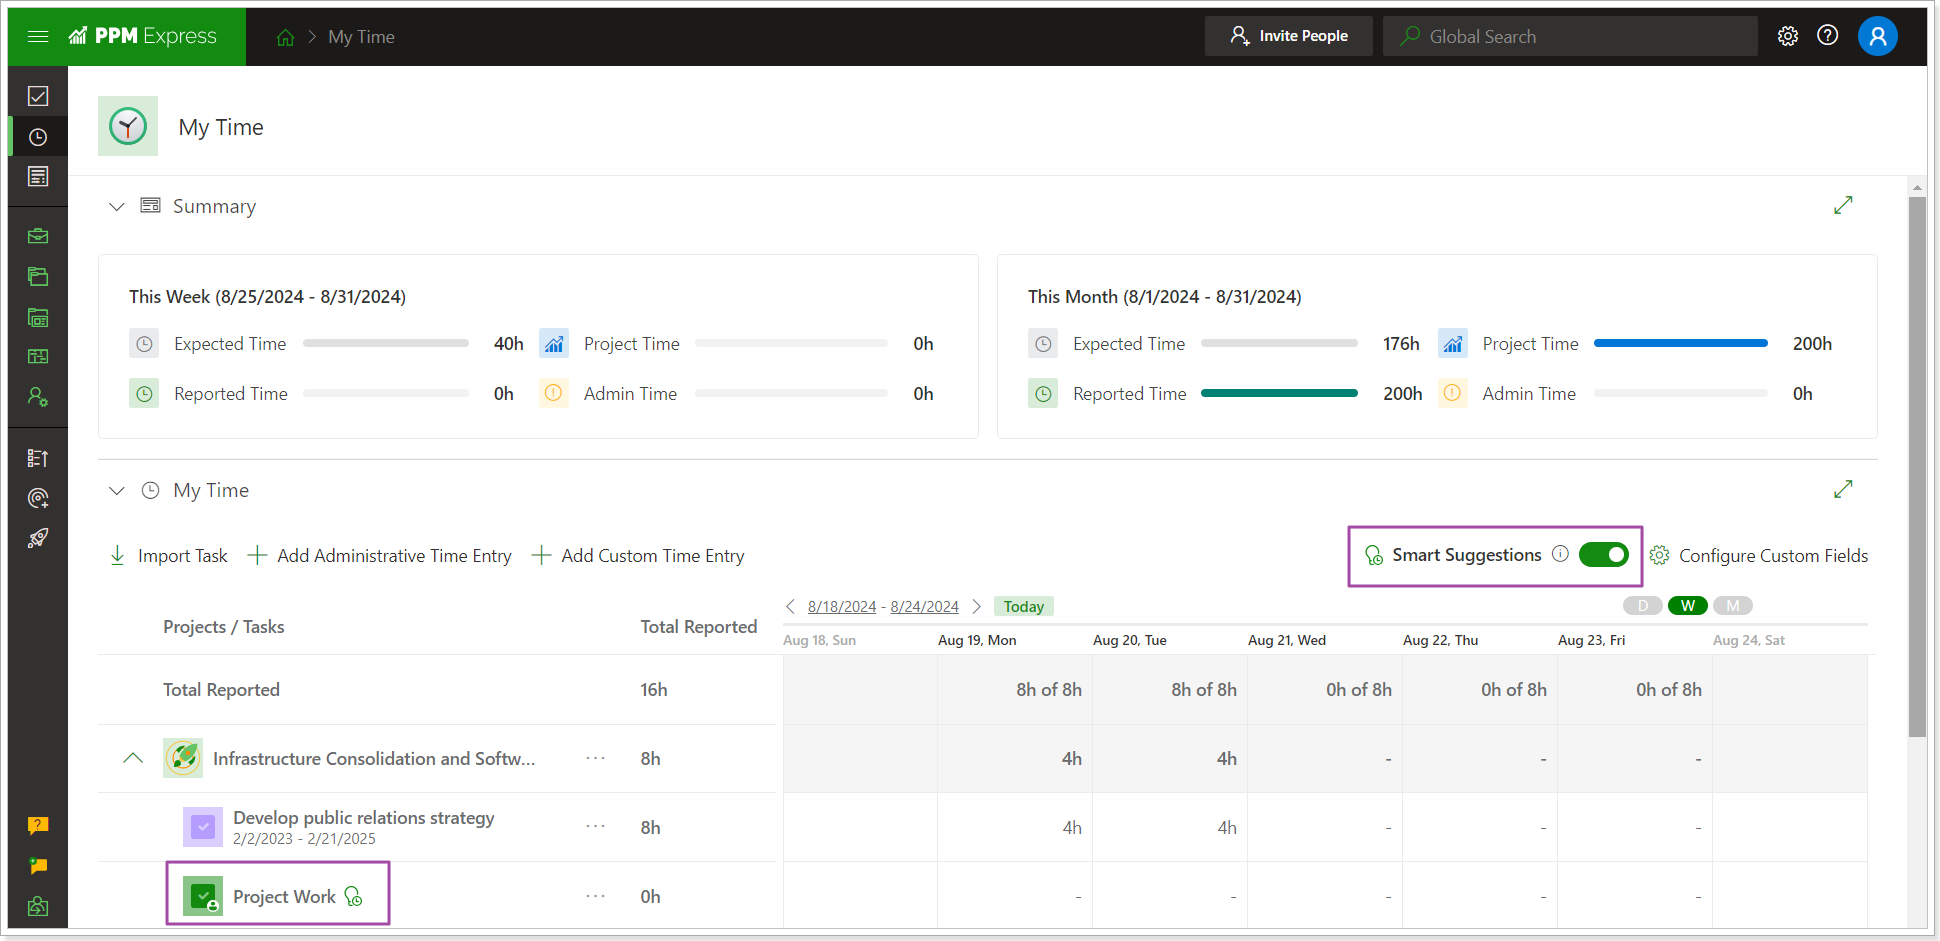
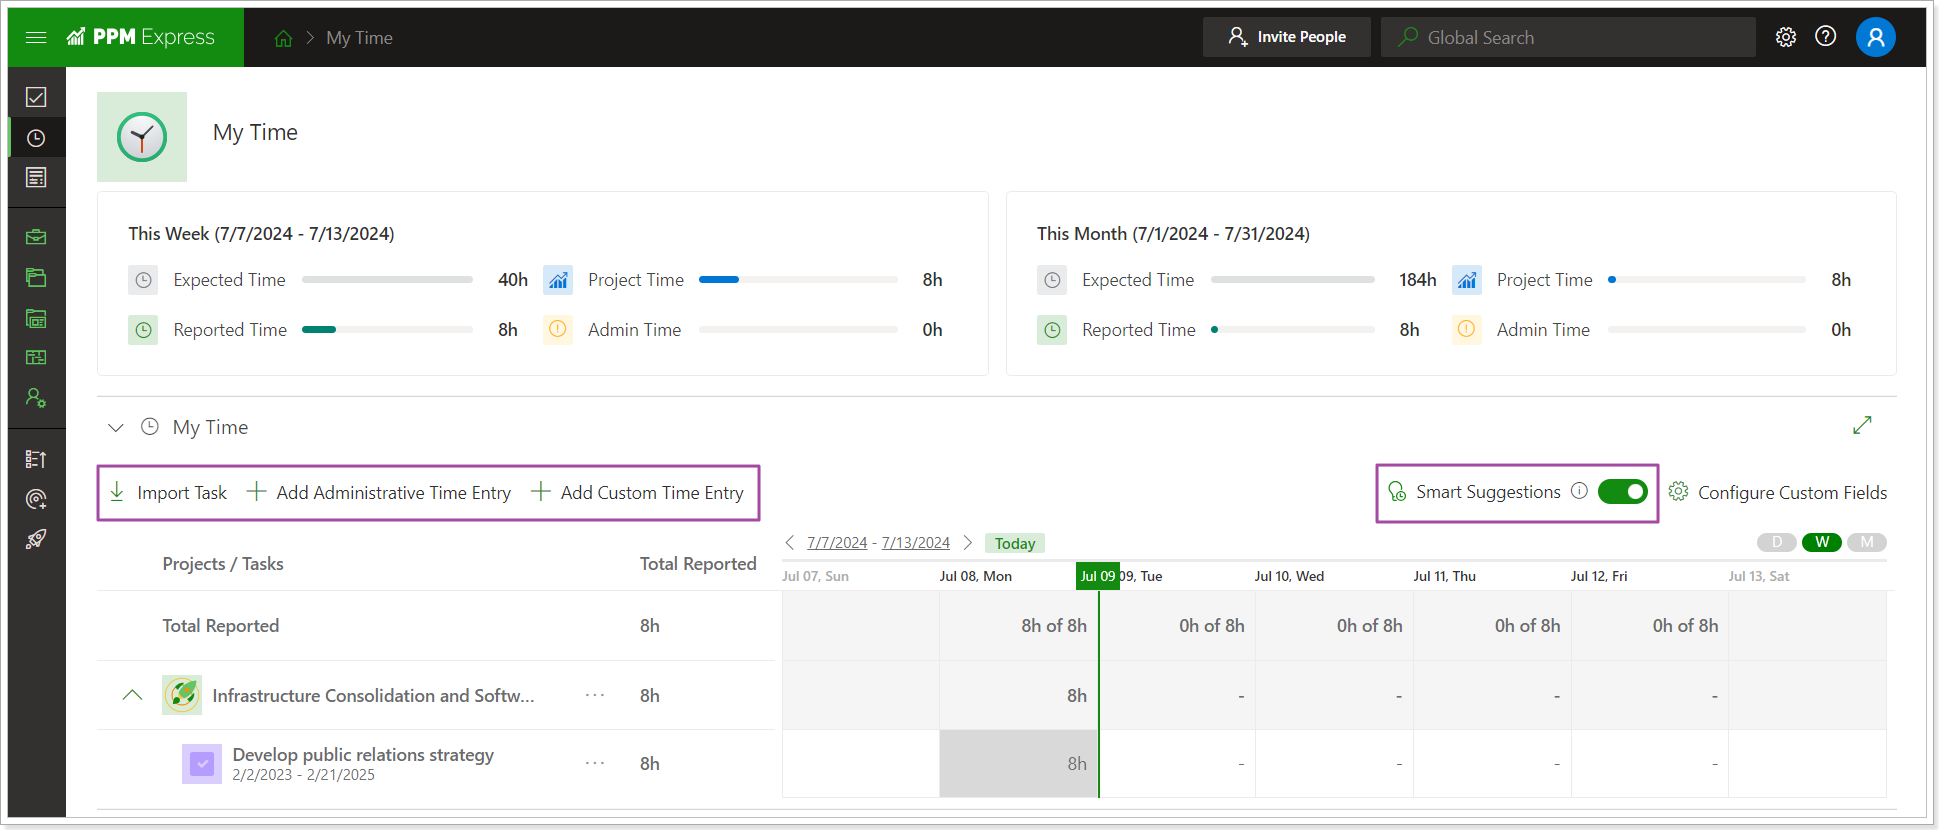
The My Time page is the main page where time is reported and managed. Time reporting on the Project Tasks and My Space pages is available as a quick and easy way of tracking time on the tasks assigned to the user.
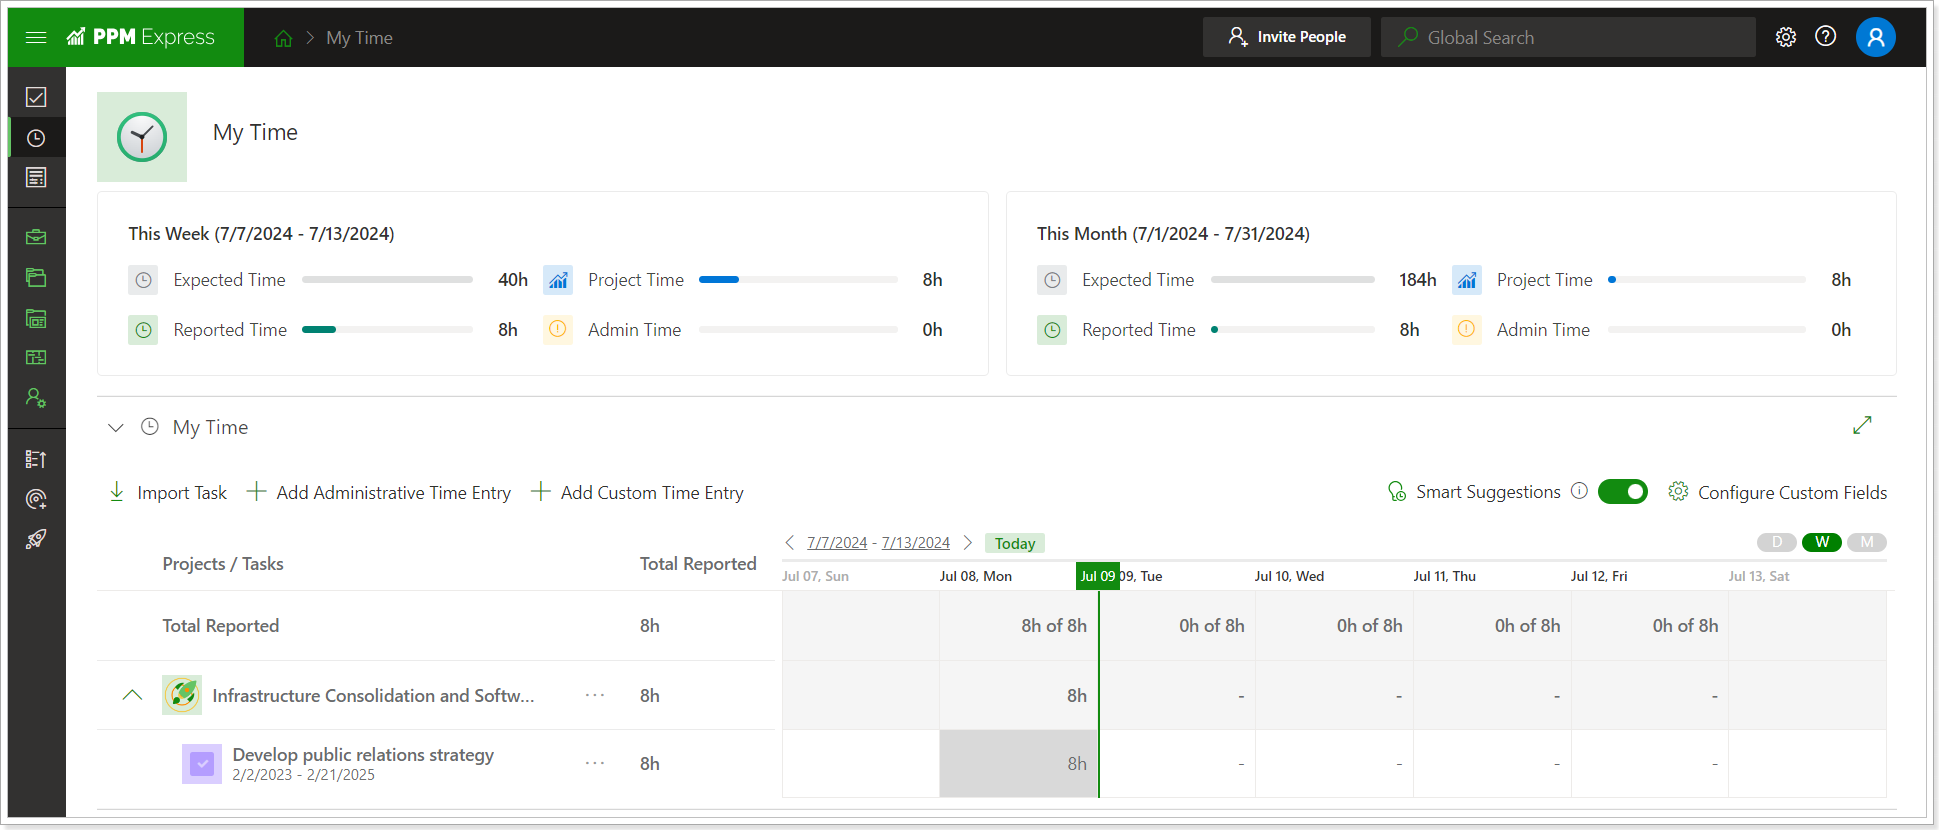
The Smart Suggestions option adds all tasks assigned to a user to the timesheet automatically. The user can start reporting the time on these tasks immediately.
Despite the Smart Suggestion option, users can report time on their tasks and activities in the following ways:
- Import Tasks (to import tasks to the timesheet from the projects a user can access)
- Add Administrative Time Entries (to report on non-project or non-working tasks or activities).
- Add Custom Time Entries (to report on their custom tasks or activities that are related to a project but don't exist within the project's schedule)
If a user works on the same task during the whole timesheet period, there is no need to report time for each day separately. It is possible to clone the time entry to the next working day or the previous working day and fill in for all week/month of the currently selected period.
For more details, please refer to the Time Tracking section on our Help site and the Time Tracking Settings article.
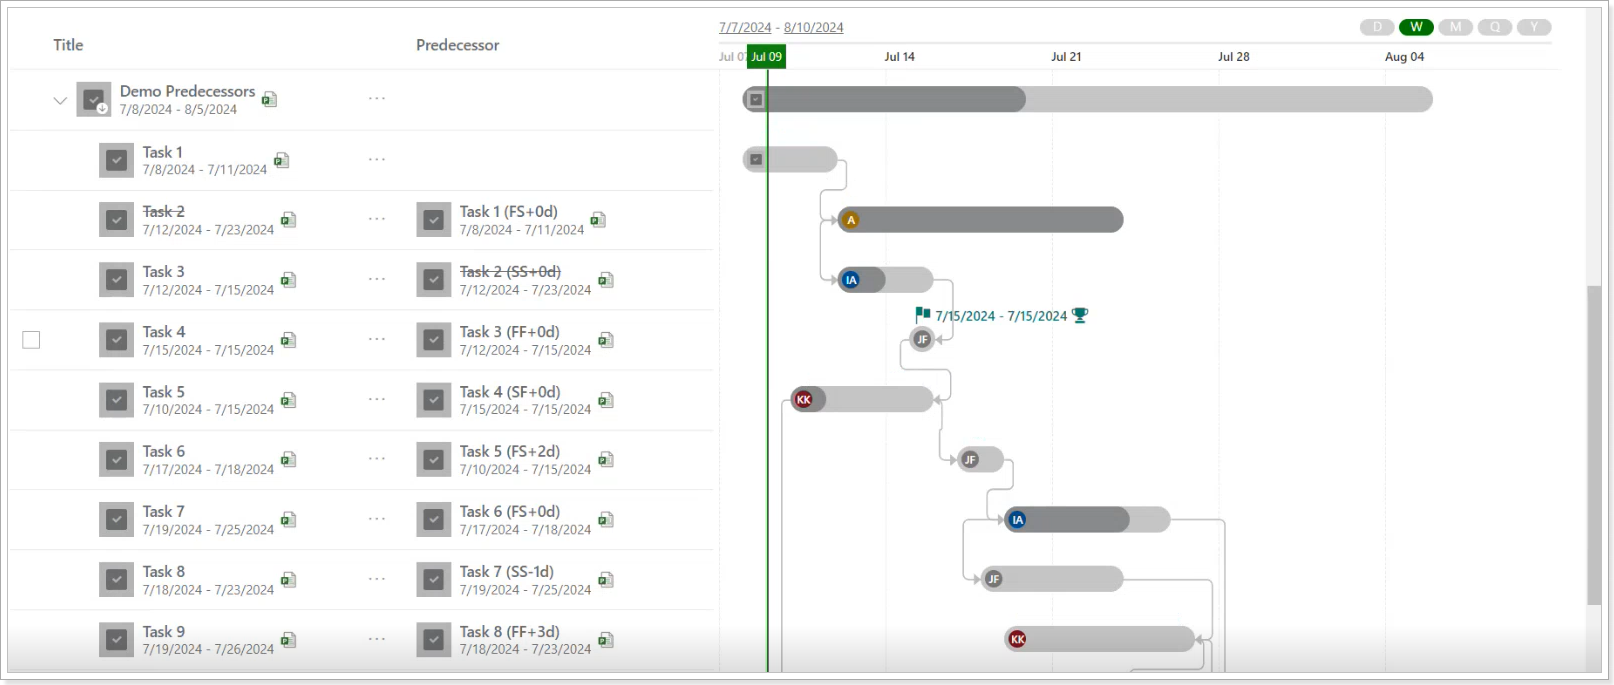
3. A possibility to import predecessors and dependencies for tasks imported from Project Publisher to PPM Express will be added.
This functionality was already available for the case when MPP tasks are imported as PPM Express tasks. With this release, this functionality is also available for the case when MPP tasks are published as a linked project in PPM Express.
When the Project Publisher is updated to the latest version after the release, the Predecessor field will become available on the Task field mapping step.
Please note: For new connections and project linking this field will be included by default. For existing ones, it is required to add this field manually or click Reset on the Mapping page.
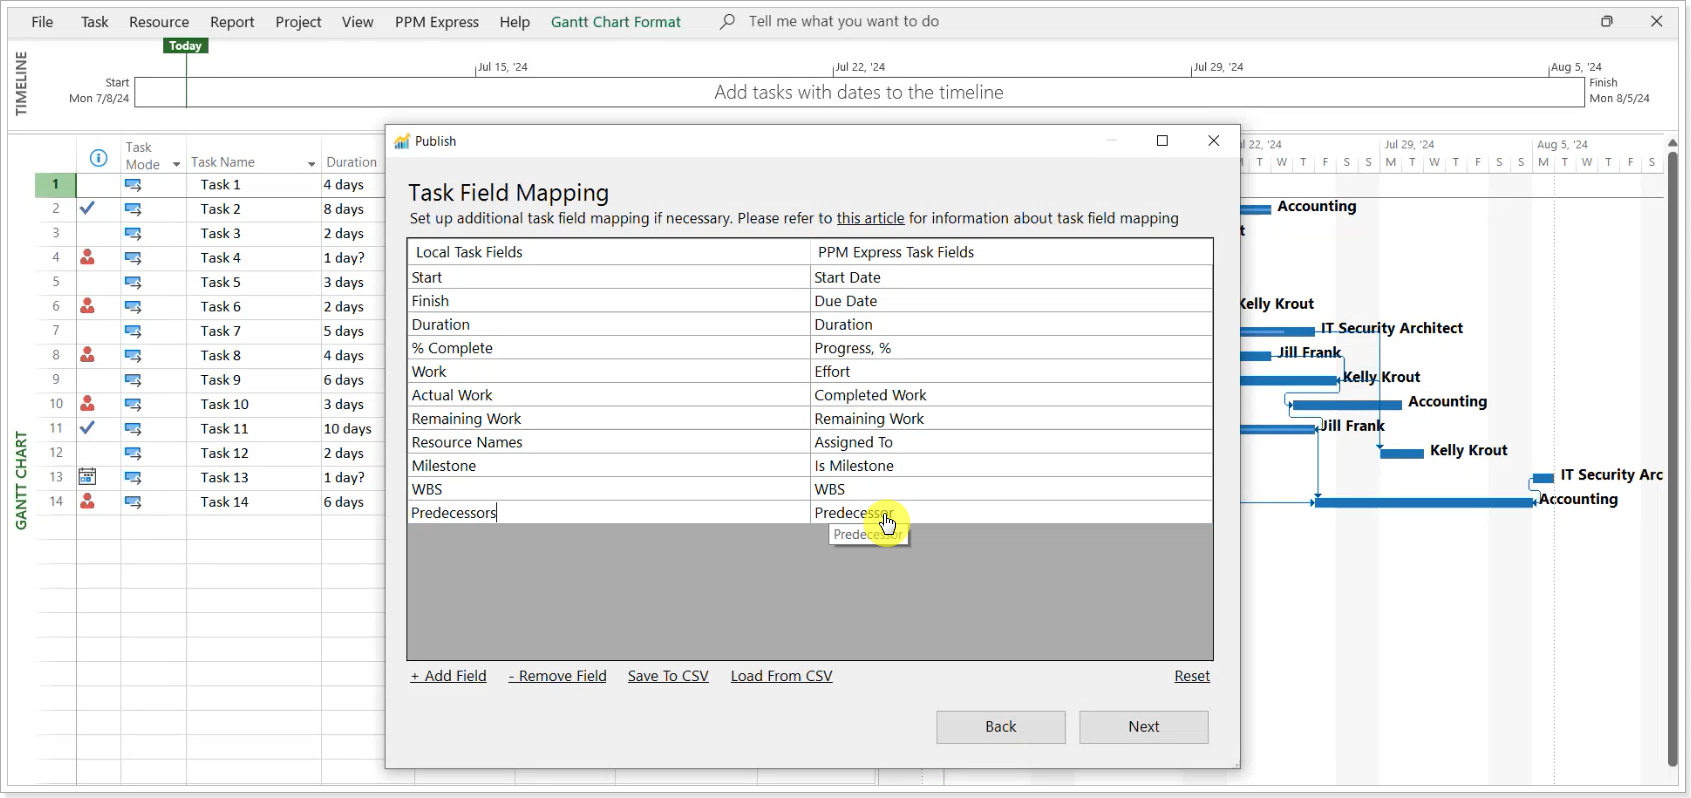
When the synchronization is completed, the predecessor field will be filled in accordingly and the task dependencies will appear on the timeline.
Release Notes 20.6 @July 2, 2024
1. The Embedded Content section was added to the Idea dashboard.
The Embedded Content section is now available for the Idea dashboard. This section can be added to the custom or default view/layout.
The Embedded Content section allows embedding external links, videos, web pages, or documents. This section can also embed PPM Express Power BI Reports into the dashboards to easily access the required report. 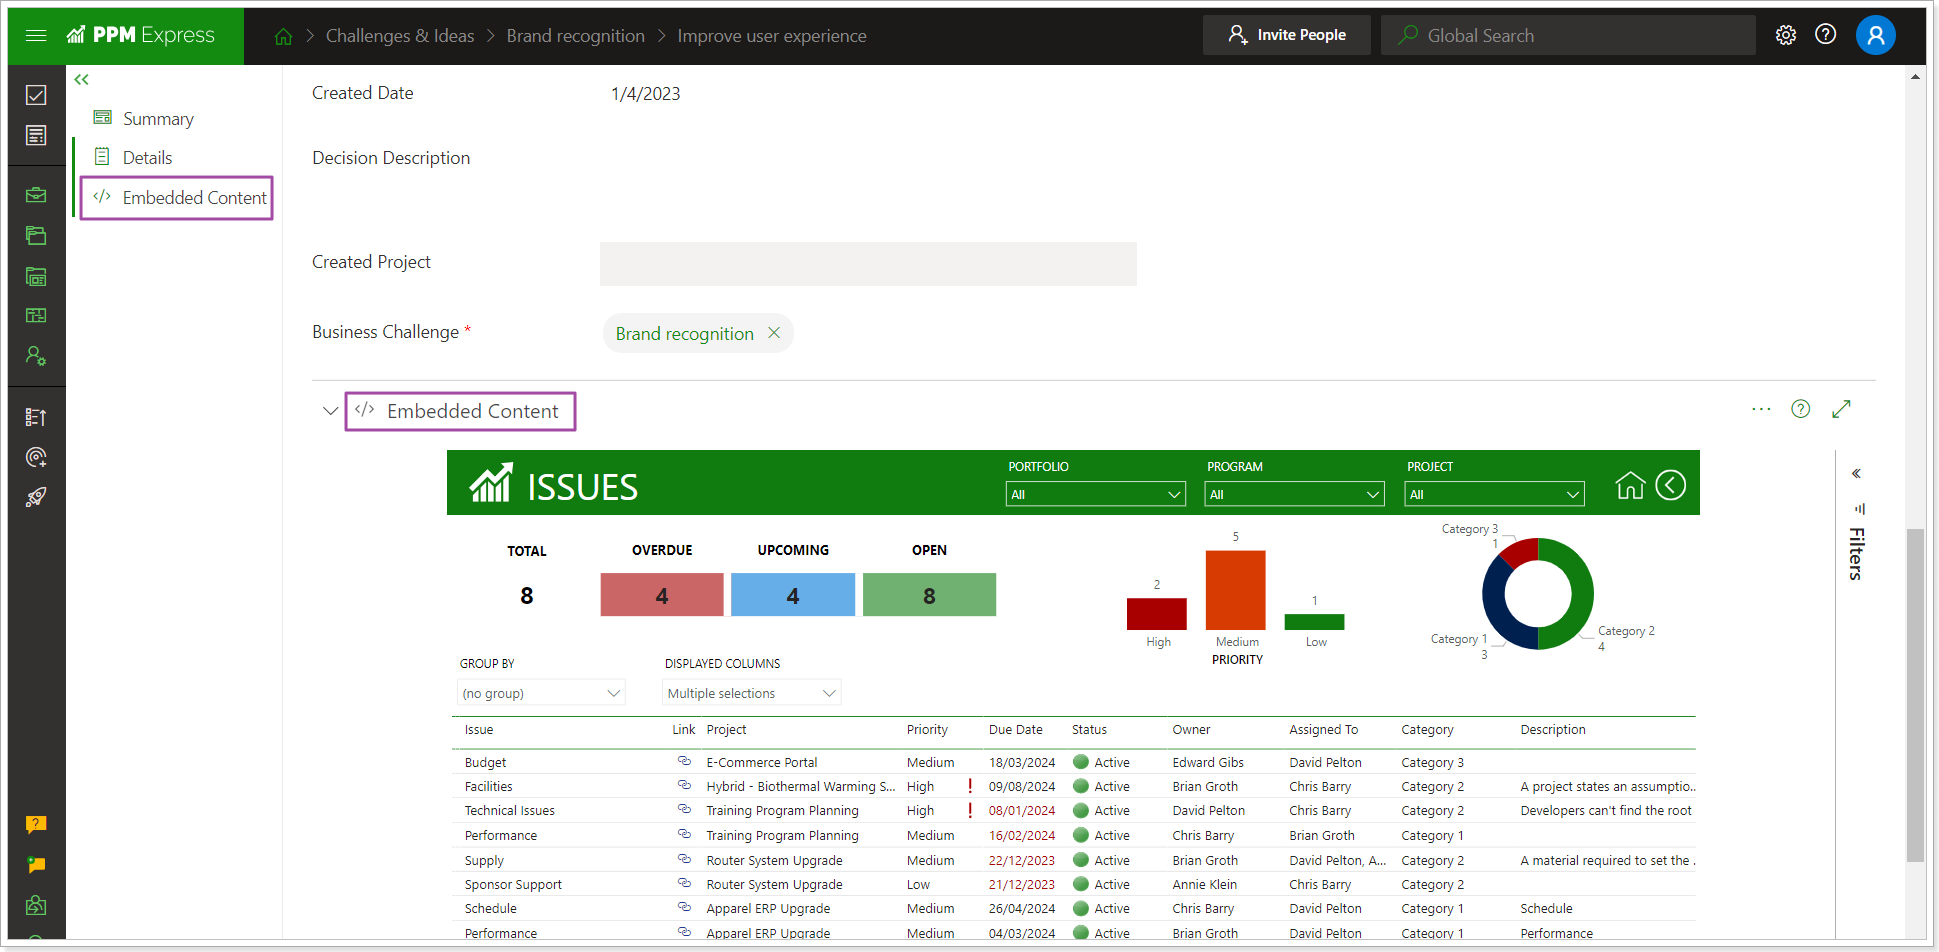
Please refer to this article "How to use the Embedded Content section" for more details.
2. An option to 'Change Auth Provider' is now available for users with Active or Inactive status.
On the People Management page, Administrators can select the users to change the provider and click the 'Change Auth Provider' button. The drop-down menu will only display the providers enabled on the tenant level (on the Tenant Settings page).
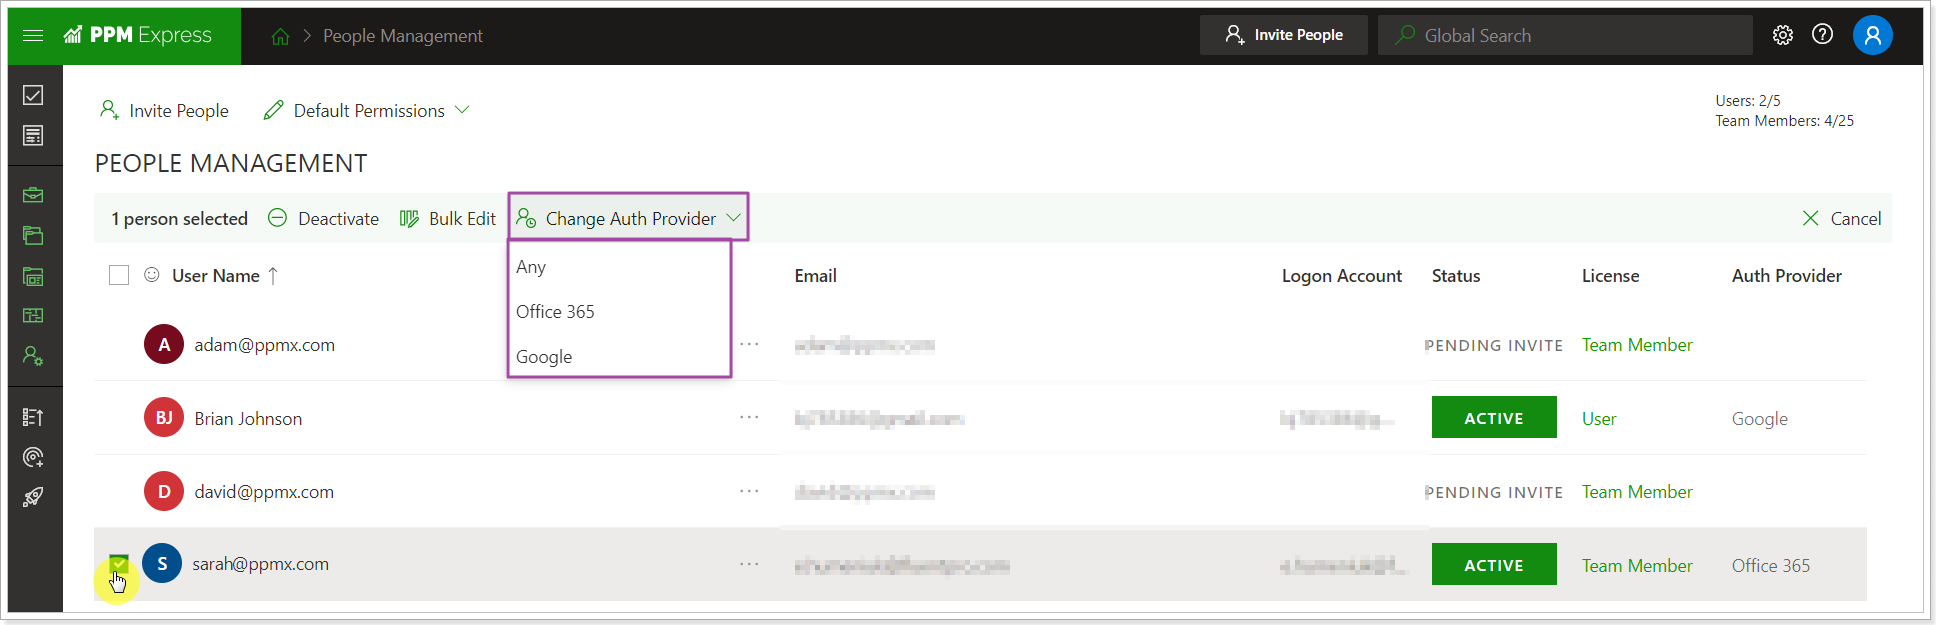
This option is also available for each user under the ellipsis button.
When the provider changes, the user status will change to Pending Invite. The user will receive an invitation email again to join the PPM Express tenant and can log in using the selected provider.
When the user re-joins the tenant, their license details and all assignments will be preserved if the provider is changed for the active user. If the user was inactive, the default license type will be applied. However, if the license is applied and permissions are set for the inactive user before changing the provider, these settings will be preserved.
For more details, please refer to this article.
3. The 'Actual Cost' field was added to the Resource Plan project section.
It is calculated using the formula: Total Actual * resource 'Standard Cost'. The roll-up field 'Resource Actual Cost' was added to the Details section at the Project/Program/Portfolio level. It is calculated using the formula: Sum of Total Actual * resource 'Standard Cost'.
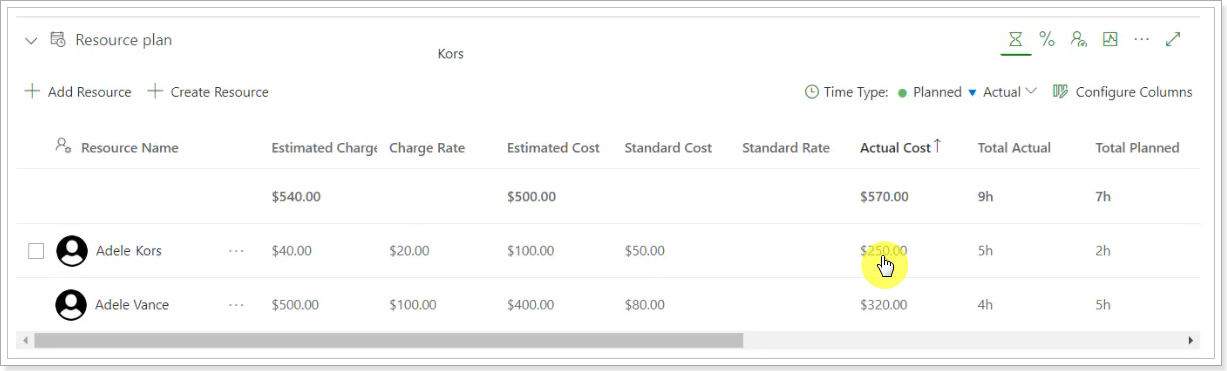
4. The ‘Priority’ field is now displayed as text and an icon in Task Management.
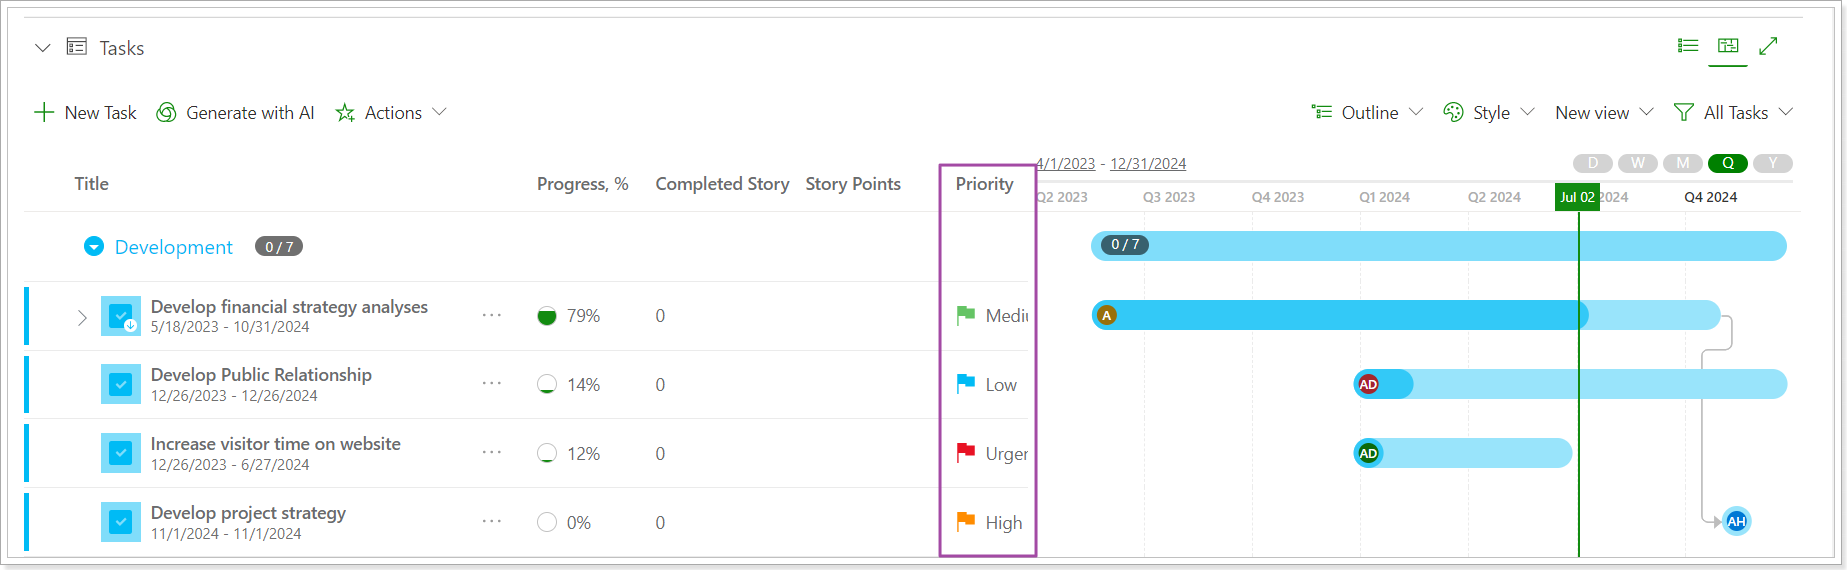
Release Notes 20.4 @June 18, 2024
1. Baseline Variance fields are now available for Key Dates.
Baseline Variance fields were added to the Project, Portfolio and Program Key Dates. If you open the Key Date and navigate to the Baseline section, the Variance field will show the difference between the Baseline and the Current values. This allows us to quickly review the variance instead of calculating it manually.
Variance fields are available for manually created Key Dates and imported ones.
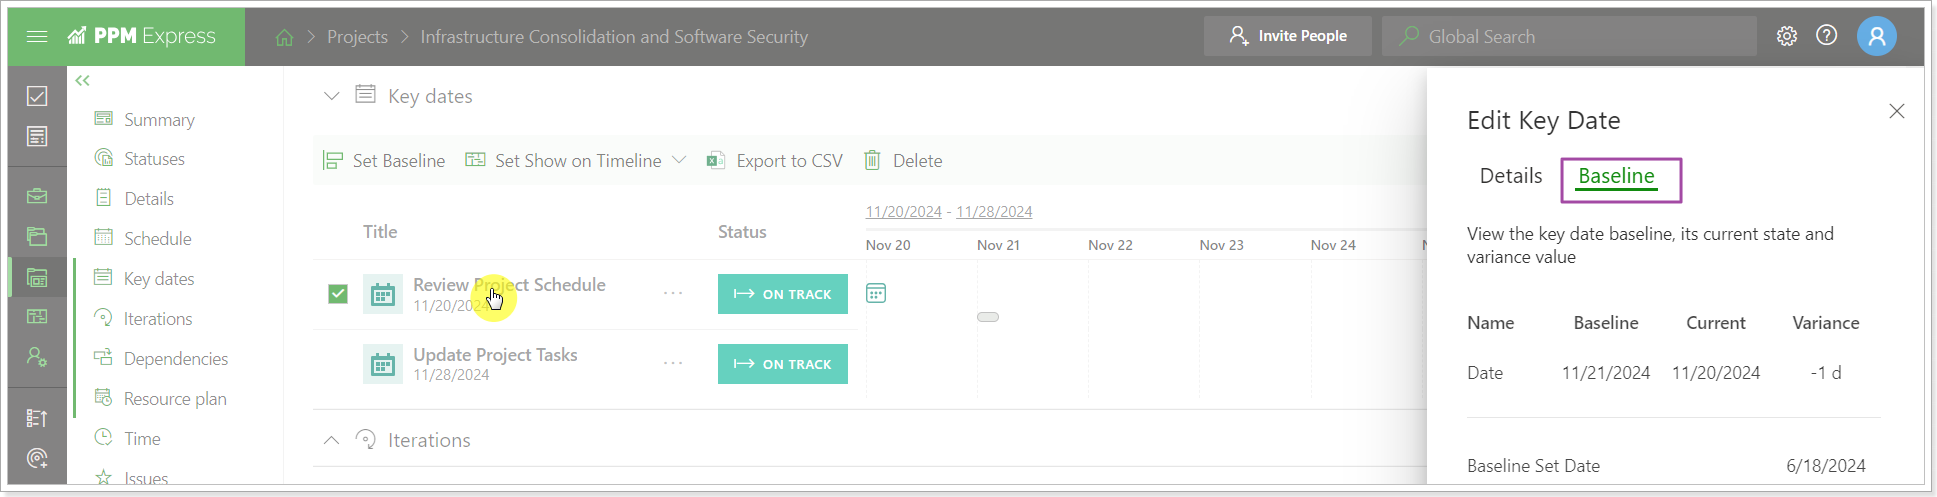
The Date Variance field can now be added to the views and filters.
The field is also added to OData and API.
2. It is now possible to select the Primary Schedule displayed within PPM Express Projects.
Users can now switch from the primary PPM Express Schedule to any other connected system Schedule on the Project Settings page.
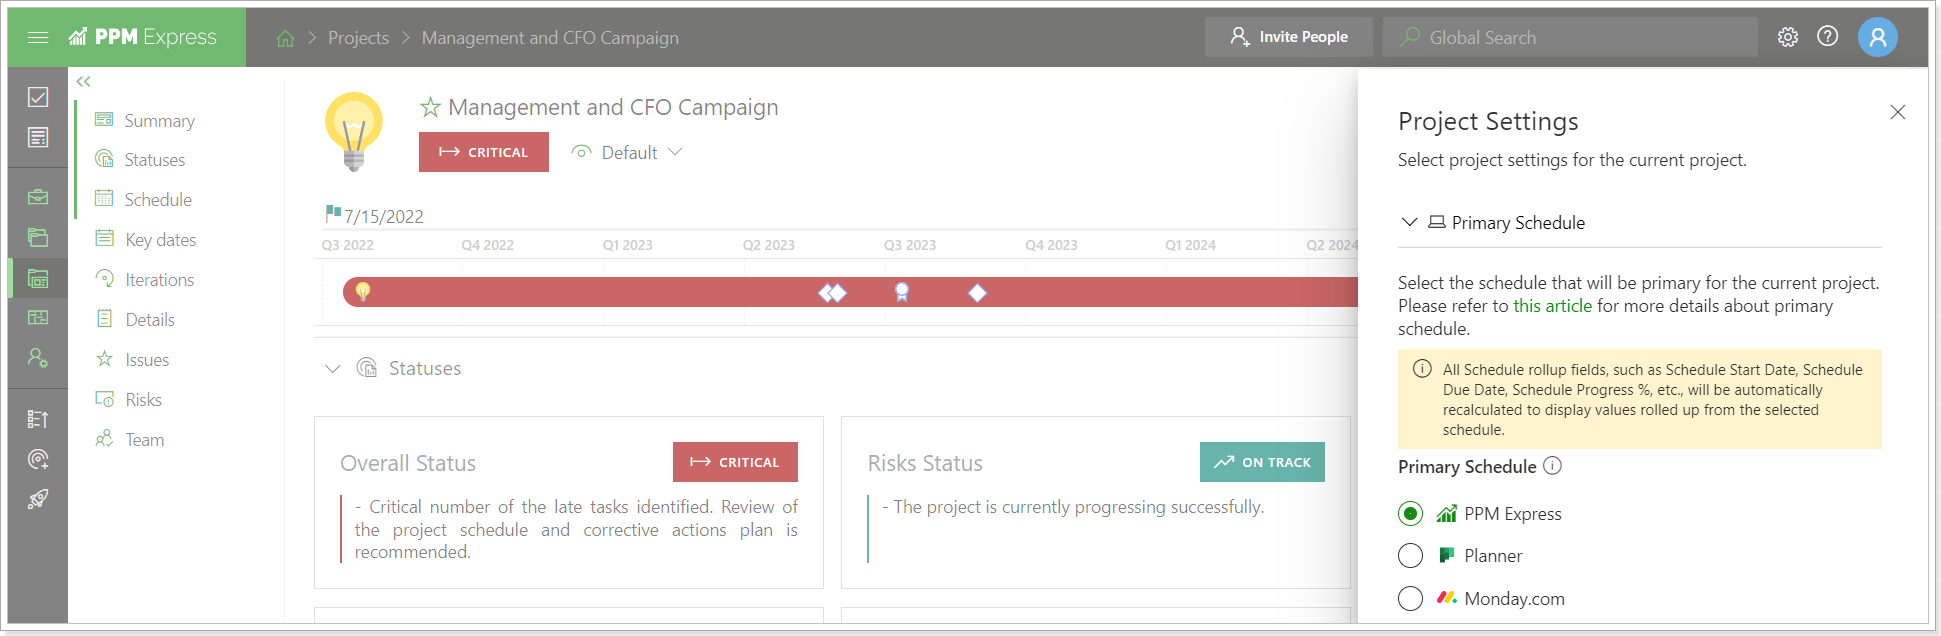
The primary schedule setting defines from what schedule the rolled-up values will be displayed in the global project rolled-up fields.
PPM Express is set as the primary system by default. When you switch to any other system, all Schedule rollup fields, such as Schedule Start Date, Schedule Due Date, Schedule Progress %, etc., will be automatically recalculated to display values from the selected schedule.
Also, when linking PPM Express Project to the Project from the external system for the first time, PPM Express will now suggest switching from the primary PPM Express Schedule to the Schedule from the connected system. However, if there are no PPM Express tasks on the project, the connected system schedule will be selected automatically (without showing a confirmation message).
When importing Projects from external systems, new Projects will be created with the external system Schedule by default. If the project already exists, the schedule will also be changed to the external system Schedule.
Release Notes 20.3 @June 11, 2024
1. Baseline Variance fields are now available for PPM Express tasks.
Baseline Variance fields were added to the PPM Express tasks. If you open the task and navigate to the Baseline section, the Variance field will show the difference between the Baseline and the Current values. This allows us to quickly review the variance instead of calculating it manually.
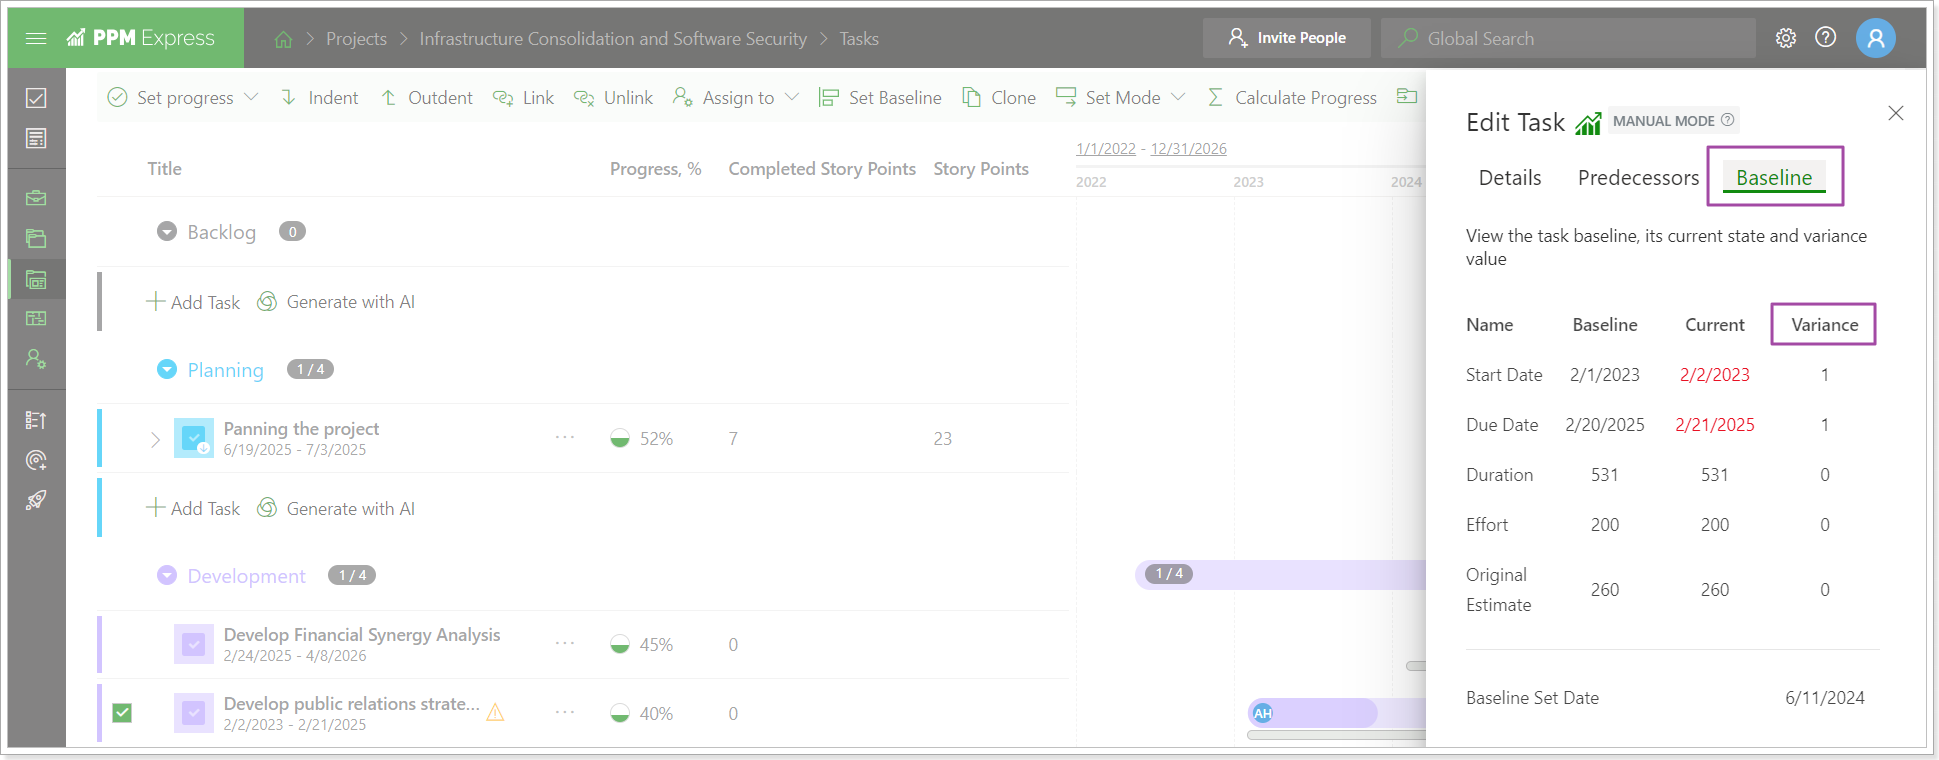
When calculating the variance, PPM Express takes into account the Global Calendar Exceptions.
The fields can be exported/imported to/from CSV file. However, these fields are calculated automatically and if any changes are made manually in the file, they will be ignored when importing.
Variance fields can be added to the view for easy navigation.
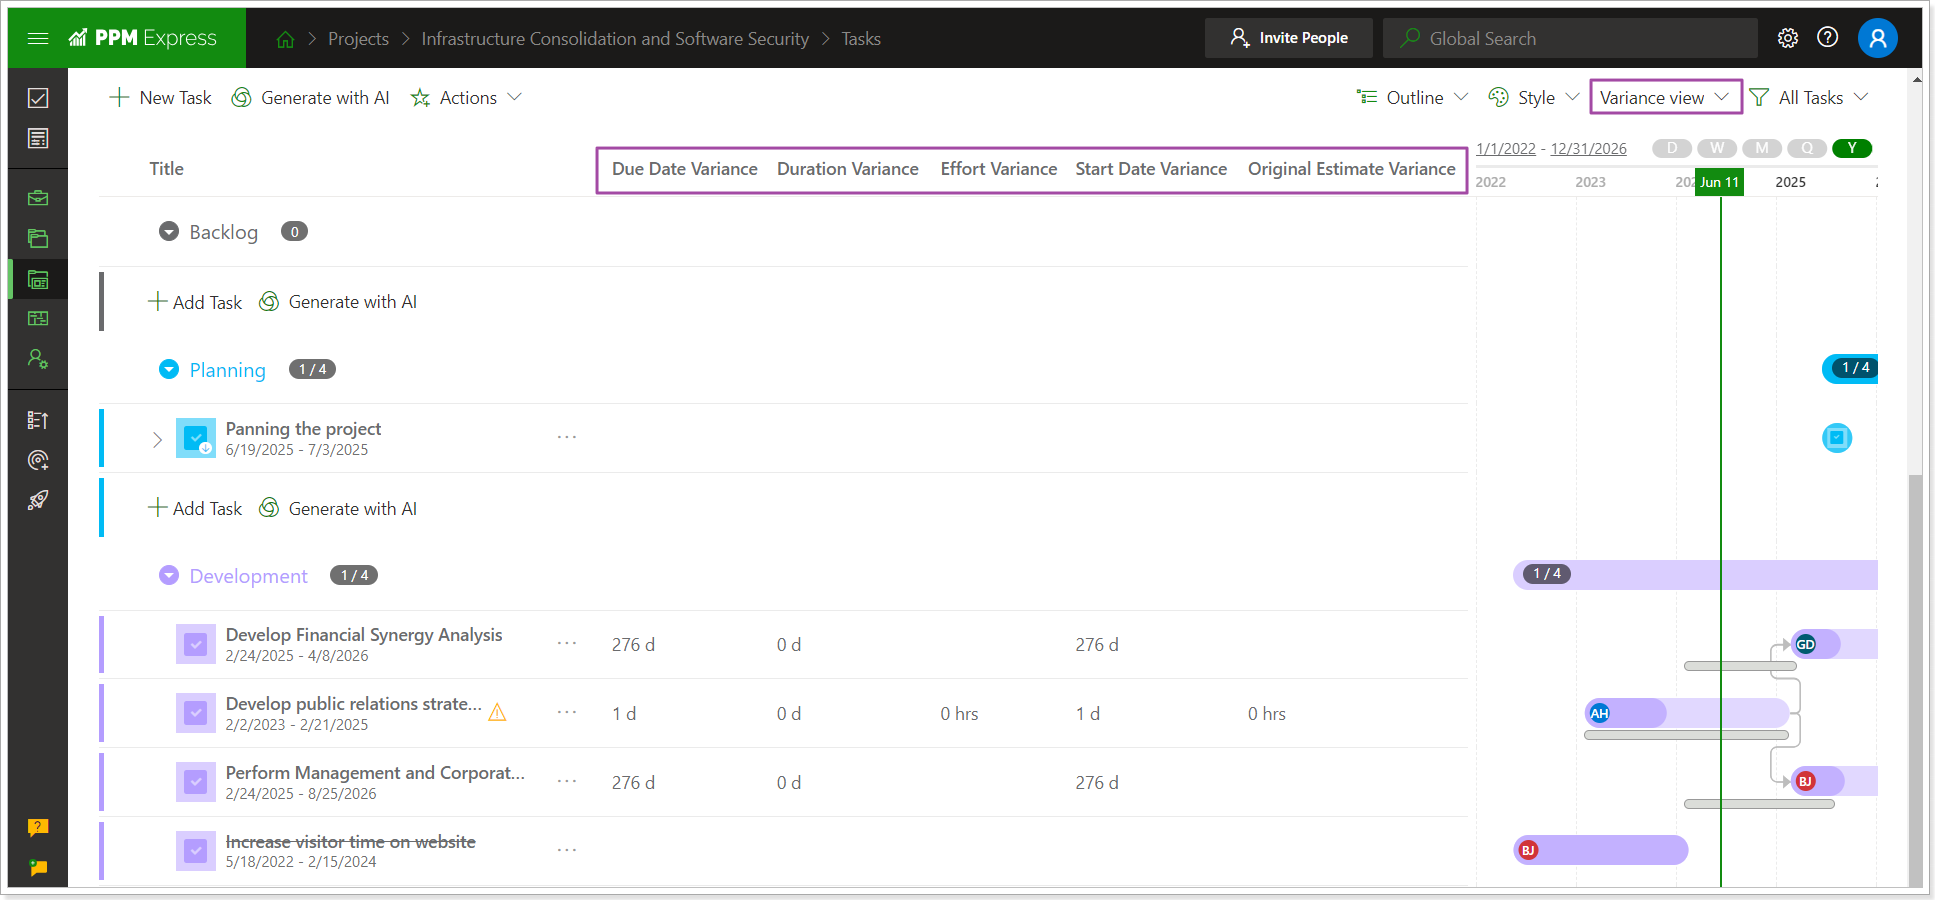
These fields are also added to OData and API.
2. It is now possible to upload a company logo and define the style type of the navigation panel.
The Navigation panel was redesigned to improve user experience. It now includes the ability to add a custom logo and select the panel's style.
- An option to expand/collapse the navigation panel was moved to the left top corner.
- The Invite People button changed its color.
- The Global Search option was moved to the right of the top panel.
- The user name is now hidden from the top panel, it is available by clicking on the user icon.
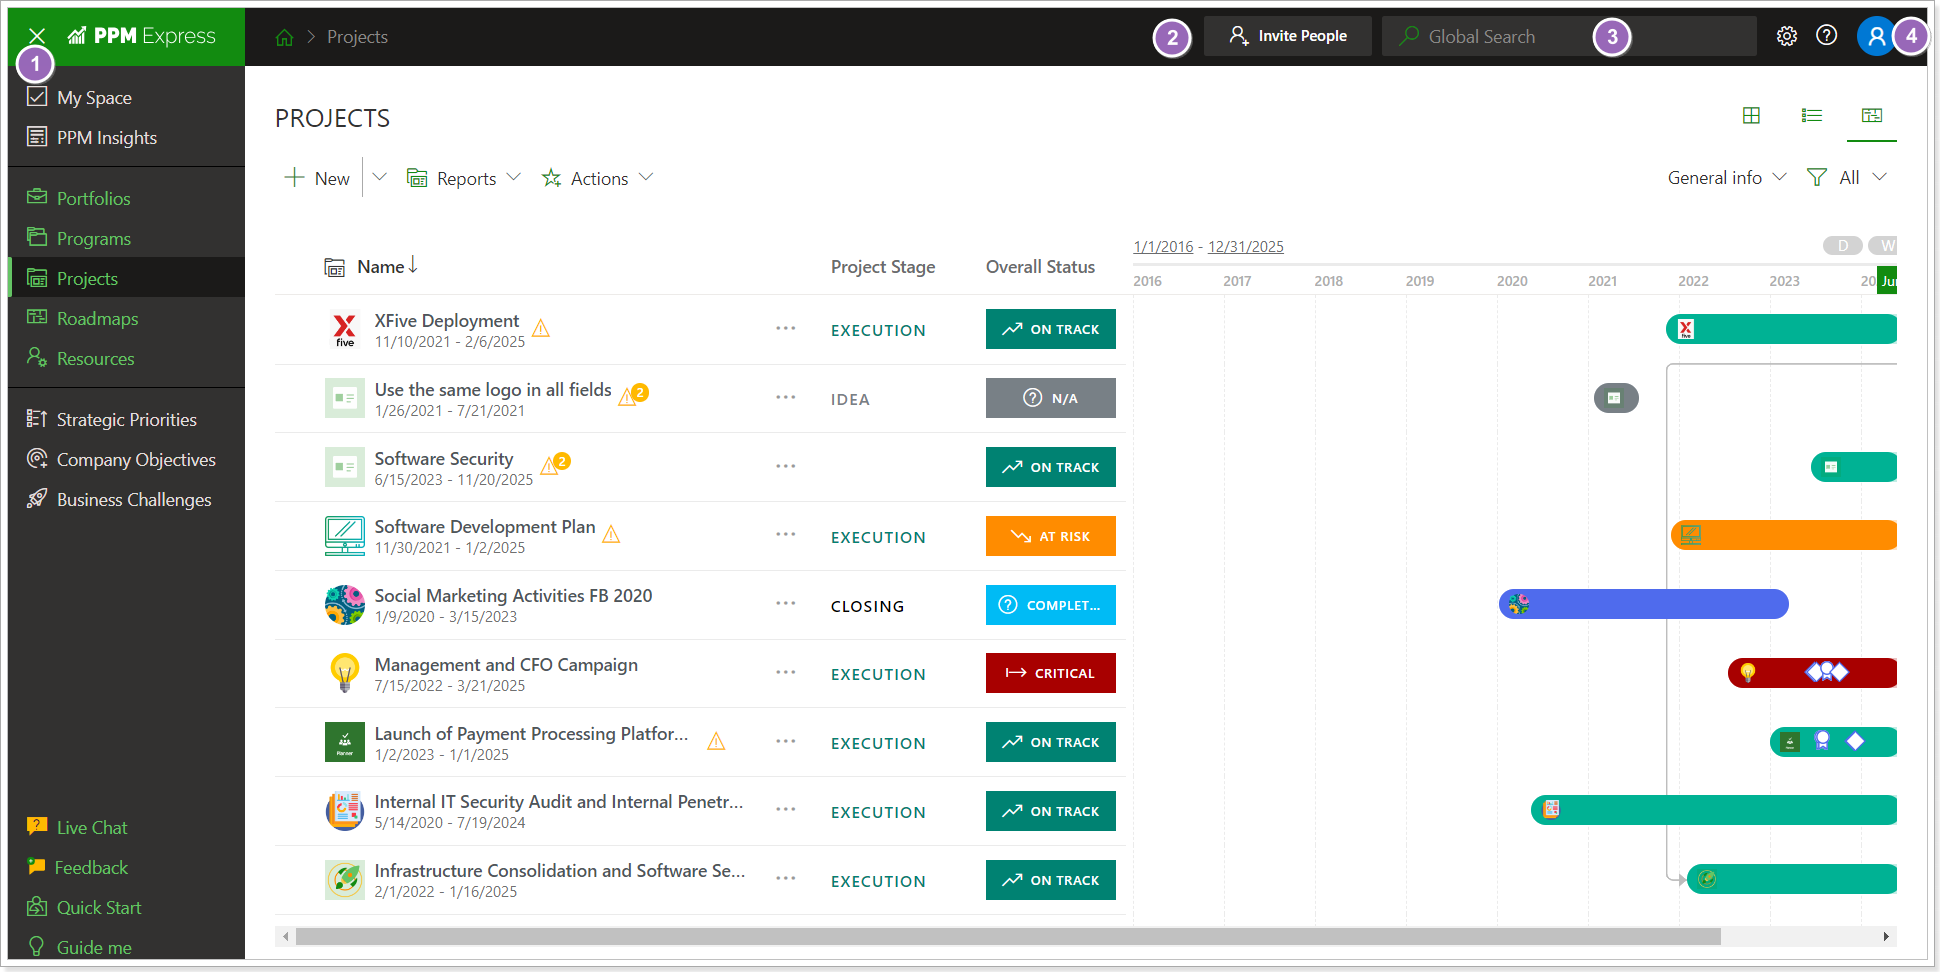
PPM Express Administrators can now change the application logo and the style of the navigation panel on the Tenant Settings page -> Style section. In this case, the custom logo and the selected style will appear for all users of the PPM Express tenant.
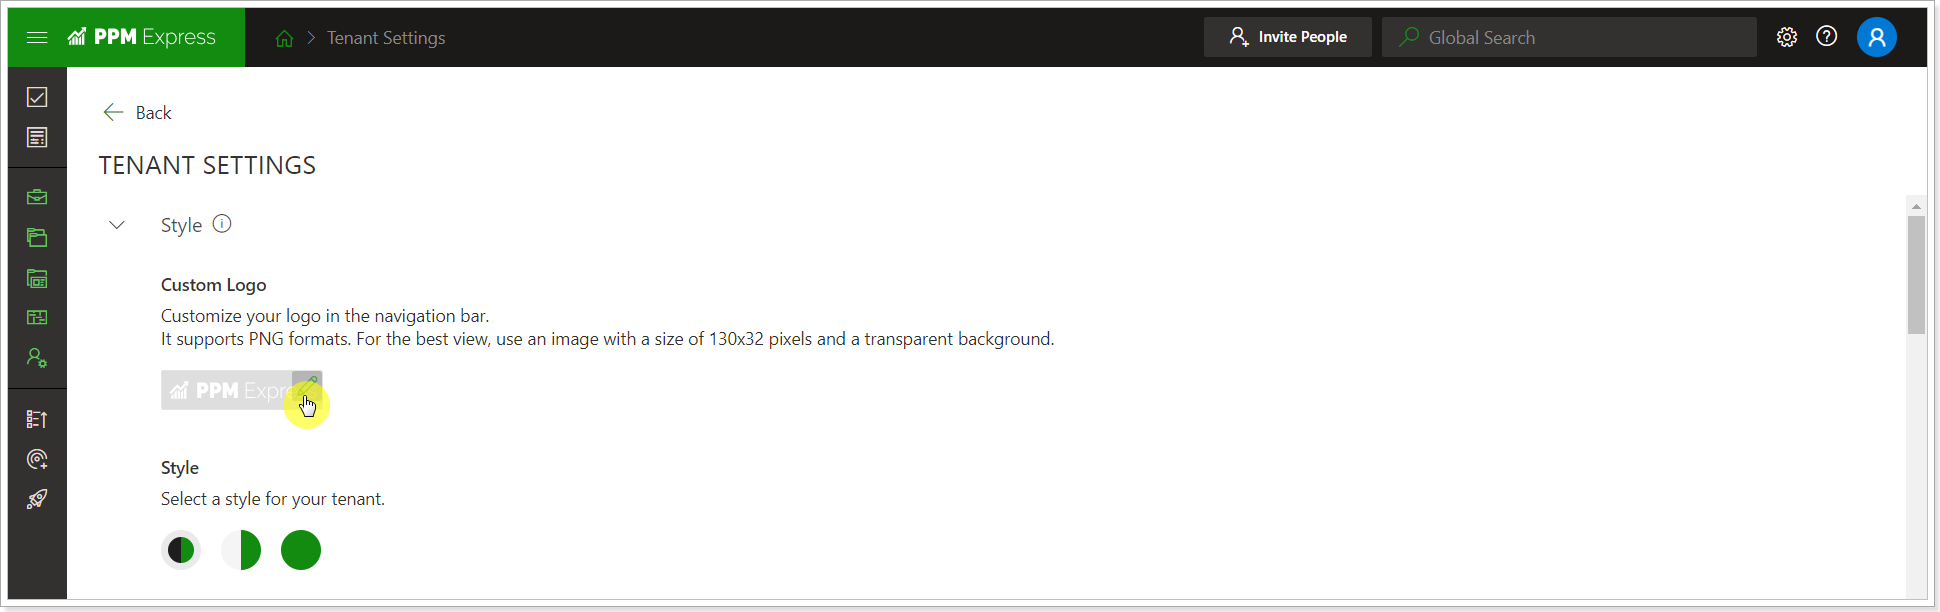
Release Notes 20.1 @May 29, 2024
1. A new section, Deliverables, was added to the Project Dashboard.
This section allows creating and managing Project Deliverables. It has two views: Table and Timeline.
You can create new Deliverables, Import them from external systems, Import them from the .CSV file, and Export to PNG. Also, configure columns and filtering options are available.
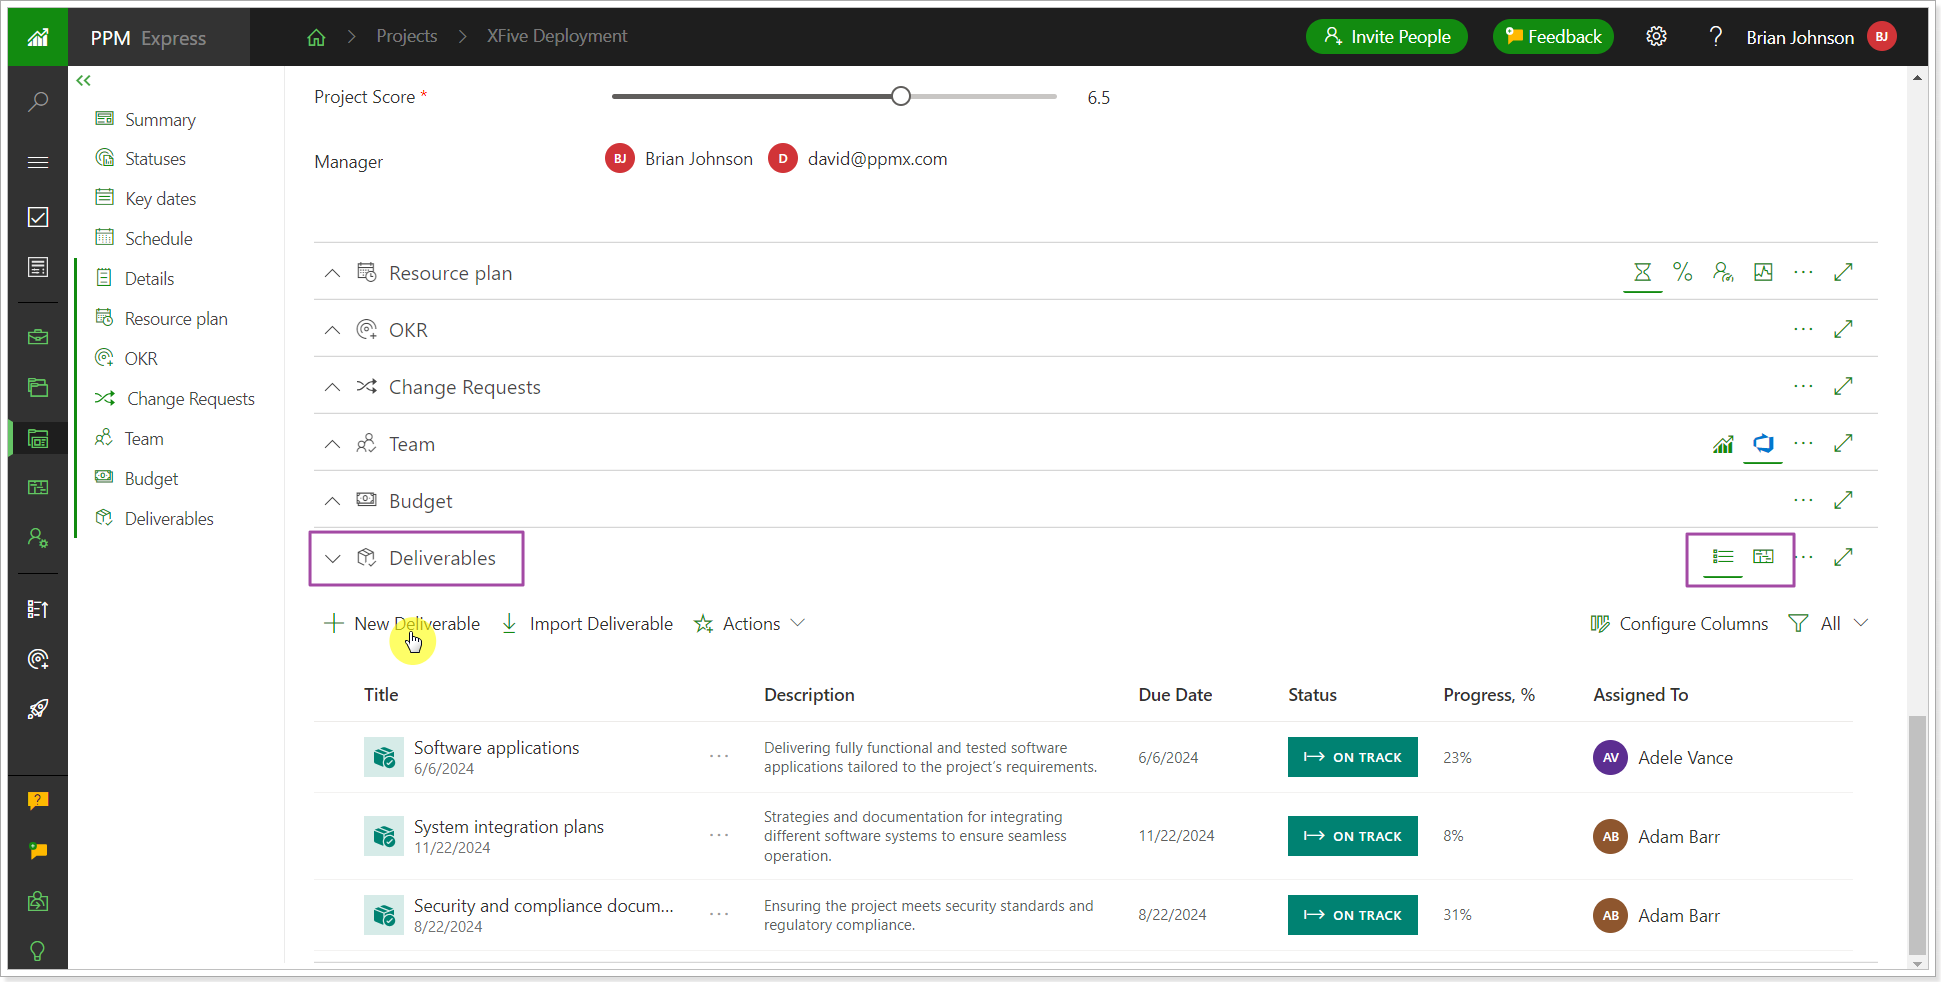
2. The ‘Regional Format’ setting was added to the ‘Global Settings’ section on the Tenant Settings page.
This setting allows you to define the date format to be displayed in the PPM Express user interface and when exported to CSV.
Please note: By default, English (US) format is selected. But for those customers who are not in the US the format was set according to their country with this release. You can always check and/or change it on the Tenant Settings page.
To change the date format, open the Tenant Settings page -> Global Settings -> Regional format. You can check how dates will appear on PPM Express pages in the Example below this setting.
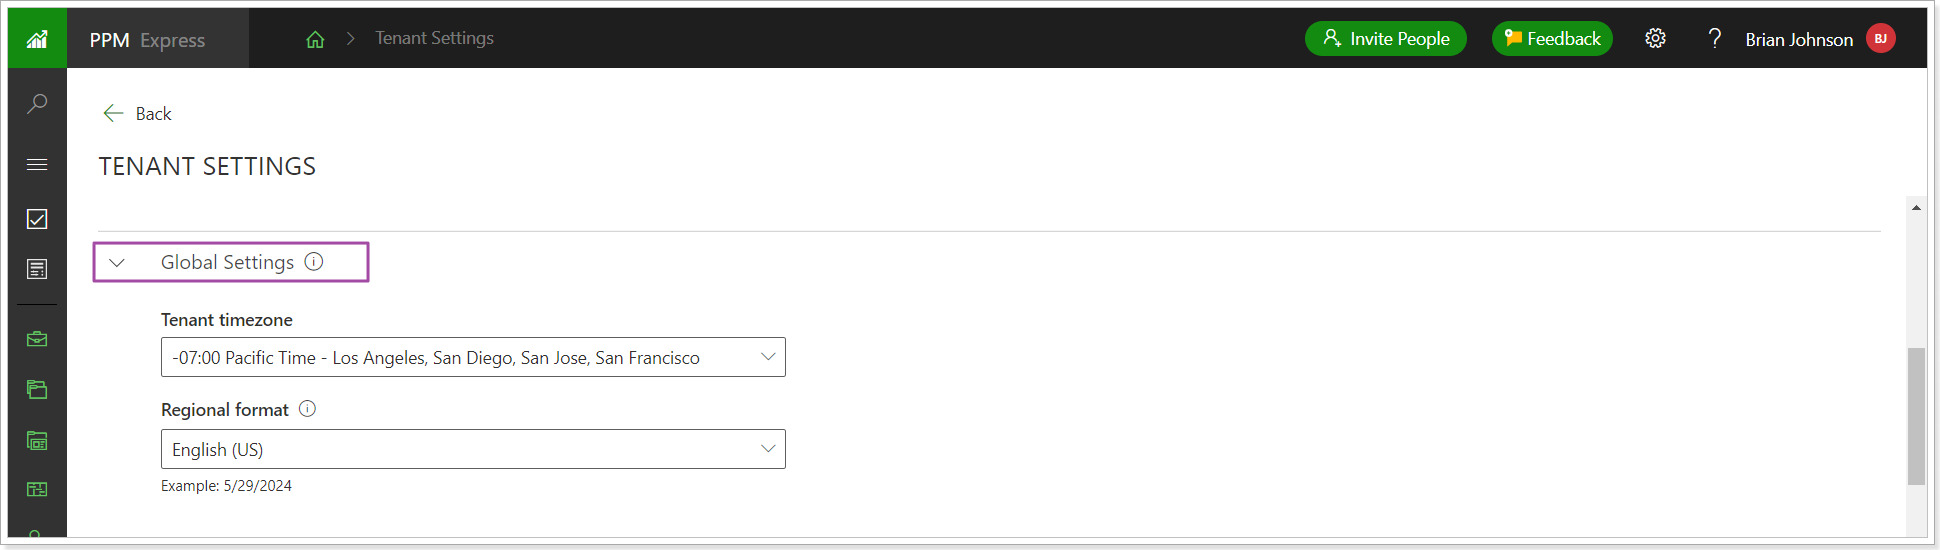
Also, with this release, it is now possible to type the Days of Week names when importing the Calendar Exceptions using the language according to the Regional Format setting (the use of the regional language is available for the .csv files only).
Release Notes 20.0 @May 23, 2024
1. Work via API was added to the Resource Plan section for Projects, Programs, and Portfolios.
To start working with the Resource Plan, you need to open Swagger and select the Resource Planning level in the Entity type.
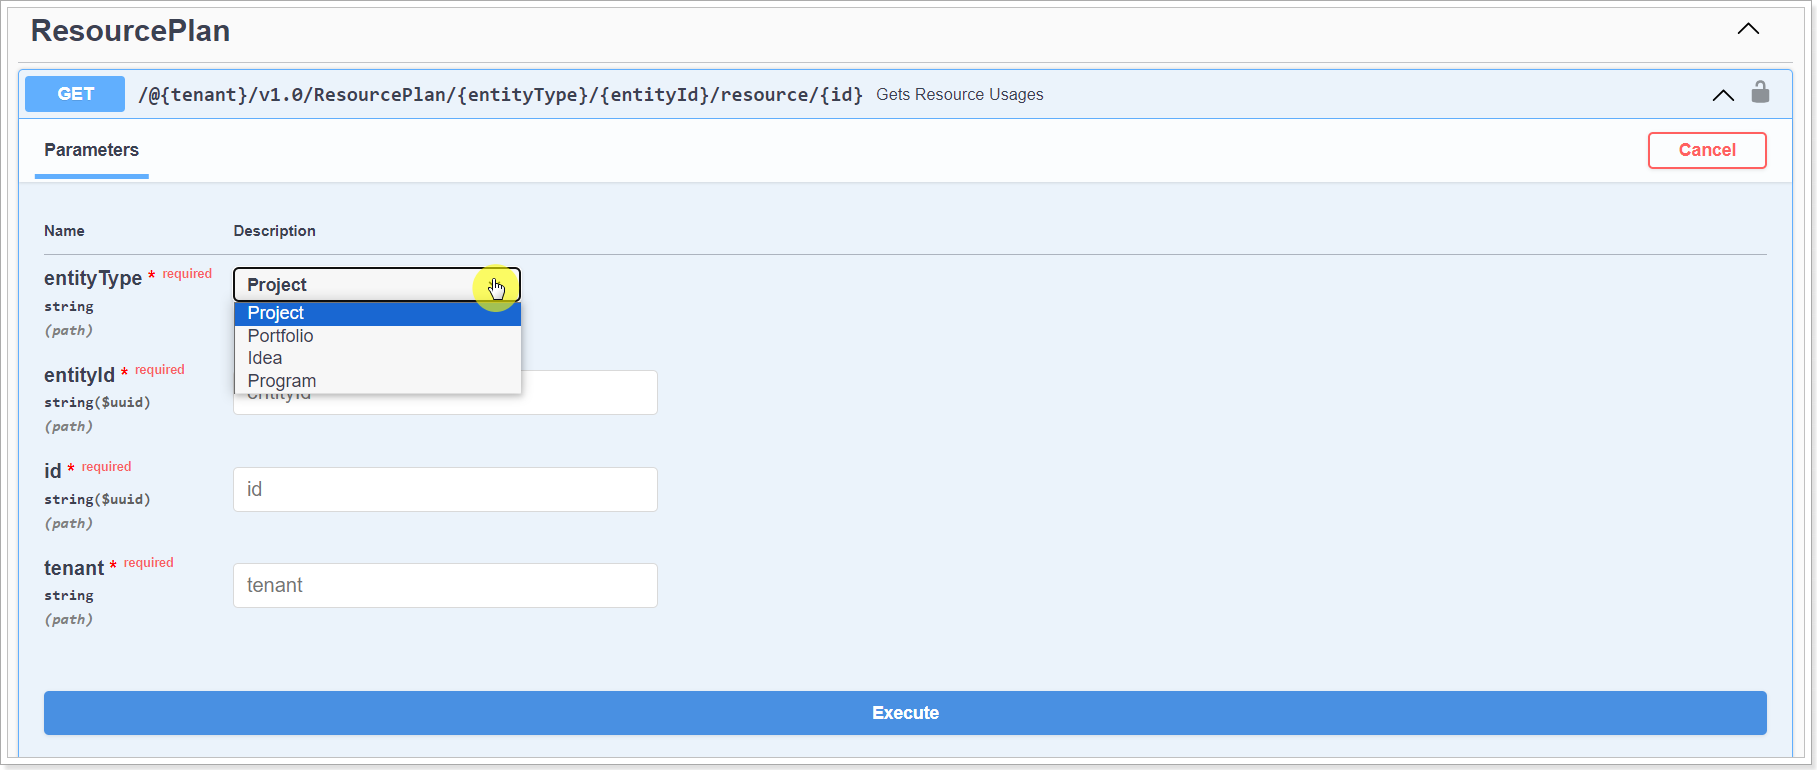
Please note: The entity you choose depends on the Resource Planning level selected on the Tenant Settings page for your PPM Express tenant (Program, Portfolio, or Project level). For example, if the Project level is selected on the tenant level, it should also be selected as the entity type.
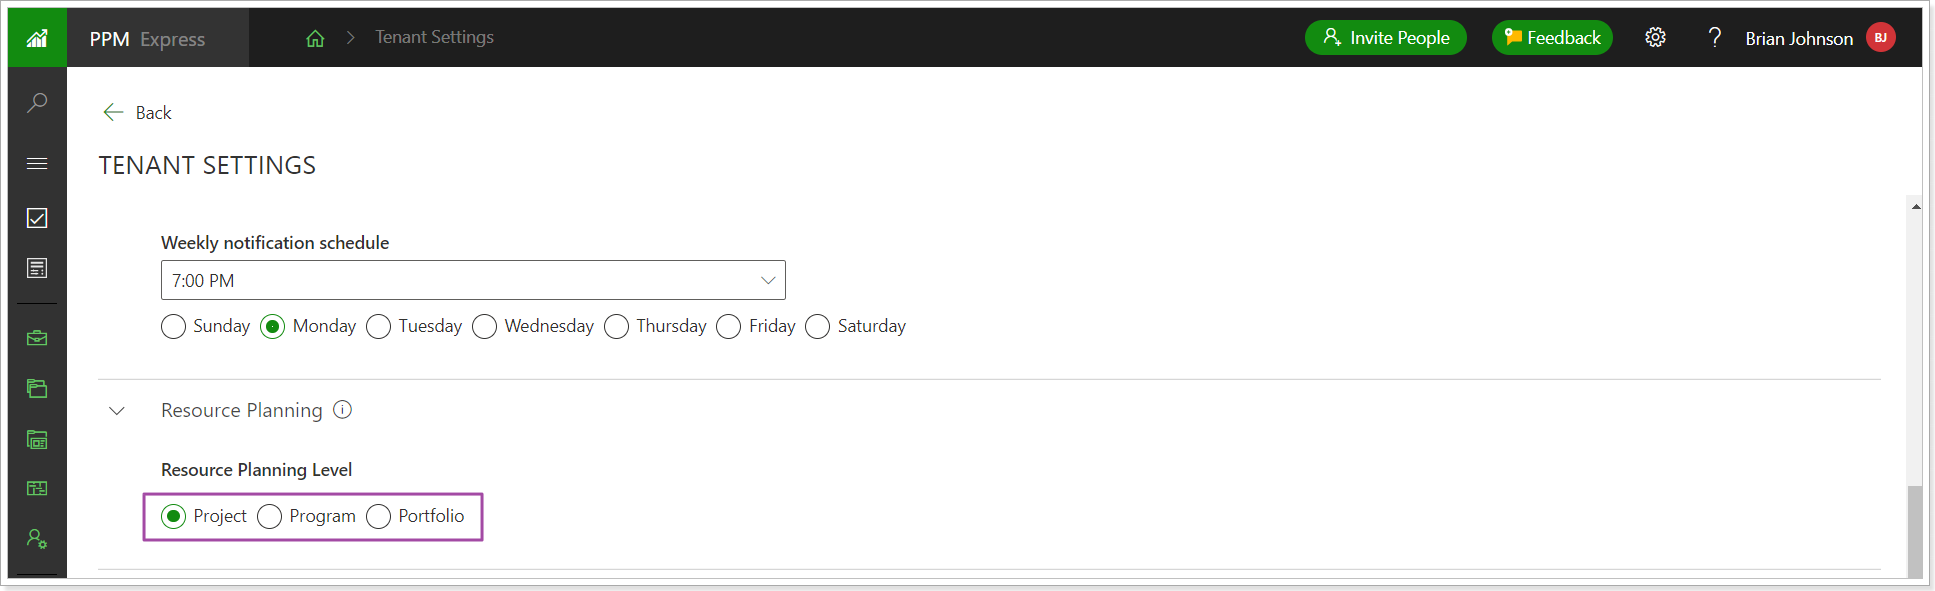
Release Notes 19.6 @May 7, 2024
1. Work via API was added to Programs and Portfolios.
2. A new setting, ‘Project Progress Calculation,’ was added to Tenant Settings.
It enables the definition of the default Progress Calculation rule that will be pre-selected in the Project Settings in the % Progress Calculation for PPM Express Tasks section when creating a new project.
When a new project is created, a formula based on Completed Work and Effort is used by default. The PPM Express Administrator can change the default calculation type for the whole tenant (it will be applied when creating new projects). When the project is created, Project managers can switch the Progress % formula for their project to a different one as needed.
For all existing projects, this setting does not change the calculation rule selected by the Project manager.
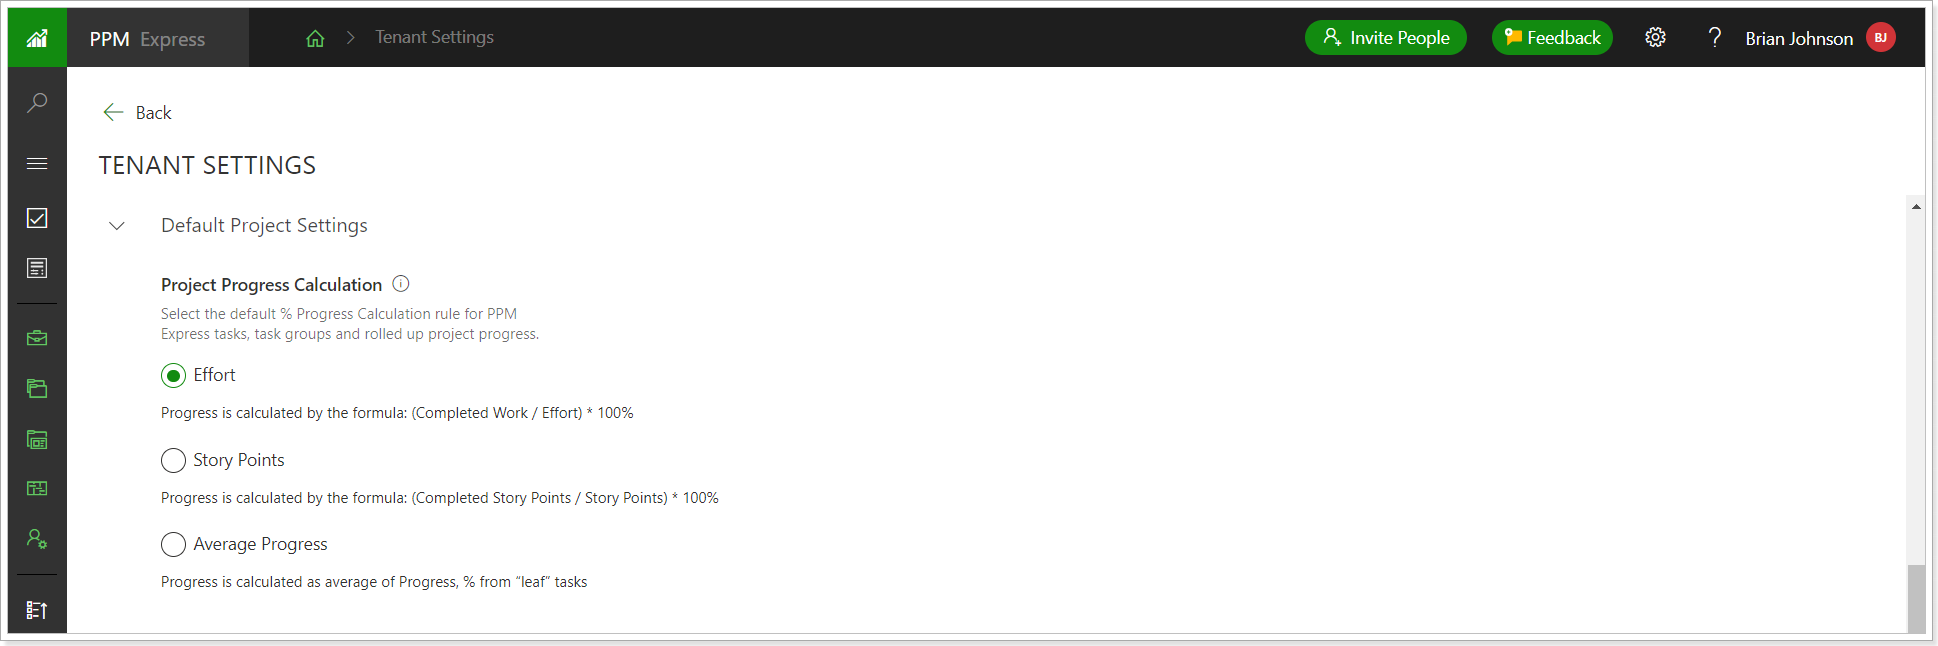
Release Notes 19.5 @April 25, 2024
1. The Schedule (Tasks) project section was redesigned for Jira to become more flexible.
The Schedule (Tasks) project section for Jira connection has a new view to display the information for all needed work items clearly and granularly.
The Schedule (Tasks) section includes the following information cards: Backlog Overview, Current Iteration Backlog, Current Iteration Progress, and Iterations.
These cards are configurable. To start editing the cards, click on the ellipsis button => Configure.
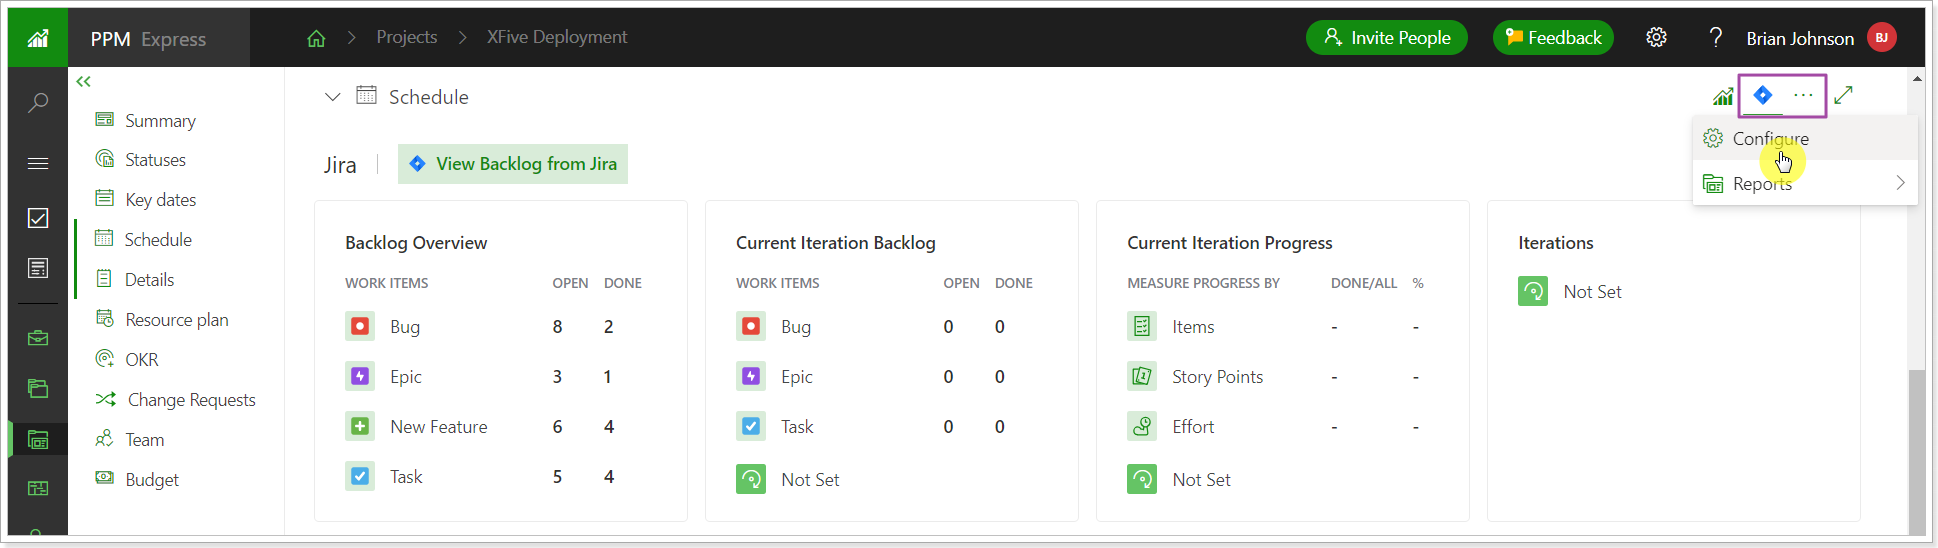
By opening the Configure View menu, users can edit the list of the information cards displayed in the Schedule (Tasks) section.
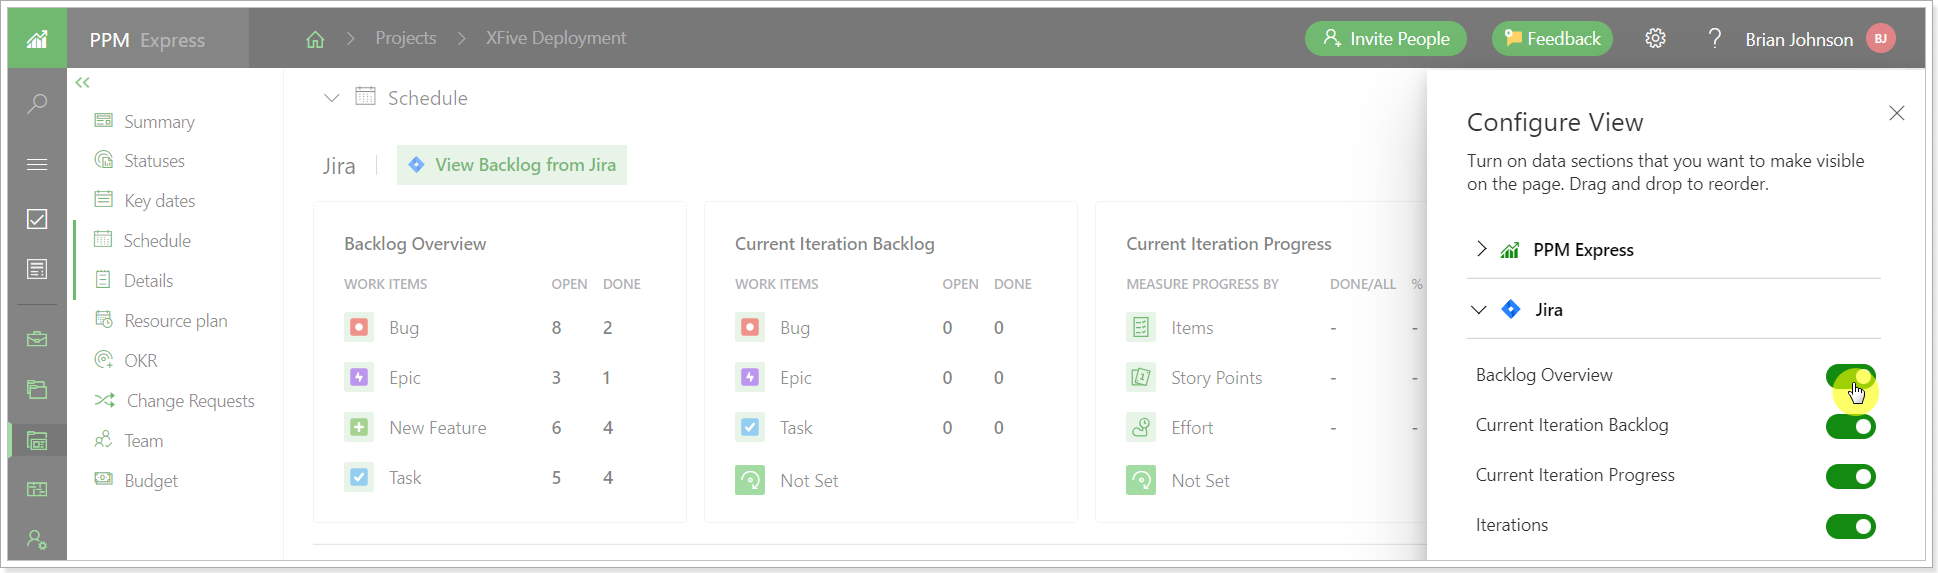
Also, the list of items included in the Backlog Overview and Current Iteration Backlog cards can be edited by clicking on the gear button next to the card name.
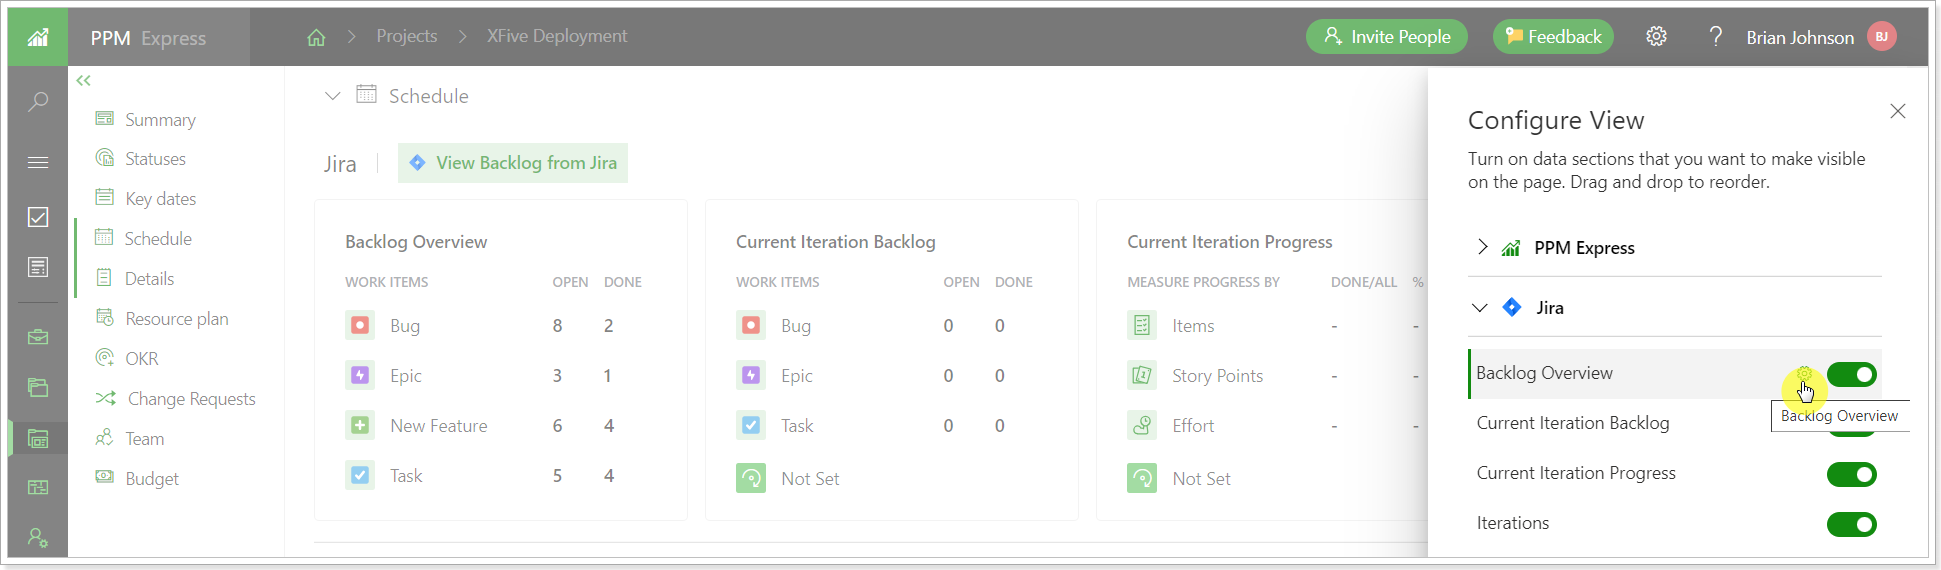
The selected items appear on the information card immediately.
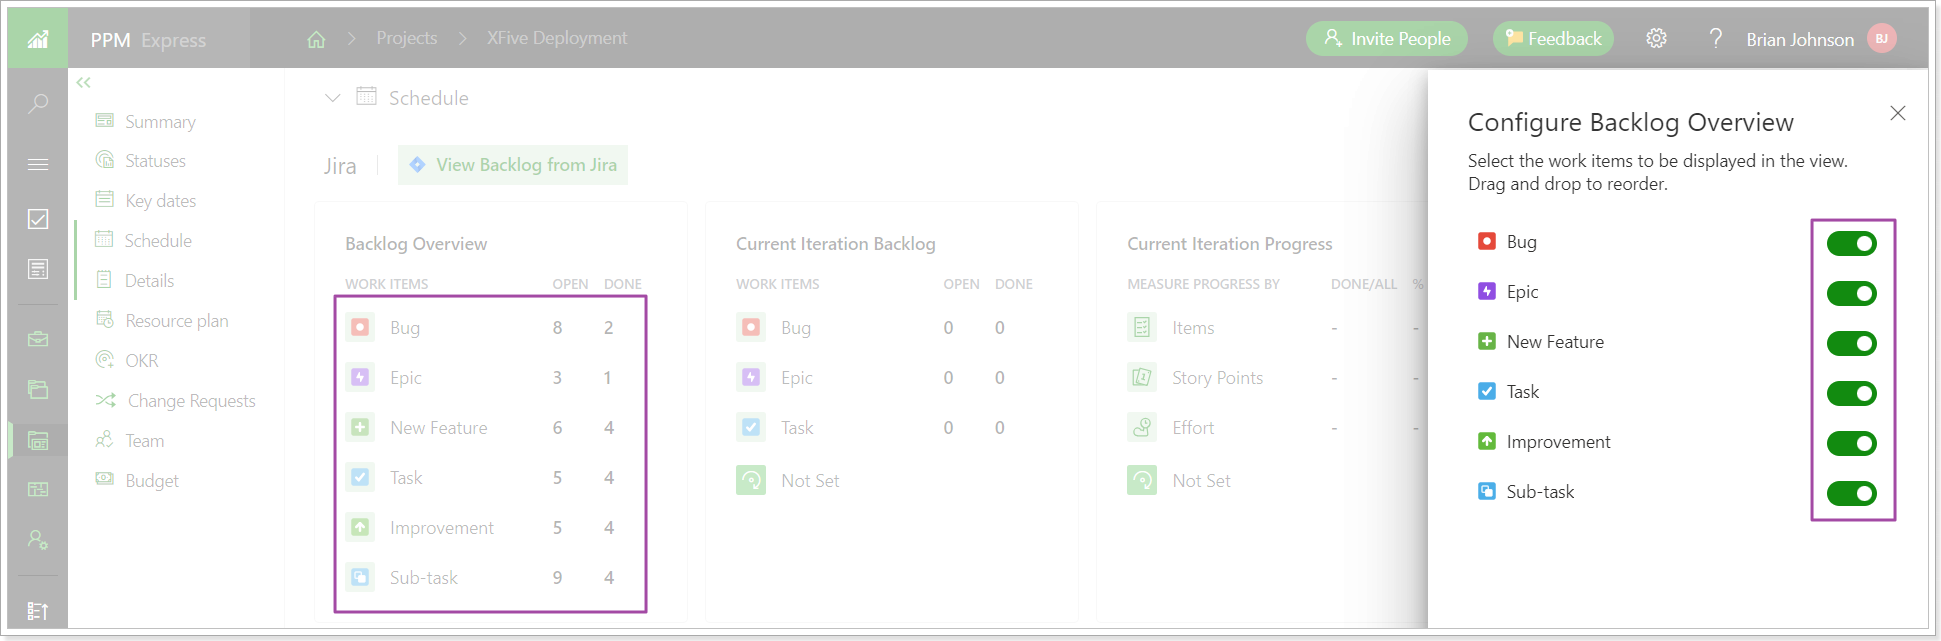
By creating multiple views and including a different set of items on the information cards for each view, it is possible to limit access for certain users to the information in the Schedule (Tasks) section.
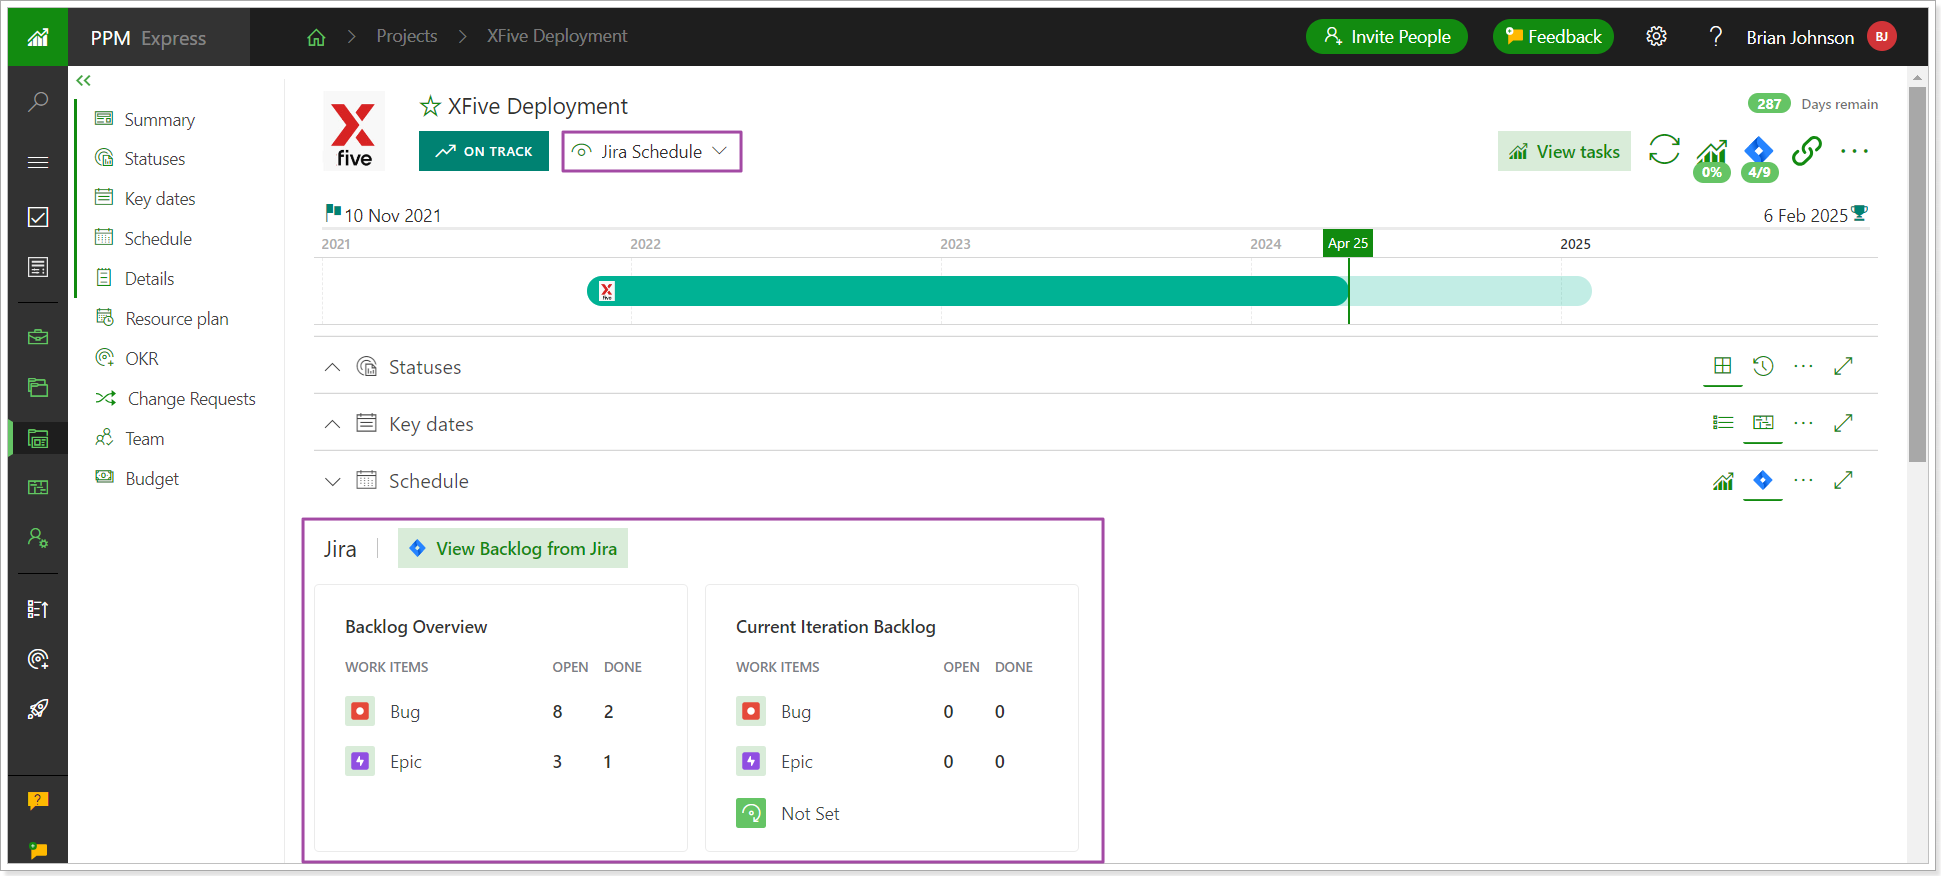
Please note: Only users with Manage Configuration permission and users who have permission to edit the project can configure the view of the Schedule section for Jira.
Clicking on each number next to the items, the Jira tasks page will be opened filtering the information by the selected item and value.
By clicking on the 'View Backlog from Jira', the Jira tasks page is opened.
2. Filters in the Task Management for Tasks with hierarchy were changed to avoid duplicates.
Before: When pre-filters or filters (including custom) were applied for tasks with hierarchy, duplicates occurred as sub-tasks were shown in the hierarchy list and as separate ones according to the filter applied.
Now: When the default filter is applied, the tasks are shown as a list with the arrows next to the parent task, notifying that this task has a hierarchy that can be extended using this button. Also, you can use the Indent/Outdent and Outline/Collapse options to show/hide the sub-tasks.
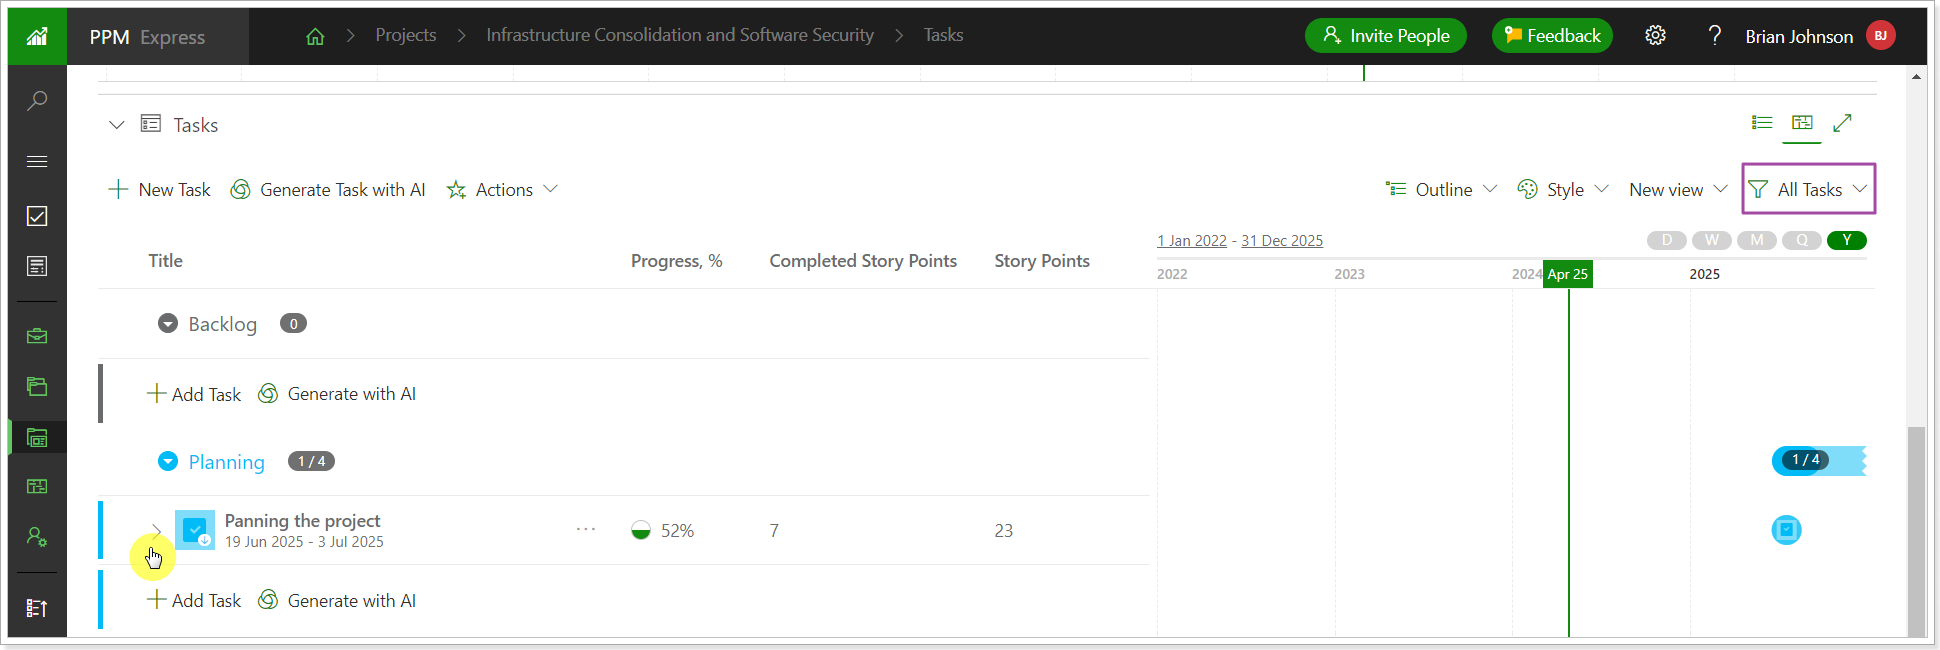
If any other filter or pre-filter is applied, the parent tasks will not show the arrow button to expand the hierarchy at once, this option is hidden and an arrow on the task icon is shown instead to notify that this is a parent task.
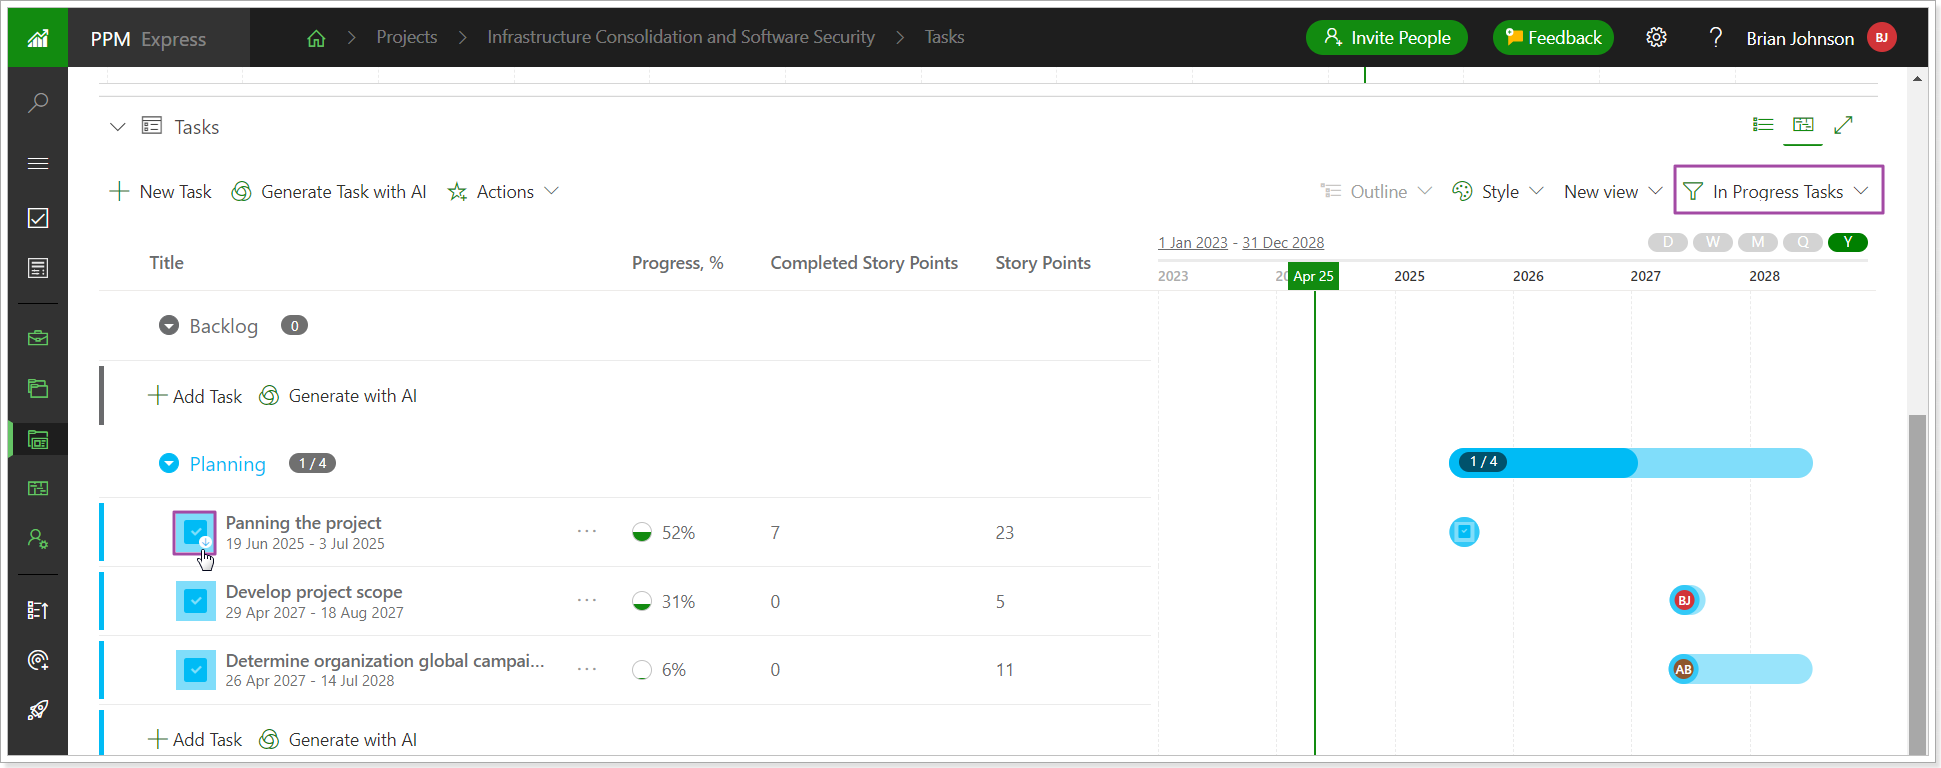
So, the tasks are shown according to the filter applied with no duplicates. If there is a need to expand the parent task, click on the ellipsis button and select the 'Expand Hierarchy' option. To hide the hierarchy, click the ellipsis button and select the 'Collapse Hierarchy' button. The Indent/Outdent and Outline/Collapse options will be greyed out in this case.
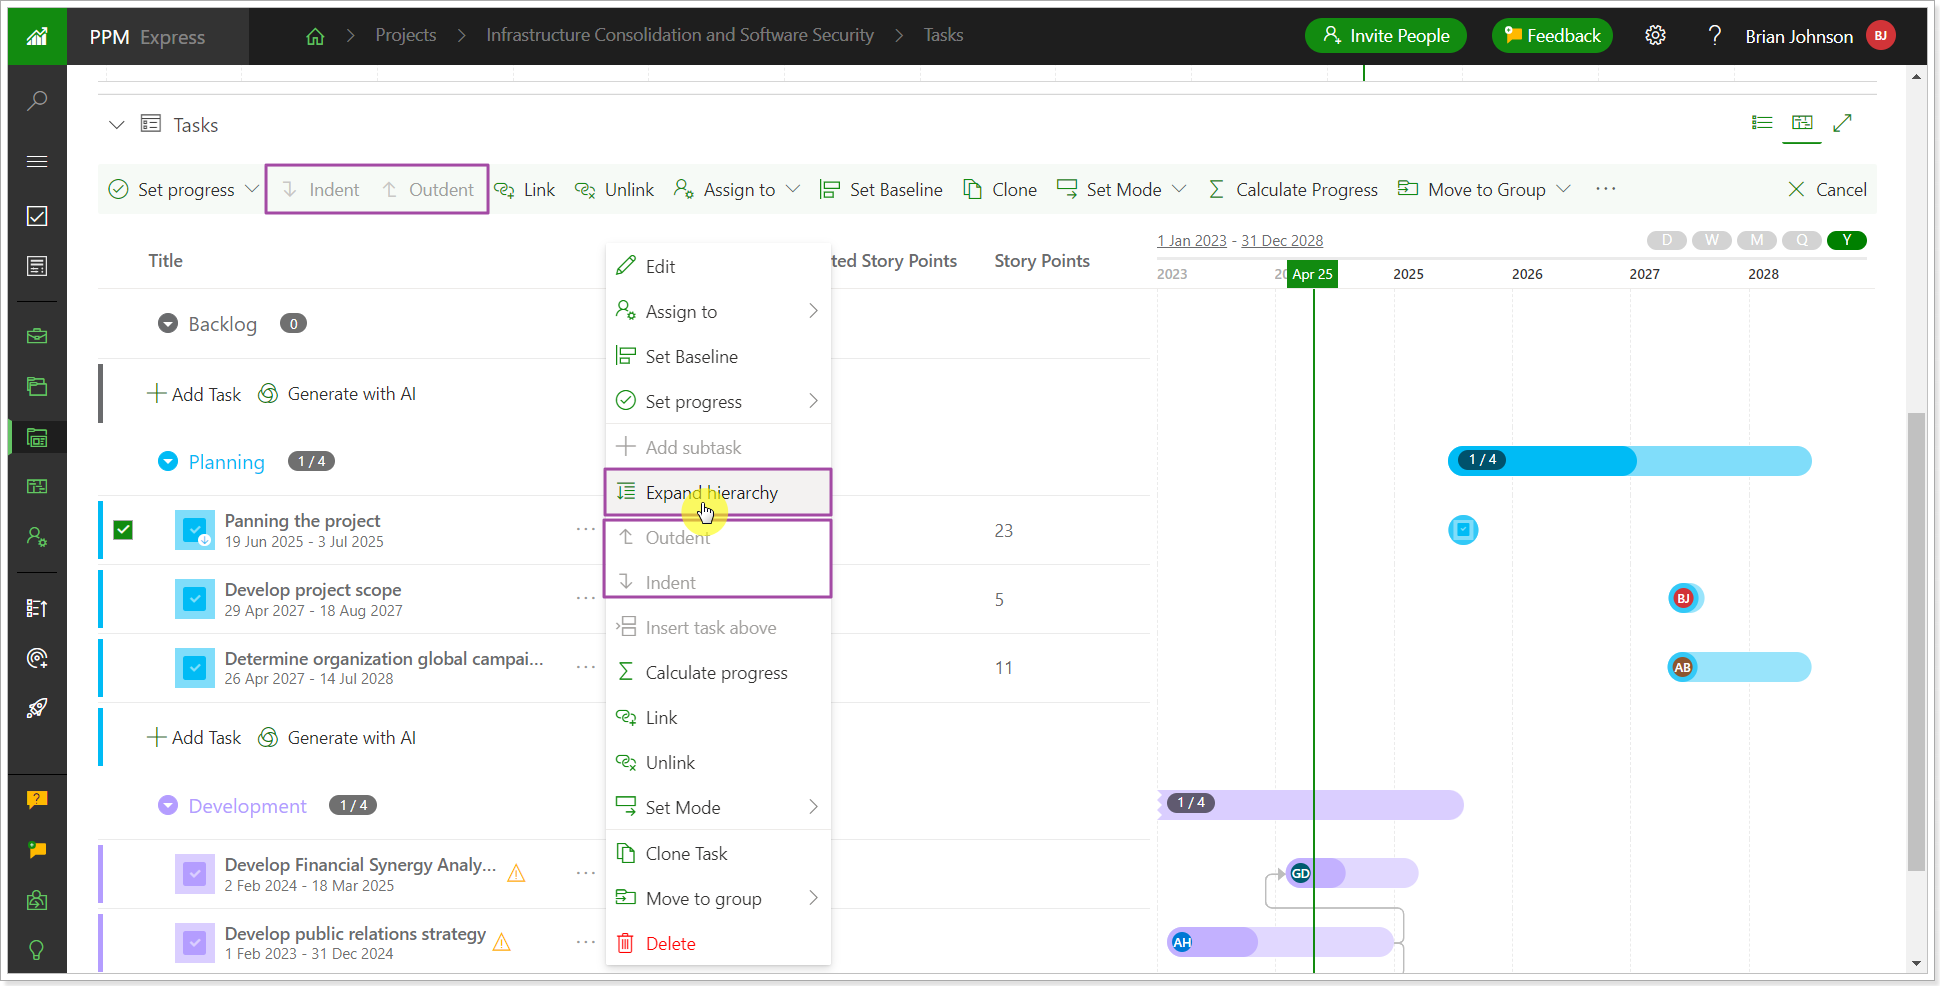
The same rule is applied to all task pages, PPM Express and external systems.
Release Notes 19.4 @April 17, 2024
1. The Calendar settings page was redesigned.
There are four sections on this page now:
- Global Work Week
- Global Calendar Exception
- My Work Week
- My Calendar Exception
This page is now available for all users and team members on the tenant level.
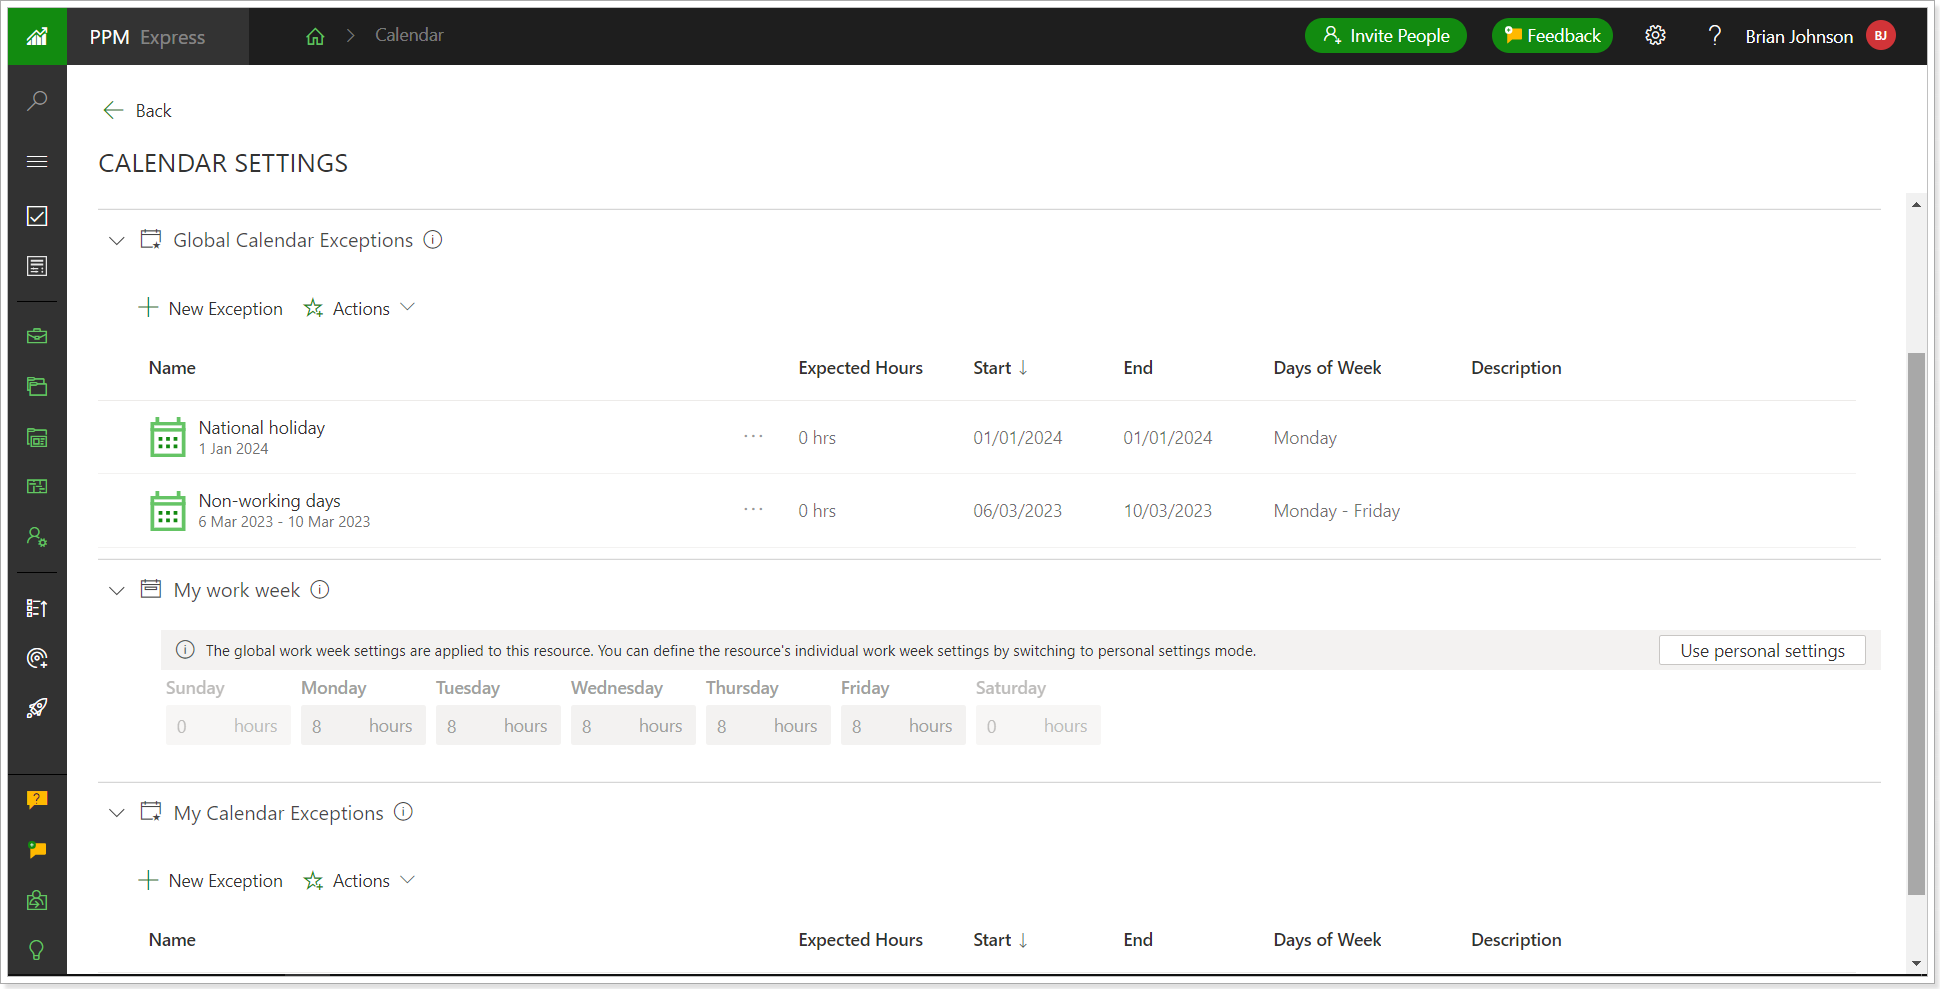
Global Work Week and Global Calendar Exceptions sections are now visible for all users and team members, but can be edited only by the administrators and users with Manage Resources permission. These sections became visible for everyone to see what are the holidays or a standard work week on the organization level. This way, users and team members can plan their own exceptions considering the ones on the tenant level.
My Work Week section displays the work week settings for a specific resource (the one who is viewing the Calendar settings page). Users with the Admin or Manage Resources permission can edit their work week on this page. If the user who is viewing this page does not have Administrator or Manage Resources permission, the section is in read only mode. For them, the user with 'Manage Resources' permission can edit their “My Work Week” setting on the Resource dashboard -> Work Week section.
All changes made on the Resource page/Work Week section will be displayed on the Calendar page -> My Work Week and vice versa. These settings also affect the calculation of the resource capacity.
My Calendar Exceptions section allows users and team members to specify their calendar exceptions (e.g., vacation, sickness leave, etc.). This section can be edited by team members and all users without specific permission.
Release Notes 19.3 @April 15, 2024
1. A new section, 'Invoices,' was added to the Project Dashboard.

2. MS Planner Connection: An option to add a new Planner Plan to the existing group was added.
You can add a new plan to the existing Group. Select a needed group from the Group field; the drop-down will list all Office 365 groups available via the selected connection. A new group will be created if the group is not selected during the new plan creation.
Check the “Connect to plan group” checkbox to create an Office 365 connection and link the plan group to your project.
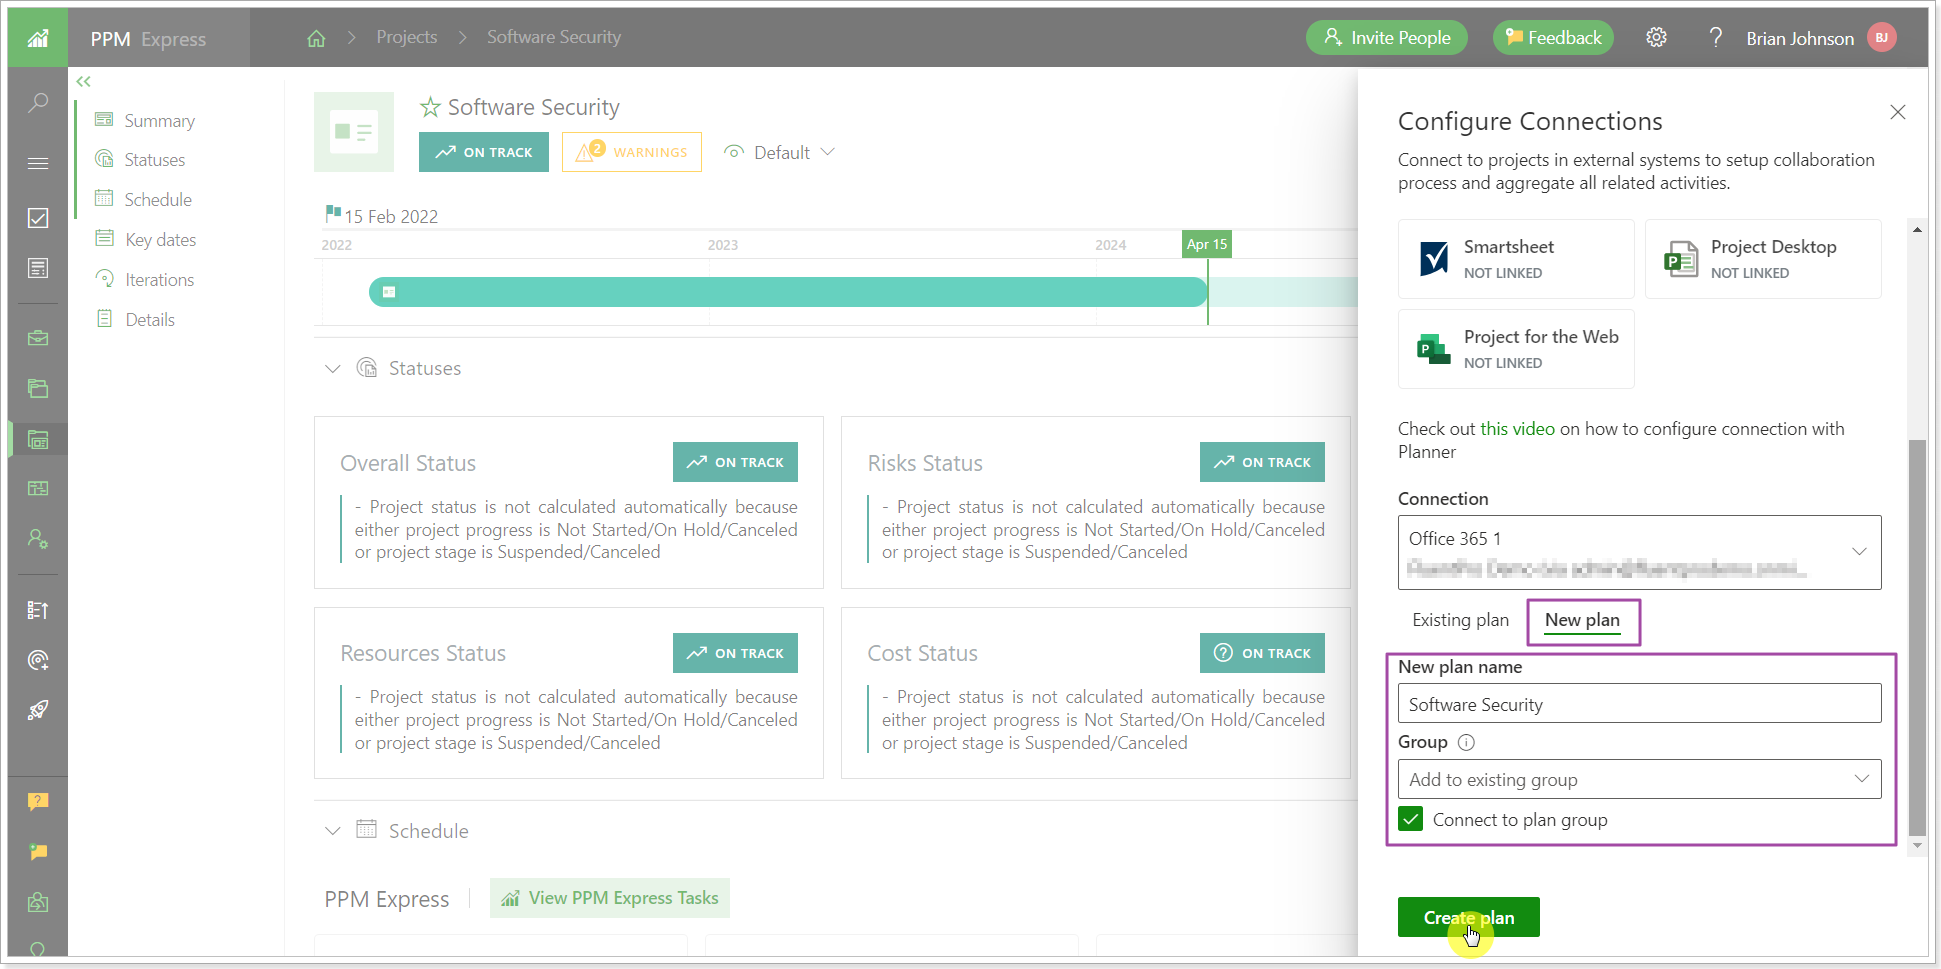
Please note: New Plan creation is not supported for the Restricted connection. The fields are in View mode for the restricted connection.
3. When a project is imported from Project Desktop to PPM Express via the MPP (Project) Publisher add-on, the baseline fields from Project Desktop can now be imported to PPM Express baseline fields or custom fields.
These fields are not displayed by default on the mapping step, but you can add them.
Baseline fields mapping is supported for both scenarios:
- Import MPP tasks to PPM Express tasks (baseline fields from Project Desktop can be mapped to the default baseline and/or custom fields from PPM Express).
- Publish MPP tasks as a linked project in PPM Express (baseline fields from Project Desktop can be mapped to custom fields from PPM Express).
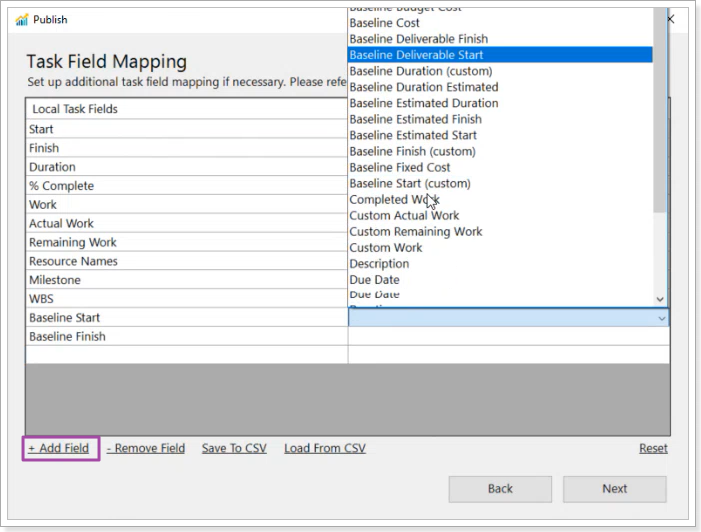
For more details, please refer to the Custom fields mapping article.
4. 'Notes' from Project Desktop can now be mapped with any PPM Express text multiline field via the MPP (Project) Publisher addon.
Release Notes 19.2 @April 9, 2024
1. The look and feel of actions for all entities and sub-entities was changed.
Before: All actions, active and inactive, were visible on the PPM Express pages for the entities even if no items were selected.
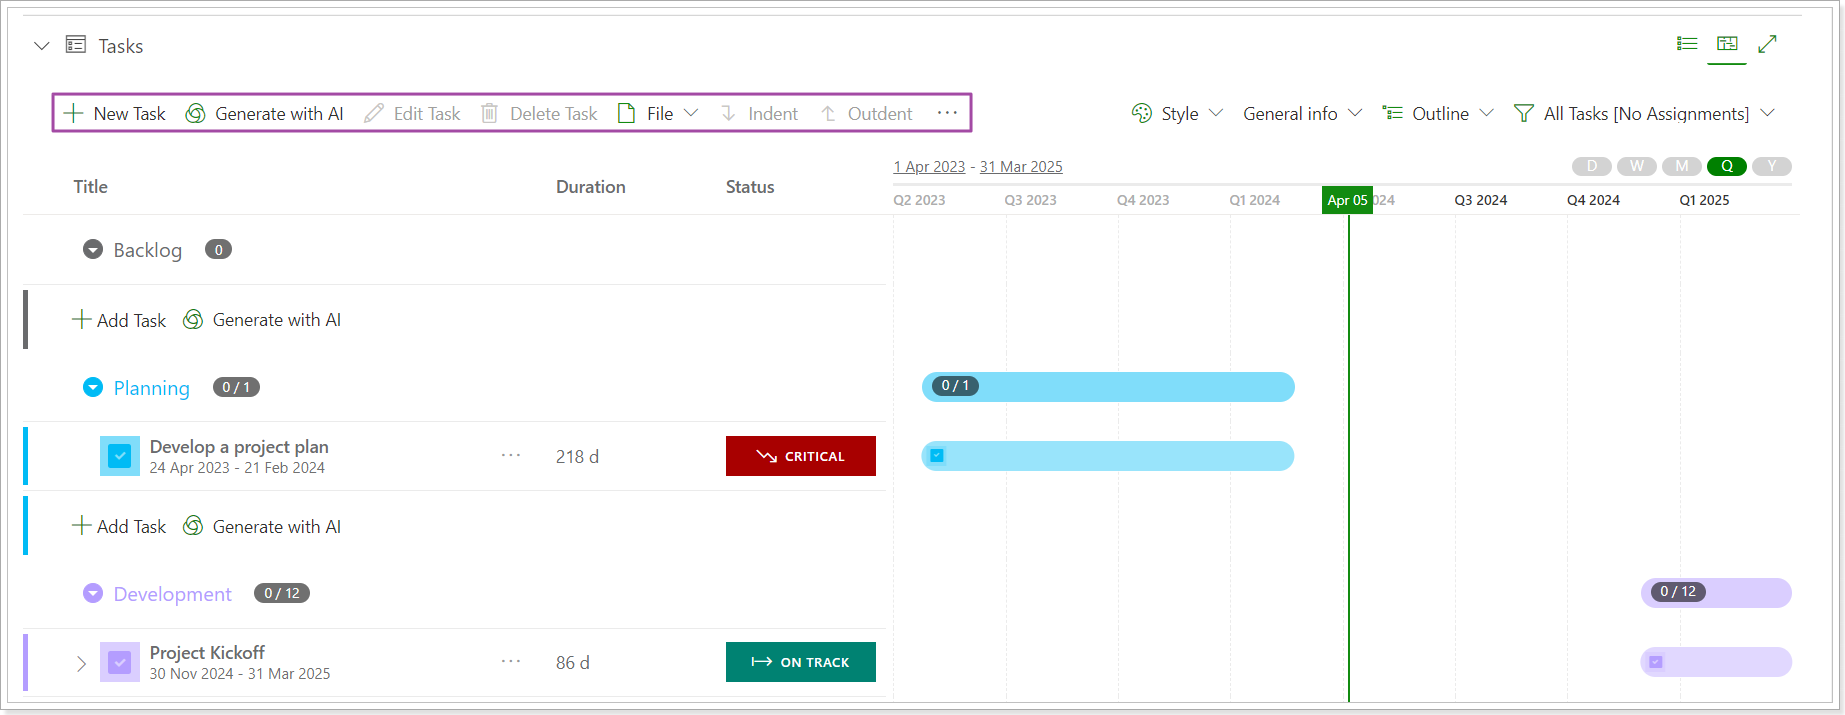
Now: We want to create more space in the pane allowing users to focus on the main actions that are relevant now.
The UI will become more user-friendly, showing the actions a user can take for a single item (under the ellipsis button menu) and for multiple items. If no items are selected, only active actions will be shown.
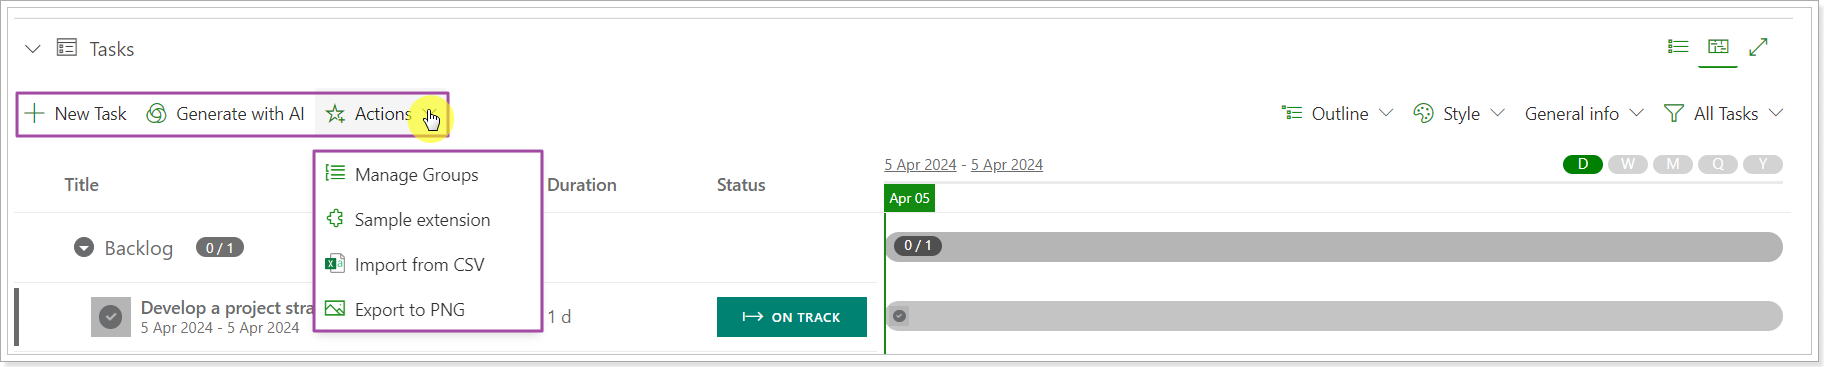 If at least one item is selected, all actions that can be taken for the selected item become available.

Also, the active actions are available under the ellipsis button for each item separately.
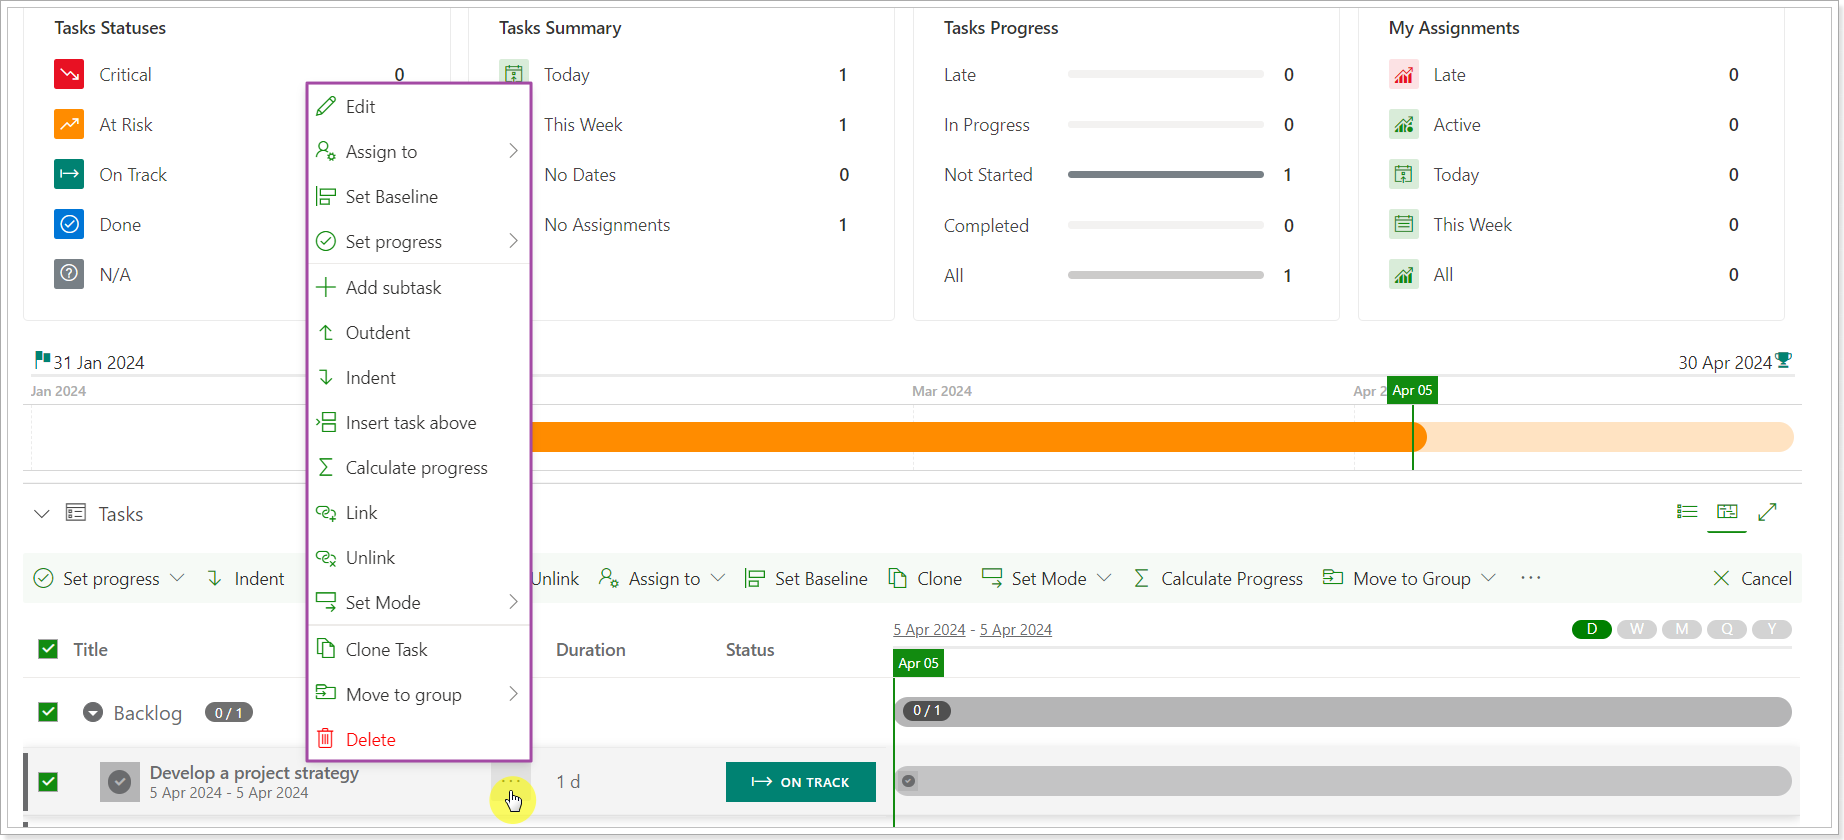
These changes will be applied to All List and Timeline views, Card views, all sections inside Projects, Portfolios, Roadmaps, Tasks, etc.
Also, the View button will be moved to the right and will now be located next to the Filters on main pages, such as Projects, Programs, Portfolios, etc. In addition, the Actions panel will be moved under the section name, and the File option will be available under the Actions drop-down.
Before: The view button was on the left, the actions panel was under the section name, and the File menu was a separate action.
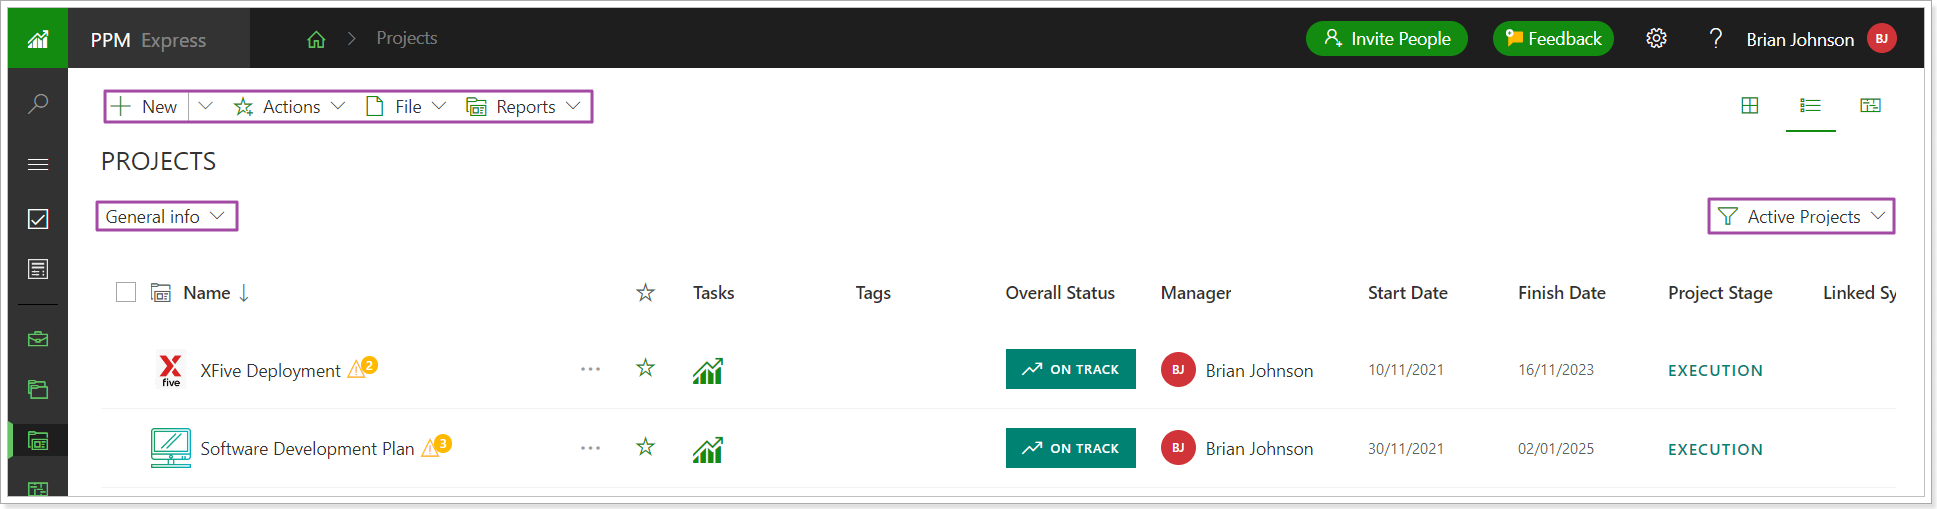
Now: The View button will be moved to the right, the Actions panel will be moved under the section name, and the File option will be available under the Actions drop-down.
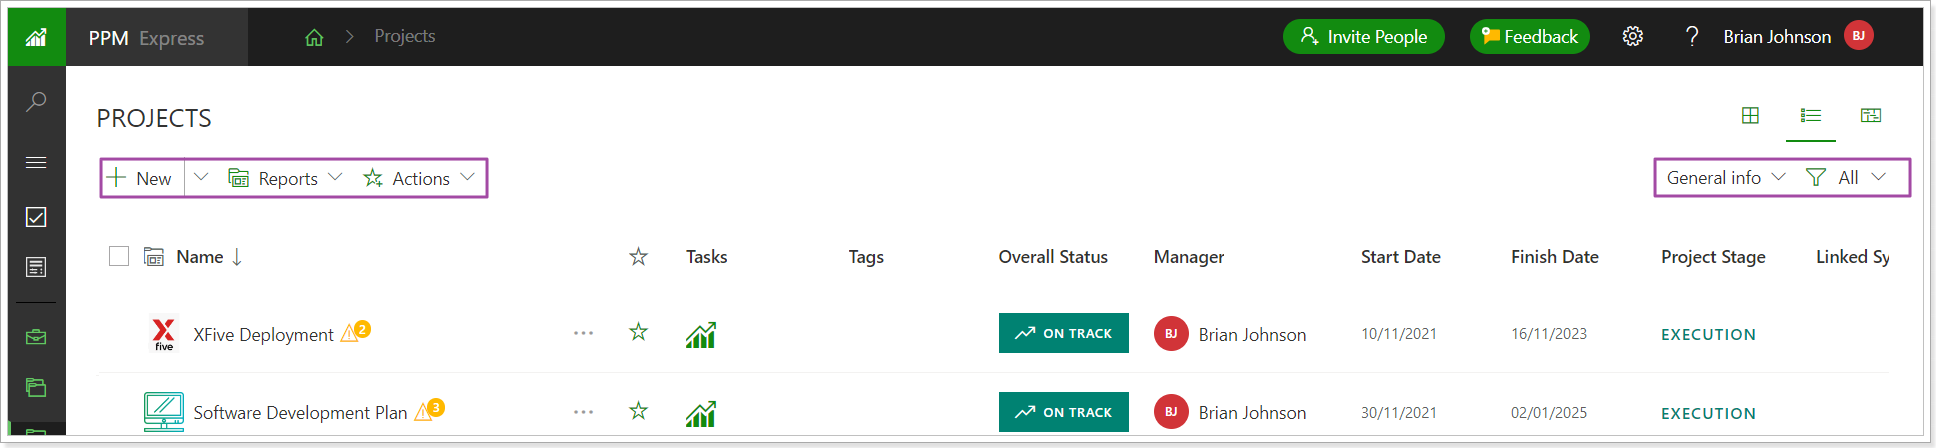
Release Notes 19.1 @April 3, 2024
1. The 'Add restricted connection' option was added to Jira connection.
If you don't want to use an Admin account for Jira connection, it is now possible to select the 'Add a new restricted connection' option when adding it to PPM Express.
In this case, users who are not members of the Admin group can add Jira connection to PPM Express. A restricted connection differs from the original one in the following way:
- cross-project linking is not supported;
- the settings for Field Mapping will need to be configured for each project individually by the project manager, as the issue type scheme for each Jira Project cannot be determined, and the configuration cannot be saved and shared in PPM Express for projects synchronized using this connection type.
The connection is added in the same way as a regular one.
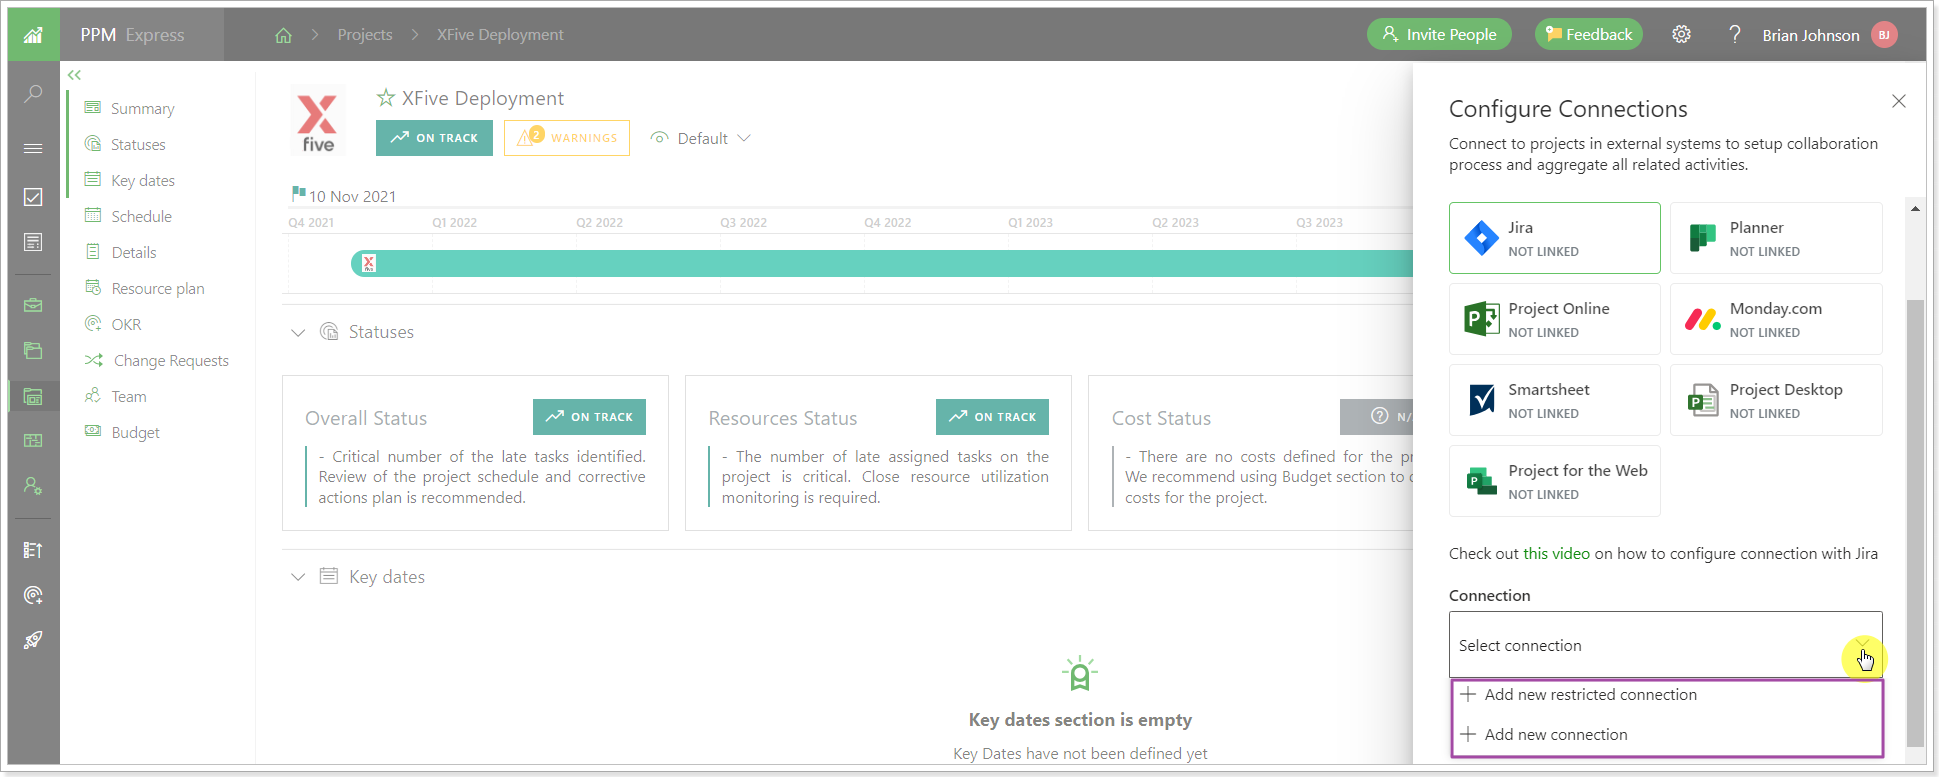
Release Notes 19.0 @March 27, 2024
1. The Tenant Settings page now allows users to restrict sign-up and log-in options based on a specific authentication provider.
Using the Permitted Authentication Providers option, the PPM Express Administrator can allow/restrict the authentication providers for the tenant. Only the authentication providers turned on for the organization will appear on the 'Log in to PPM Express' page for the tenant.
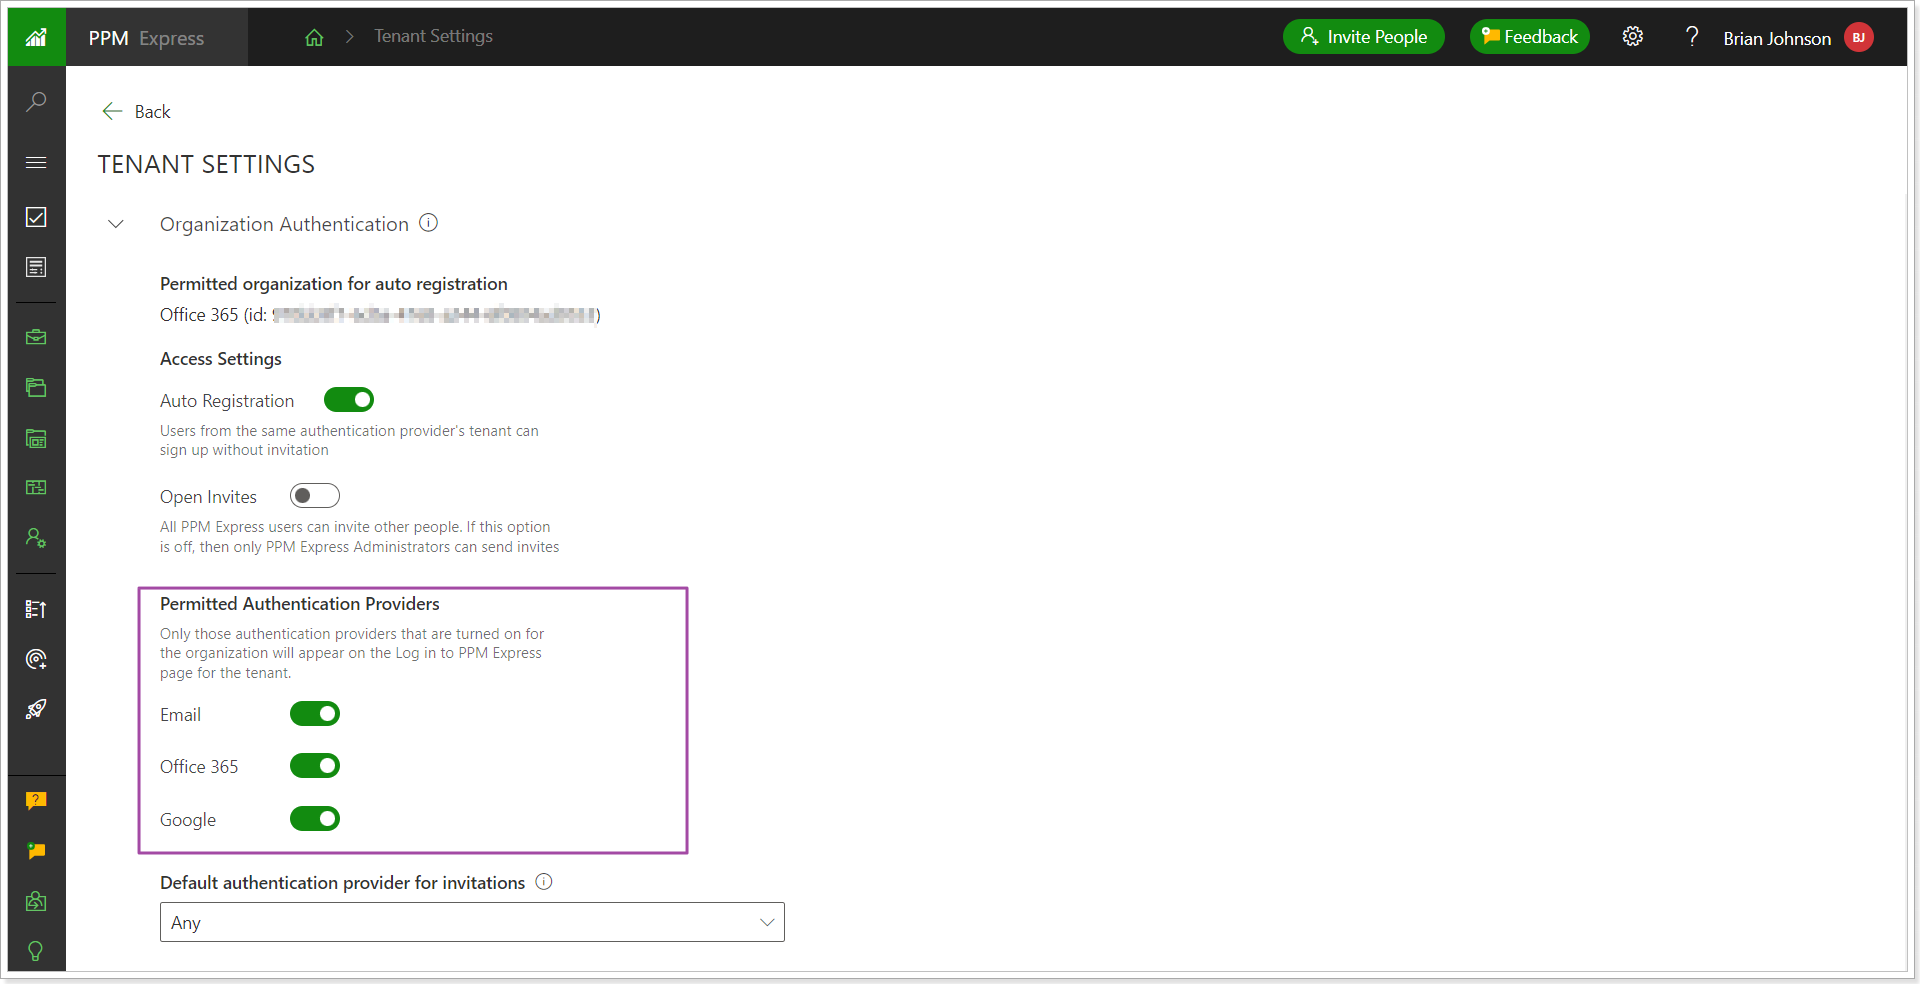
If the authentication provider is in use, for example, the invitation was sent using the Email option, the Administrator will not be able to restrict this authentication type.
Before turning off the provider that is in use, it will be necessary to:
- deactivate all users who use this provider with Active status;
- delete all users with Invite Pending status with this authentication provider defined in the System field or Change the Auth Provider to a different one.
After this, it will be possible to restrict the authentication provider.
The default authentication provider for invitations option defines the default authentication provider for sending the invitations. If the default authentication type is selected, only PPM Express Administrators can change the authentication provider when inviting new users. For all other users, the default authentication provider for invitations will be pre-selected without the ability to change it.
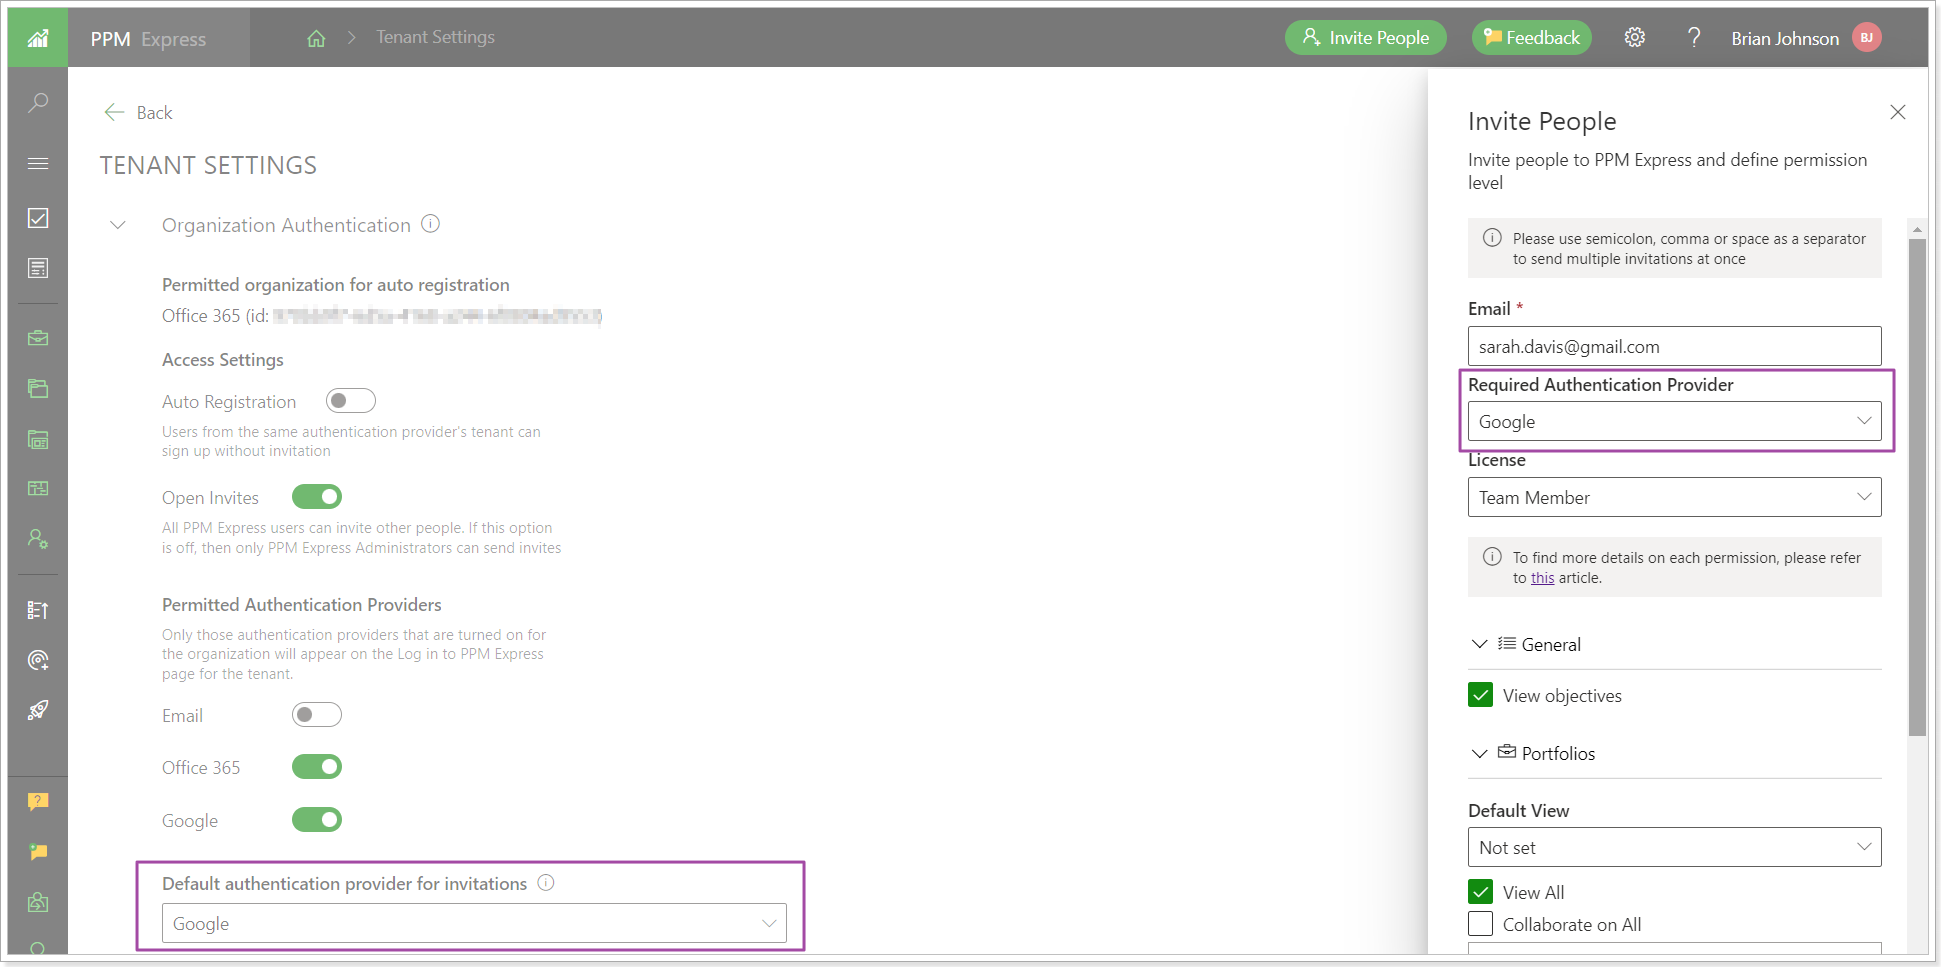
Users will see only the chosen authentication option when clicking Join in the invitation email. But on the login page, users will see all allowed providers (Office 365 and Google in our example).
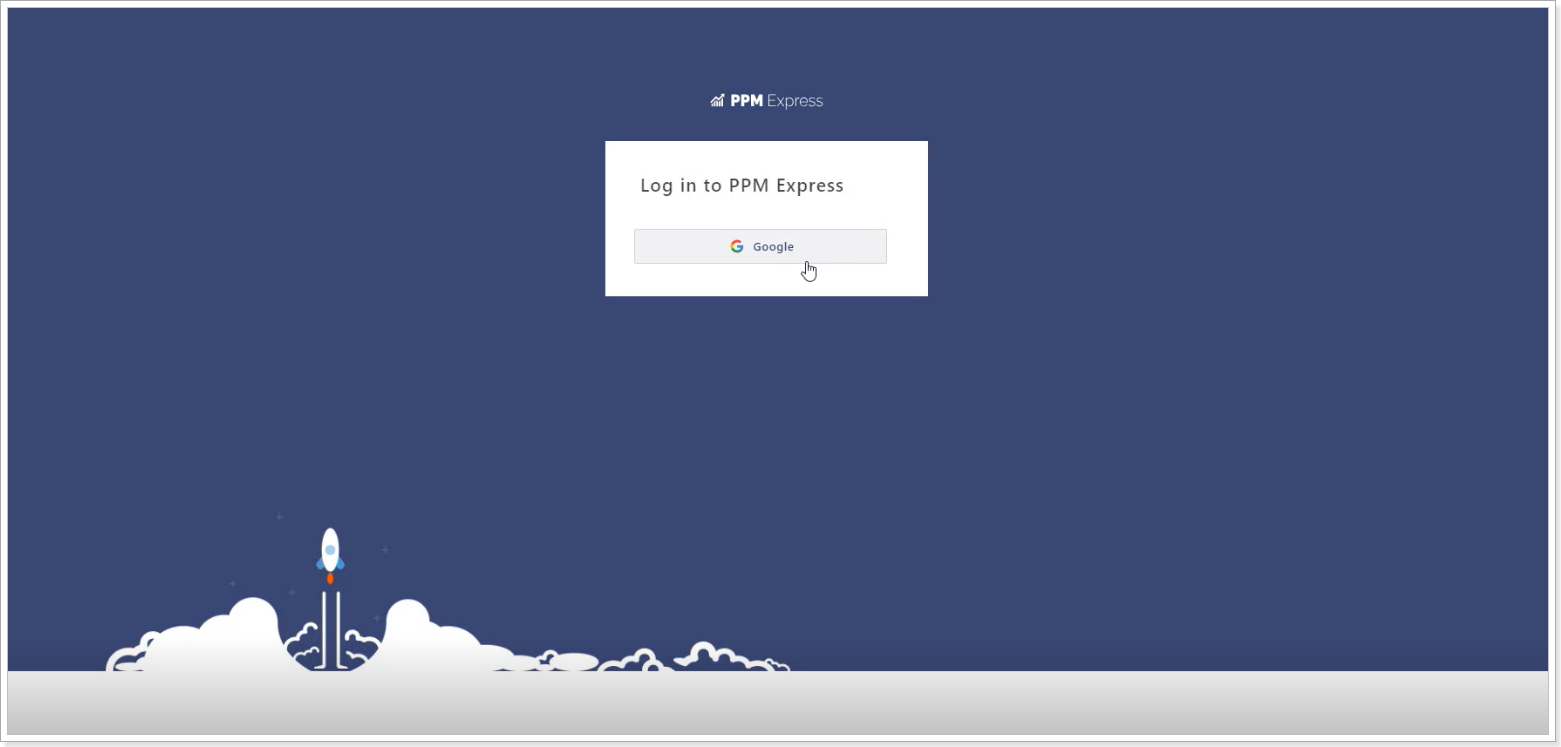
Please refer to the articles about ‘Tenant Settings’ and ‘How to invite users to PPM Express’ for more details.
2. A new ‘Demand and Innovation Management’ plan is now available in PPM Express.
A new plan includes Resource Management, Business Challenges and Ideas, Strategic Priorities, and Power BI reports.
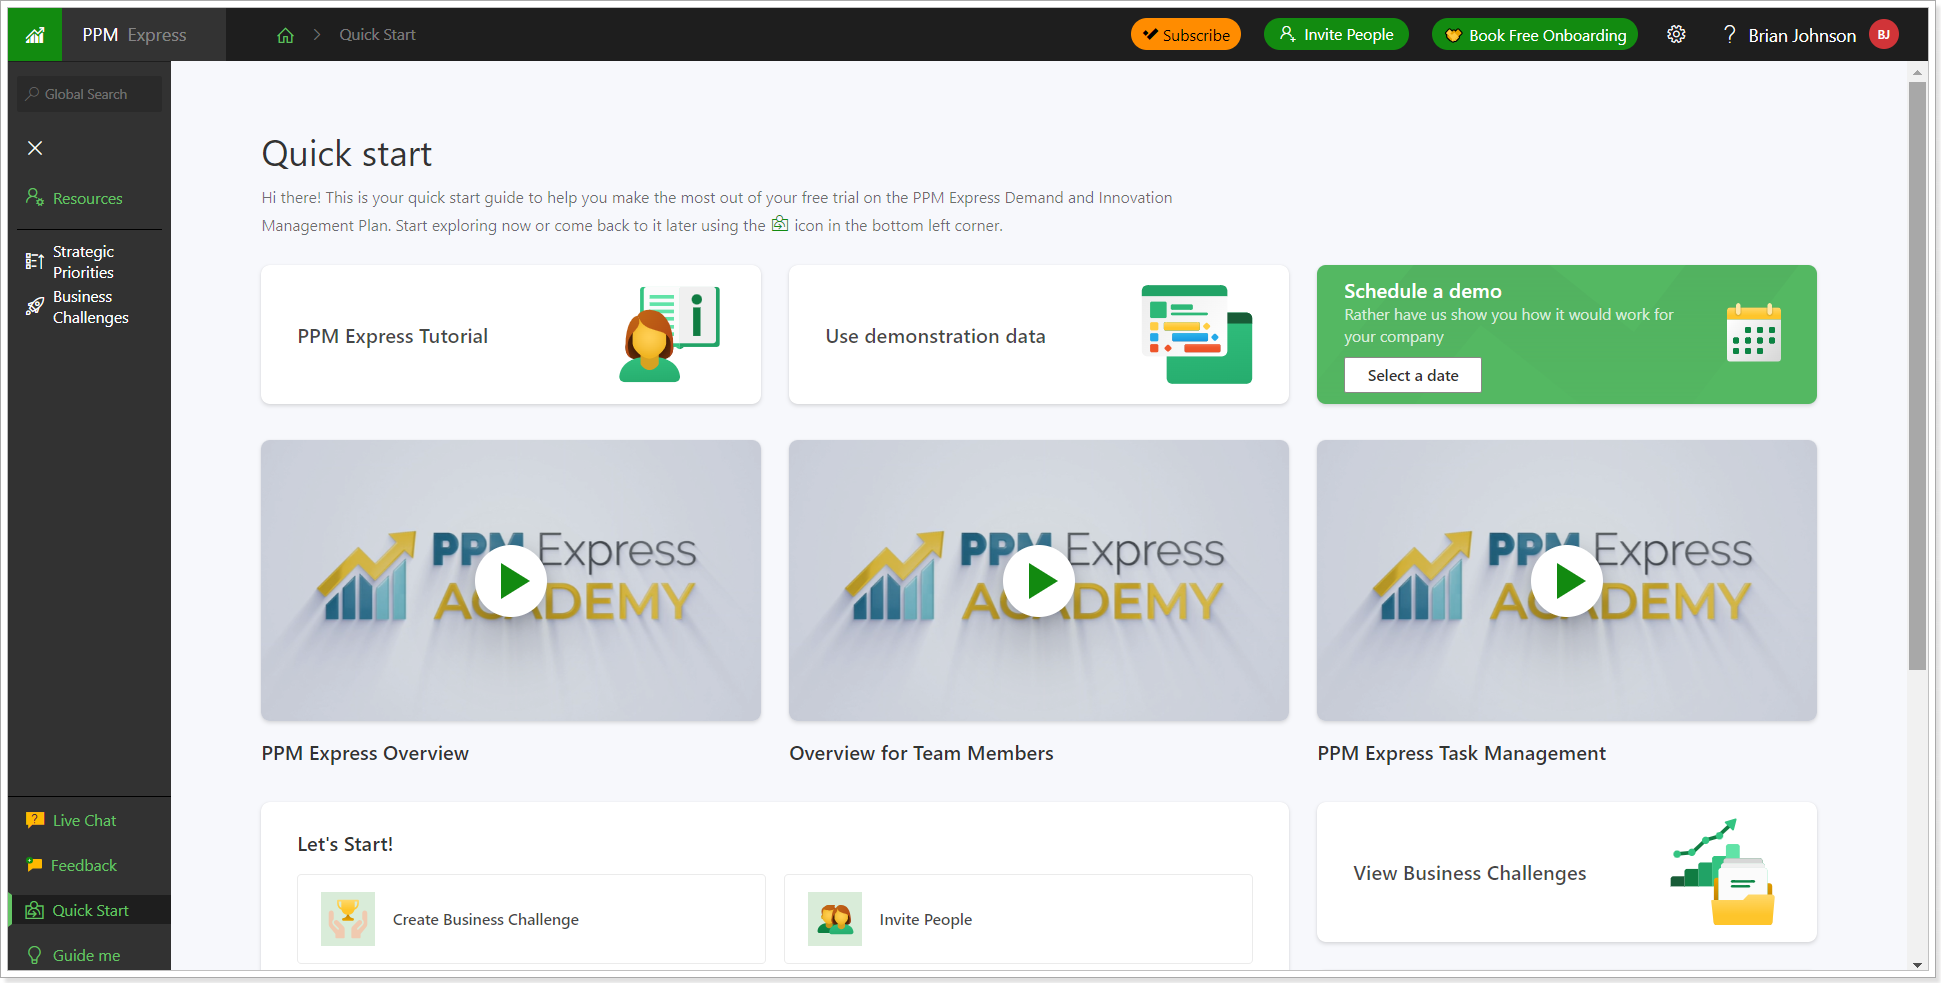
Release Notes 18.12 @March 14, 2024
1. An option to generate project risks via AI capabilities was added.
This functionality allows you to create risks for your PPM Express projects using AI.
When the PPM Insights AI is enabled on your tenant, the Generate with AI option becomes available on the Project dashboard, Risks project section.
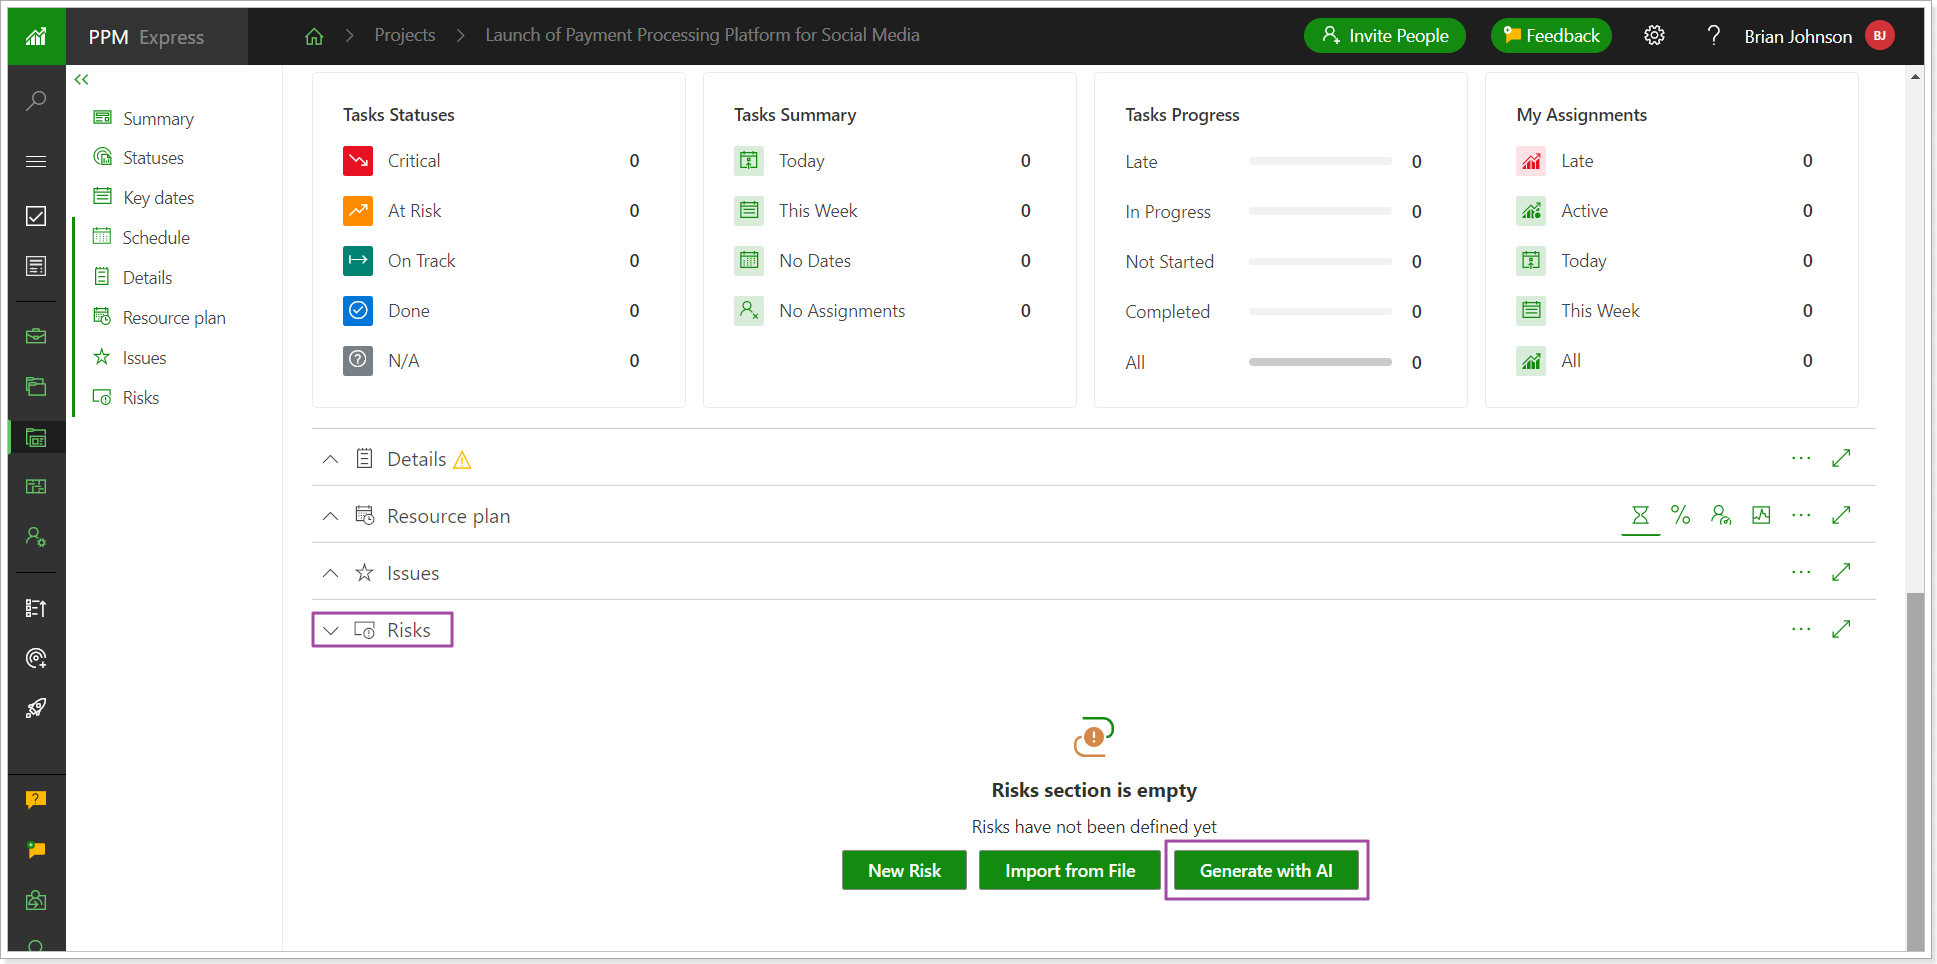
You can use basic Project information (Project name, description, active tasks, and Overall status description) and/or include additional description, and AI will generate Risks for your Project based on the given details. 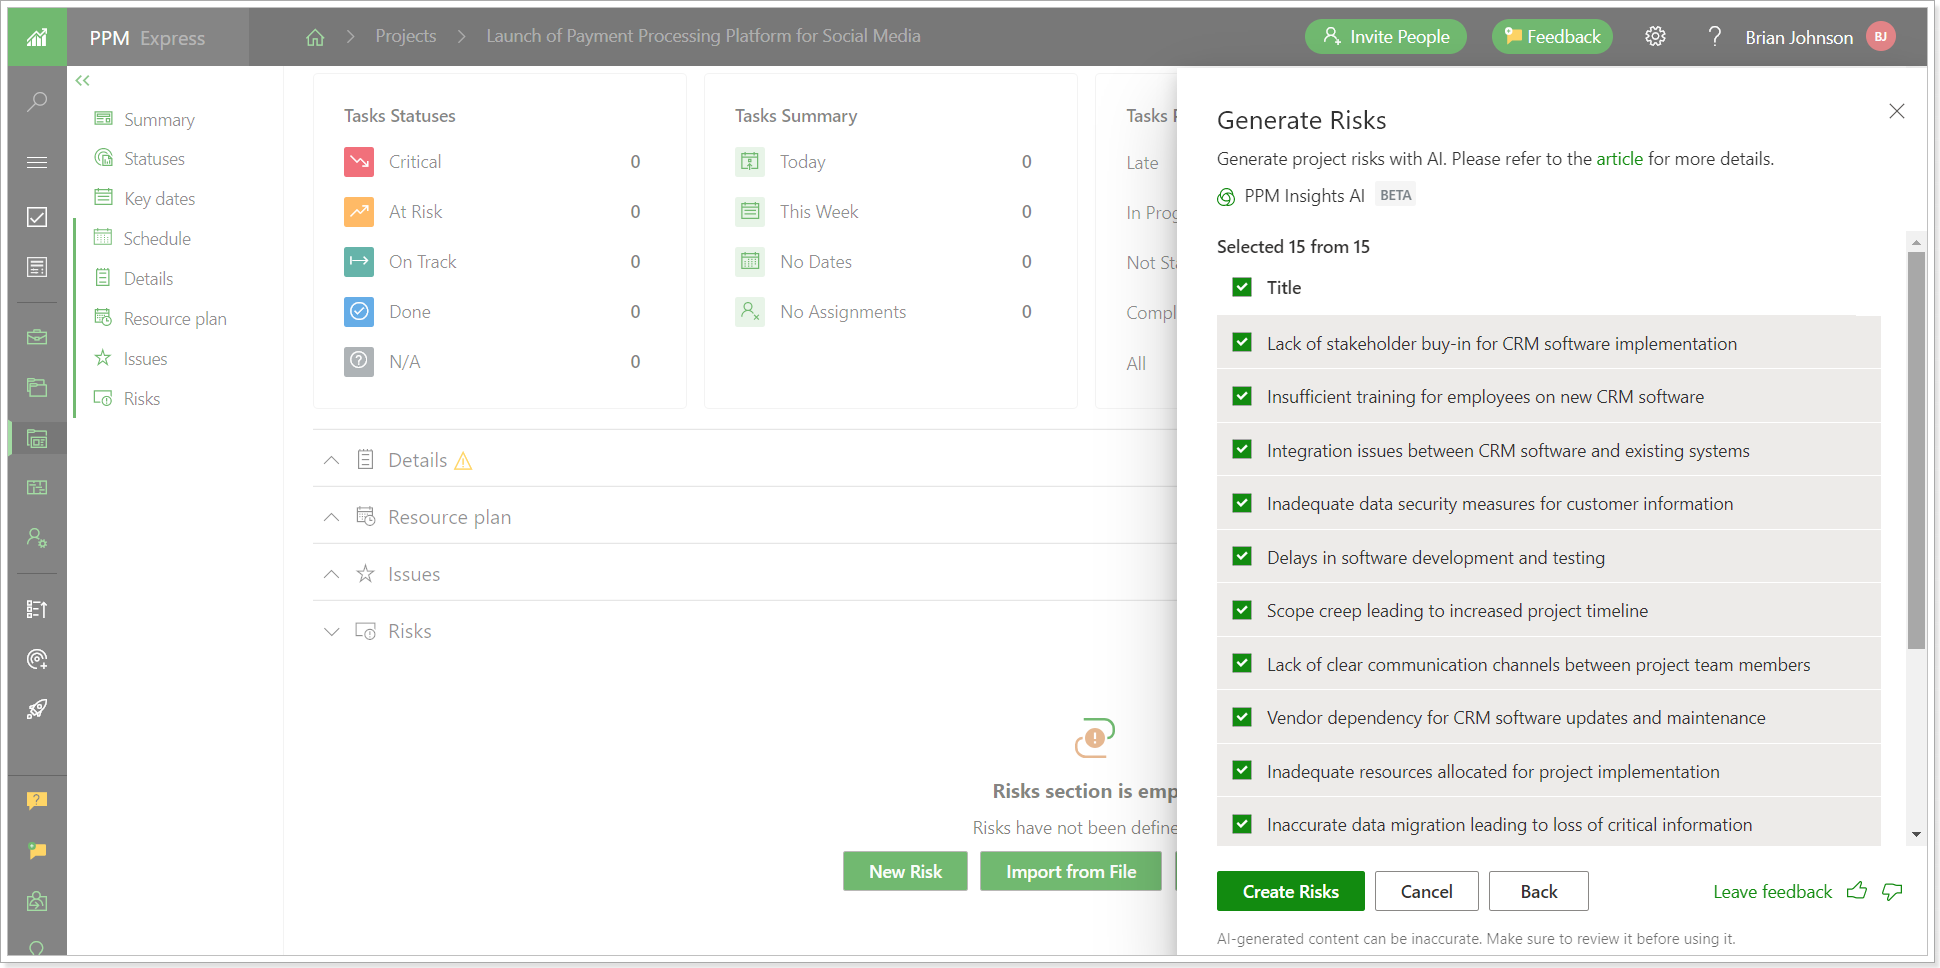
For more details, please refer to the Generate Risks with AI article.
2. A new column ‘Tasks’ was added to the Projects page.
The column always displays the PPM Express Tasks icon and the icons of other connected systems linked to this project. Clicking on the icon opens the Tasks page for the selected system.
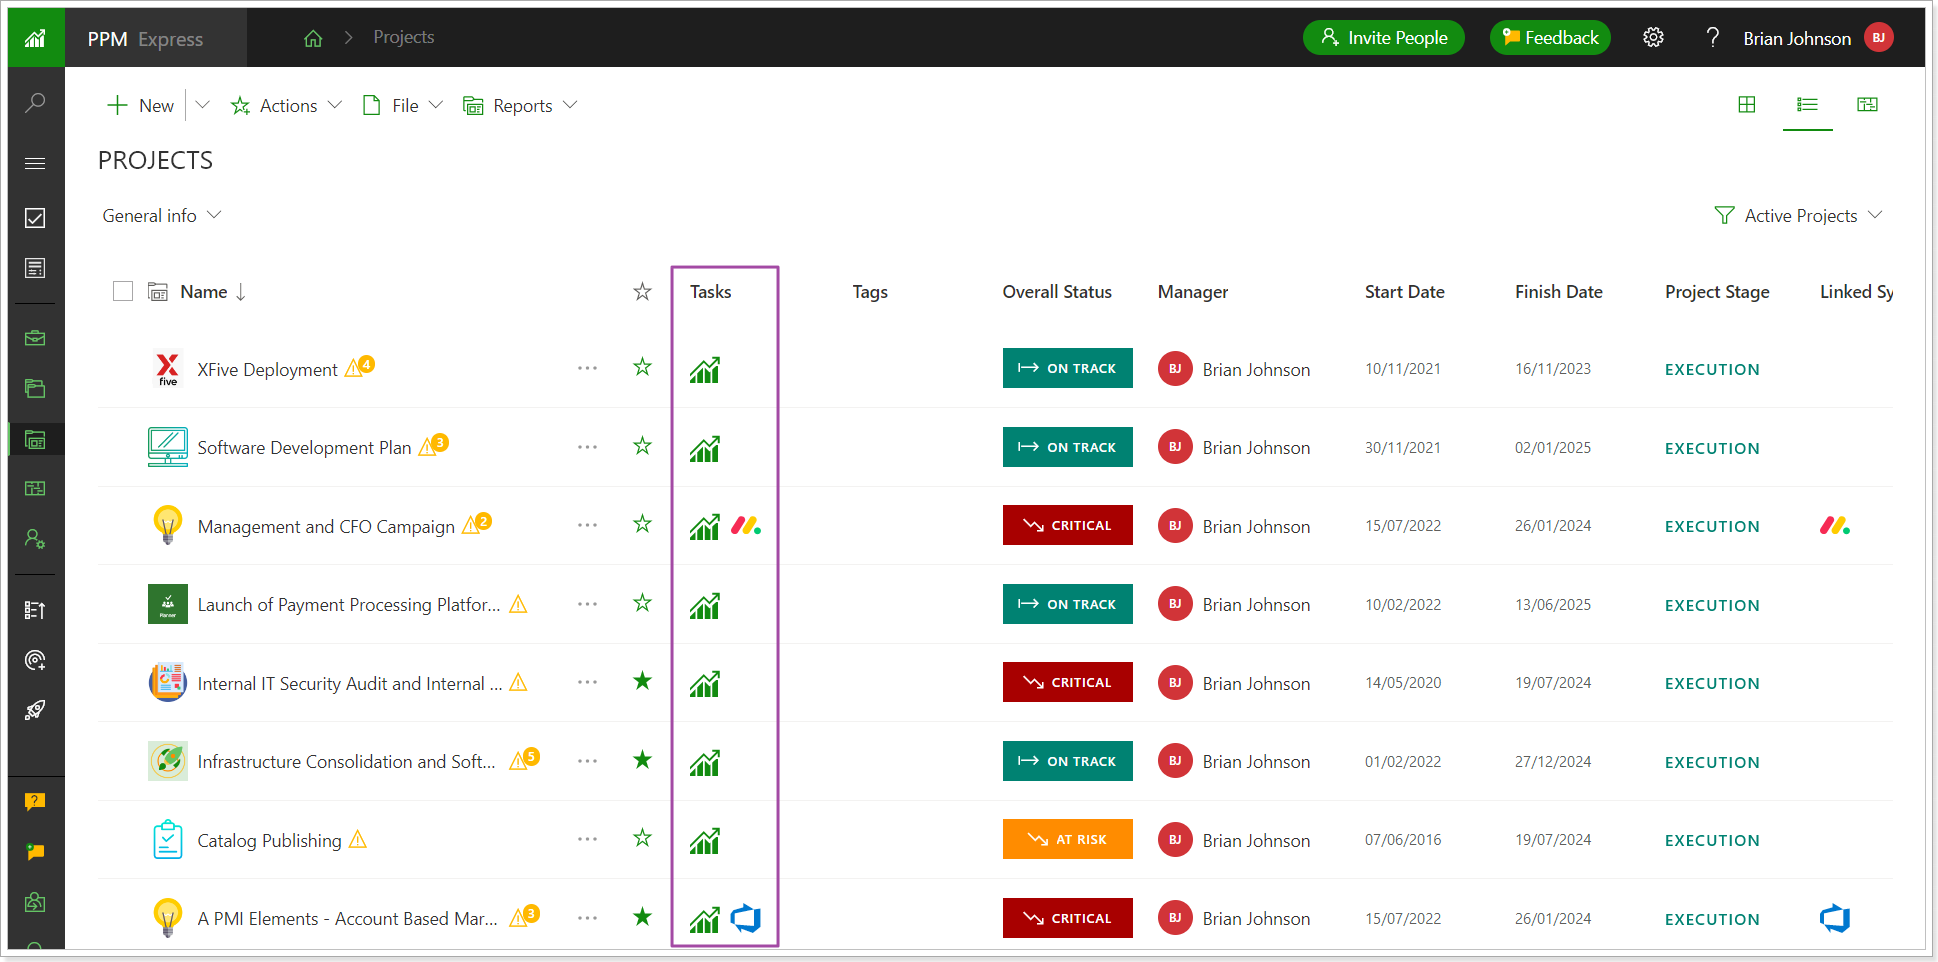
Release Notes 18.10 @February 27, 2024
1. The additional menu opened from the ellipsis button for PPM Express entities (Projects, Programs, Portfolios, Key Dates, etc) was moved to the front and is now located next to the Name field.
This change was made for better navigation. The additional settings have not changed, just the position of the ellipsis button.
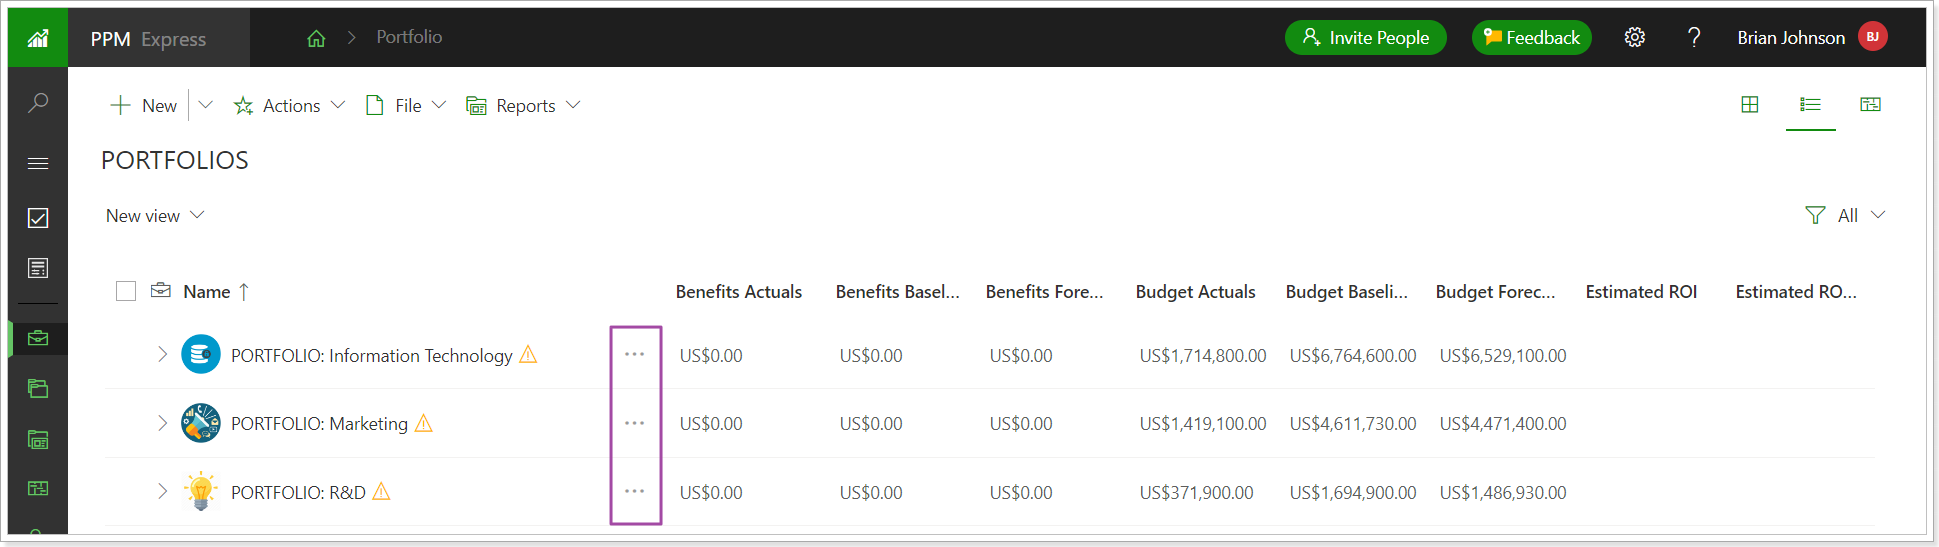
Also, these settings were added to other sections, for example: Iterations, Risks, Issues, People Management page, Exceptions, etc.
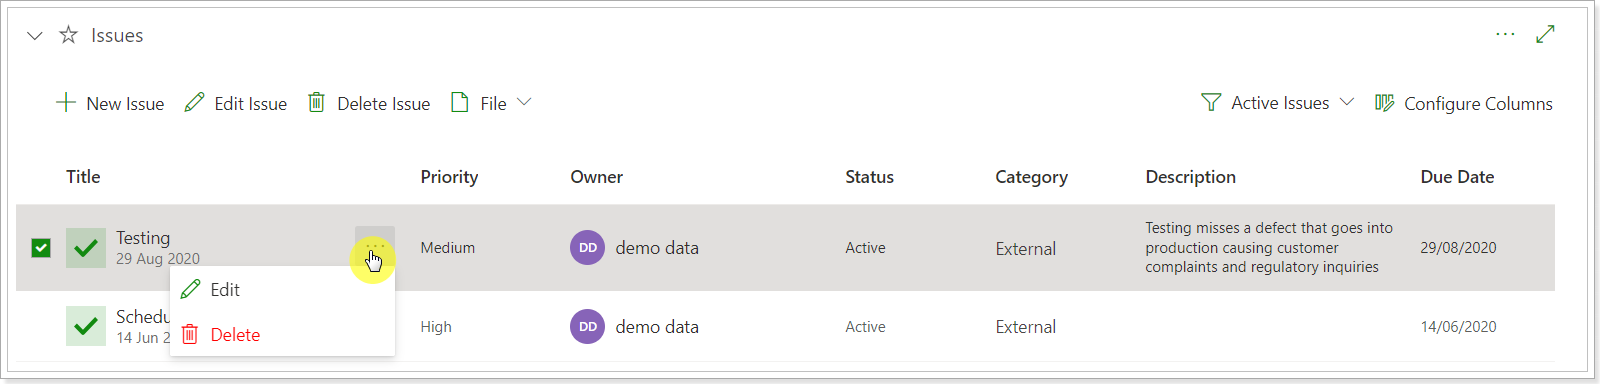
With this release, the Name field for the entities with the additional settings will be fixed, you will not be able to move or disable it. Also, if the Name field was moved or disabled on your tenant for some entities, it will appear in the list after the release and will be placed in the beginning.
2. Lessons Learned section changes.
With this release, the Lessons Learned section will be changed: the Lessons Learned multiline field will be renamed to Description (if the field was renamed, the custom name will be preserved).
The Lesson Name field and the ellipsis button with the additional settings will be added next to it.
After this release, the new field will be empty, but the field itself will be required. If you have many items, you can update them in bulk using the import/export to/from .csv option.
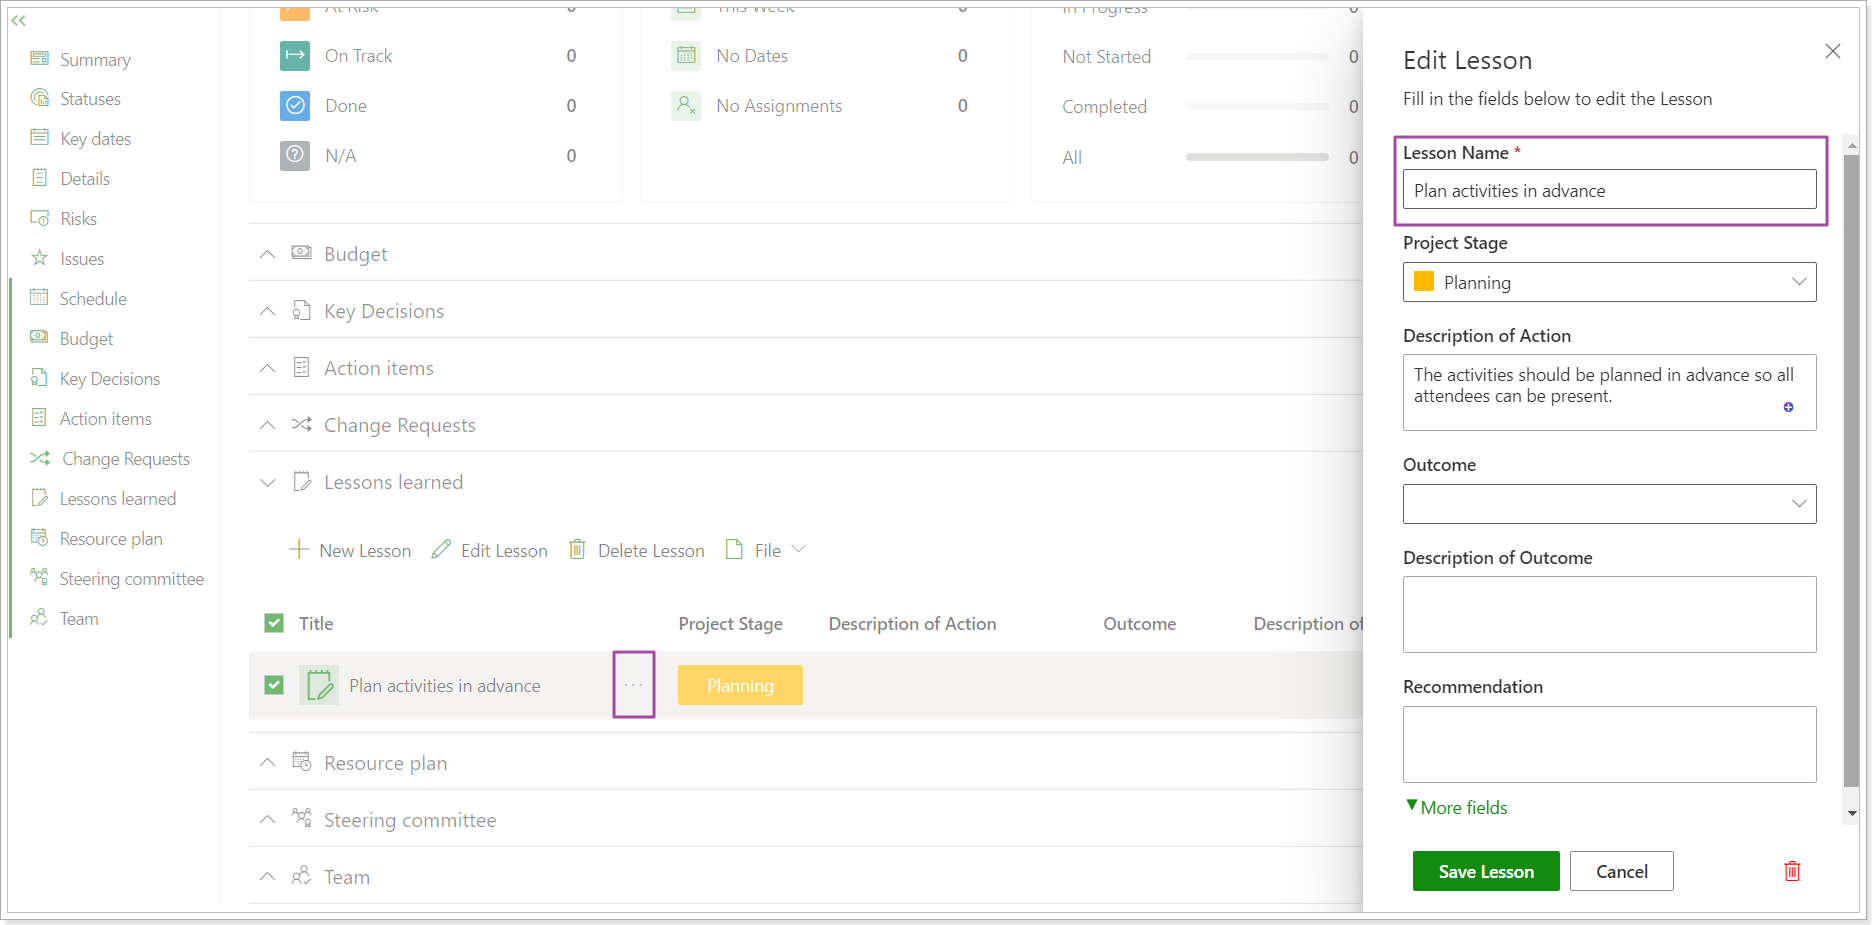
In OData, the columns Name and Description were added, and the column Lesson Learned was preserved to keep the existing reports showing data correctly.
3. The Embedded Content section was added to the Project, Portfolio, Program, and Business Challenge dashboards.
The Embedded Content section allows embedding external links, videos, web pages, or documents to PPM Express dashboards. This section can also embed PPM Express Power BI Reports into the dashboards to access the required report easily.
For more details, please refer to the "How to use the Embedded Content section" article.
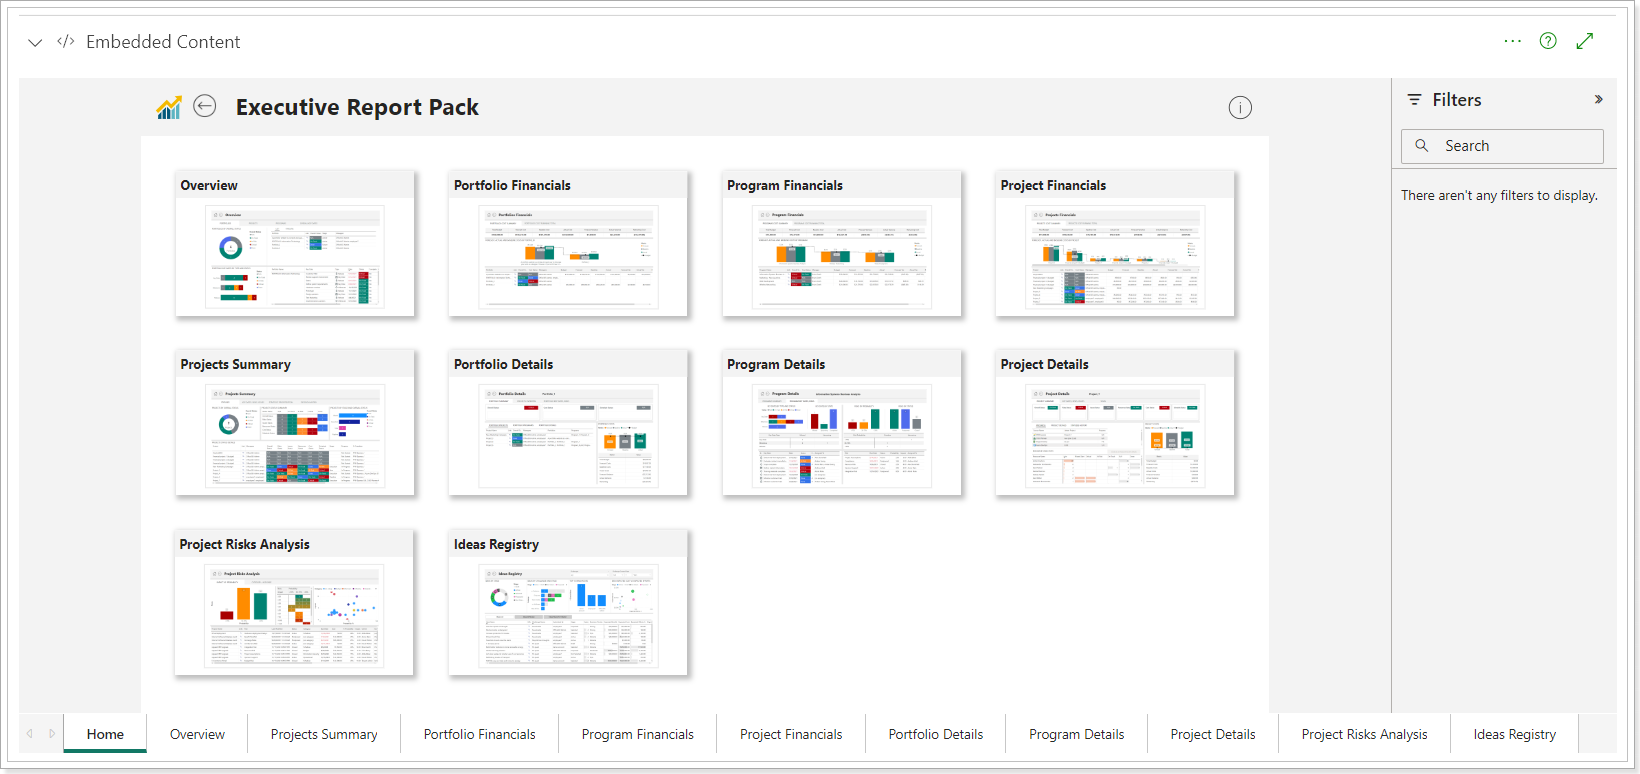
4. The View Tasks button was added to the Project dashboard.
With this release, the 'View Tasks' button was added to the Project dashboard, next to the tasks icon. This button opens the PPM Express Project Schedule.
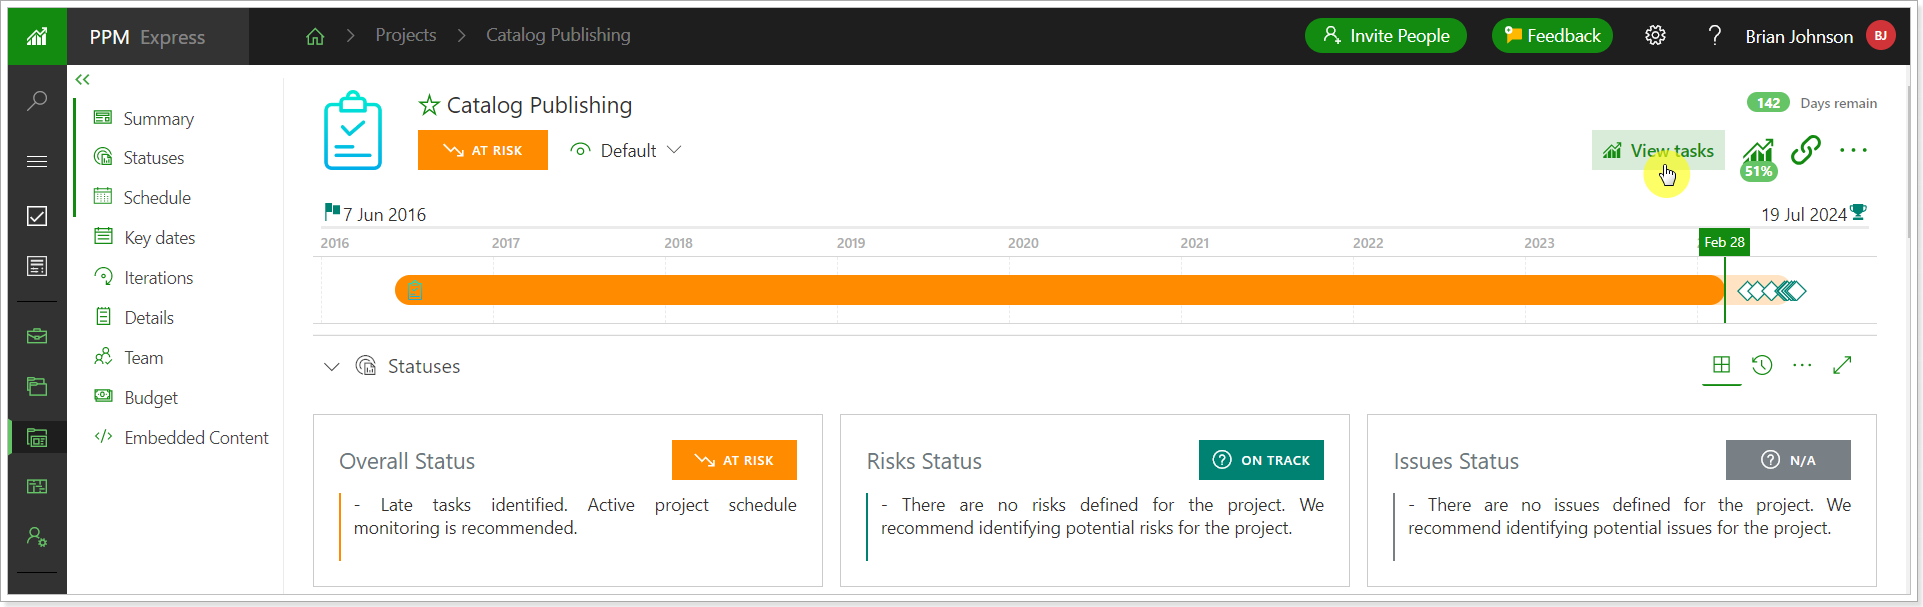
Also, the button that opens the tasks from the Schedule section was renamed and highlighted. The buttons on the tasks page that open the Project dashboard or tasks pages synchronized from the external systems were also highlighted in green.
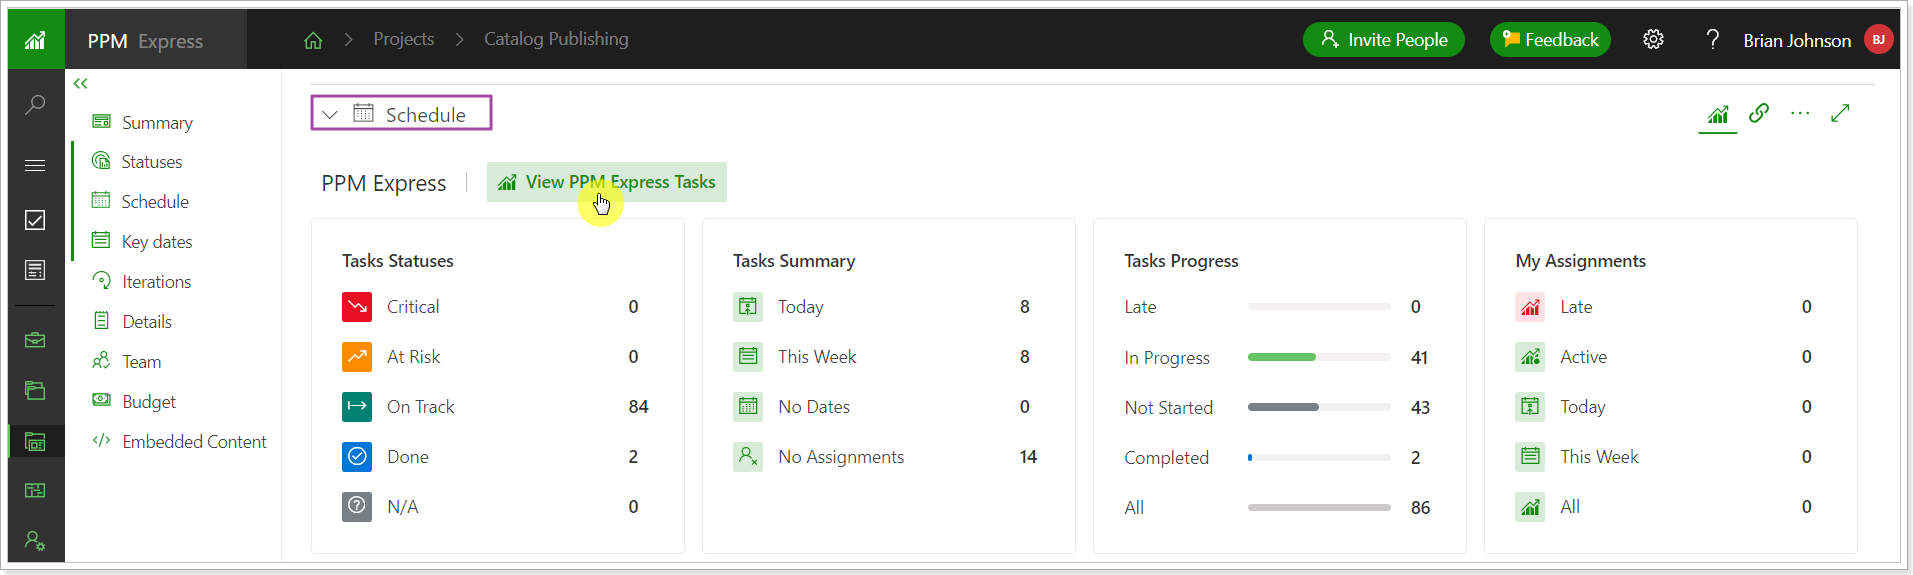
The 'Open Schedule' option on the Projects page was renamed to 'Open Tasks'.
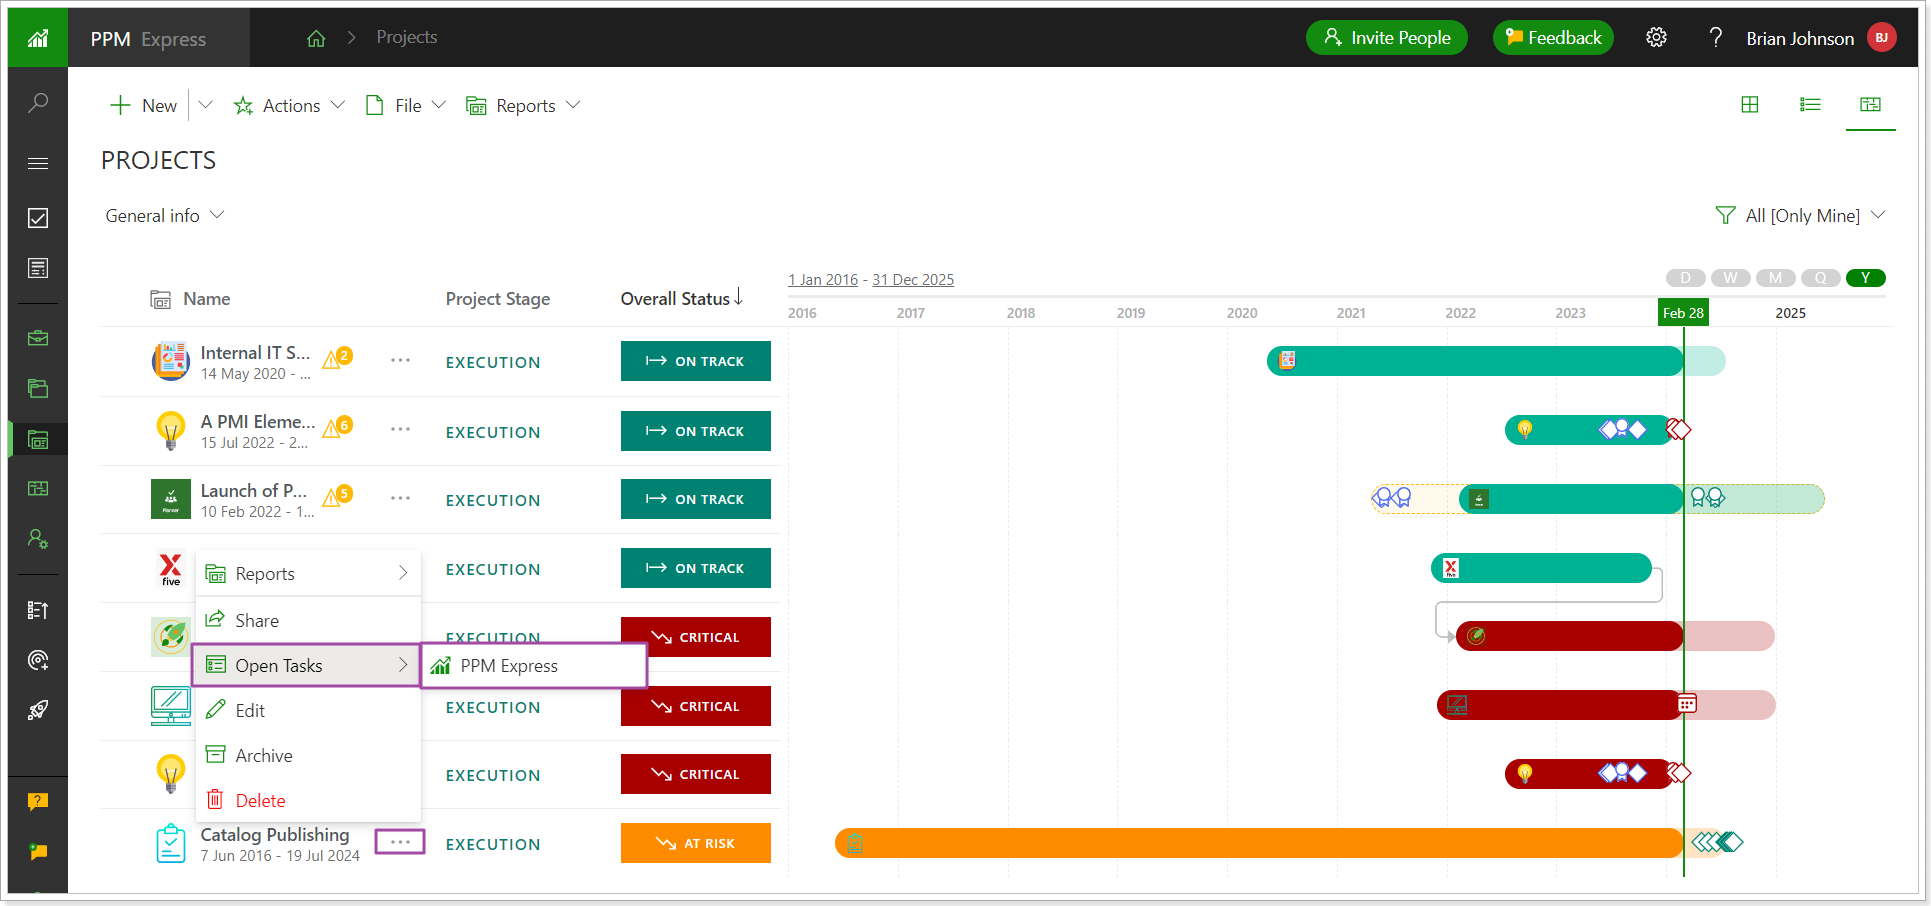
Release Notes 18.8 @February 15, 2024
1. An option to generate project tasks via AI capabilities was added.
This functionality allows creating tasks for your PPM Express projects using AI. It helps you plan your next steps quickly, stay organized, and boost your productivity.
When the PPM Insights AI is enabled on your tenant, the Generate with AI option becomes available on the PPM Express Tasks page.
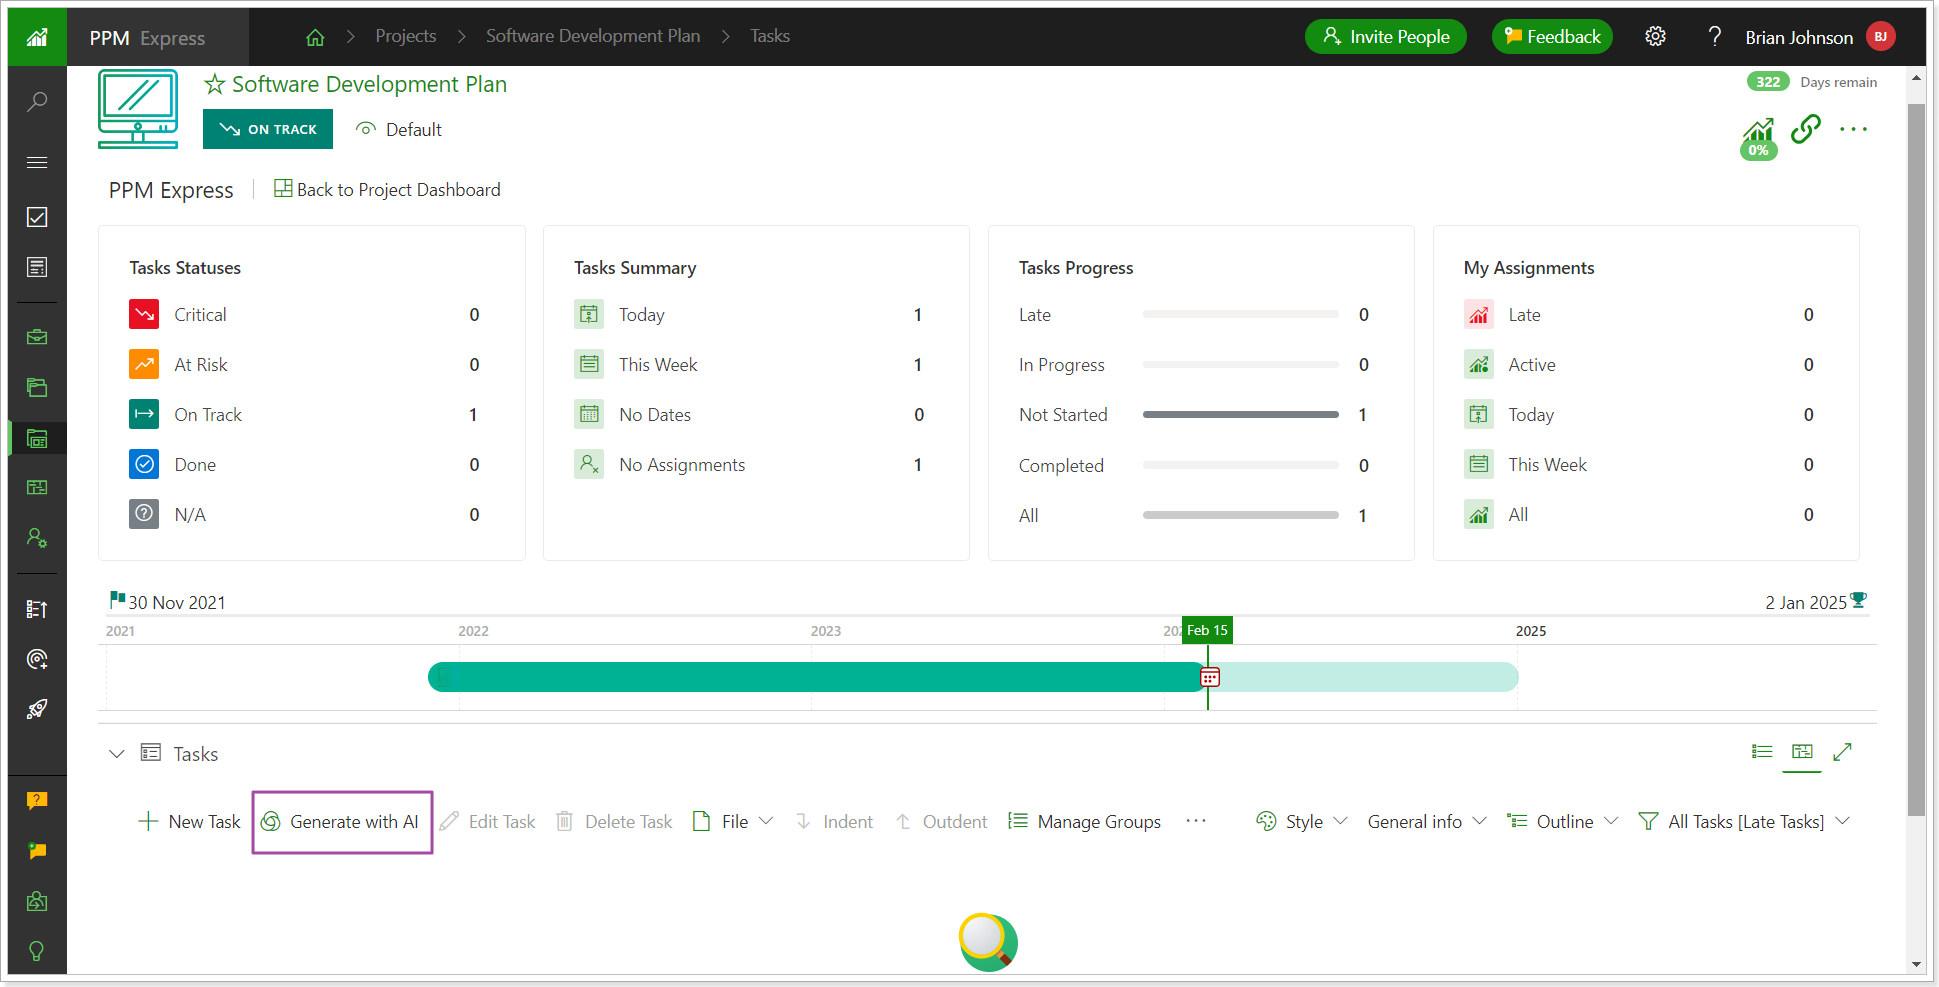
To generate the tasks using the AI feature, provide some details in the 'Context for AI Task Generation' field. You can provide information about the project or the tasks you need to generate, specify the number of tasks you need for the project, etc. The more context you provide, the more precise the output is.
The 'Add Project Description' button allows copying the text from the Description Project field (Details Project section).
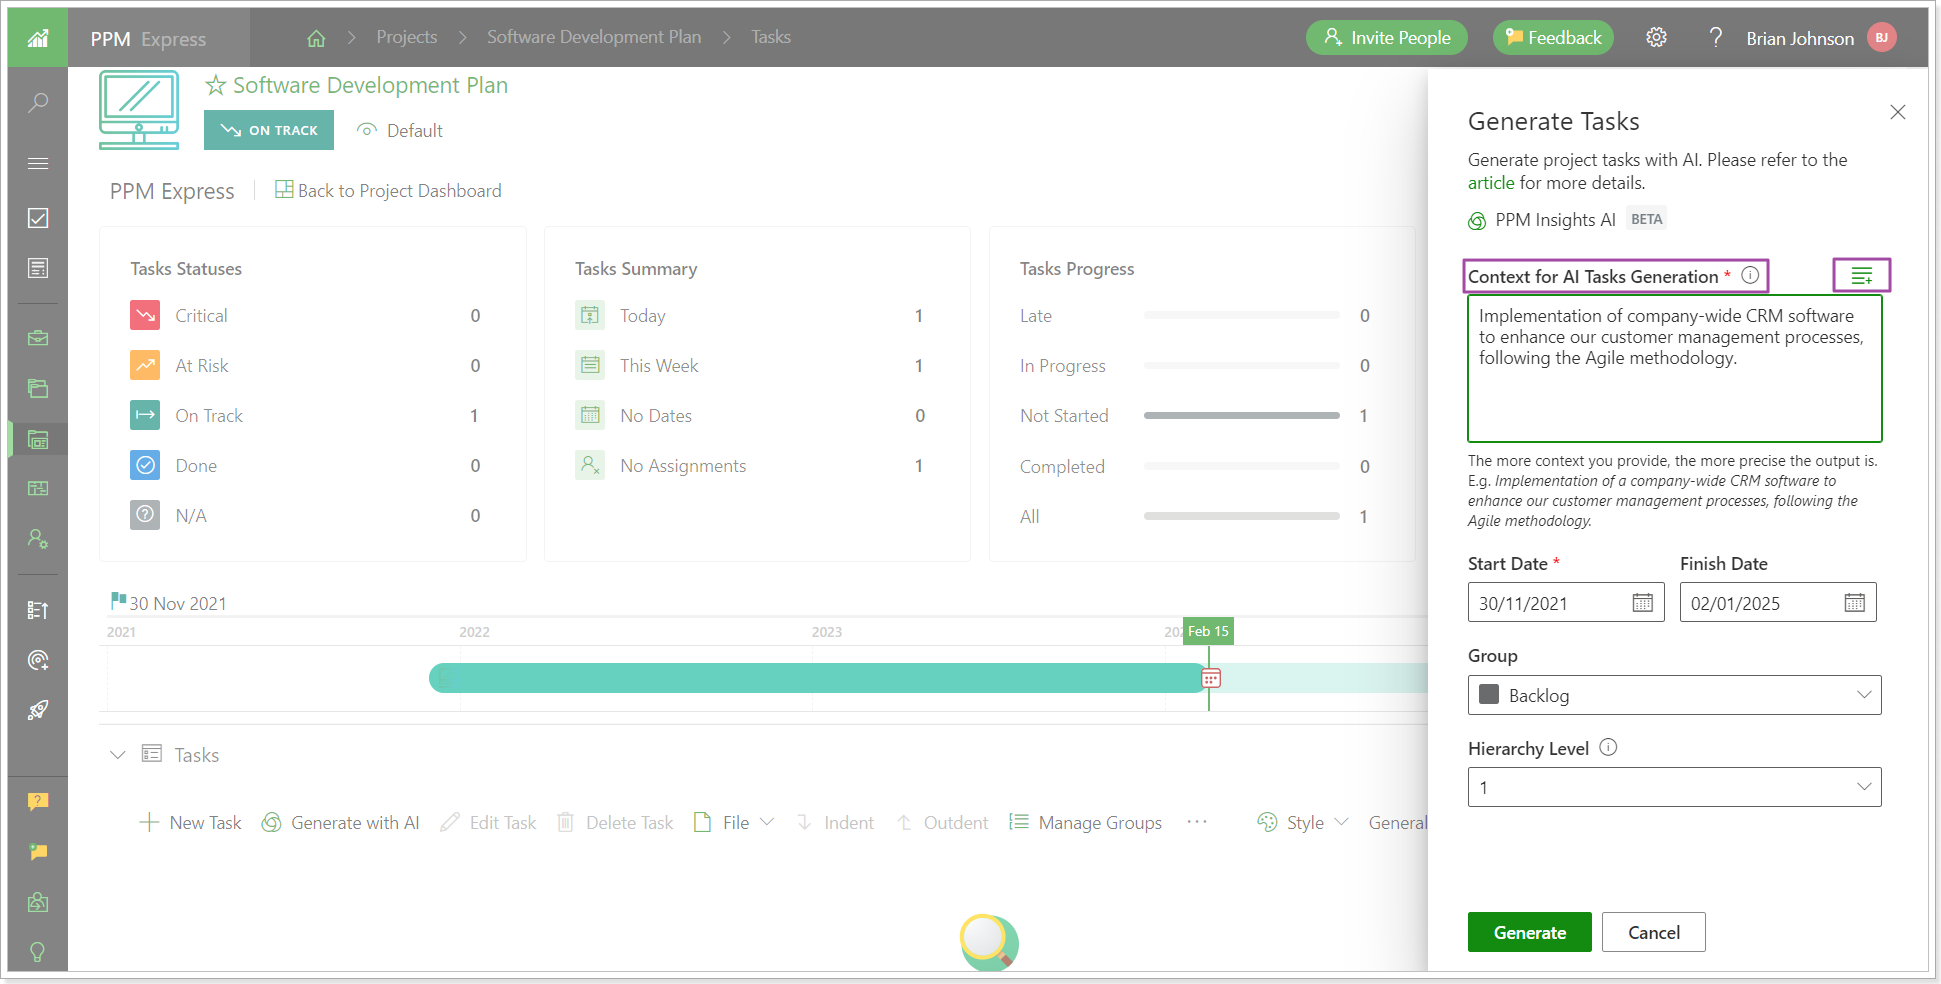
Provide the Start and Finish dates, group, and hierarchy level. Click Generate.
You can preview the tasks before you proceed and create them.
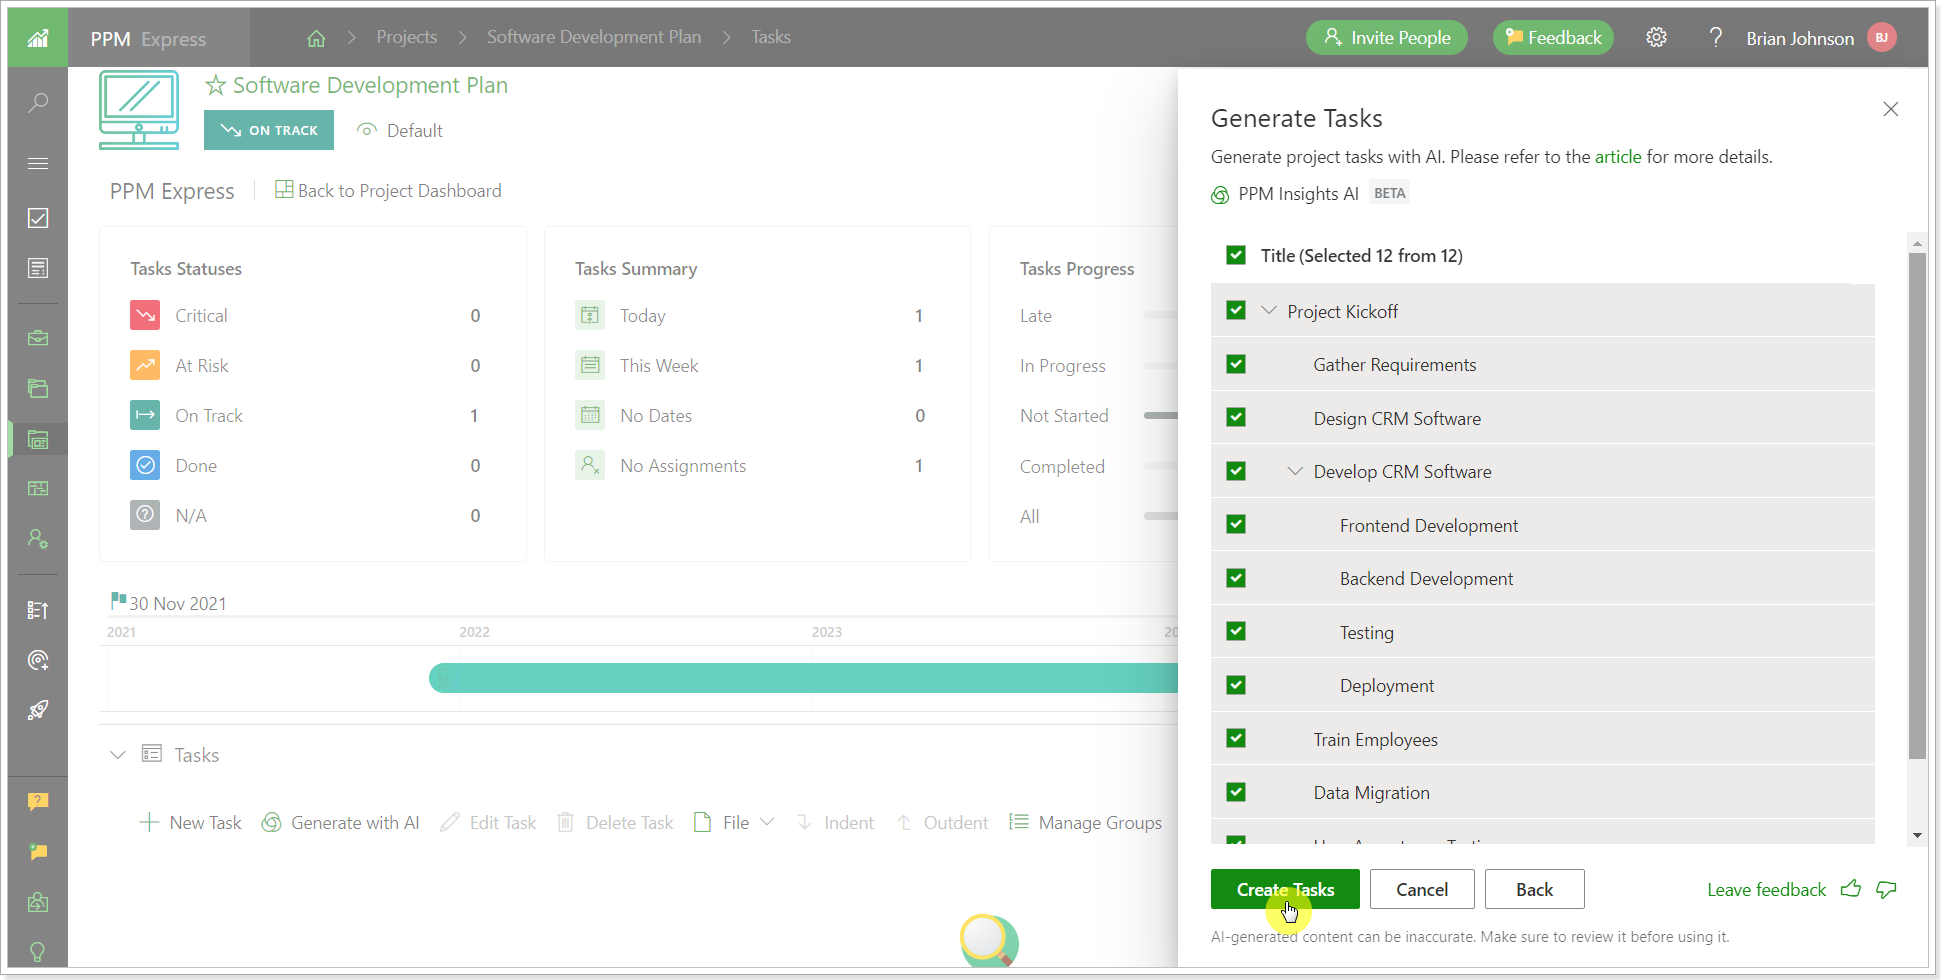
Once ready, click the Create Tasks button, and the tasks will appear in the selected group. Task start, finish dates, duration, and status will be filled in automatically.
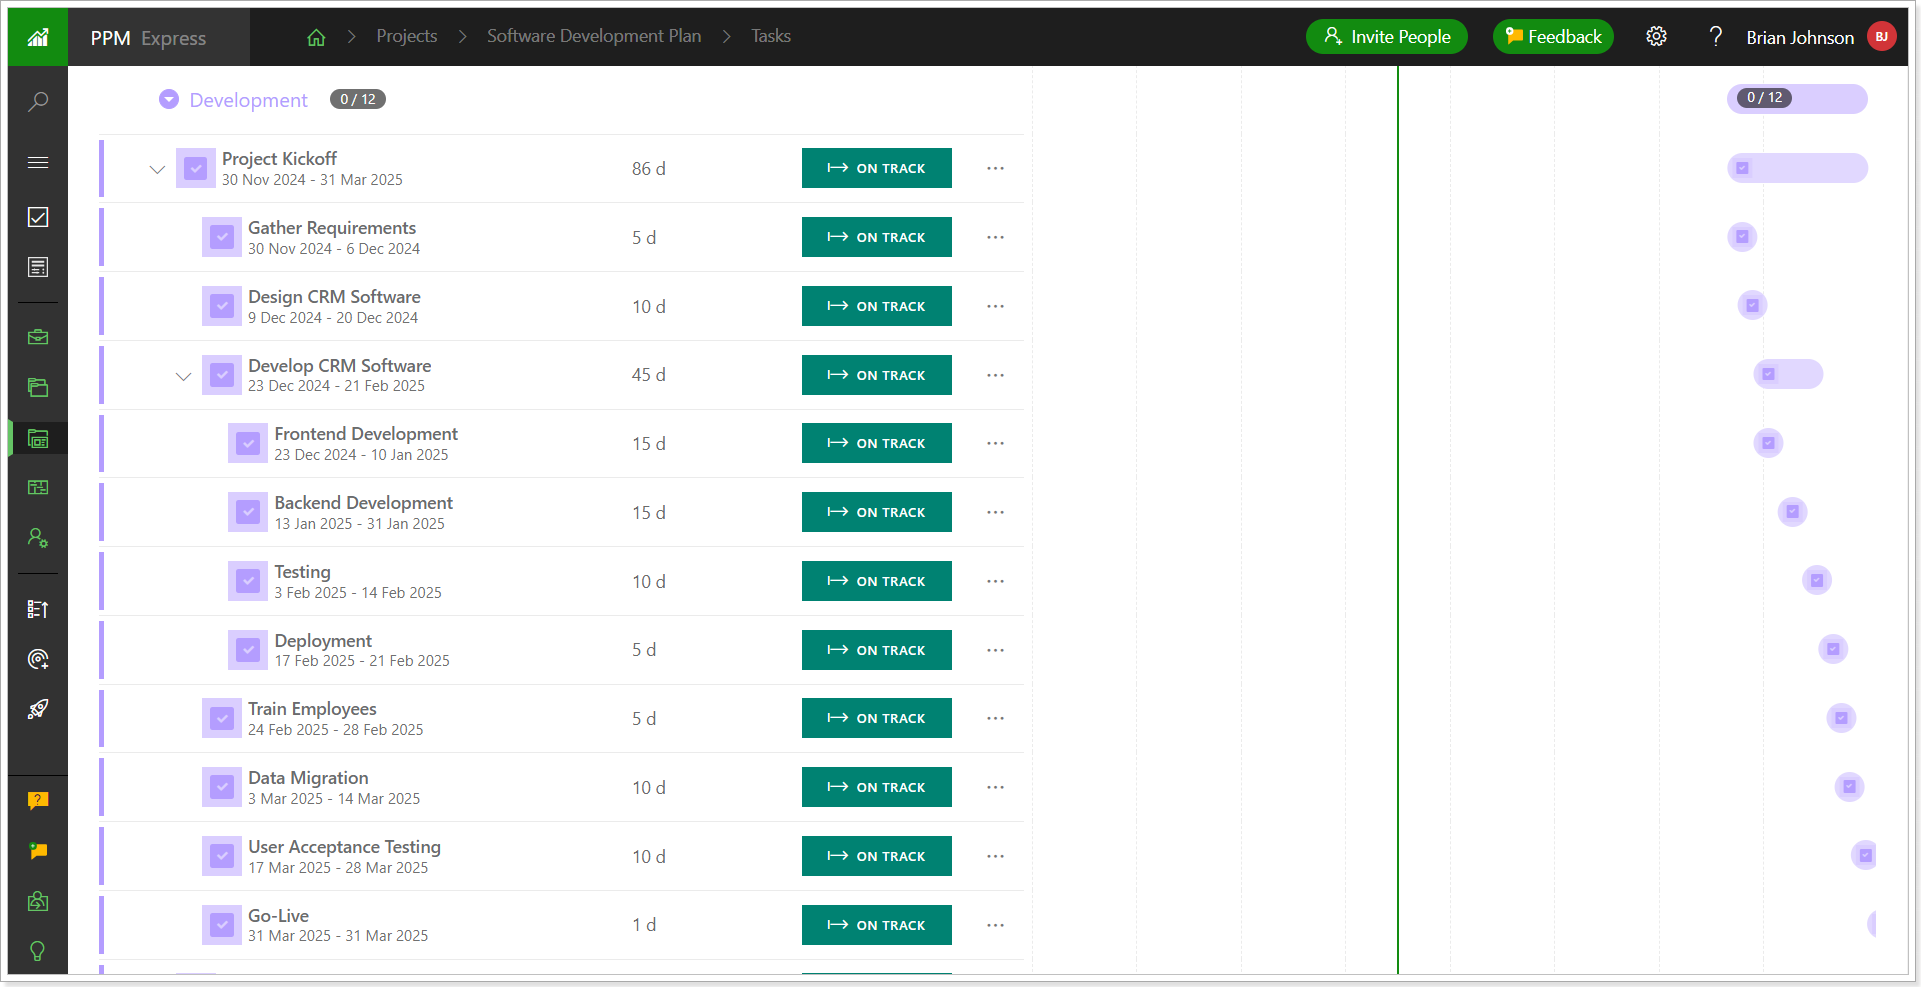
For more details, please refer to the Generate Tasks with AI article.
2. A new Resource Management subscription plan (Monthly or Annual) was added.
The Resource Management subscription plan includes Project Management and the Resource Planning functionality:
- Unlimited Project Management
- Integration with Microsoft Project and Publishing MPP tasks as linked projects in PPM Express
- Resource Planning
- My Space (Resource Dashboard and Assignments)
- 100+ Power BI Reports
Release Notes 18.6 @January 29, 2024
1. A new section ‘Purchase Orders’ was added to the Project Dashboard.
A new 'Purchase Orders' section allows adding the following information:
- Order name
- Description
- PO Number
- Created date (set automatically)
- Due date
- Amount
- Paid amount
- Vendor name
- Assigned to
- External ID
- External link
- External system
- Status
- Status Description
- Tags
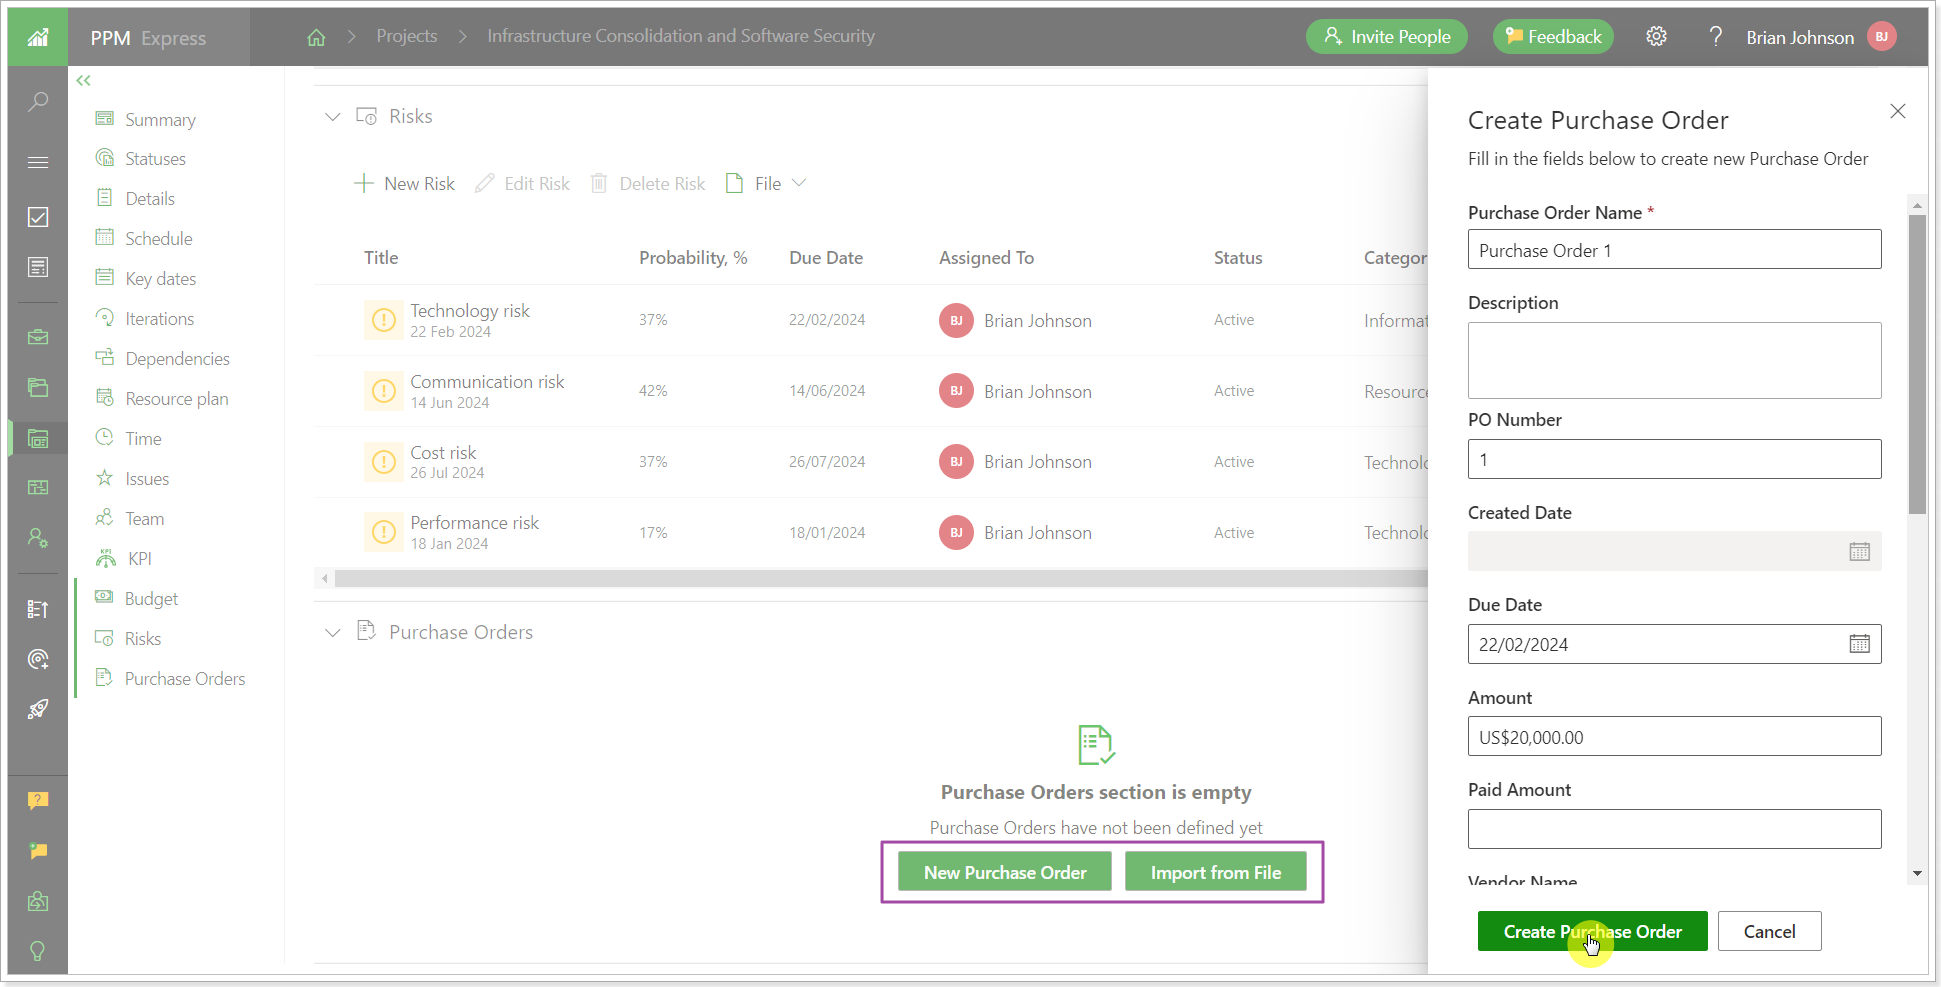
When the order is added, it can be edited or deleted, users can configure columns for this section, export orders to PNG files, and import orders from CSV to PPM Express. 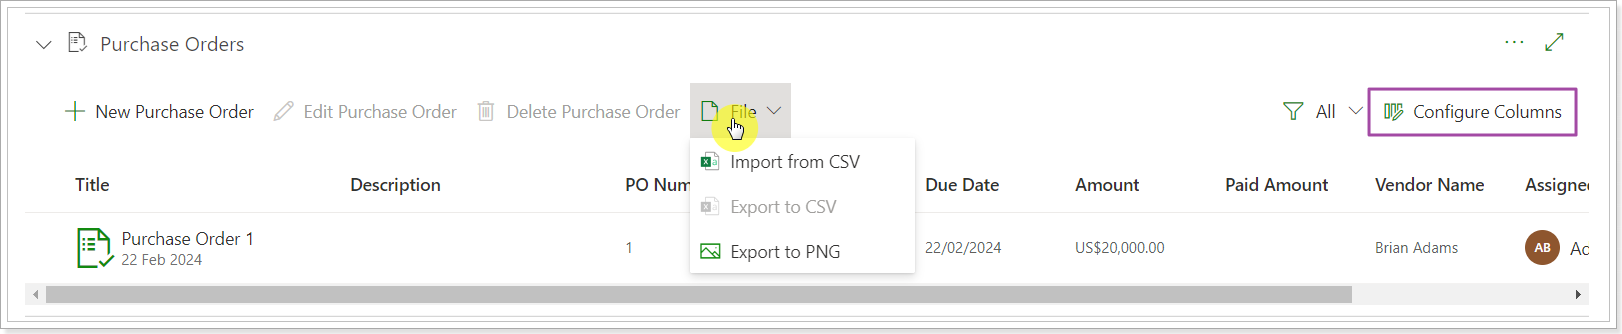
Release Notes 18.4 @January 15, 2024
1. An option to generate a Project Digest via AI capabilities was added.
AI Project Digest gives you access to AI-driven functionalities from PPM Express directly. The AI Project Digest allows project managers to generate summary information on their project data and send this summary as an email to stakeholders, team members, or any other recipients.
AI Project Digest aims to save time during project summary creation and boost daily work efficiency.
When the PPM Insights AI is enabled on your tenant, the AI Project Digest setting becomes available from the Project dashboard menu.
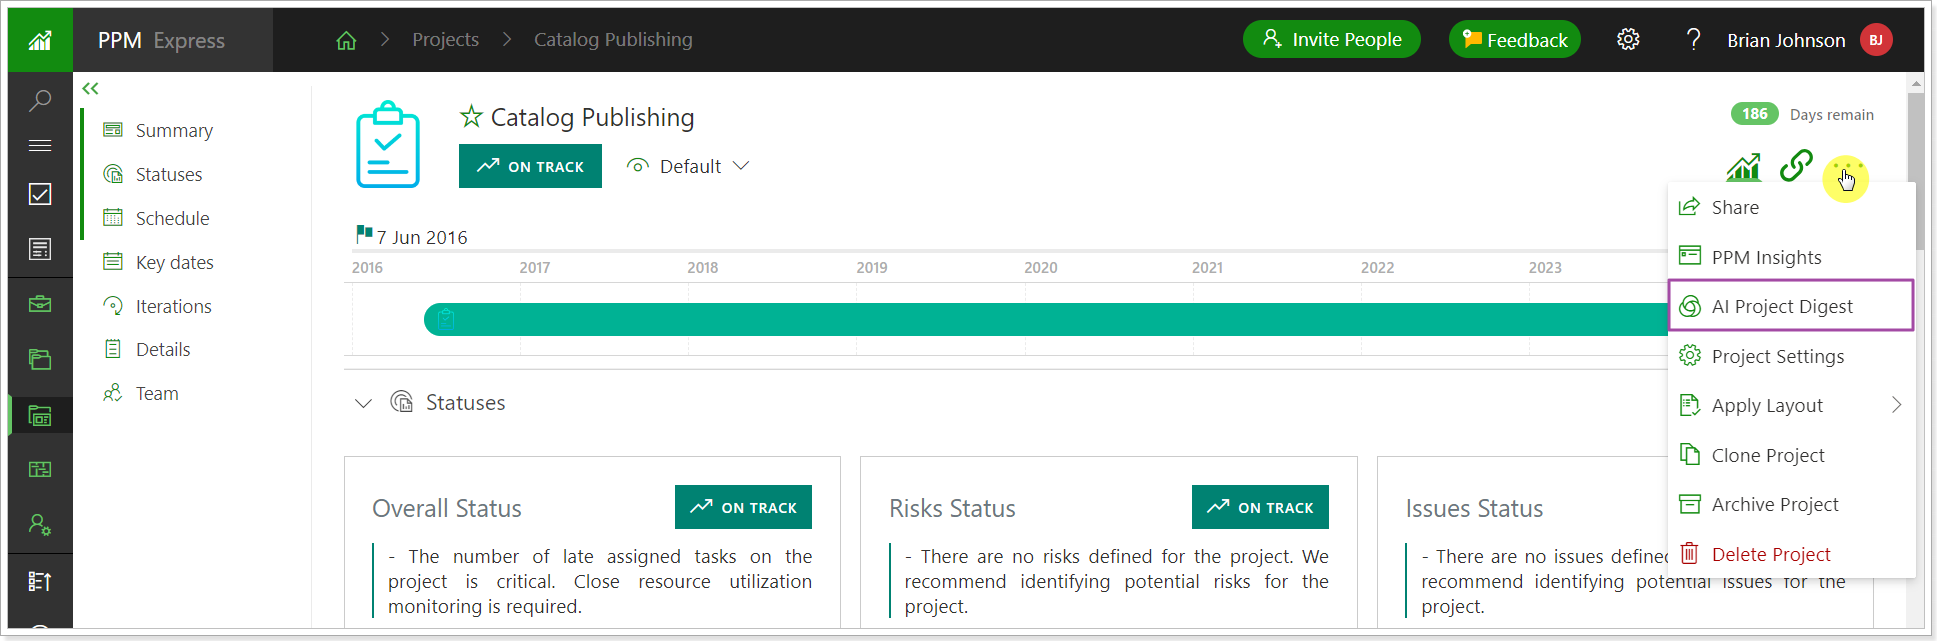 Data that may be included in Project Digest:
- Project Attributes
- Statuses
- Milestones
- Schedule Information
- Budget Information
- Risks
- Issues
- Action Items
- Change Requests
Select the data sets you need to generate a digest for several sets of data at once.
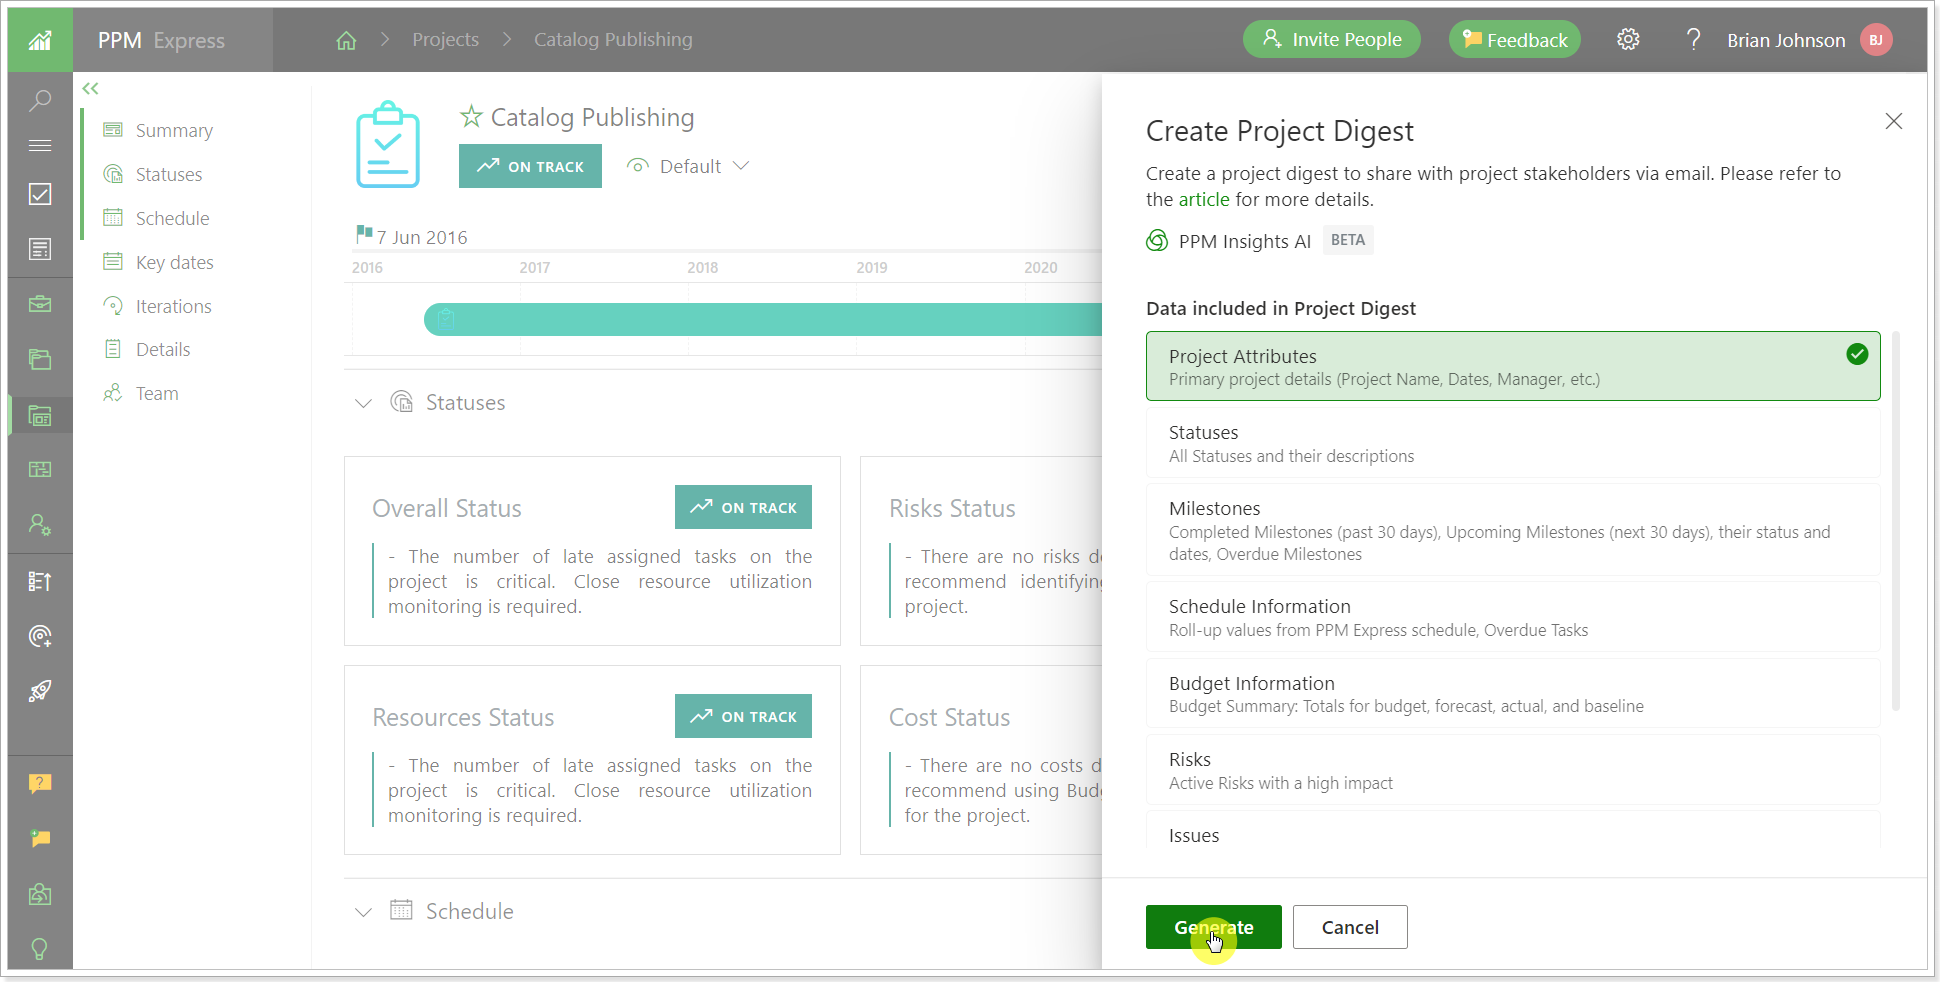
When the digest is generated, you can adjust it to your needs: make it brief, expand, or get data in bullet points. It is also possible to manually edit the digest, by deleting the information or adding new data to it.
Also, you can copy the digest text to the clipboard.
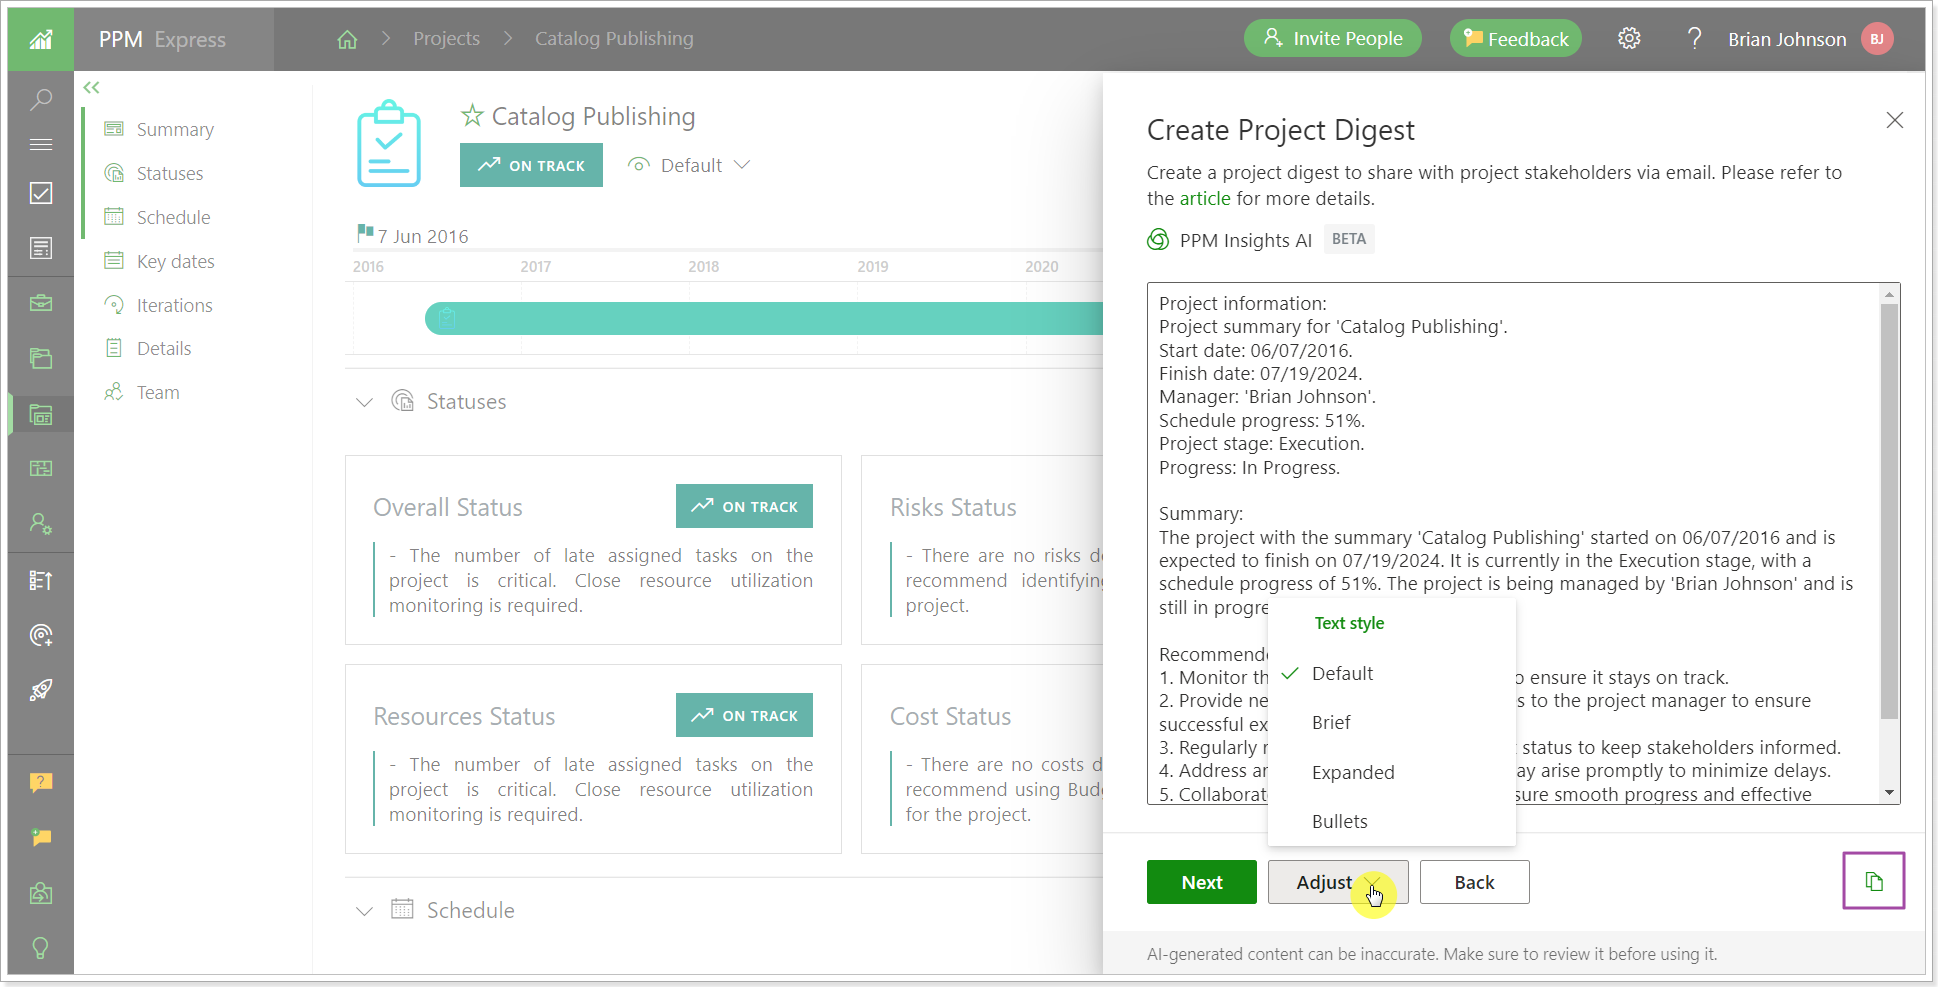
By default, the digest is created as a text document. If needed, you can switch to the HTML format to add visuals.
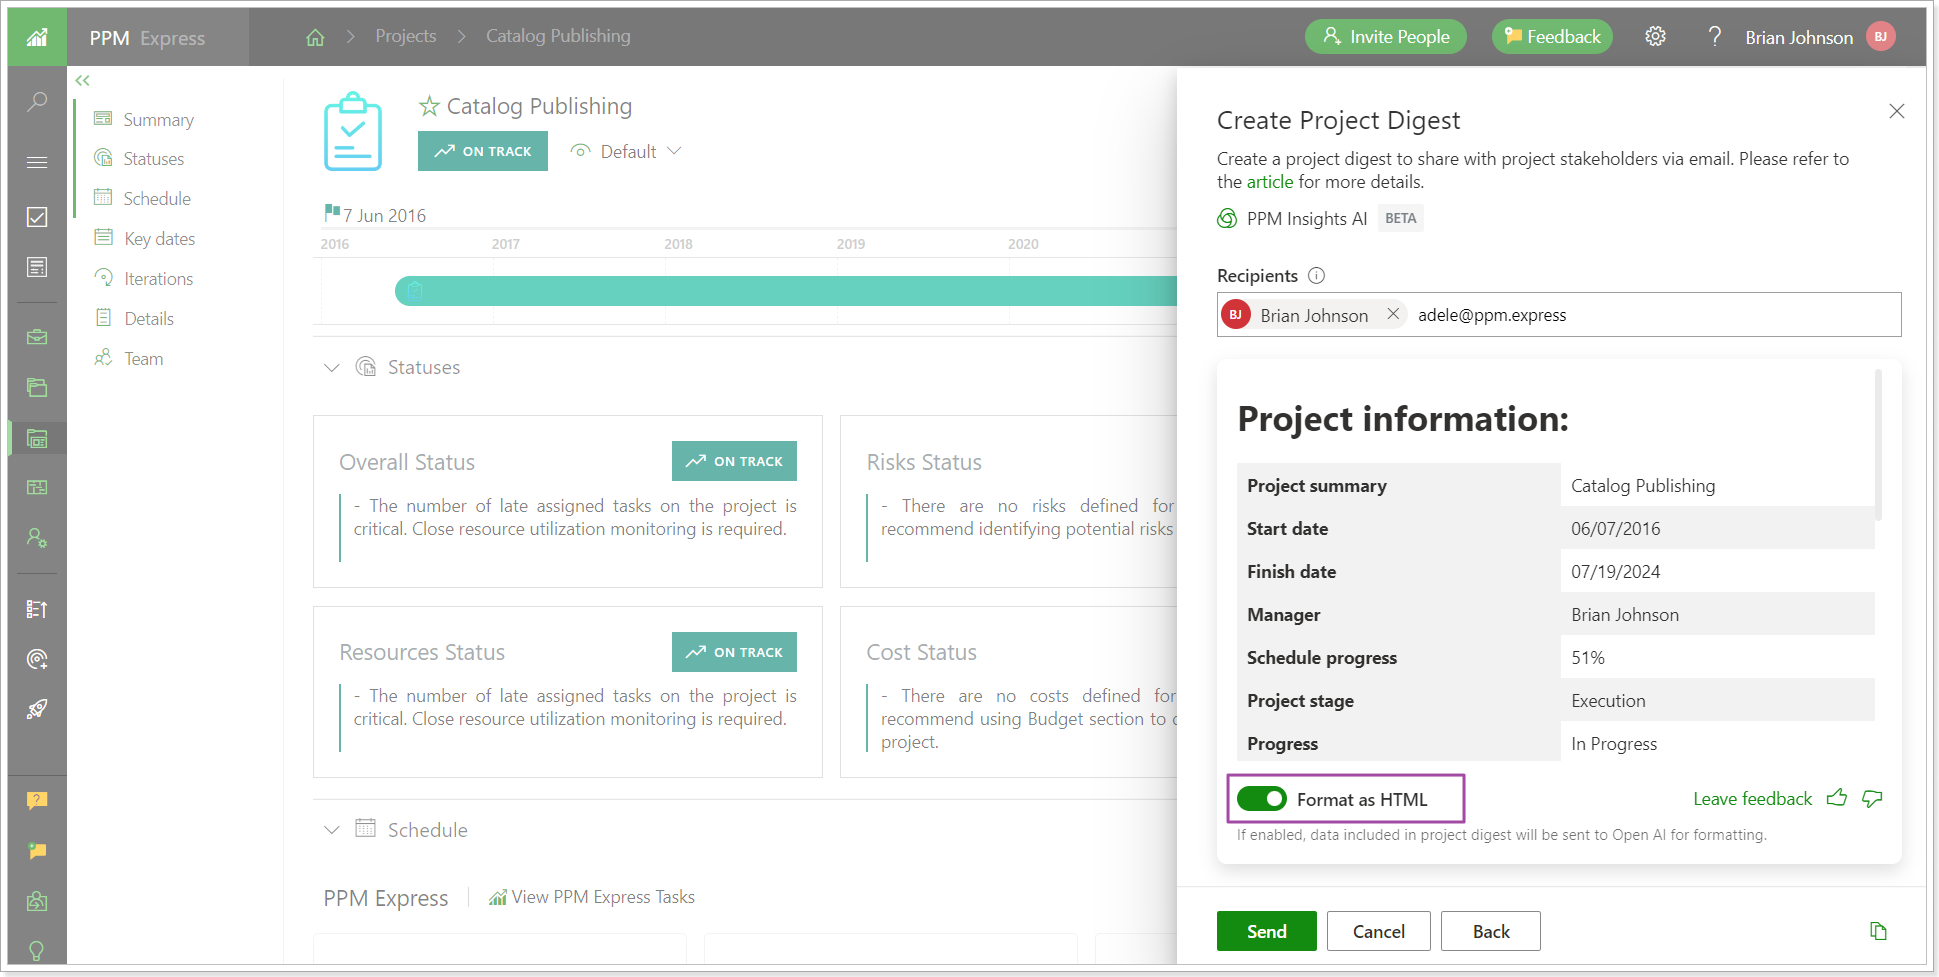
When the digest is ready, in the Recipients field provide the emails where it will be sent. You can select from the available PPM Express users or type in any other email.
2. The ‘Default Permissions’ menu was enhanced, allowing the indication of a specific entity for access by new users and team members.
Before: In the Default Permissions pane it was possible to select View All, Collaborate All, or Edit All options only. There was no option to specify to which specific entity new users and team members could have access by default.
Now: An option to provide a specific entity in the Default Permissions was added and it works in the same way as on the User setting pane for a user/ team member.
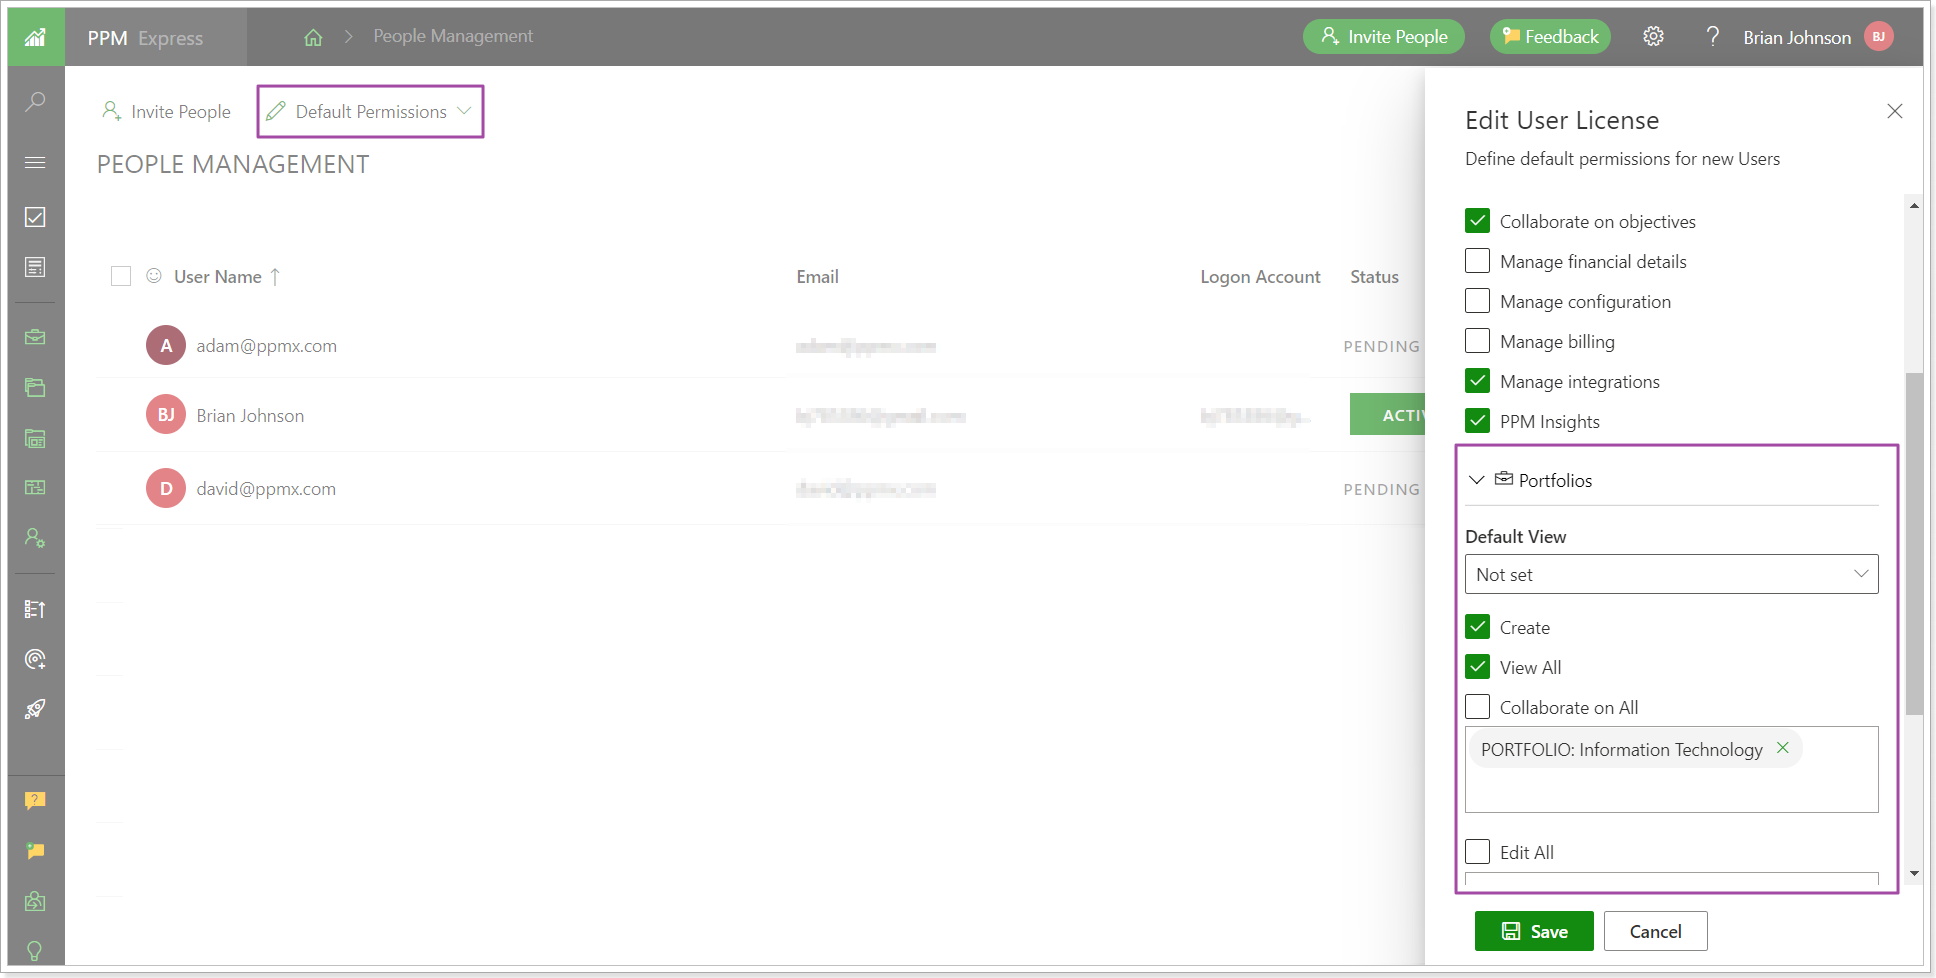
Release Notes 18.3 @January 04, 2024
1. It is now possible to hide the OKR module for specific users.
The Manage Objectives permission was enhanced on the People Management page allowing to show/hide the OKR module for users. This permission became more granular allowing users to have full access with edit permission, collaborate on, or only view the Objectives depending on user license type.
For users with the Team Member license type, it is possible to permit view Objectives in read-only mode or hide the OKR module at all if the View Objectives permission is not enabled.
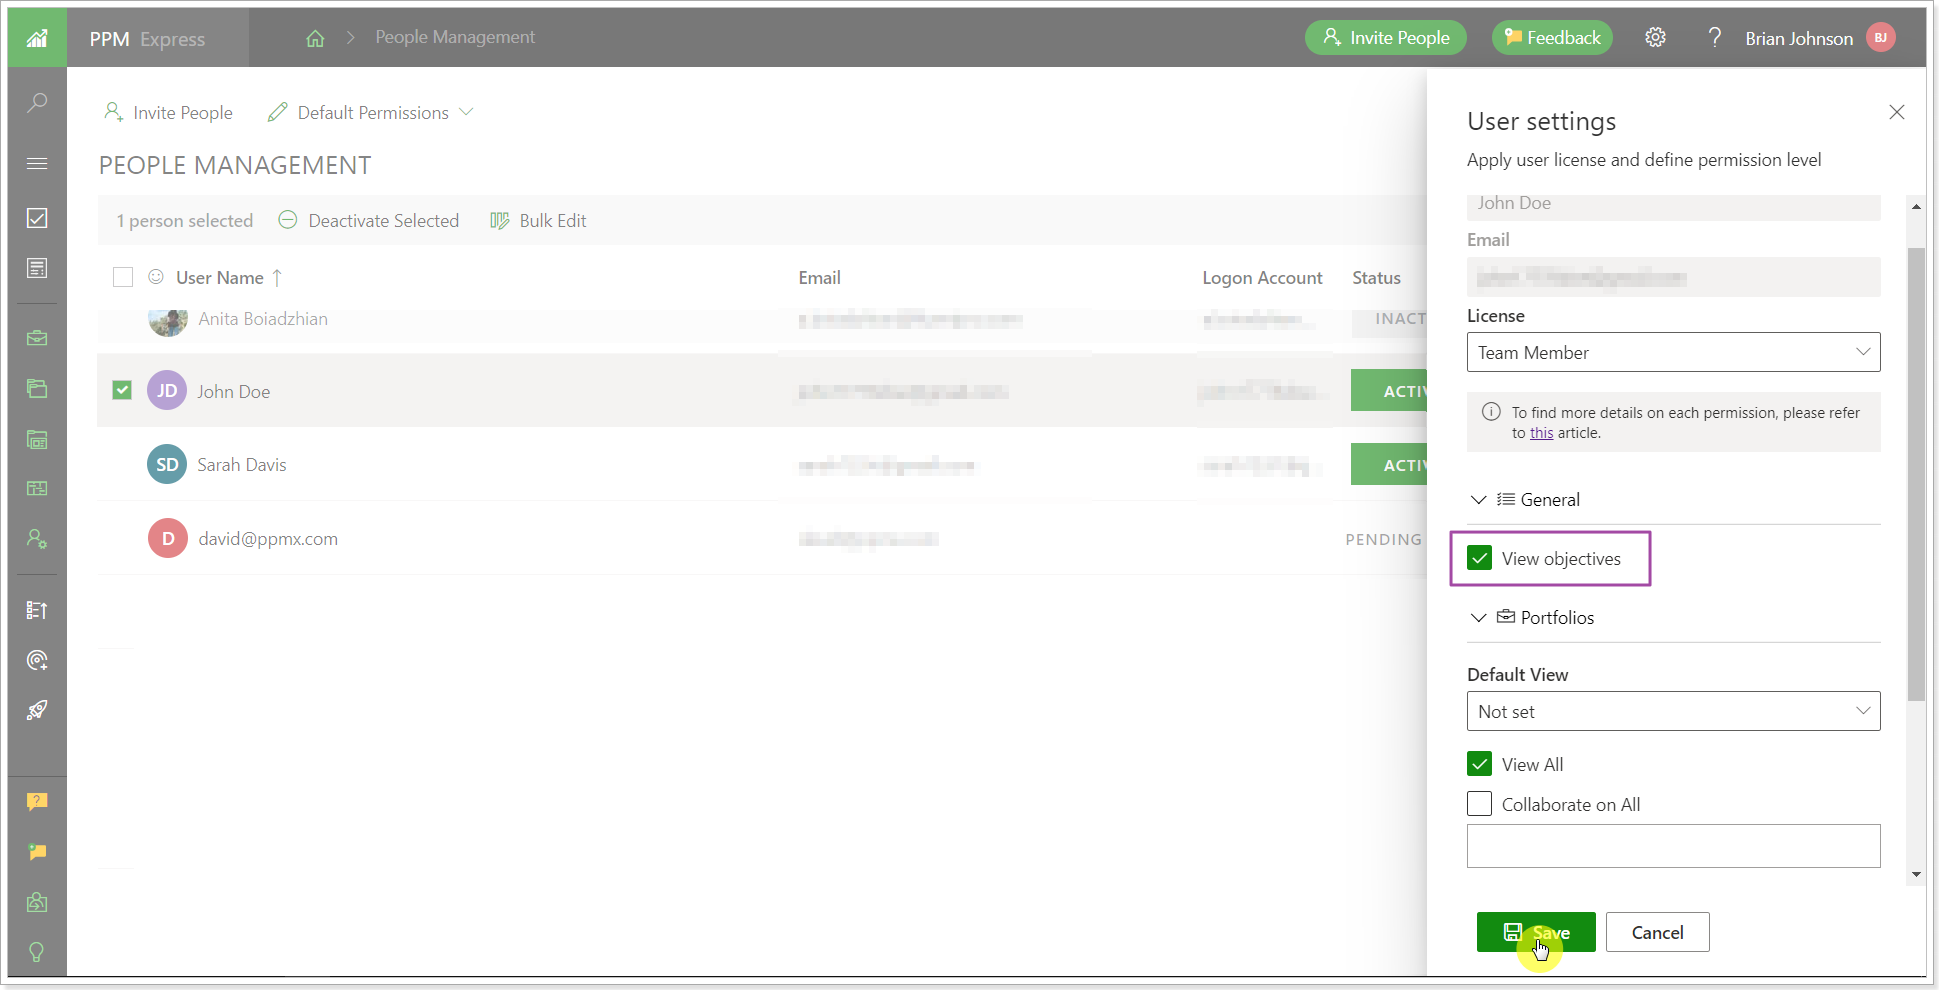 For those who have the User license type, it is possible to grant the Manage Objectives and/or Collaborate on permission.
With 'Manage Objectives' permission Users can create/edit/delete all Objectives on the tenant. With The 'Collaborate on objectives' permission only, Users can review all Objectives and create/edit/delete the ones they own.
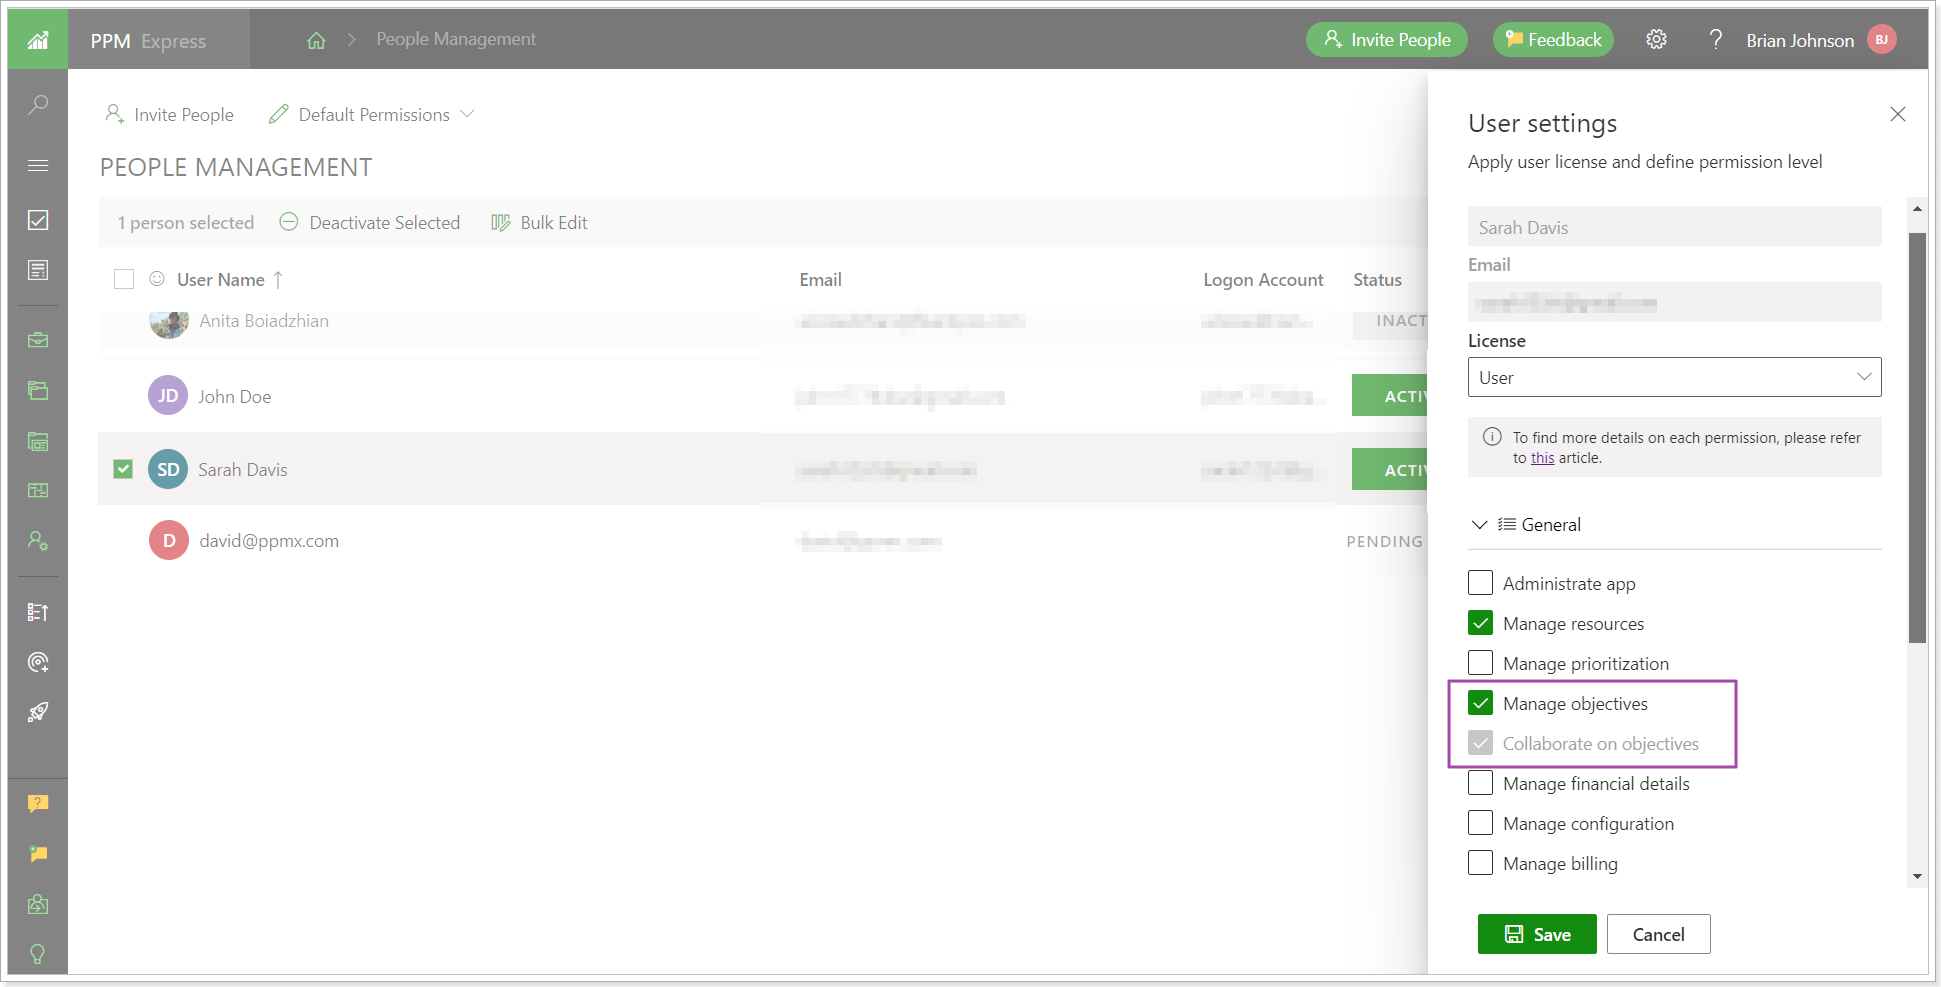
With this release nothing will change for existing users, the 'View Objectives' permission is ON by default for Team Members and the 'Collaborate on Objectives' permission is ON by default for Users. If the Manage Objectives permission was granted to Users, it will also remain unchanged.
Release Notes 18.2 @January 01, 2024
1. A new section ‘Benefits’ was added to Projects, Programs, Portfolios, and Ideas to manage plans and assessment of expected positive outcomes from the implementation.
This section is available for users with Manage Financial Details permission.
The Benefits Project section is similar to the Budget section and is configured via the Financials widget.
Two formula fields were added for this section to display data as needed: Estimated ROI and Estimated ROI Baseline.
- Estimated ROI = ((Benefits Forecast - Budget Forecast)/Budget Forecast) *100% (if at least one parameter is 0, the value will be 0)
- Estimated ROI Baseline = ((Benefits Forecast - Budget Baseline)/Budget Baseline) *100% (if at least one parameter is 0, the value will be 0)
Also, the Benefits Start/Finish date fields are available in the Project Details section and are hidden by default. There are two Benefit types: Fiscal and Non-fiscal.
The settings and fields are similar to the Budget section.
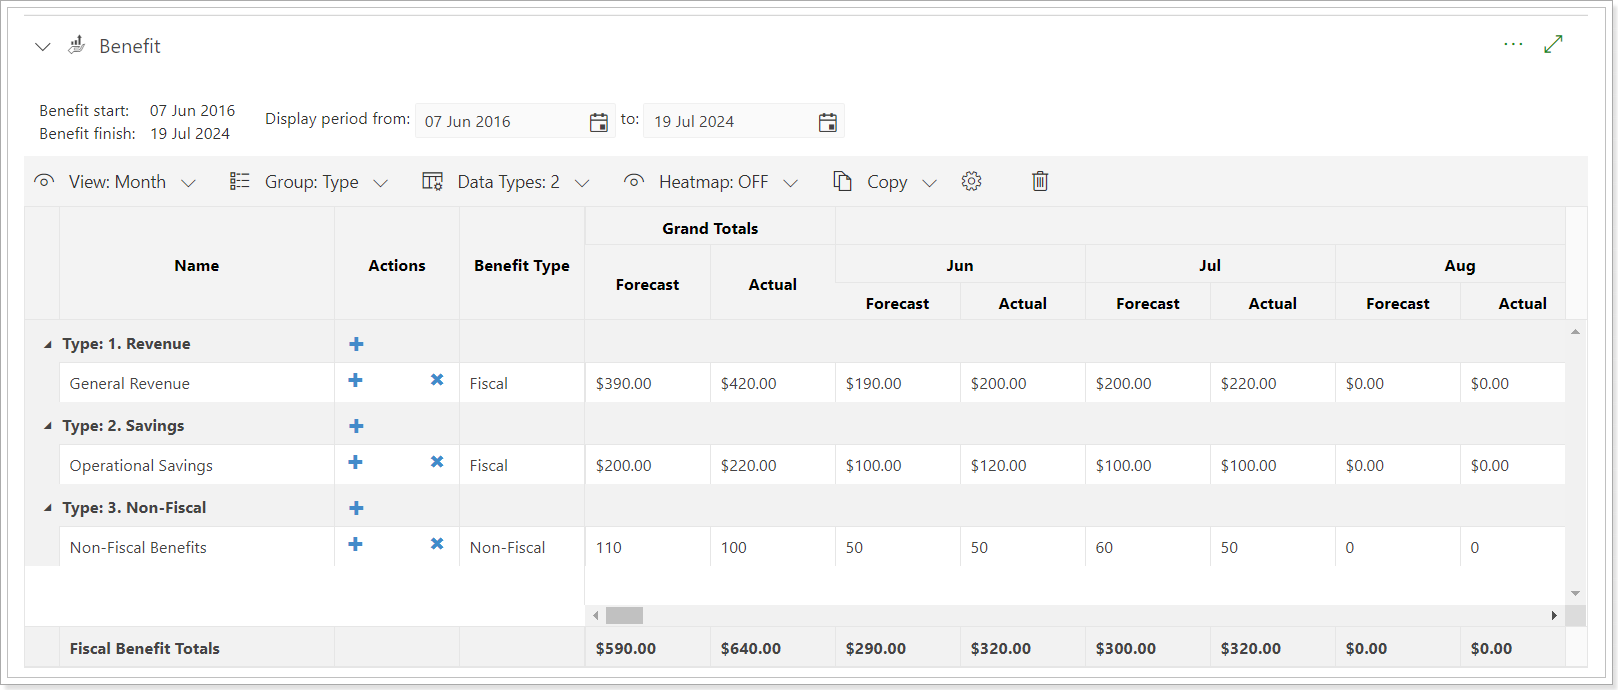
2. Bulk actions, such as Indent/Outdent, Link/Unlink, Assign to, Set progress, Move to group, and Clone, were added to the toolbar panel for PPM Express Tasks.
Before: Most of these settings were available from the ellipsis button next to each task.
Now: These settings are now available from the toolbar as well. It allows bulk updating of the tasks by selecting the required ones and changing the values using the settings from the toolbar.
Please note the following when editing tasks in bulk:
Progress: If there are Summary tasks in the automatic mode, progress will not be changed using the bulk update option. Only those tasks that have Progress editable should be updated.
Clone: To clone all the tasks in the hierarchy, they all should be selected. If you select one task from the hierarchy, only one task will be cloned.
Link/Unlink: These options allow setting predecessors/successors for the selected tasks. If edited in bulk, the dependency type will be Finish to Start. If the predecessor conflicts with an existing one during the bulk edit, it will be skipped.
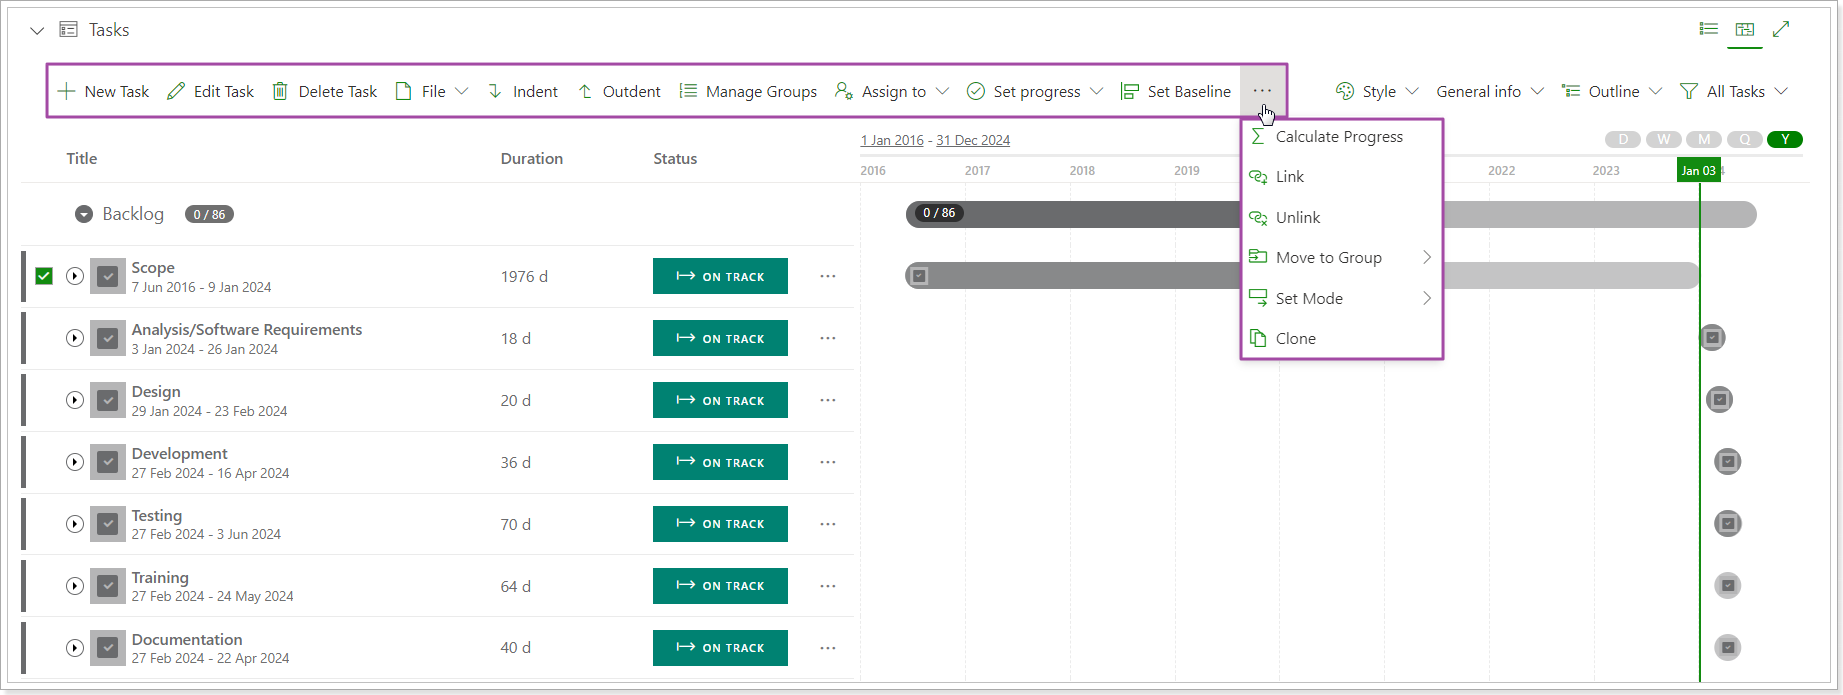
Release Notes 18.1 @December 26, 2023
1. Planning the allocation of resources is now available at the Project, Program, or Portfolio level.
The planning level can be now selected in the 'Resource Planning' setting added to the Tenant Settings page.
The Project level is selected by default. The Resource Plan logic is the same for all levels. All Resource fields are available on the Program, Portfolio, and Project dashboard, but data for these fields will be visible depending on the level selected. If the Project level is selected, then the Resource fields will be active on the Project dashboard.
The data will not be deleted from the Resource Plans created on the previously selected level, it will be hidden from the application. In case the setting is changed back, existing data will become visible again.
Please note: Only one level can be selected.
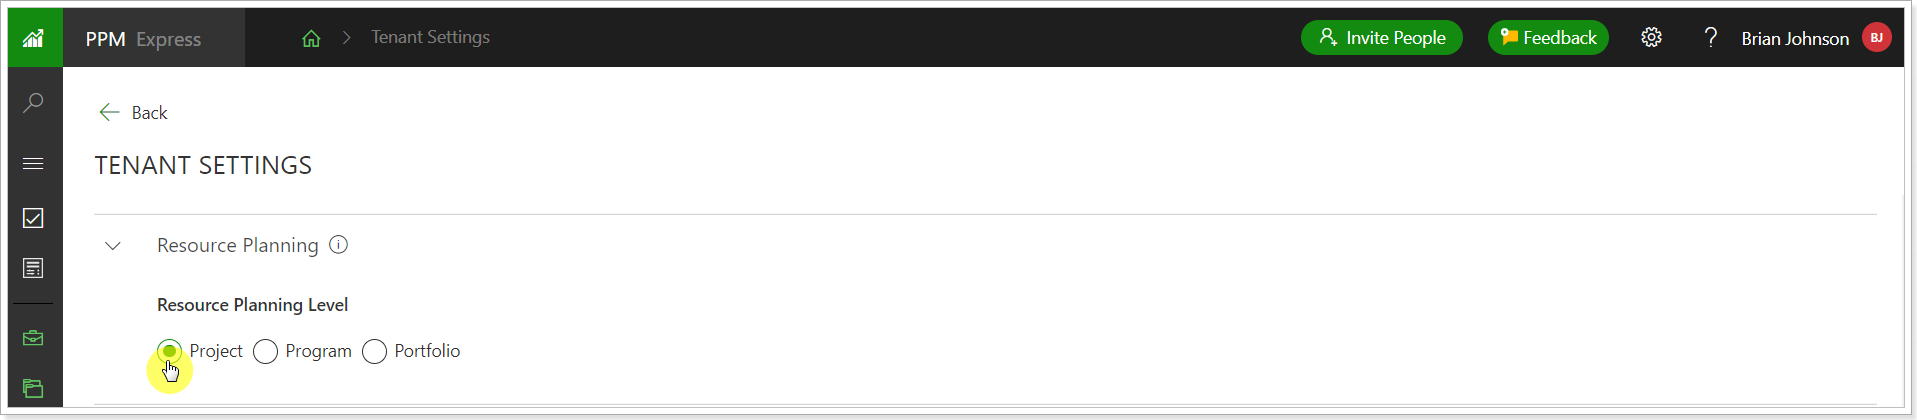
2. Work via API has been added to the Calendar Exceptions section for both Global and Resource Calendar settings.
For example, if you need to create a global Calendar Exception or an exception for any specific Resource, it can be done via API.
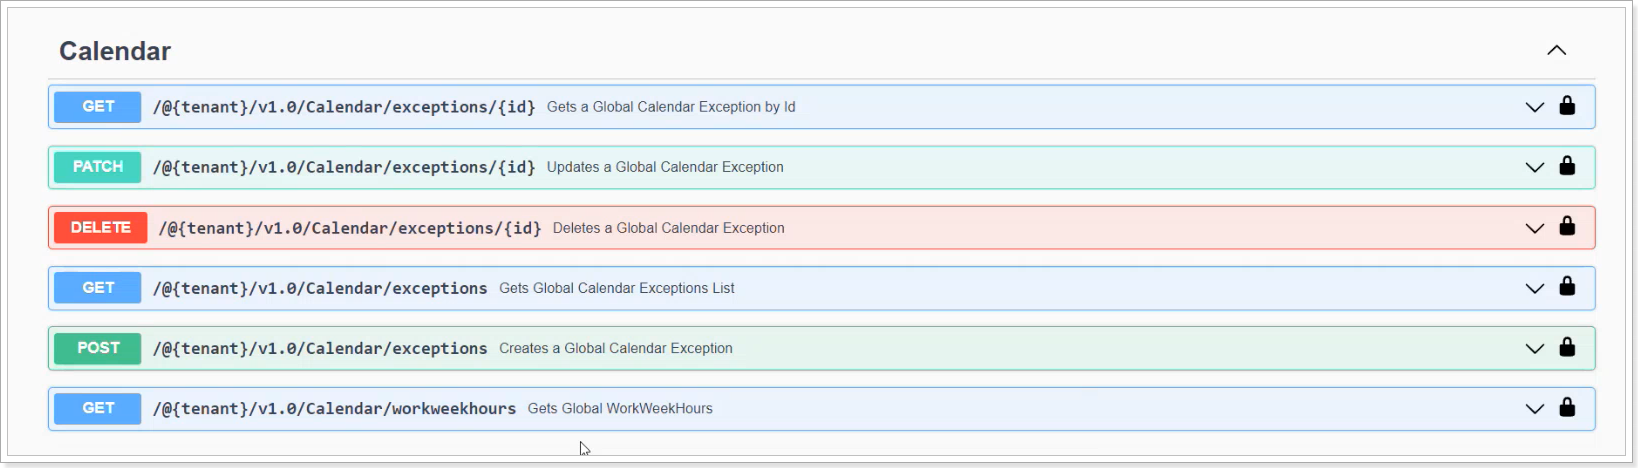
3. The 'Task Field Mapping' option has been added to the interface of the MPP (Project) Publisher addon.
When publishing your schedules from Project Desktop to PPM Express, you can now include task custom fields and their values along with the schedule.
Project Publisher performs a default mapping of compatible task fields automatically. You can use the default mapping or customize it as needed.
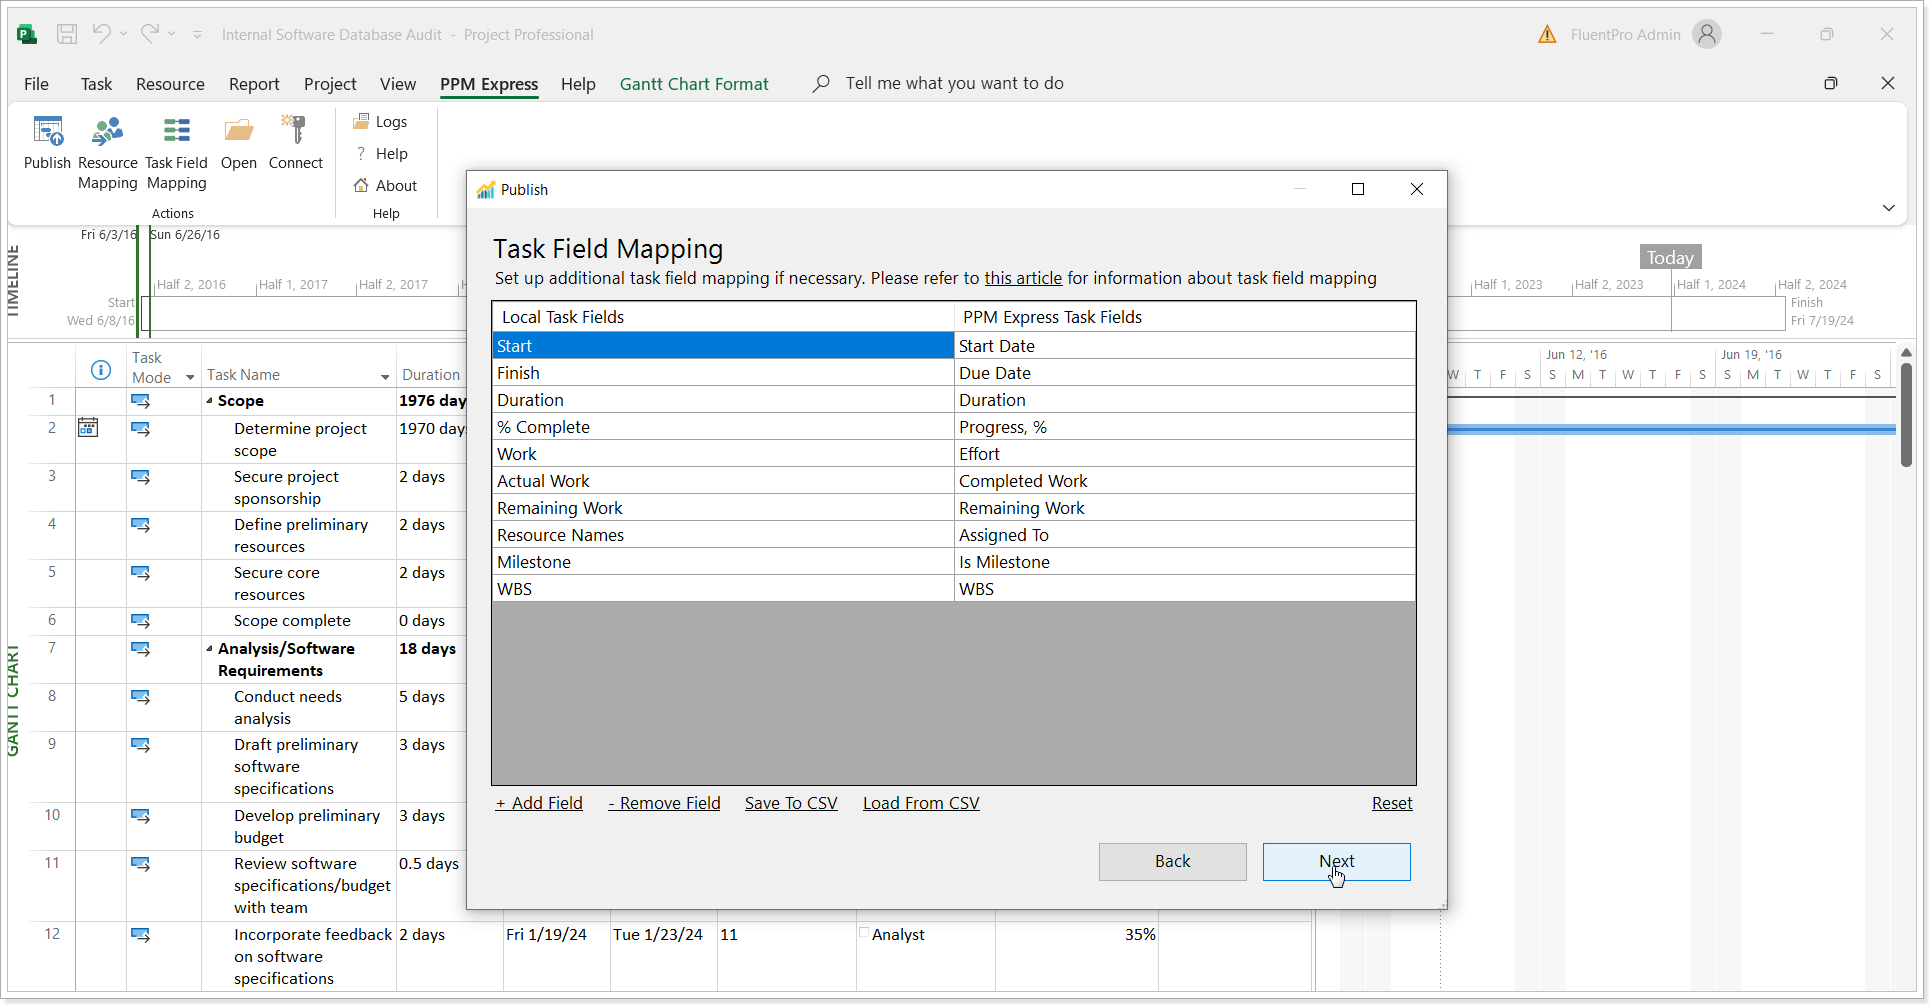
4. Tasks from MPP files (Project Desktop app) can be now imported as PPM Express tasks using Project Publisher.
This feature allows importing tasks from the .mpp file into the PPM Express Task page of the selected Project without Project linking. These tasks will appear on the Tasks page in the editable mode, as regular PPM Express tasks (as if they were created manually). There will be no Project Desktop icon next to these tasks.
Please note: If the import of the task is done to the existing PPM Express Project and there are any tasks for this Project already in PPM Express, they will be deleted and tasks from the .mpp file will be created instead.
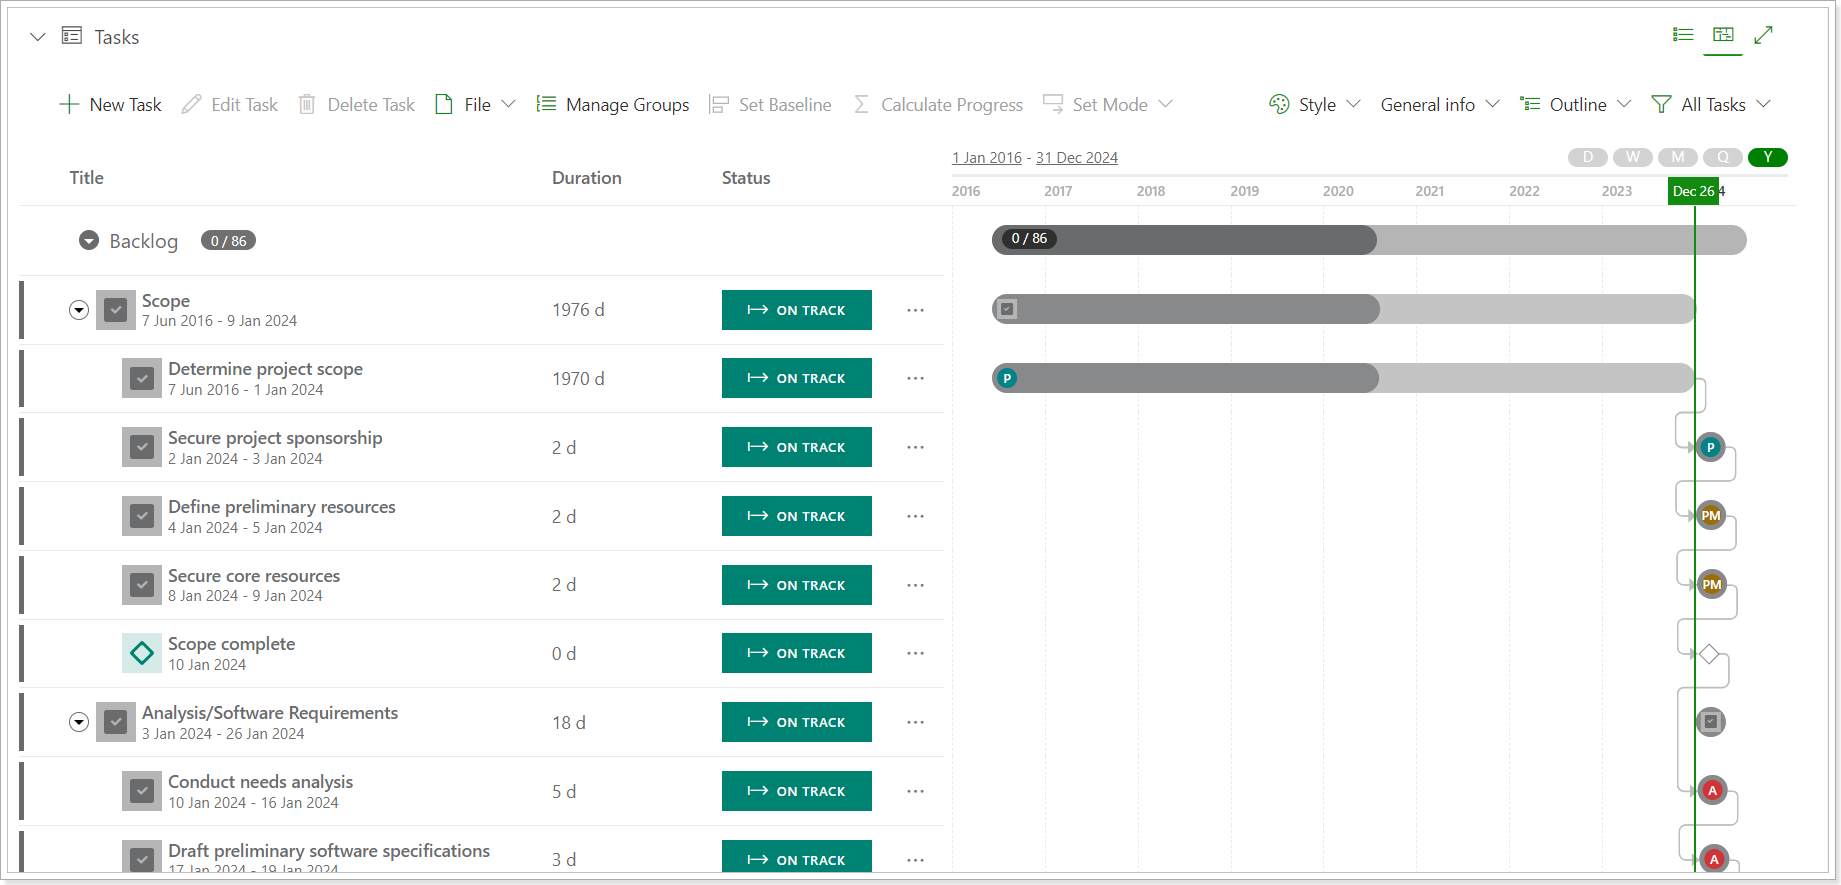
5. The option to update the Project’s Start Date and Finish Date with the dates from the project summary task has been added to the Project Publisher addon.
This setting is available both for the Project Publish and tasks import from the .mpp file.
From now on, Project Start/Finish Date synchronization depends on the 'Update Project Start Date and Finish Date fields' setting which is turned on by default.
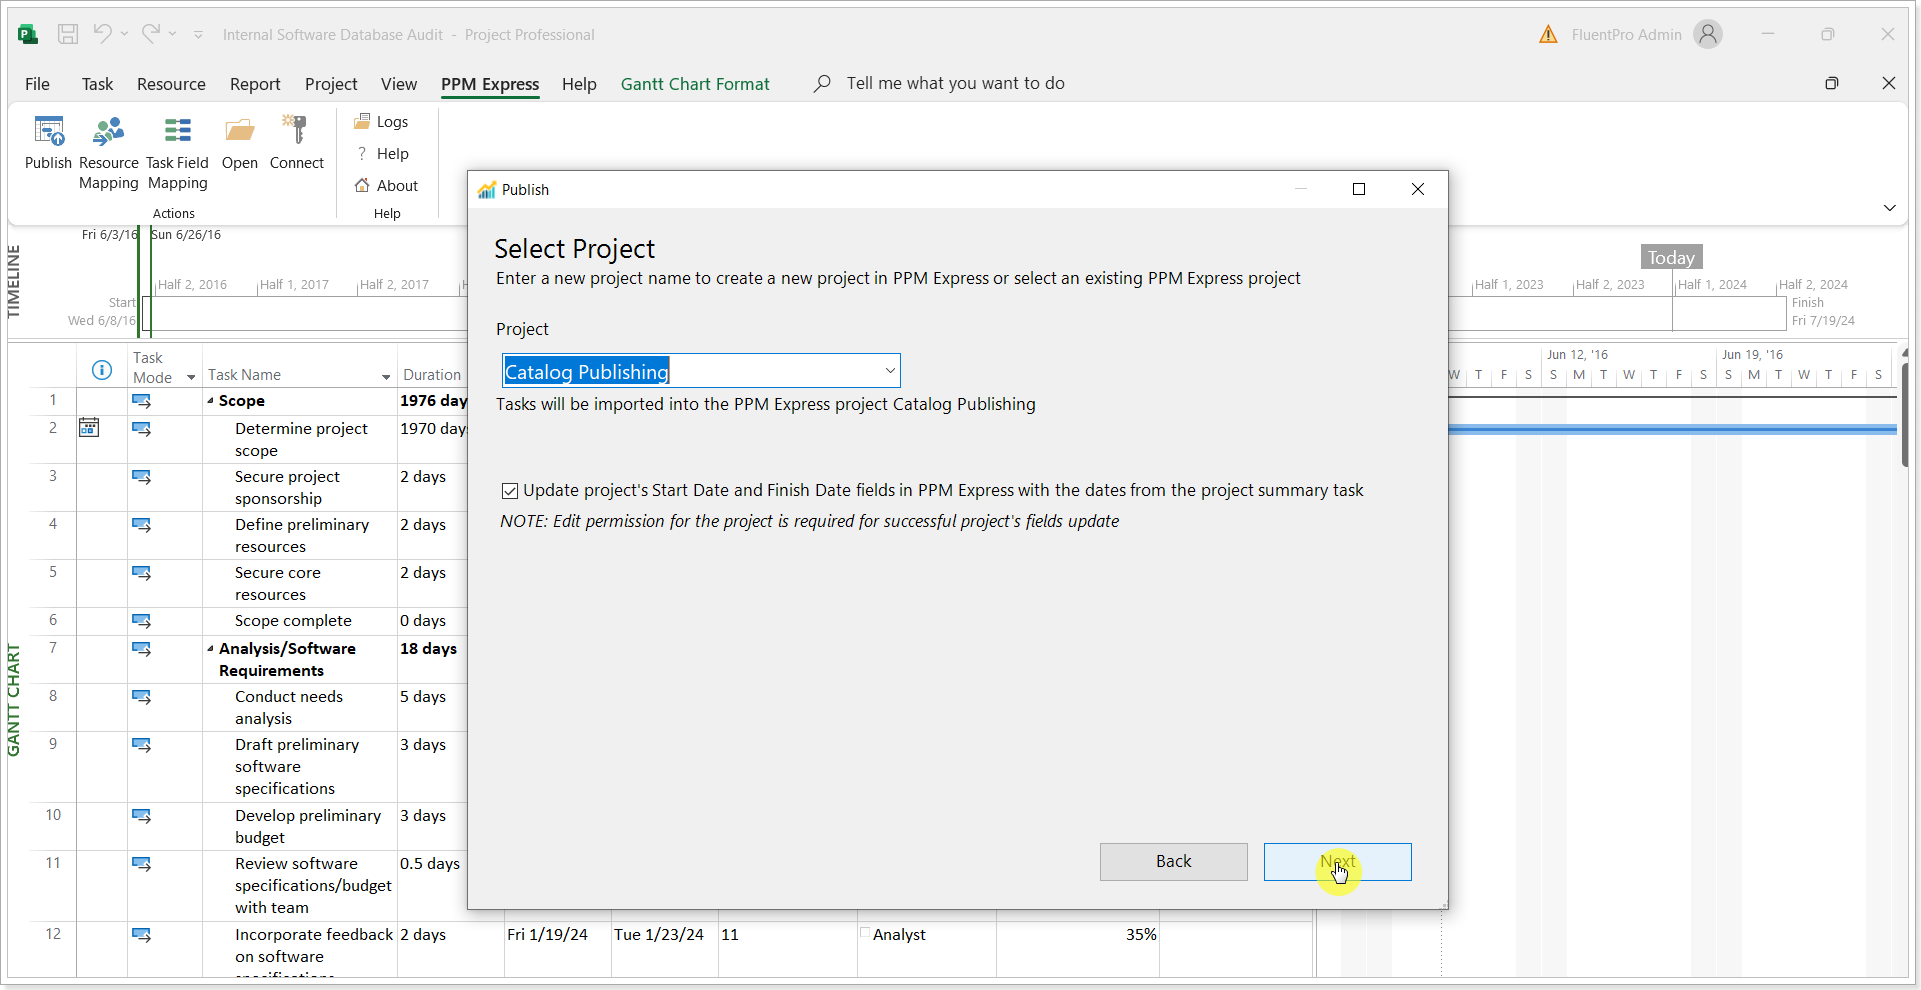
If the 'Update Project Start Date and Finish Date fields' checkbox is checked, the PPM Express project will be updated with the dates from the Summary Task.
When data is synchronized to the PPM Express project, and the 'Update Project Start Date and Finish Date fields' checkbox is not checked, the dates in the PPM Express project will not be affected (even if there is only one date set: Start Date or Finish Date, or no dates at all) as well as the Summary section.
6. The 'Outline' option has been added to the Tasks page for PPM Express tasks and all connector systems with a hierarchical structure of tasks.
This option allows you to expand and collapse all levels of the hierarchy without expanding/collapsing each task individually.
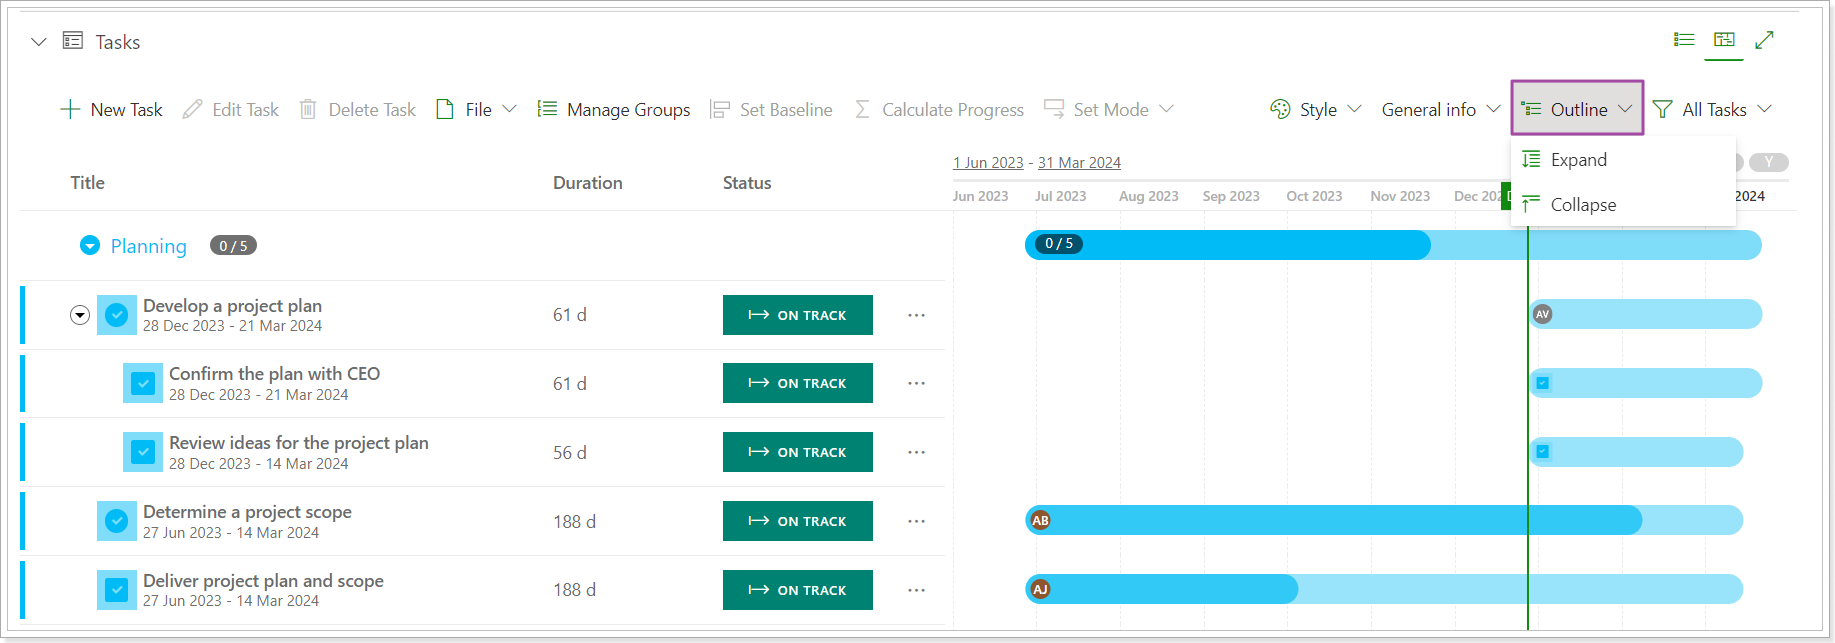
Release Notes 18.0 @December 18, 2023
It is now possible to edit status categories for PPM Express entities: Projects, Programs, Portfolios, Tasks, Key Dates, Roadmaps, and Objectives.
There are five status categories in PPM Express, and the names/colors of these categories cannot be changed.
- N/A
- Critical
- At Risk
- On Track
- Done
By default, each status category includes one status with the same (as the category) name and color.
From now on, new statuses can be added to each category and the status name and color can be changed by clicking on the pencil-like button next to it.
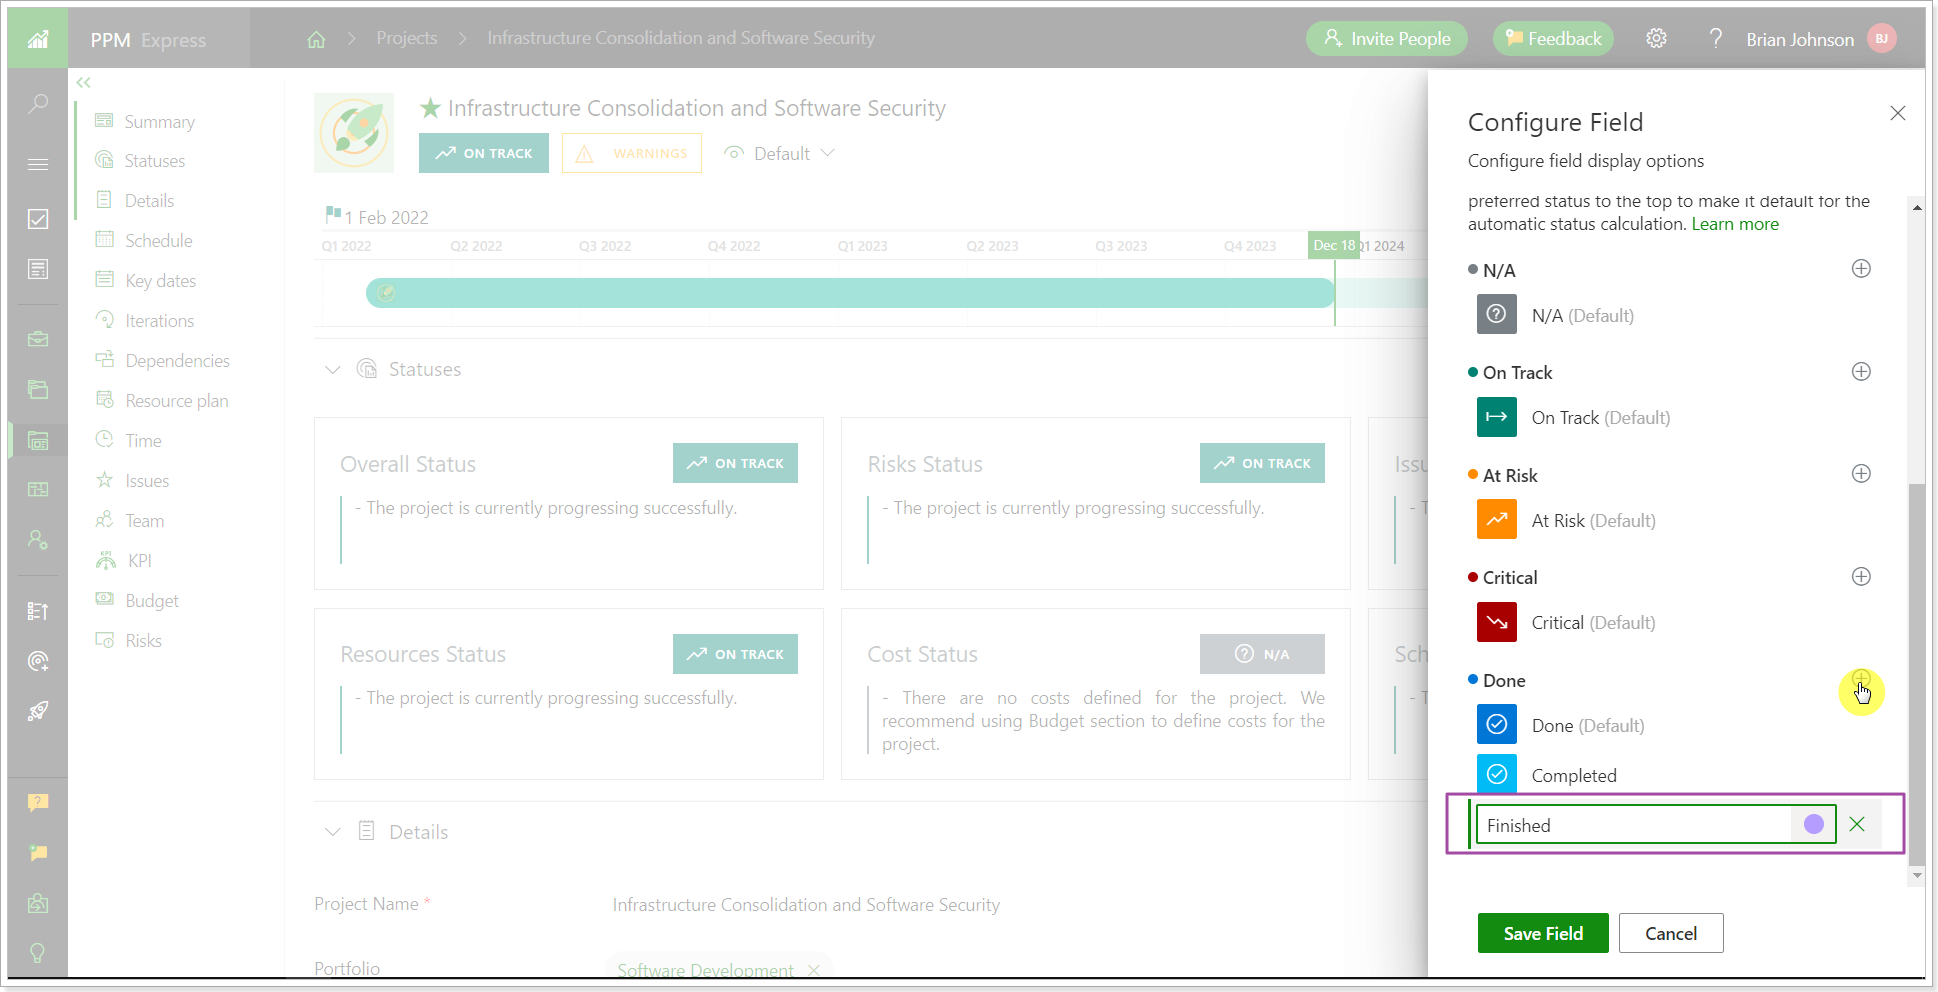
You can add as many statuses as you need.
To change the default status, drag the preferred status to the top of the status category. This status will become the default one for automatic status calculation (if it is enabled on the tenant).
For more details about creating and editing statuses for each PPM Express item, please refer to the "How to customize status categories for Projects/Programs/Portfolios/Tasks/etc" article.
Release Notes 17.0 @October 2, 2023
1. Auto calculation mode for Progress-related fields is now available for PPM Express tasks.
In this release, the auto calculation of Progress related fields became available. For all existing customers nothing will be changed with the release for existing projects, the calculation mode will be set to manual and will need to be changed to auto if needed.
Before: To recalculate the task progress and the progress-related fields, users selected the tasks and clicked the Calculate Progress button.
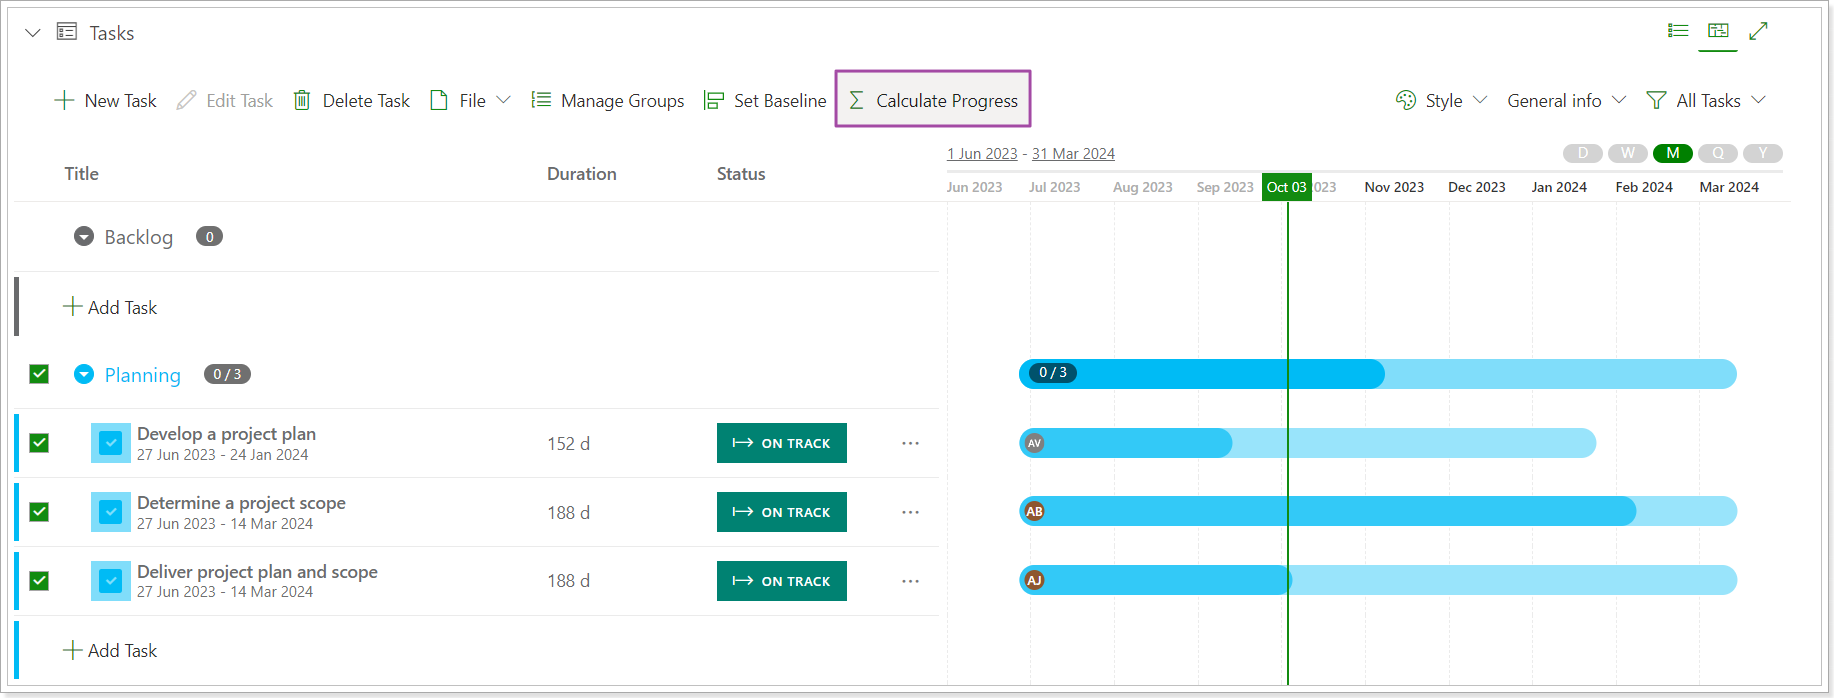
Now: Both Manual and Auto-calculation modes are available. For the manual mode, the process remained unchanged, the 'Calculate progress' button is used to trigger the on-demand calculation. When the auto calculation mode is on, PPM Express tasks progress and the related fields will be recalculated automatically when the corresponding changes to the task fields take place. For more details, please refer to the 'Calculation of PPM Express Tasks Progress' article.
The setting is applied per project. To change the calculation mode to Auto, open the required project -> ellipsis button -> Project Settings -> Default Mode for new PPM Express tasks.
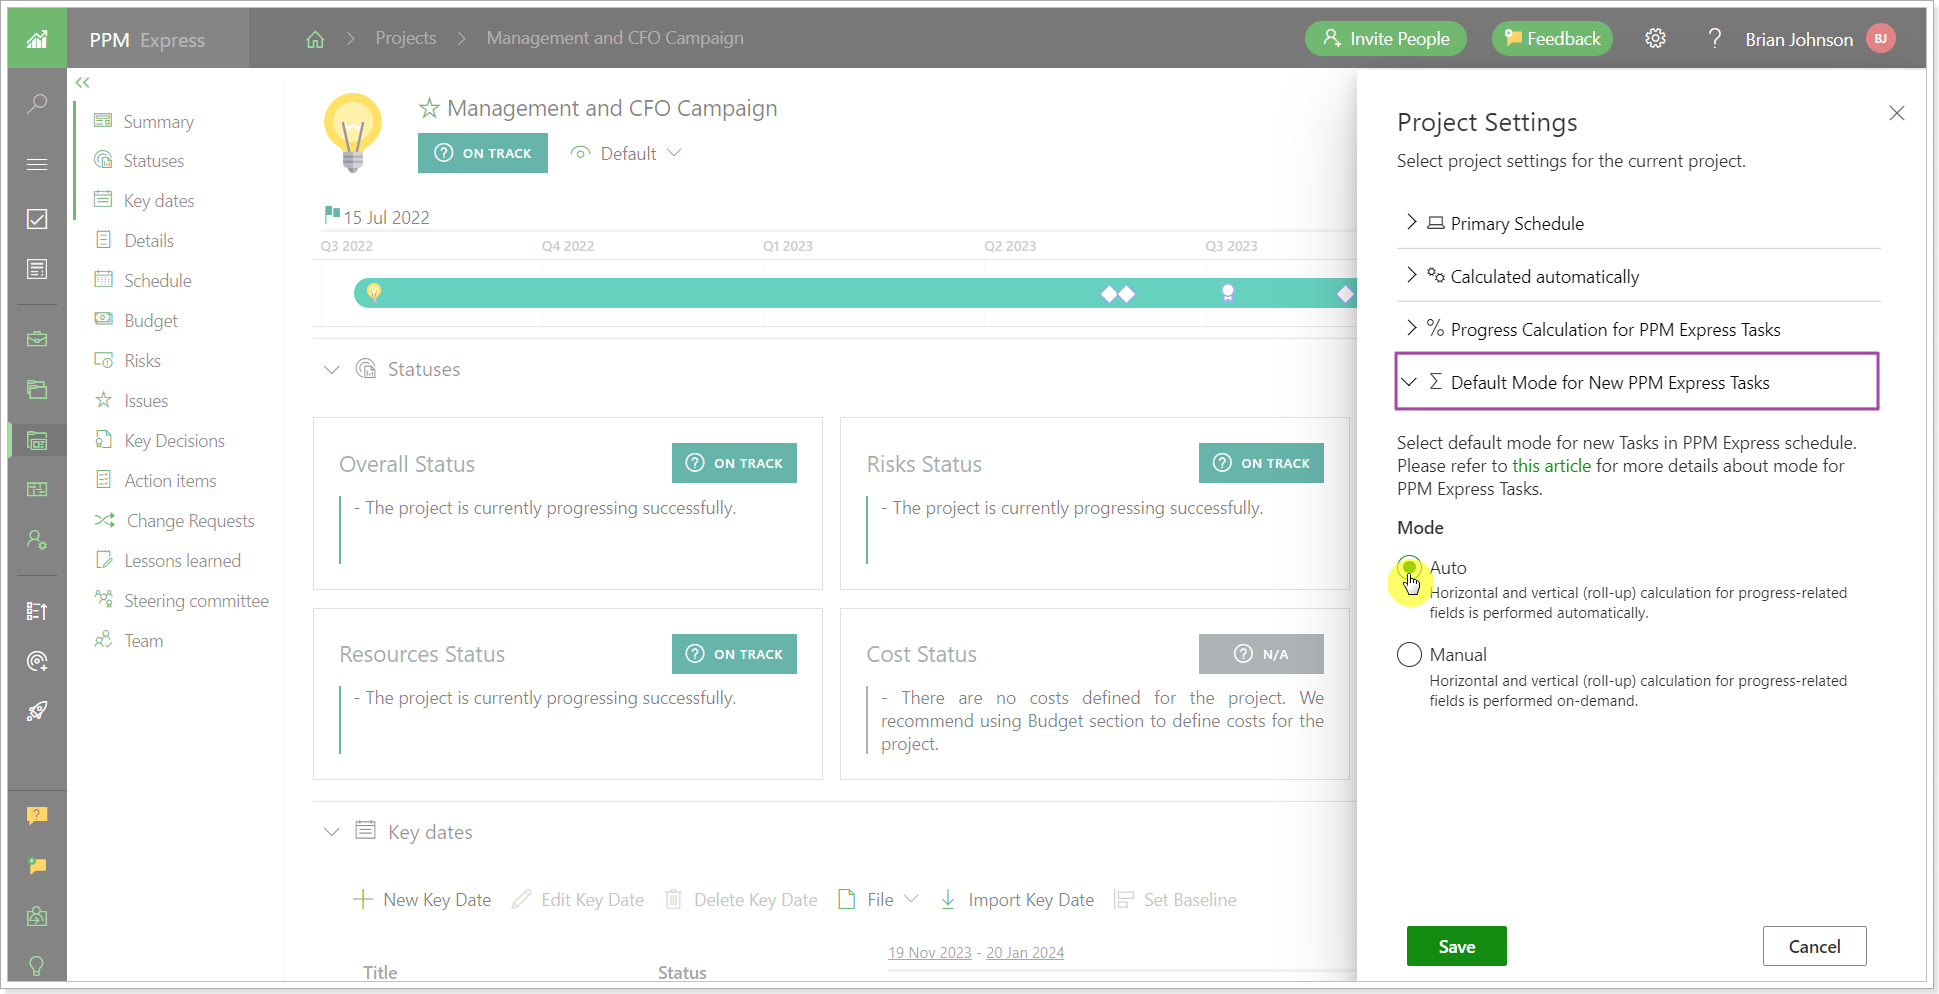
Please note: All tasks created before the mode was switched to auto, will be still calculated manually.
To set the mode to auto for all existing tasks open the tasks page, select the required tasks -> Set mode -.> Auto.

Release Notes 16.8 @August 21, 2023
1. Progress Calculation Settings will be updated and the way how the Progress for PPM Express Schedule is displayed will be changed.
Please note: All changes in this release are related to PPM Express tasks only, tasks imported from the external systems were not affected.
Some customers use Efforts and hours, other customers use Story Points and maybe some customers just manually input Progress, % for tasks.
With this release, flexible settings for PPM Express Tasks for Progress calculation will be introduced. These settings will define what formula will be used in calculations of Progress, % rollup values in summary tasks, task groups, and on the project level. These settings will be flexible as they allow you to select Progress,% calculation type depending on the organization's needs, if Effort and hours are used for Progress calculation or the Story Points, or just manual input for PPM Expres tasks.
The Project Progress will be displayed in % instead of the number of tasks.
By default, a formula based on Completed Work and Effort will be used, but project managers can switch the Progress, % formula for their project to a different one as needed. These settings are applied per project.
Please note: If you are using Story Points or manually input the Progress,% of tasks, the setting will need to be changed right after the release to display the Progress value accurately.
To set up the Progress,% calculation type, open the Project Setting menu from the ellipsis button -> Project Settings.
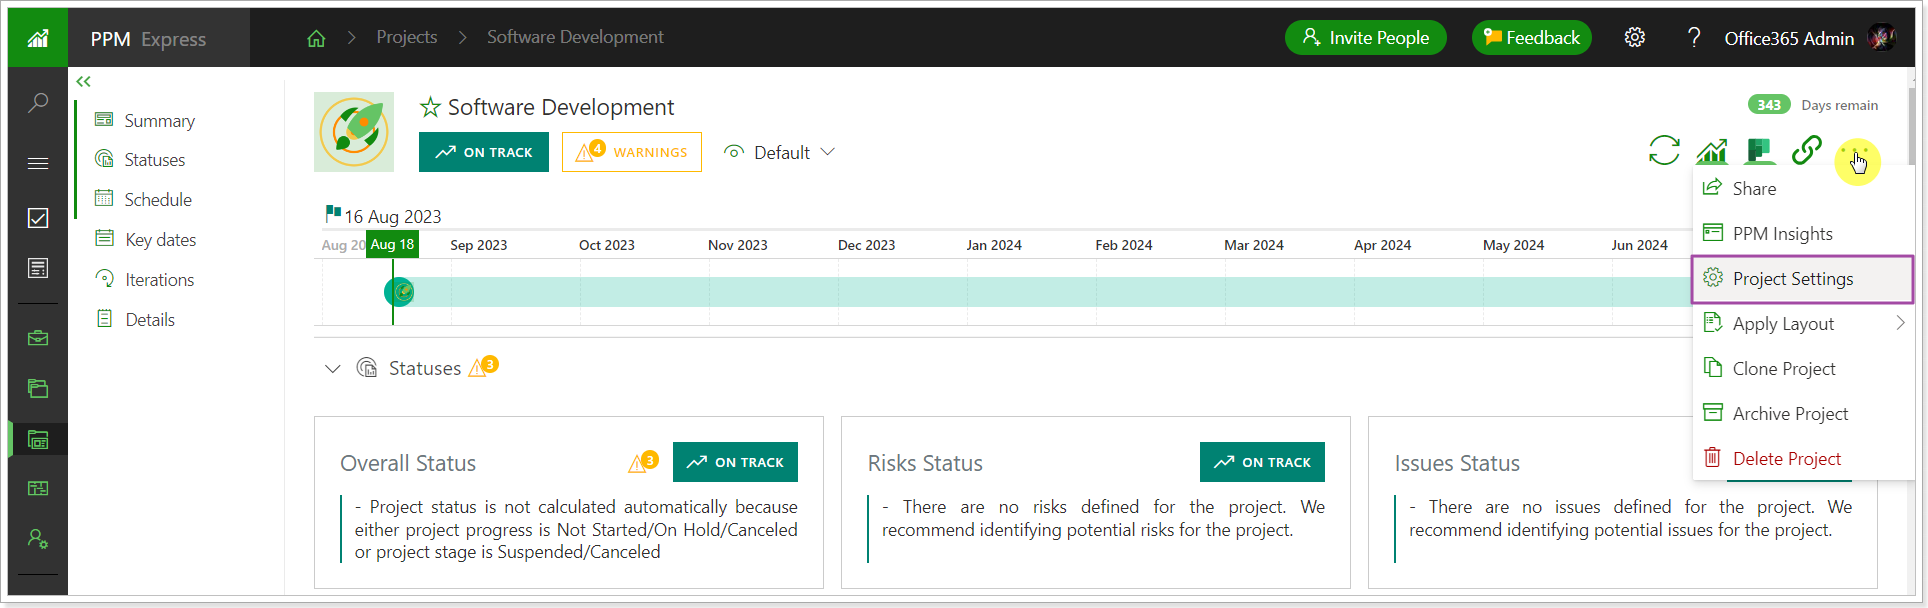
Select the Progress calculation for PPM Expres tasks option and choose the required setting.
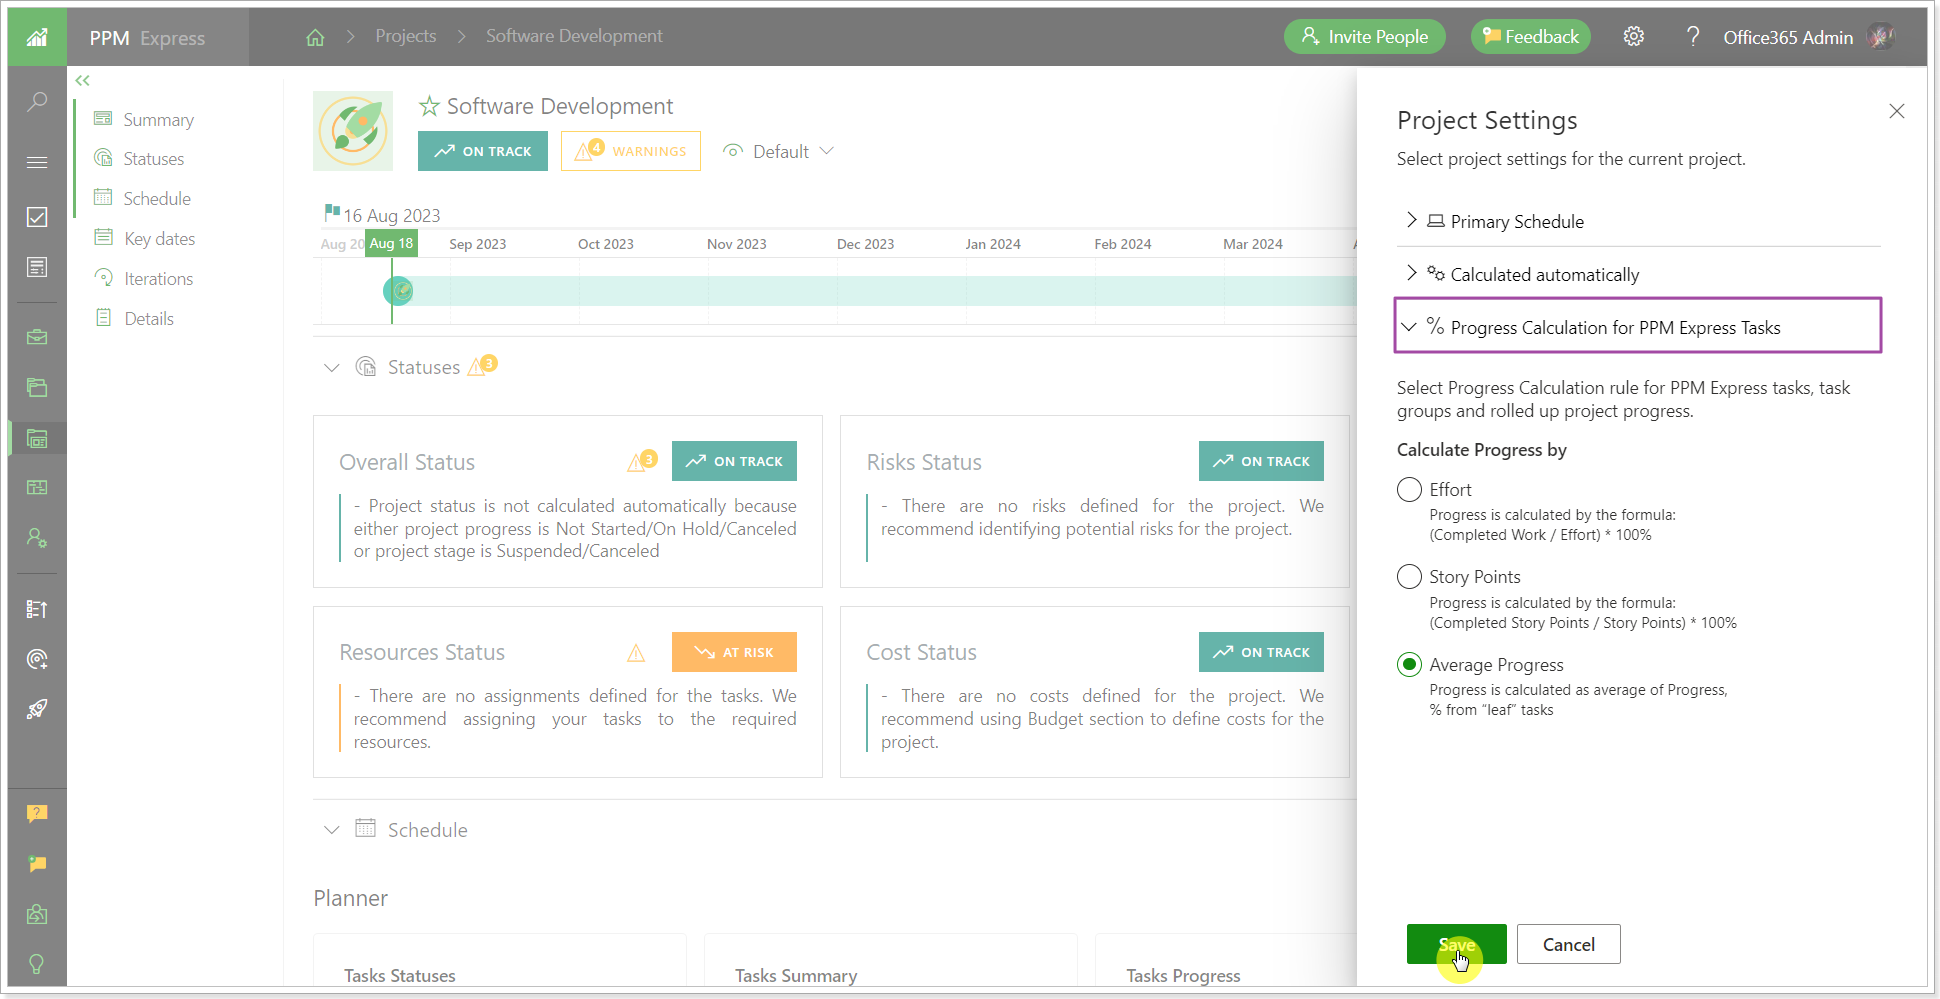
- Effort: Progress is calculated by the formula: (Completed Work / Effort) * 100%
- Story Points: Progress is calculated by the formula: (Completed Story Points / Story Points) * 100%
- Average Progress: Progress is calculated as an average of Progress, % from “leaf” tasks
If the calculation type is changed, then the new rule will be saved and applied at once:
- Progress for task groups and Project Progress roll-up will be automatically re-calculated based on the logic of the selected option.
- Progress for the summary tasks will be re-calculated based on the logic of the selected option when Calculate Progress is triggered.
- Progress for non-summary tasks will be re-calculated based on the new logic when the Calculated Progress is triggered or will remain unchanged if the manual input for non-summary tasks is supposed to be used according to the new rule.
Progress Calculation setting will be applied to:
Applied to: |
Calculate Progress from Effort and Completed Work |
Calculate Progress from Story Points and Completed Story Points |
Calculate Progress as average |
(triggered on-demand) |
Calculation by the formula: (Completed Work / Effort) * 100% |
No calculation, only manual input |
No calculation, only manual input |
(triggered on demand) |
Calculation by the formula: (Completed Work / Effort) * 100%
where Completed Work and Effort are rolled-up values from “leaf” tasks under the summary task |
Calculation by the formula: (Completed Story Points / Story Points) * 100%
where Completed Story Points and Story Points are rolled-up values from “leaf” tasks under the summary task |
Average Progress,%
Progress is calculated as an average of Progress, % from “leaf” tasks under the summary task |
|
Calculation by the formula: (Completed Work / Effort) * 100%
where Completed Work and Effort are rolled-up values from “leaf” tasks in the task group |
Calculation by the formula: (Completed Story Points / Story Points) * 100%
where Completed Story Points and Story Points are rolled-up values from “leaf” tasks in the task group |
Average Progress, %
Progress is calculated as an average of Progress, % from “leaf” tasks in the task group |
|
Calculation by the formula: (Completed Work / Effort) * 100%
where Completed Work and Effort are rolled-up values from “leaf” tasks in the project |
Calculation by the formula: (Completed Story Points / Story Points) * 100%
where Completed Story Points and Story Points are rolled-up values from “leaf” tasks in the project |
Average Progress, %
Progress is calculated as an average of Progress, % from “leaf” tasks in the project |
Release Notes 16.7 @August 15, 2023
1. A new connection type with limited access and without Admin consent is now available for Planner and MS Teams.
From now on, a regular connection account can be used to import/link PPM Express Project/Program with a Planner plan or to add an MS Teams connection. Admin consent is not required for this connection type. This connection type for Planner is restricted as it does not give full access to the Planner data.
Planner restricted connection
To add a restricted connection using a regular account, open the PPM Express project for linking and select Planner ->pp Add new restricted connection -> use your regular account to connect to Planner.
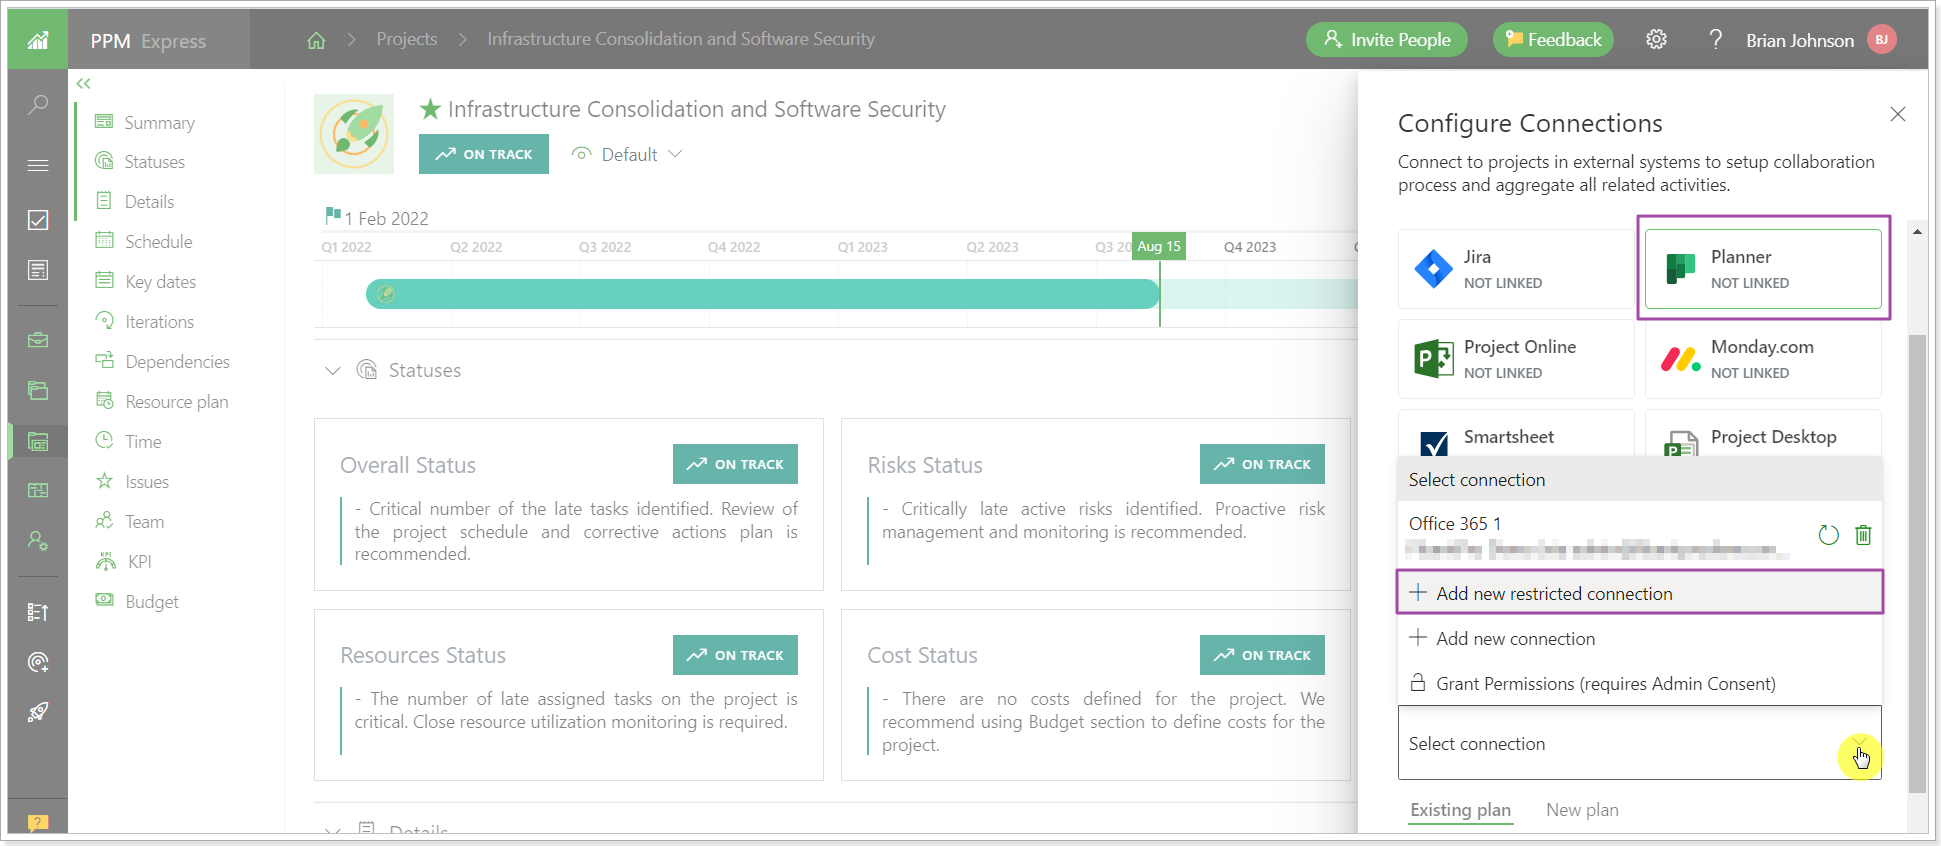
When the restricted connection is added, only those plans where the connection account is added as a member will be available for linking. Also, the user must open the plan selected for linking in Planner at least once, otherwise, this plan will not appear in the list of available ones in PPM Express. This is an API limitation. The groups are not available and it is not possible to create a new plan from PPM Express with this connection type.
Clicking on the lock sign next to the connection name, it is possible to grant Admin consent for this connection, if needed.
For more details please refer to the 'How to add Planner connection' article.
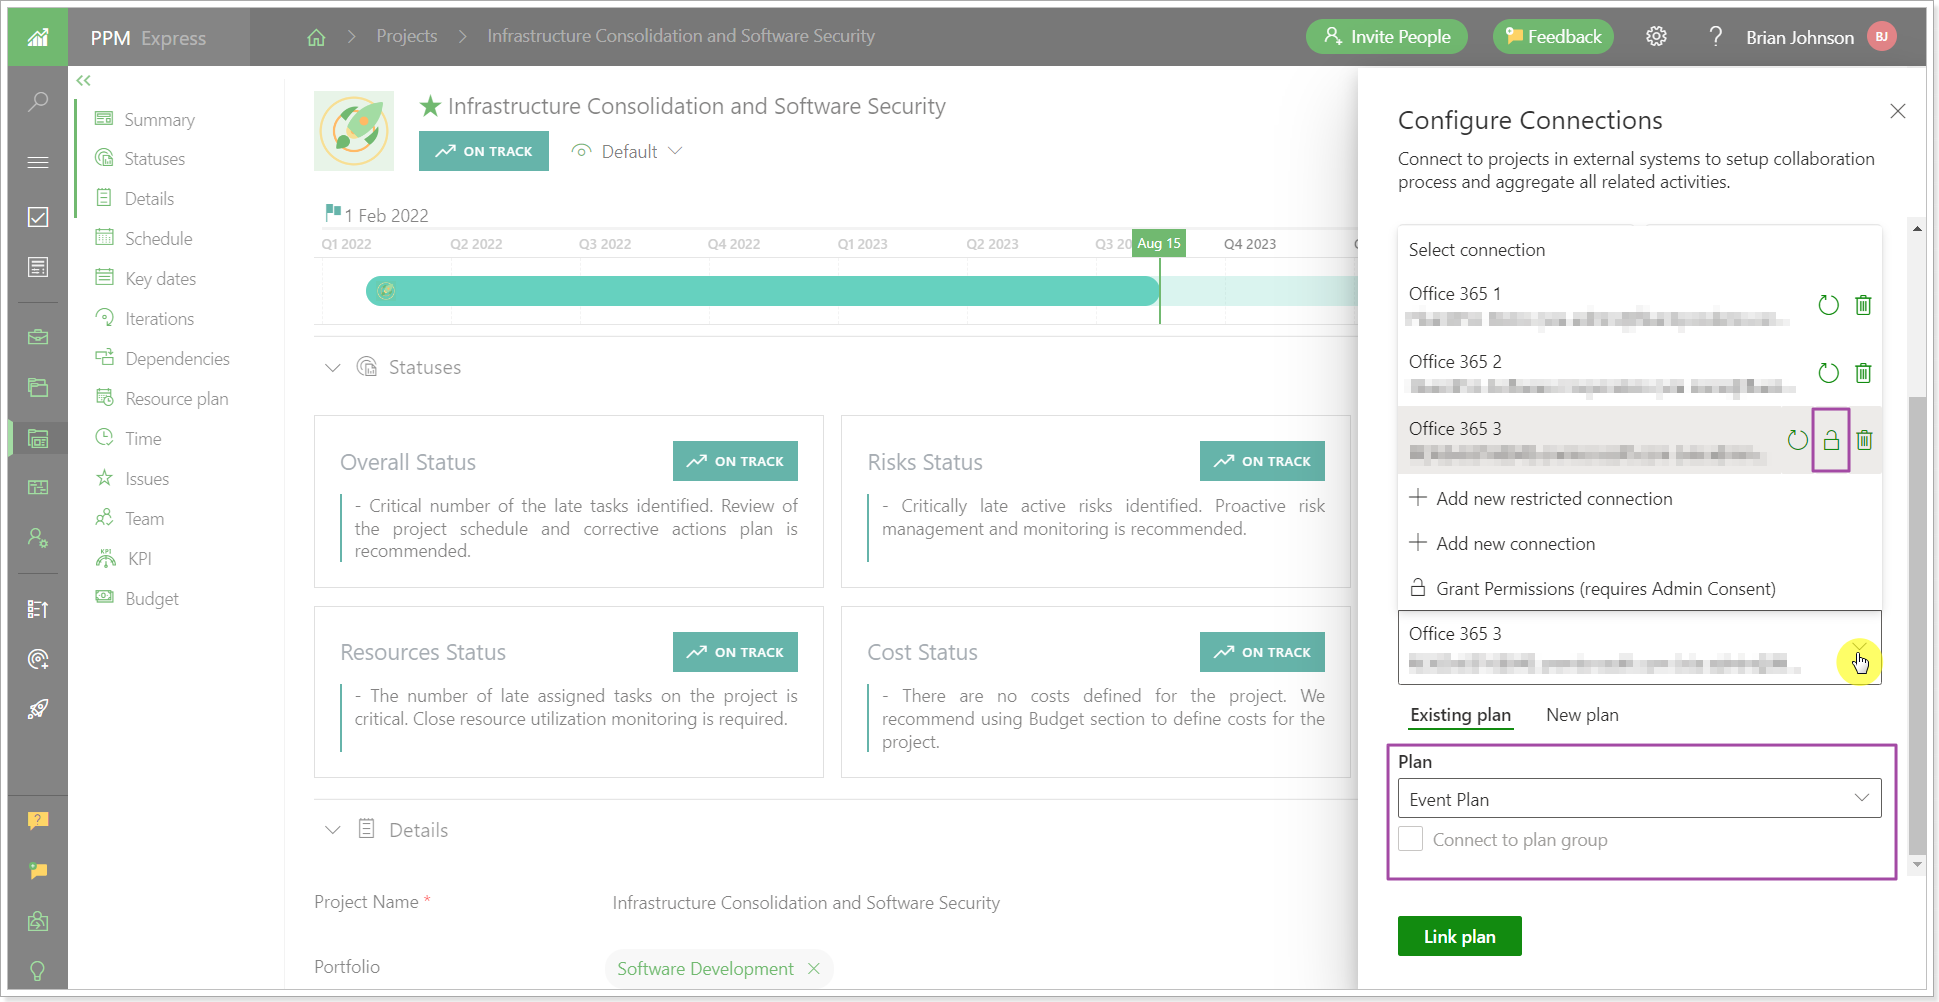
MS Teams restricted connection
PPM Express provides an ability to link PPM Express projects, program, portfolios or challenges to Teams group and receive notifications to Teams application on PPM Express actions. Please refer to this article for more details about Teams notifications: Teams and Email notifications.
Linked Teams group does not provide a possibility to synchronize any data from the Teams group to PPM Express Project. If the Teams group is linked to the PPM Express project, program, portfolio, or challenge, notifications from PPM Express will be sent to the Teams application.
With the restricted connection there are no limitations in terms of data or Teams channels that can be linked in comparison to the connection with Admin consent. For more details please refer to this article:
How to link Teams app to PPM Express.
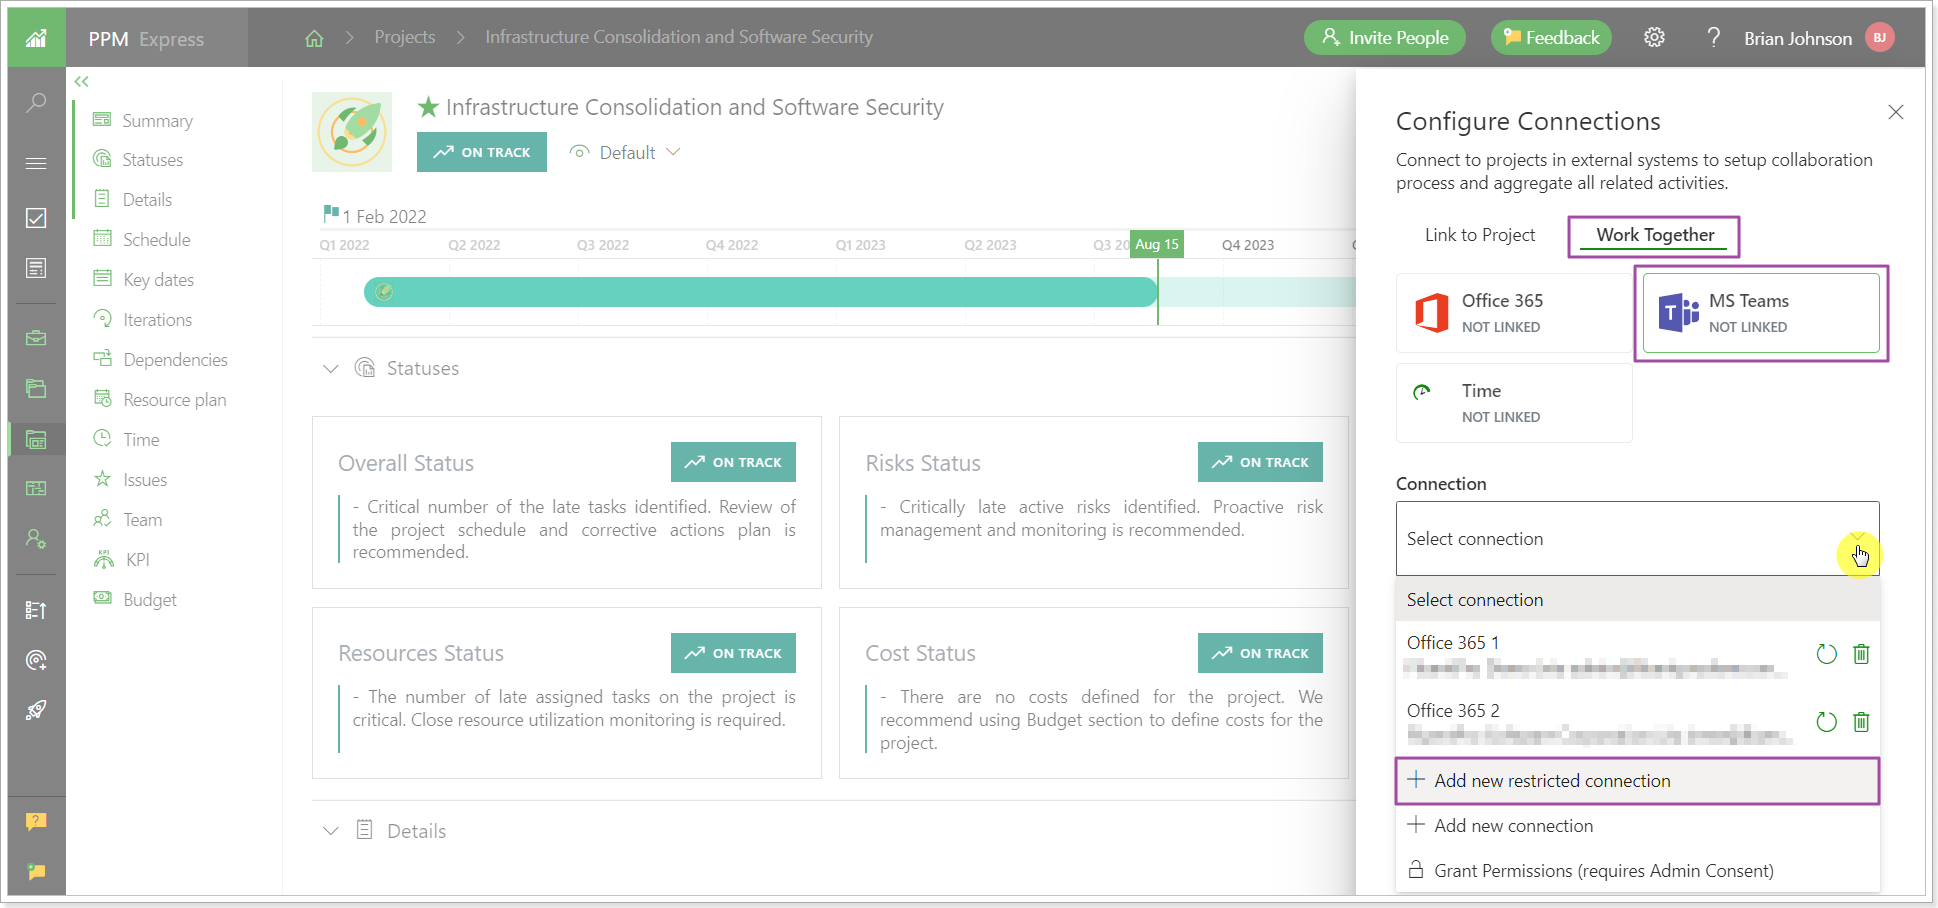
Release Notes 16.5 @August 02, 2023
1. Cross-projects linking is now supported for Jira connection.
PPM Express will now allow linking several Jira projects to one PPM Express project. You can link either several Jira projects fully or only the selected Jira issue types. Selecting the required Jira issue types for linking allows managing issues from different Jira projects as a single project in PPM Express. For example, in the scenario when several different teams (Marketing, Dev, Customer Success) manage their tasks in different projects per department in Jira, it will be easier for a project manager responsible for the launch of all these activities to manage them as one project in PPM Express.
The process of linking is the same as with one Jira project, but you can select several projects for linking in the Project field.
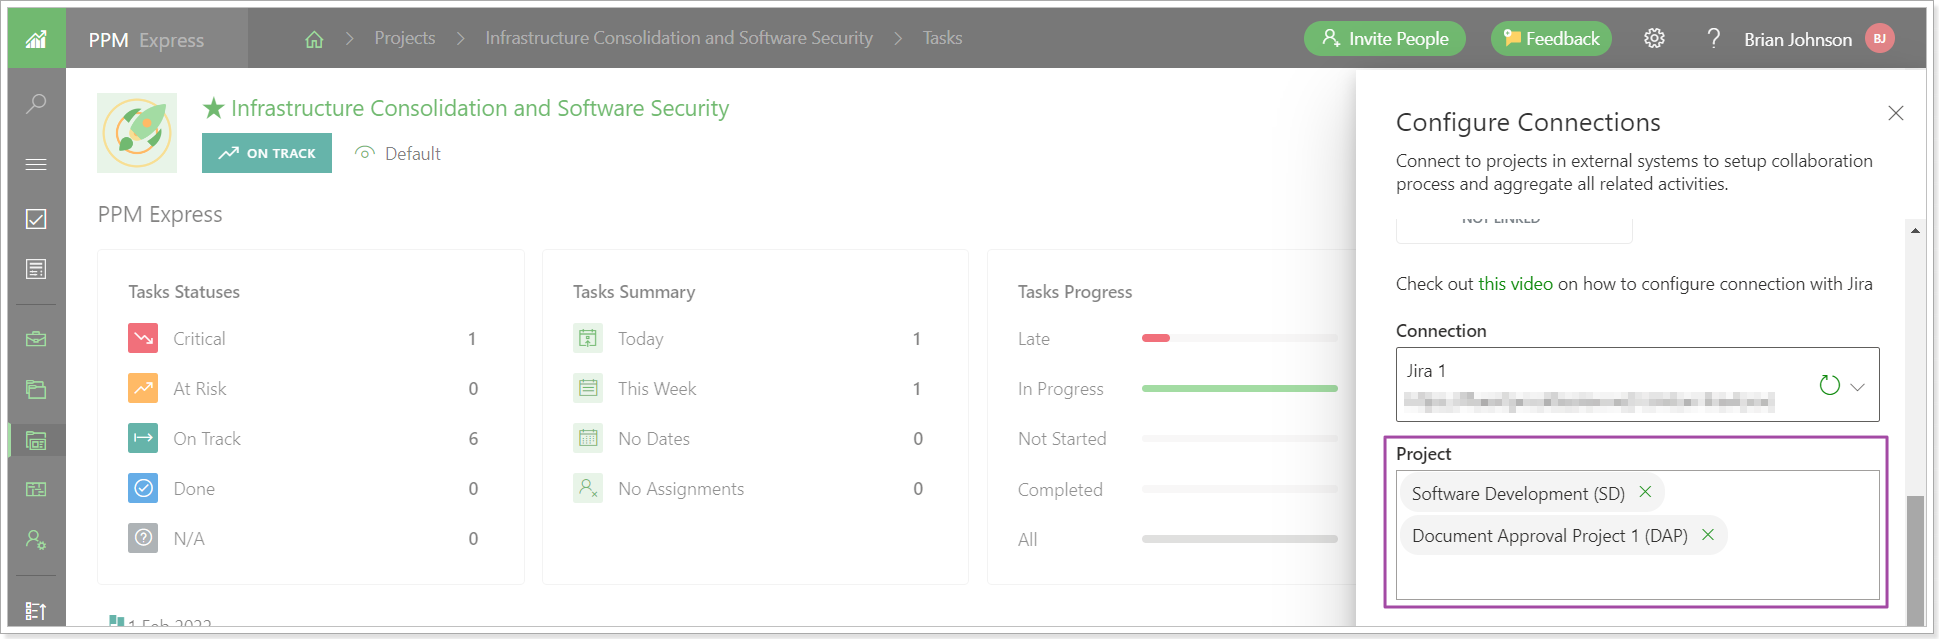
Please note: Only the projects that belong to the same Jira issue type scheme can be added to one PPM Express project. When a project is created in Jira, it is associated with a new Issue type scheme created with this project. Even if the scheme is the same in terms of the issue types it contains, the system still considers this as a different scheme in PPM Express.
To calculate all project-related settings, like Project Progress, Project Status, Rollups, Storypoints, etc. PPM Express requires Jira projects to be associated with the same Issue type scheme in Jira.
To associate the required projects to the same scheme open Jira -> gear button -> Issues -> Issue type scheme.
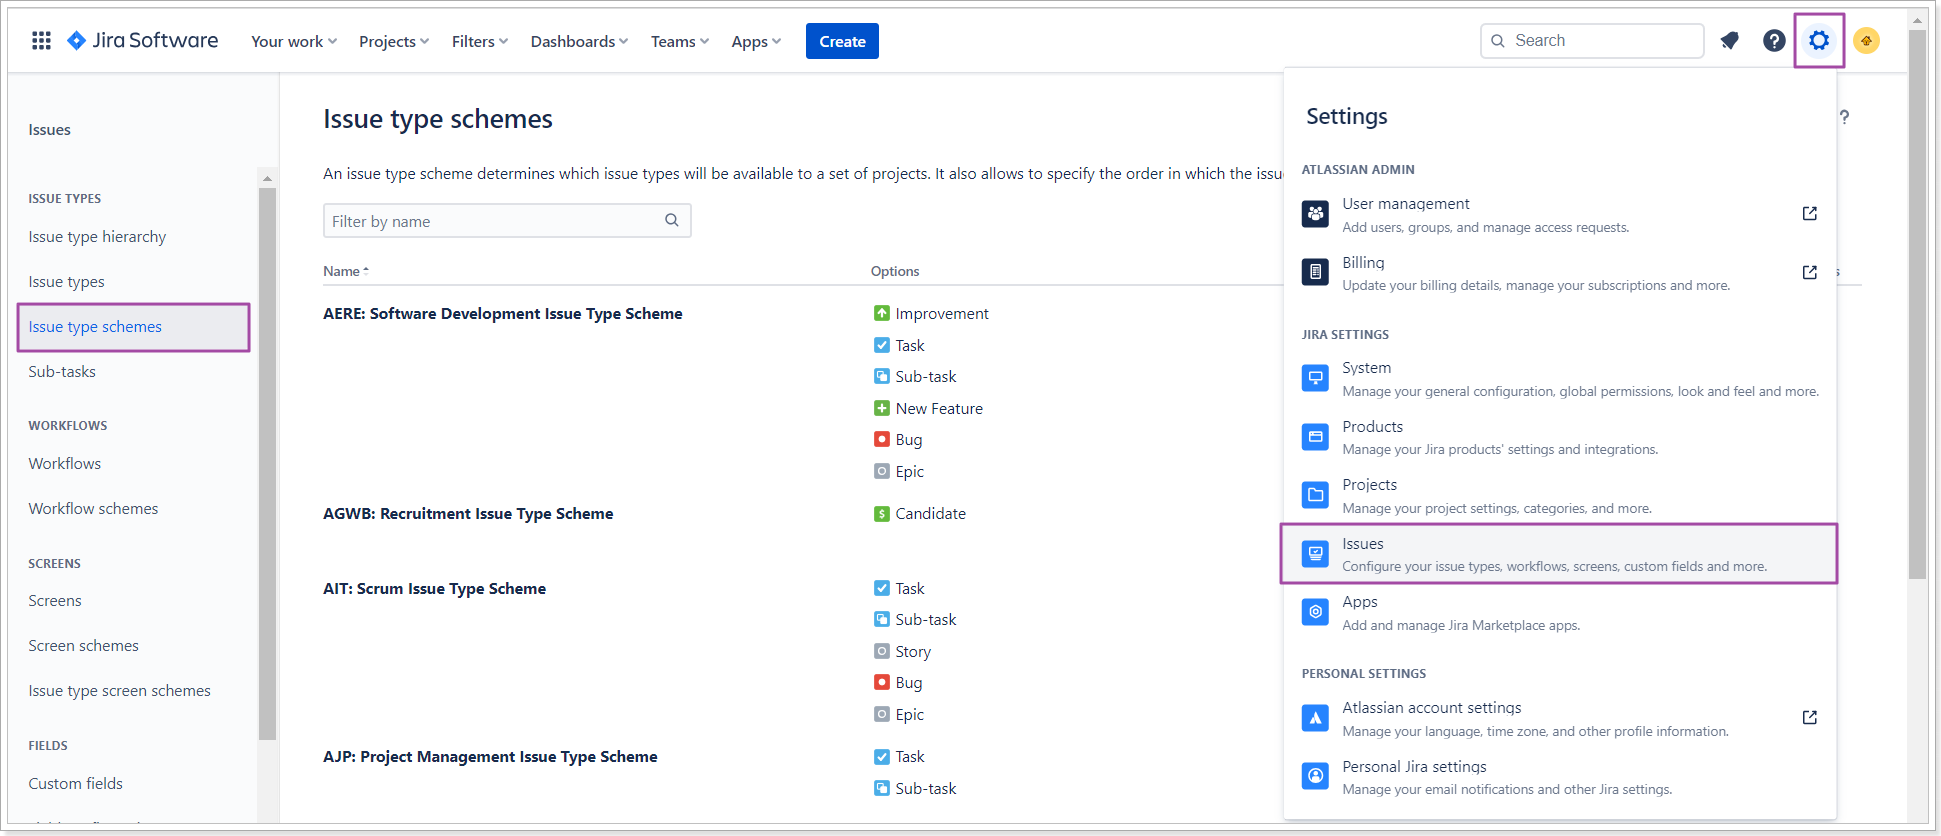
Open the menu next to the required scheme, and associate the selected projects with the same scheme.
It is also possible to select the boards of these projects for linking to import Jira Sprints from the selected Boards to the Iterations project section. If the boards are specified, only the sprints from the linked Boards will be considered during data synchronization.
Selecting the Parent Issue allows linking the PPM Express project to the selected issue(s) and their sub-tasks instead of the whole project.

For more details please refer to the 'How to import/link projects from Jira to PPM Express' article.
Release Notes 16.3 @July 25, 2023
1. Projects can now be archived in PPM Express.
Archiving your projects will ensure that you have completely finished working on a certain project and that it is hidden from the list of active projects. It will also help you avoid losing data that need to be preserved for transparency, record keeping, and evidence of certain project activities.
Please note: Archiving projects feature is available for Enterprise plans only.
Select the projects you need to archive and click the 'Archive' button.
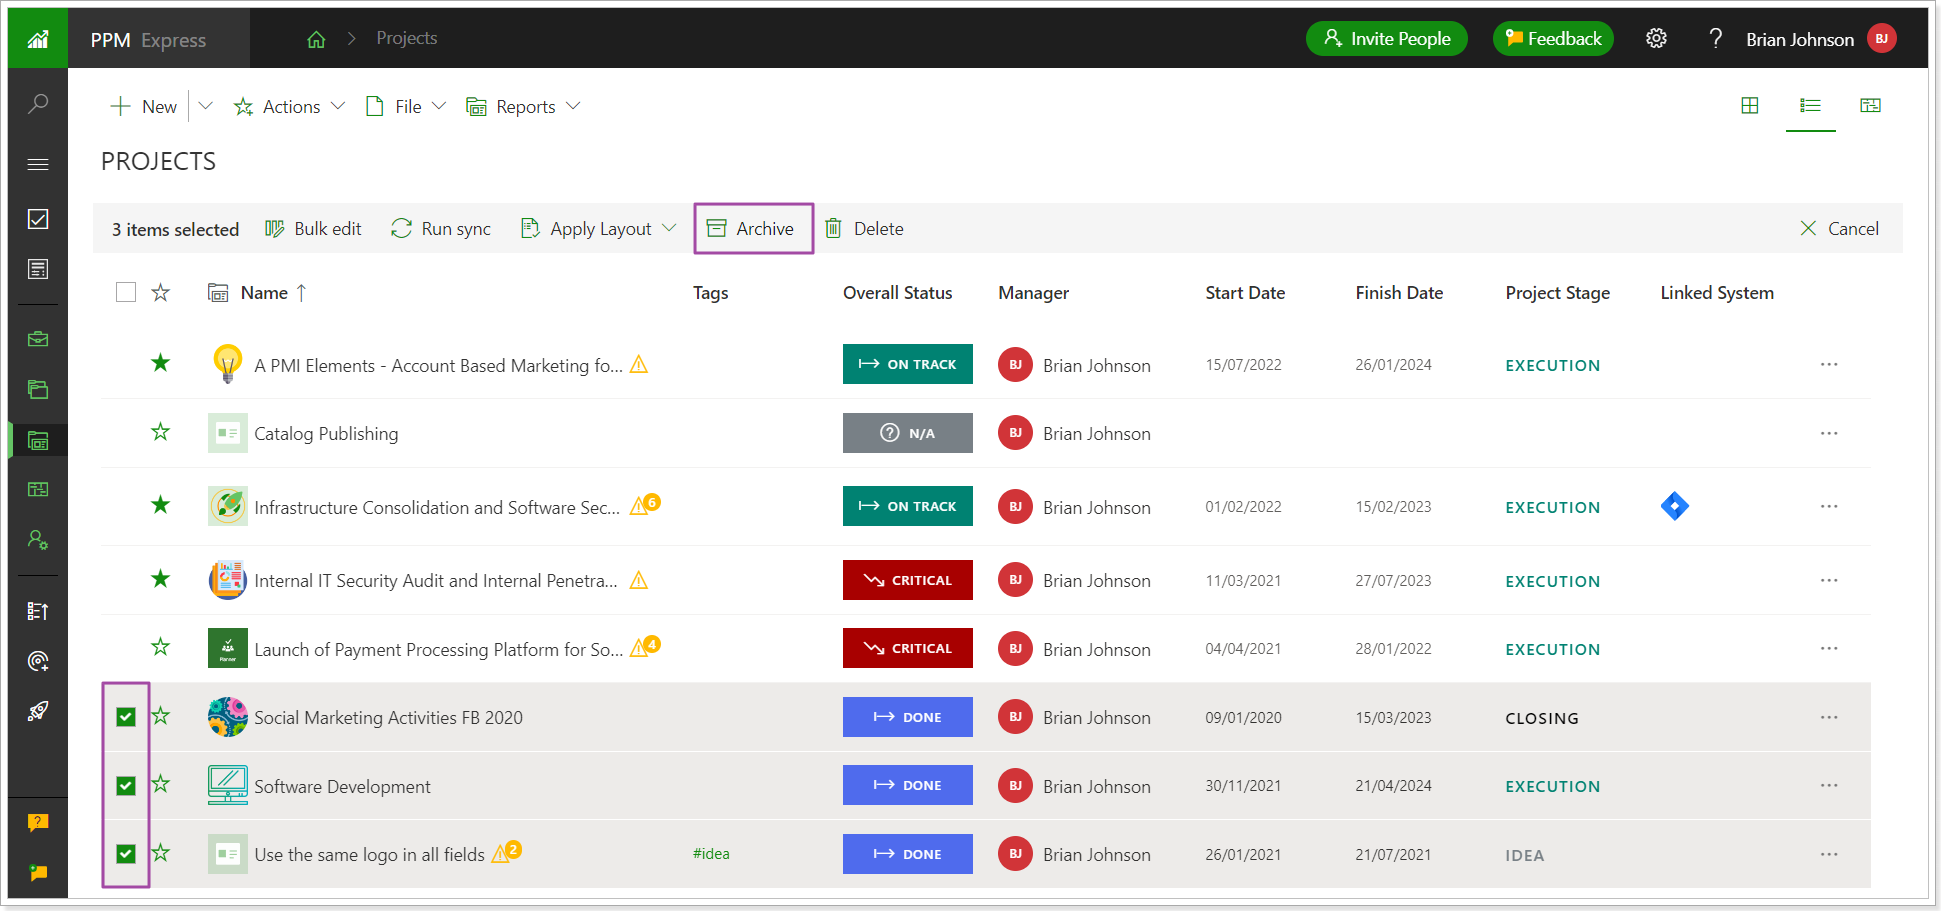
When the projects are archived, they become available in read-only mode under the Settings (gear button) -> ‘Archived Projects’ option.
The archived project is removed from the Program and Portfolio. The rolled-up data such as project Key Dates, Risks will be also removed from the Portfolio/Program where the project was included.
Also, the archived project data is not available in OData and thus in PPM Express Power BI Reports.
All other project data is saved as is at the moment of archiving and becomes available in read-only mode.
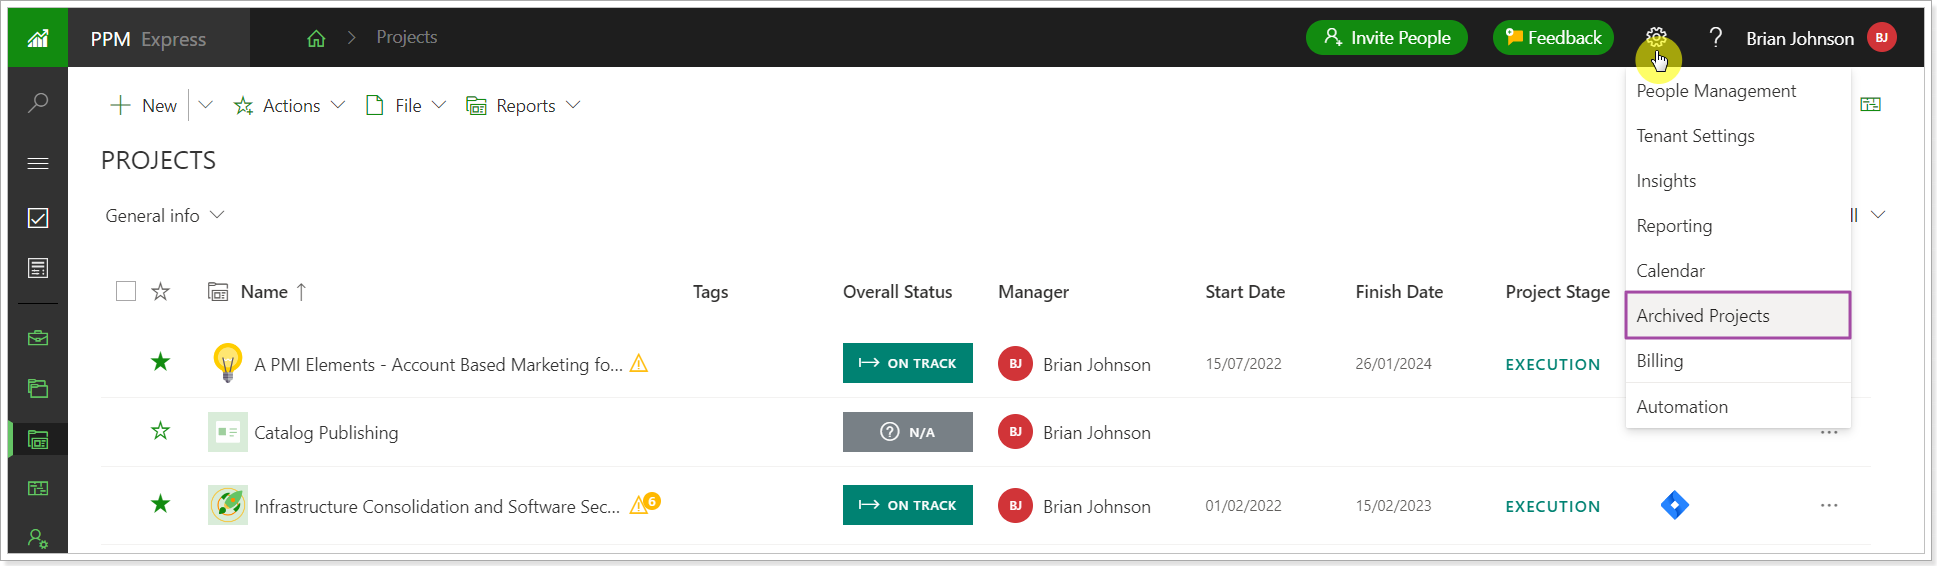
Once archived the projects cannot be restored. However, the archived projects can be cloned. In this case, a complete copy of the project will appear on the Projects page and will be available for editing.
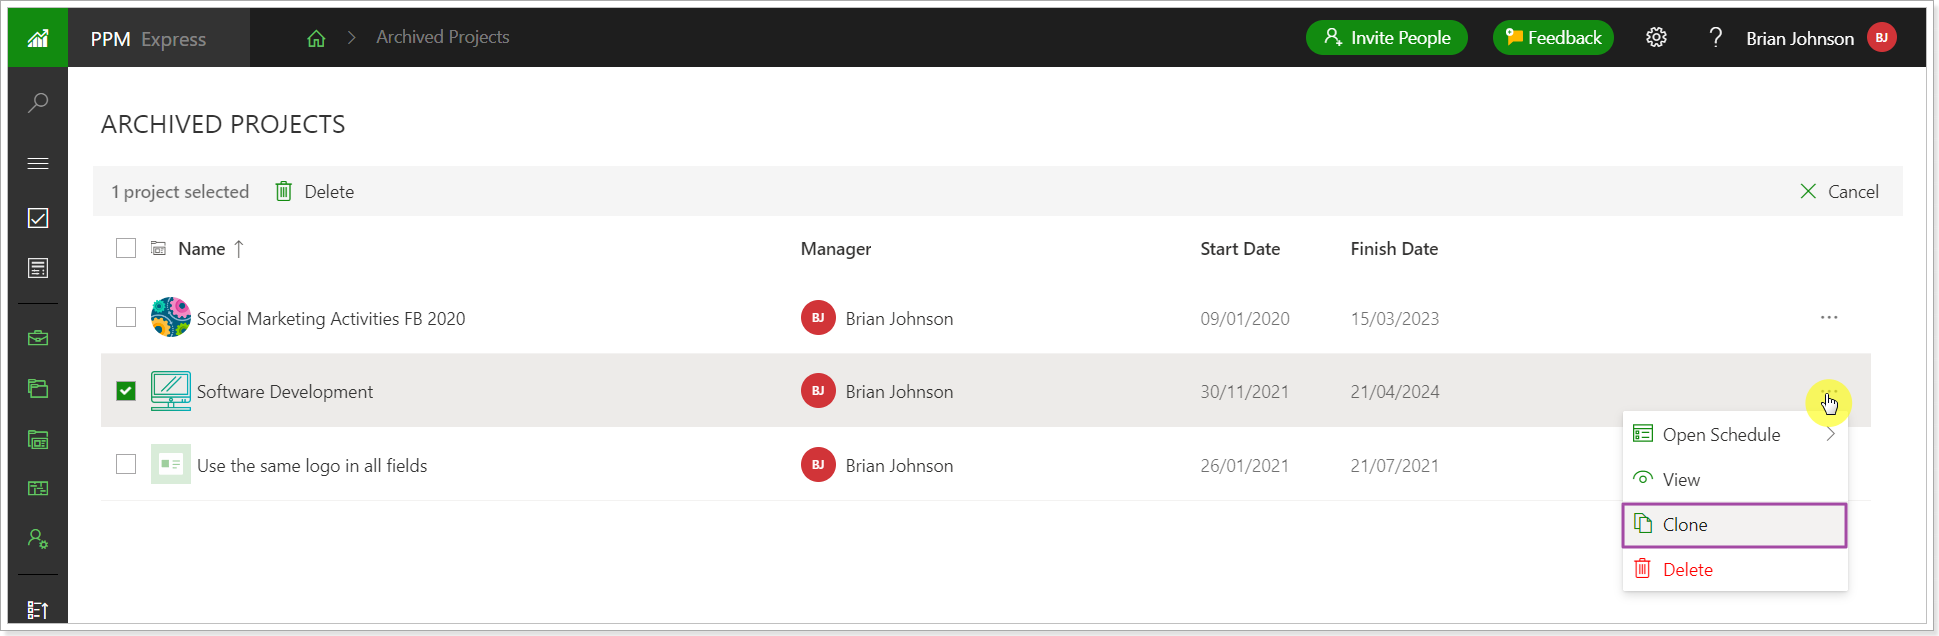
Release Notes 16.2 @July 18, 2023
1. Calculation for Task Group tooltip fields will be updated.
Before: Progress for the task groups was calculated based on the task Effort and task Progress by this formula:
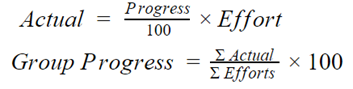
If Effort was not provided for the task, task Duration was used instead. E.g., for 5 days of Duration multiplied by 8 hours per day = 40 hrs of Effort for the task group.
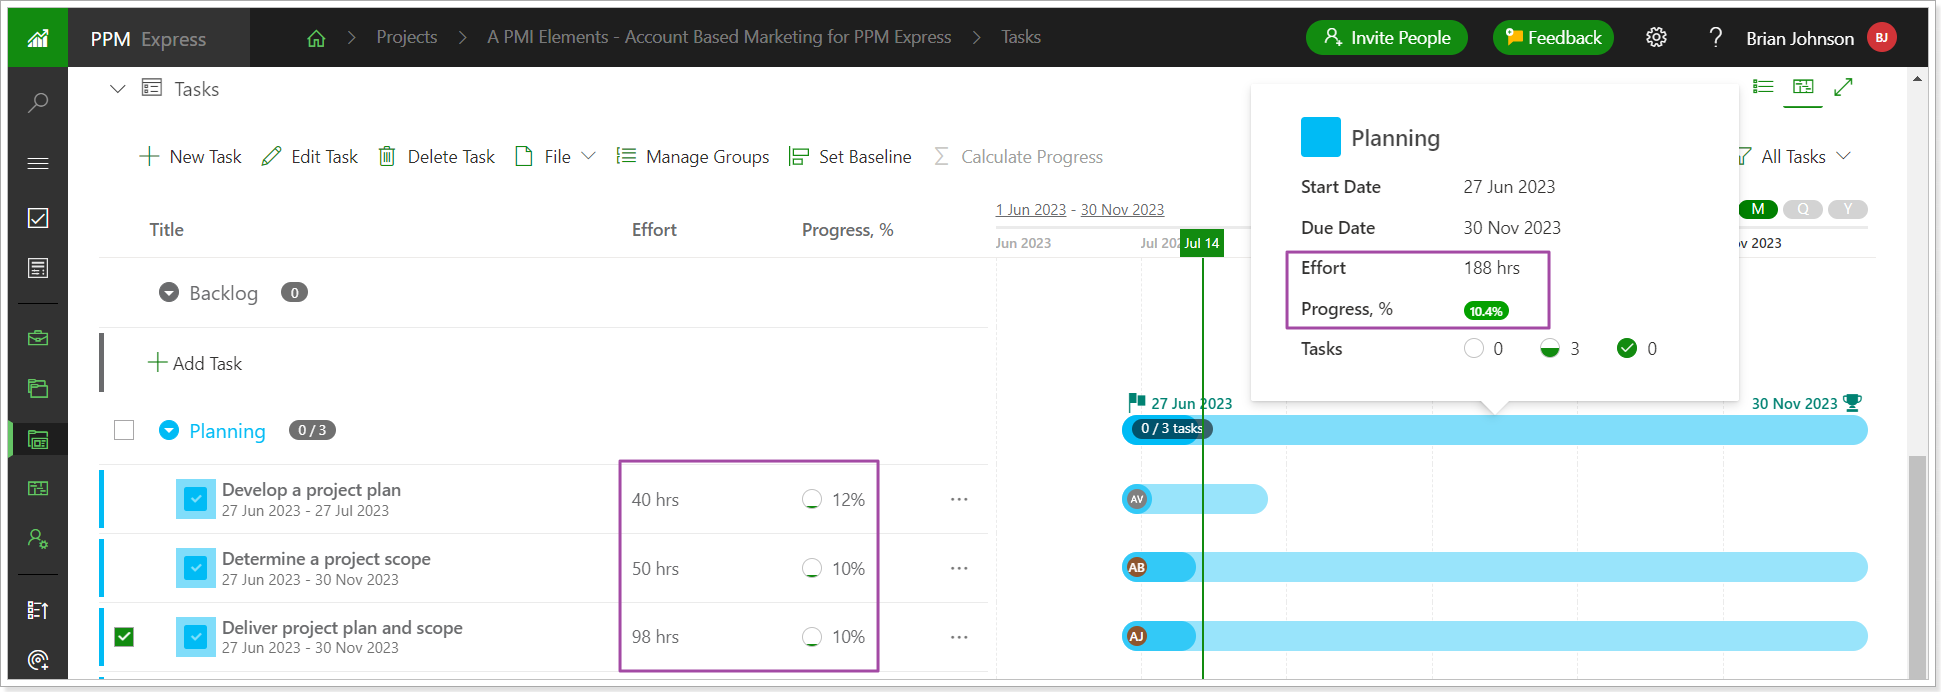
Now: The calculation of Progress for the task groups will be updated to correspond to the formulas used for summary tasks and project rollups calculation.
Progress for the task groups will be calculated in the same way as Progress % for the summary tasks and the Schedule Progress % (PPM Express) project field:
(Completed Work / Effort ) * 100%
Where:
- Completed Work – the sum of Completed Work values from all “leaf” tasks in the task group;
- Effort – the sum of Effort values from all “leaf” tasks in the task group.
Effort for task groups will be calculated in the same way as Effort for the summary tasks and Schedule Effort (PPM Express) project field:
The sum of all non-summary values underneath the summary tasks and regular (non-child) tasks values from this task group – i.e., the sum of Effort values from all “leaf” tasks in the task group.
Duration will be calculated in the same way as the Duration for summary tasks and the Schedule Duration (PPM Express) project field.
The total amount of working days between the task group Start Date and the task group Due Date (calendar settings should be applied when calculating total amount of working days).
2. Calculate Progress feature will be extended to include on-demand horizontal calculation for non-summary tasks.
In this phase, we would like to expand the on-demand calculation triggered by Calculate Progress feature to include horizontal calculation of progress-related fields for non-summary tasks.
This horizontal calculation will allow users to fully calculate effort-related values for all PPM Express schedules on demand and review the results prior introduction of the Auto mode which will follow the same calculation principles, but in an automatic mode.
The horizontal calculation for progress-related fields will include on-demand calculation of Progress %, Effort, Completed Work, and Remaining Work fields by formulas.
The “Calculate Progress” option will become active when one or several tasks of any type are selected – summary or non-summary.
If the selection of tasks includes summary and non-summary tasks, then for each task type its own calculation should be performed – rollup or horizontal.
The following base formulas should be used for the horizontal calculation of progress-related fields:
- Progress, % (Completed Work / Effort) * 100%
- Effort = Completed Work + Remaining Work OR alternative formulas: Effort = (Completed Work *100) / Progress Effort = (Remaining Work /(100 – Progress))*100
- Completed Work = Effort – Remaining Work Completed Work = (Progress /100 ) * Effort
- Remaining Work = Effort – Completed Work
When the on-demand calculation is applied (or all fields have some values manually defined), and user triggers on-demand calculation for the non-summary task, then progress-related fields should be re-calculated according to the primary fields:
- Completed Work
- Remaining Work
- Effort – re-calculated by the formula: Effort = Completed Work + Remaining Work
- Progress, % - re-calculated by the formula: (Completed Work / Effort) * 100%
In this case Effort and Progress,% should always be overwritten by re-calculation.
If a task’s Progress is set to 100% and on-demand re-calculation is triggered, then the Remaining Work will be set to 0, and Completed Work should become equal to Effort.
All progress-related fields for all tasks will remain editable allowing users to update the values as per their needs.
Release Notes 16.1 @July 13, 2023
1) The States are now saved in all List Views.
The Save States feature works on all PPM Express pages and in all sections except for the Settings pages and Strategic Priorities page as for now. Any State (Filter, View, Sub-view, Sorting, etc.) is saved immediately after a user makes a change. The states are saved and applied when the user leaves and reopens the page, refreshes the page, logs out, and logs in again.
The tasks page is taken as an example, the following information will be saved as soon as there are any changes:
- In the Timeline View - Timescale (Days, Weeks, Months, Quarters, Years), Timeframe (date range), Style Settings (‘Show Baseline’), View, Filter, Pre-filter, Column Width, Sorting.
- In the List View - View, Filter, Pre-filter, Column Width, Sorting. Such states as View, Filter, Column Width, and Sorting are saved per system (PPM Express tasks or external system tasks).
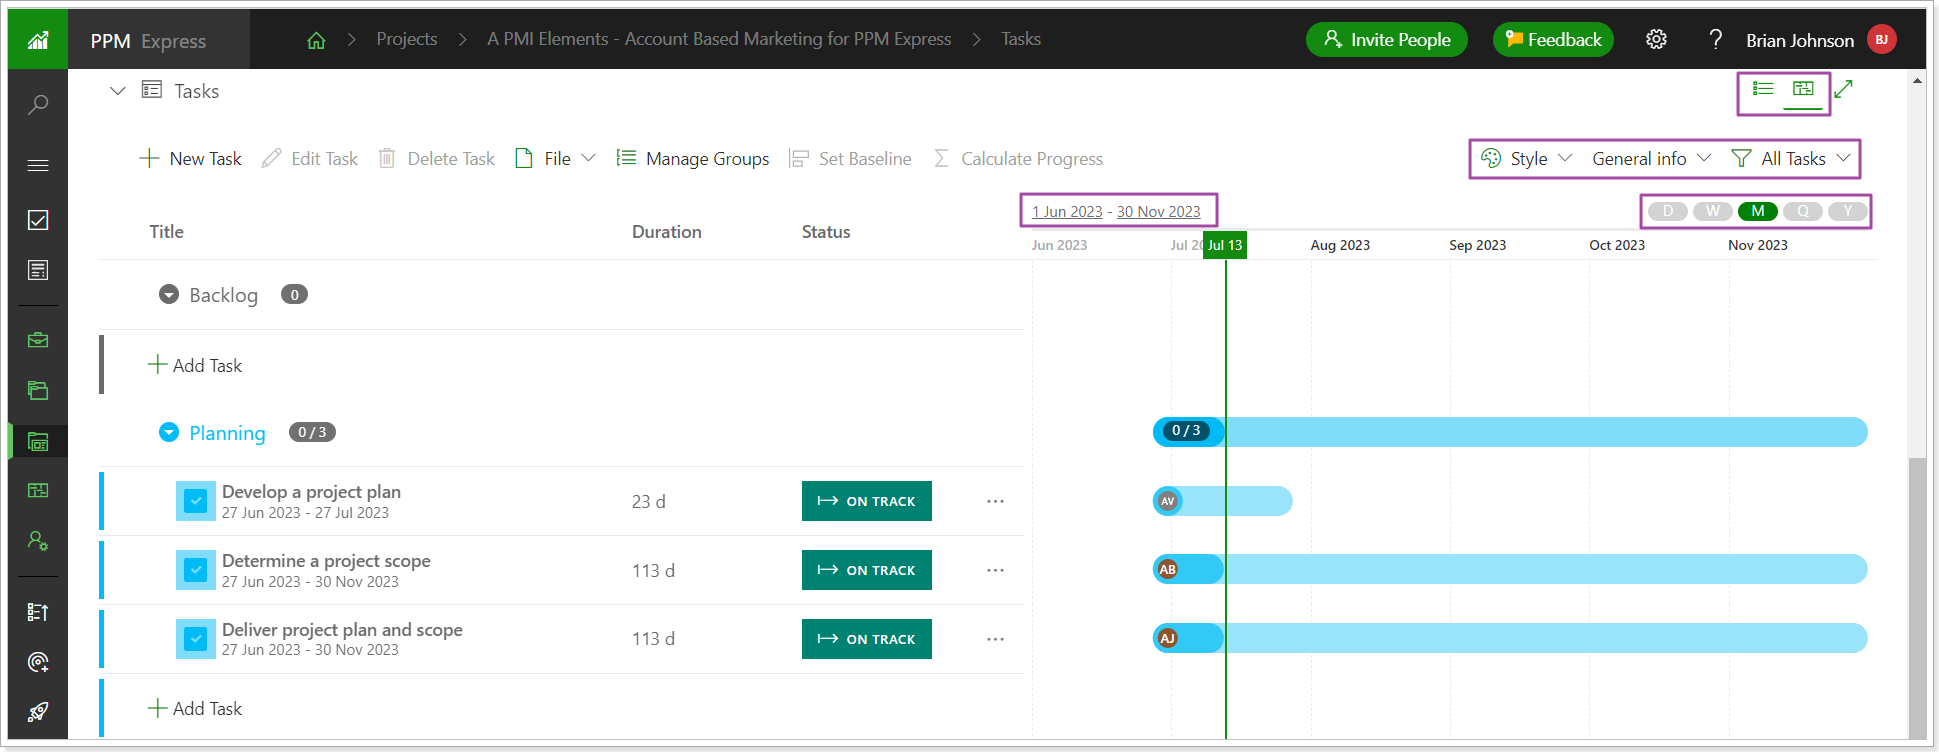
The states are saved:
- per user (each user has their own settings and preferences saved);
- per entity (different Views, Filters, Sorting etc. are saved in each project, program, portfolio, resource, idea, and objective);
- per View (for example, different section Views, Filters, Sorting, Column Width etc., will be saved in different project Views);
- across devices/browsers (if the user logs in to PPM Express in another browser or on another device, the same saved states will remain applied to the pages).
Please note: Currently, states are not saved on the Strategic Priorities page (but saved for the Strategic Alignment section), in the Calendar Exceptions section on the Resource Dashboard page, and on all Settings pages.
Release Notes 15.11 @June 26, 2023
1. RAID+ Registry report pack will become available on the PPM Express Reporting page for download and configuration.
For more details about the pack, please refer to this article section: RAID+ Registry report pack.
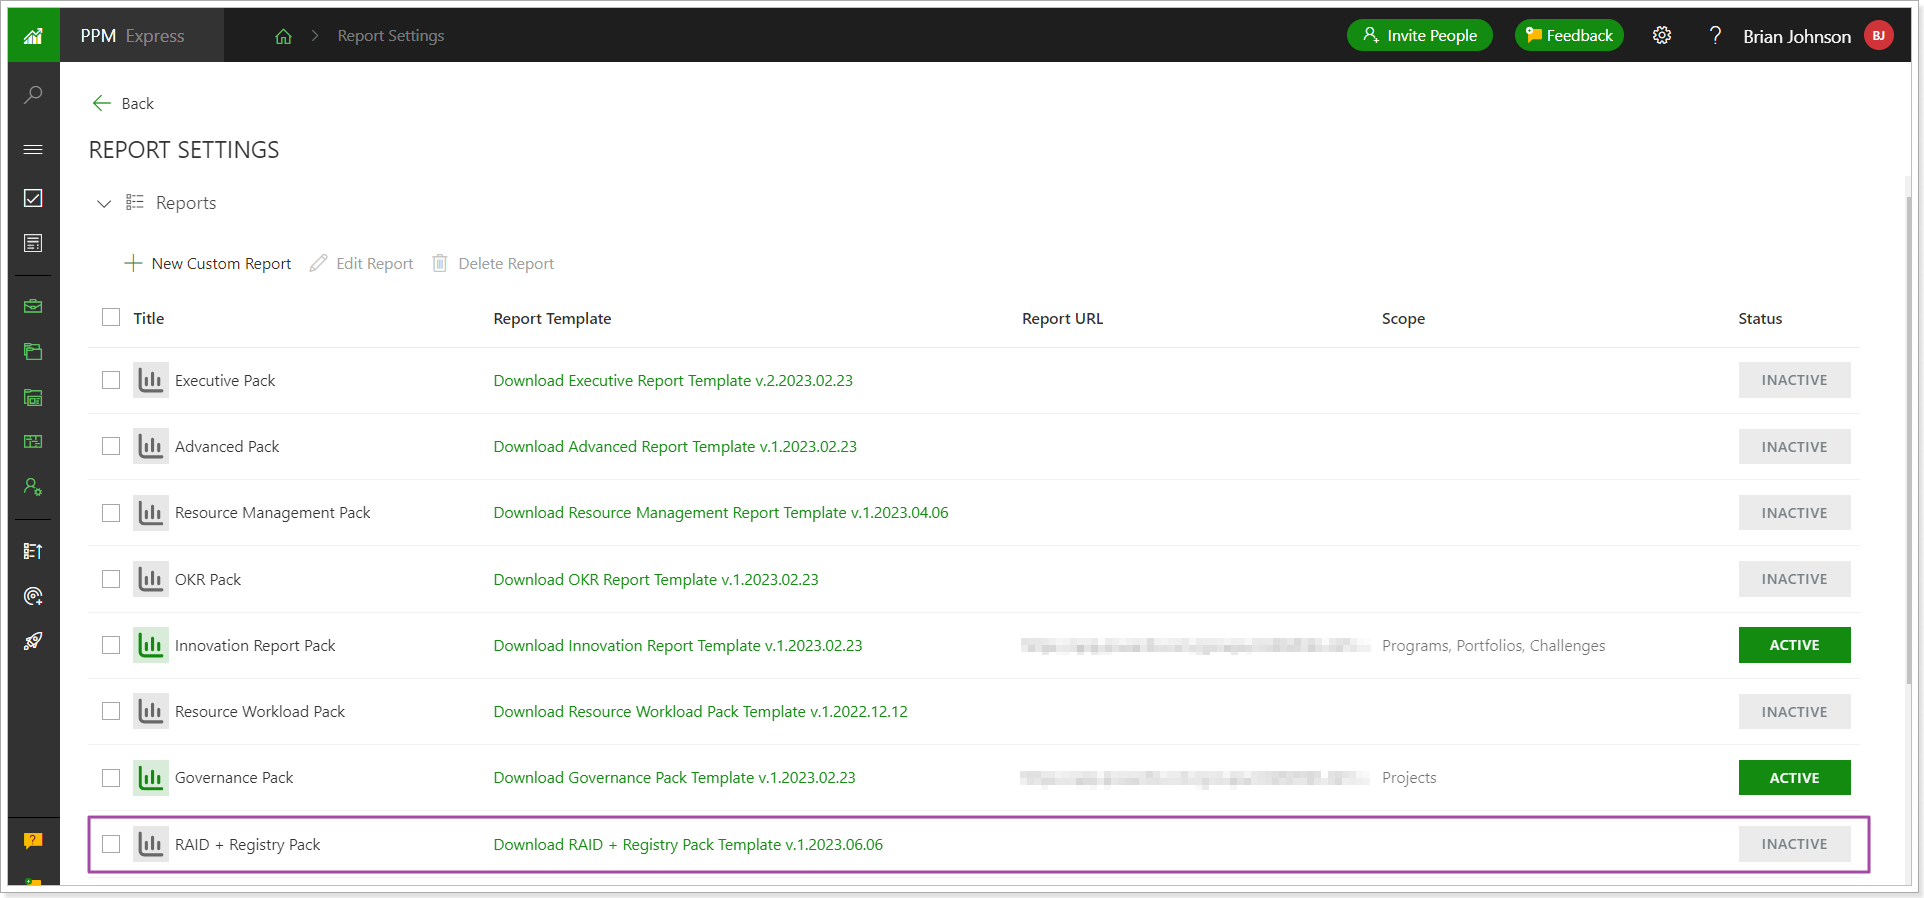
2. Task Summary tiles were updated for better navigation and quick access to user data.
Task Summary tiles will be updated for the PPM Express tasks page, Planner, Project Online, Monday.com, Smartsheet, and Project for the web. For the Jira connector, the tiles will be redesigned in the same way as for Azure DevOps in one of the nearest releases.
The Summary tiles will now include the My Assignments section where users can review information for their tasks. All the numbers are clickable and will filter data in the table below accordingly.
Also, the 'All' option will be added to the cards to review the full list of tasks. The buttons to go back to the project or open tasks from the connected system, if any, will be moved to the top right corner.
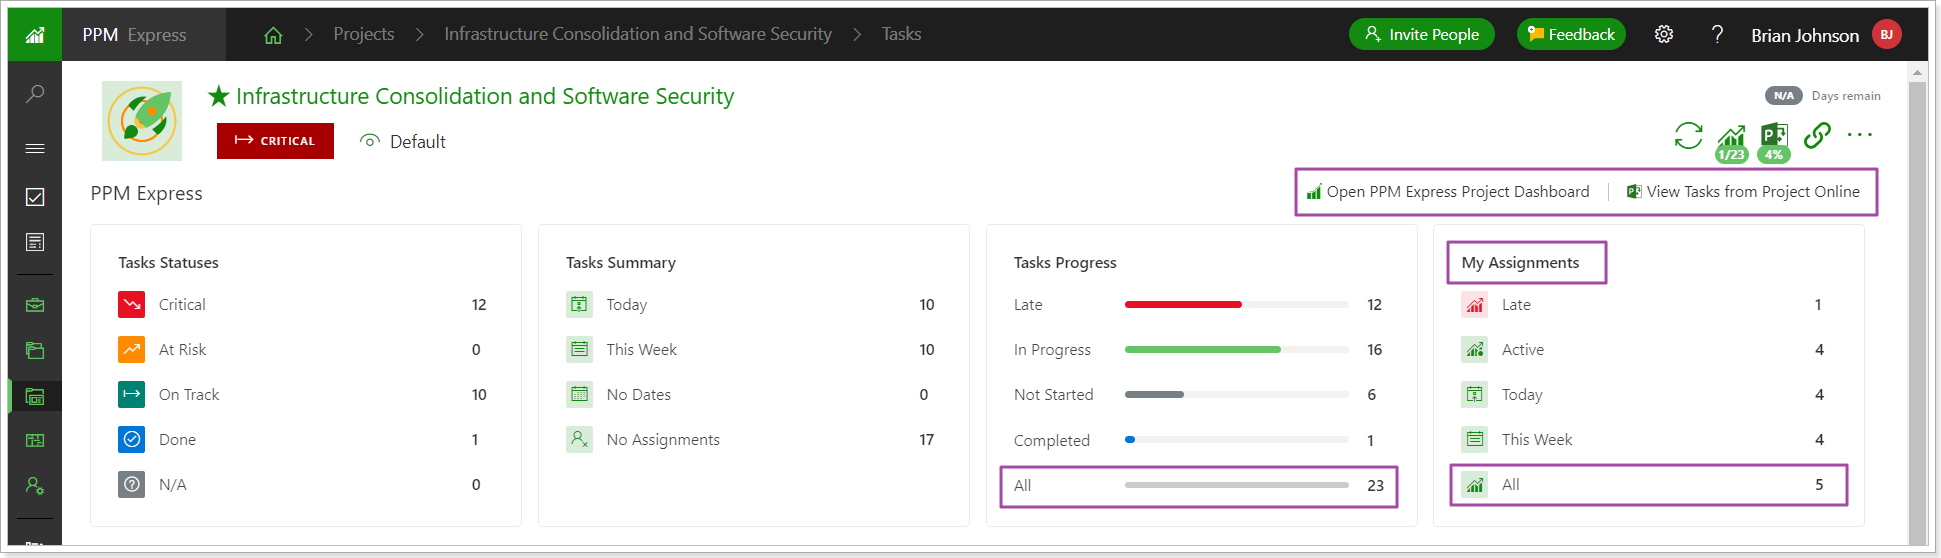
These changes will also apply to the card view of the Schedule Project section.
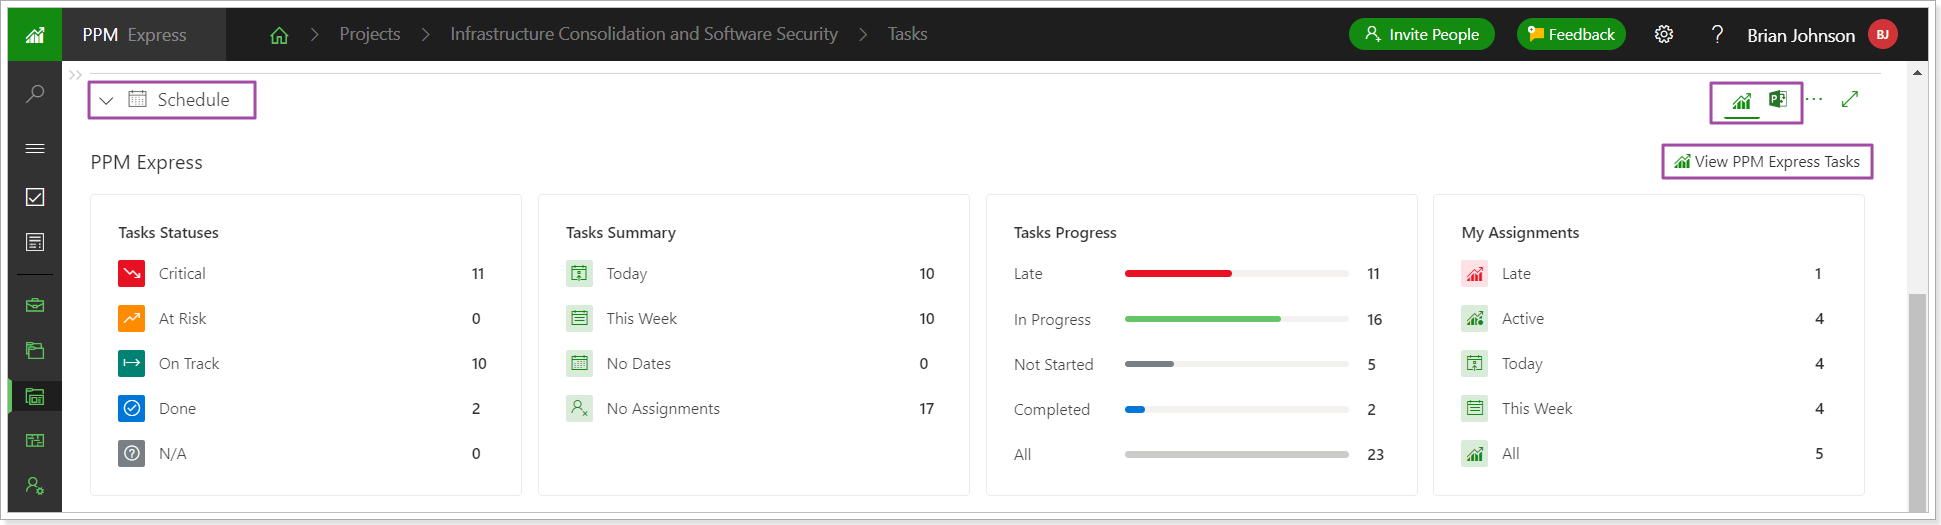
Using the 'Configure' menu you can turn on data sections that you want to make visible on the page. Drag and drop is available to reorder the position of these sections. These changes can be saved to Project layouts and views.
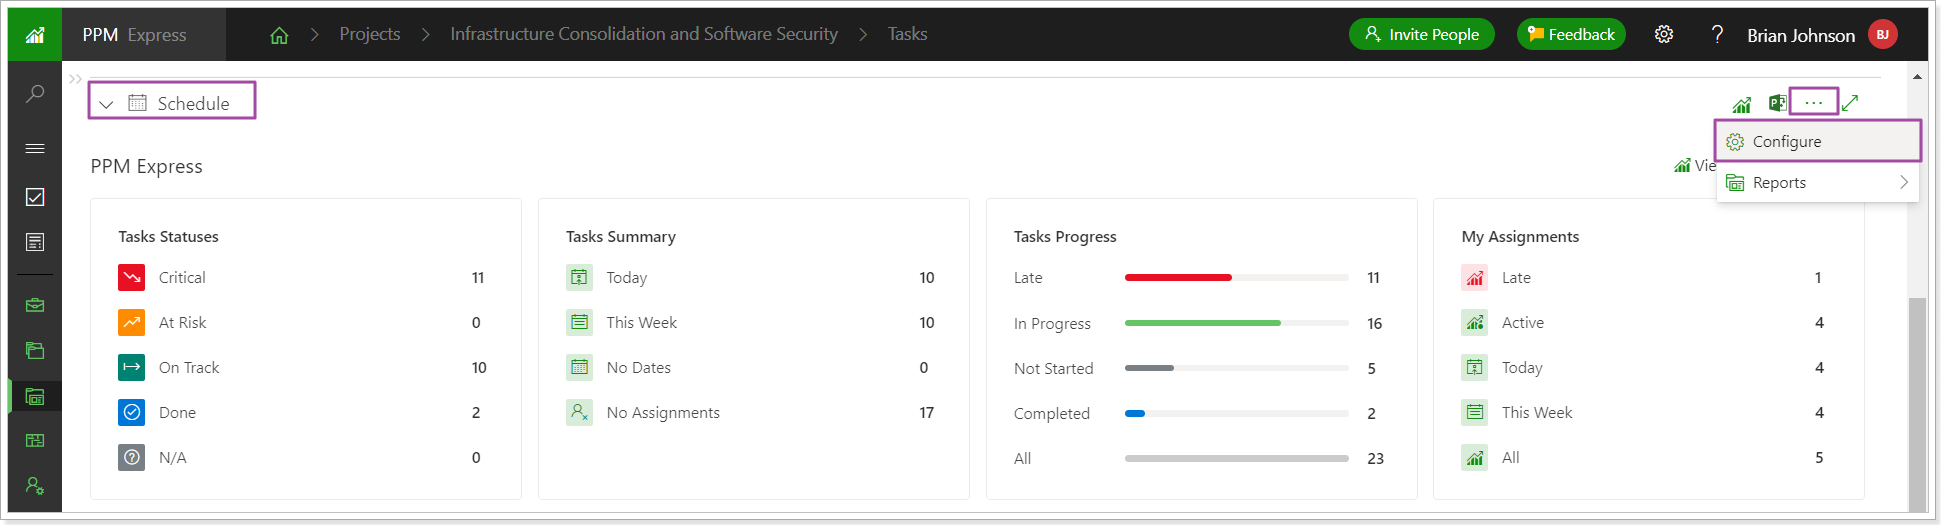
Release Notes 15.10 @June 21, 2023
1. New read-only fields related to rolled-up values from PPM Express schedule, effort and progress were added to the Project Details section.
New fields are now available in the Details section of the Project dashboard. The values for these fields are not editable, they are rolled up from the PPM Express tasks schedule, effort and progress. This way, you can see the main values from your PPM Express tasks schedule on the project level. You can also add them to the KPI section for quick access to the important project metrics.
To enable these fields, open the Configure Fields menu from the Details page, and start typing 'schedule' in the search field to quickly find and enable them all.

The fields will become available for review in the Details section. The information button next to each field shows the details for the field value calculation.

Release Notes 15.9 @June 19, 2023
1. When clicking on the Iteration name on the Tasks page, the filter criteria for the Iteration has been updated to include both Iteration and Type ‘User Story’.
Before: When clicking on the Iterations on the Tasks page card, the filter was applied to show the Iterations in the tasks table below. However, the items tree was not fully preserved from Azure DevOps, as PPM Express displayed the child items as part of the parent item, and then showed them separately one more time, creating duplicates.

Now: When clicking on the Iteration name on the Tasks page, the filter criteria for the Iteration has been updated to include both Iteration and Type ‘User Story’. As the 'User Story' item type is mostly used for Iterations, it was included in the Iteration filter to display the items tree correctly, in the same way as it is in Azure DevOps.

However, if another item type is used for Iterations, clicking on the Iteration name on the tasks card, the table below will be empty. If you have a different item type, you can open the filter for editing and select your item type instead of the 'User Story'. When needed, you can switch to this filter to see the information for your Iteration.
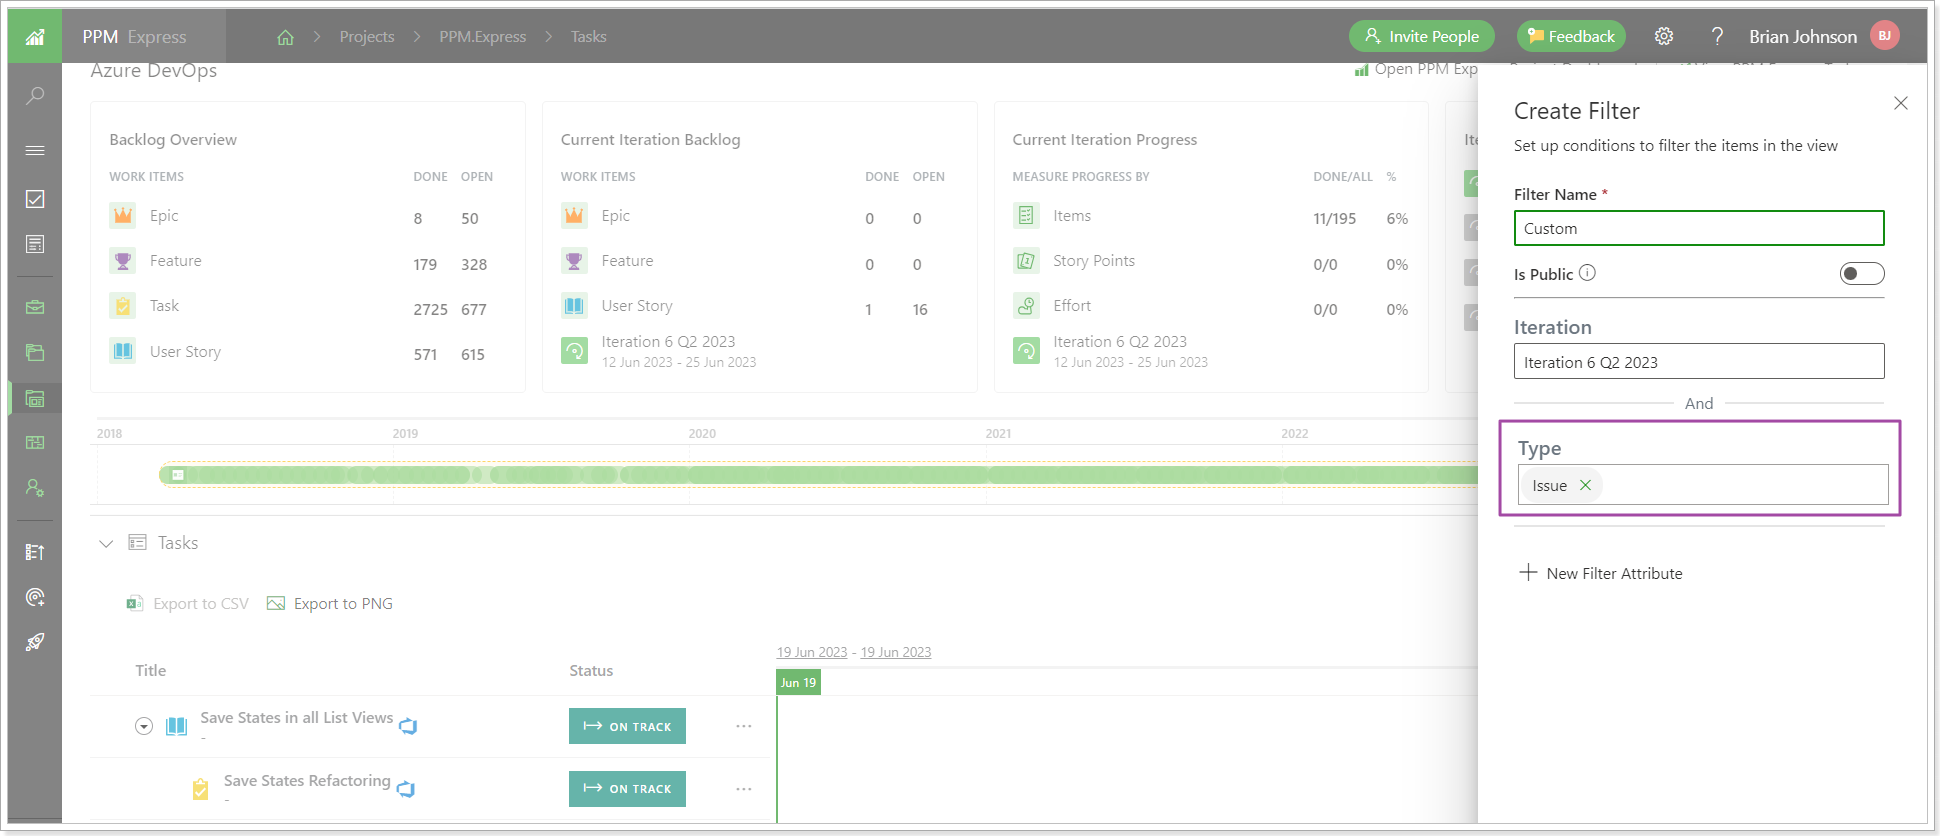
2. The ‘File Integration’ option was added to Idea dashboard and allows adding a document link to an idea.
It is now possible to add files to your Ideas. On the Idea dashboard, click the Connect button to add a link to your file.

Paste the file link to the File URL field and click Link File.
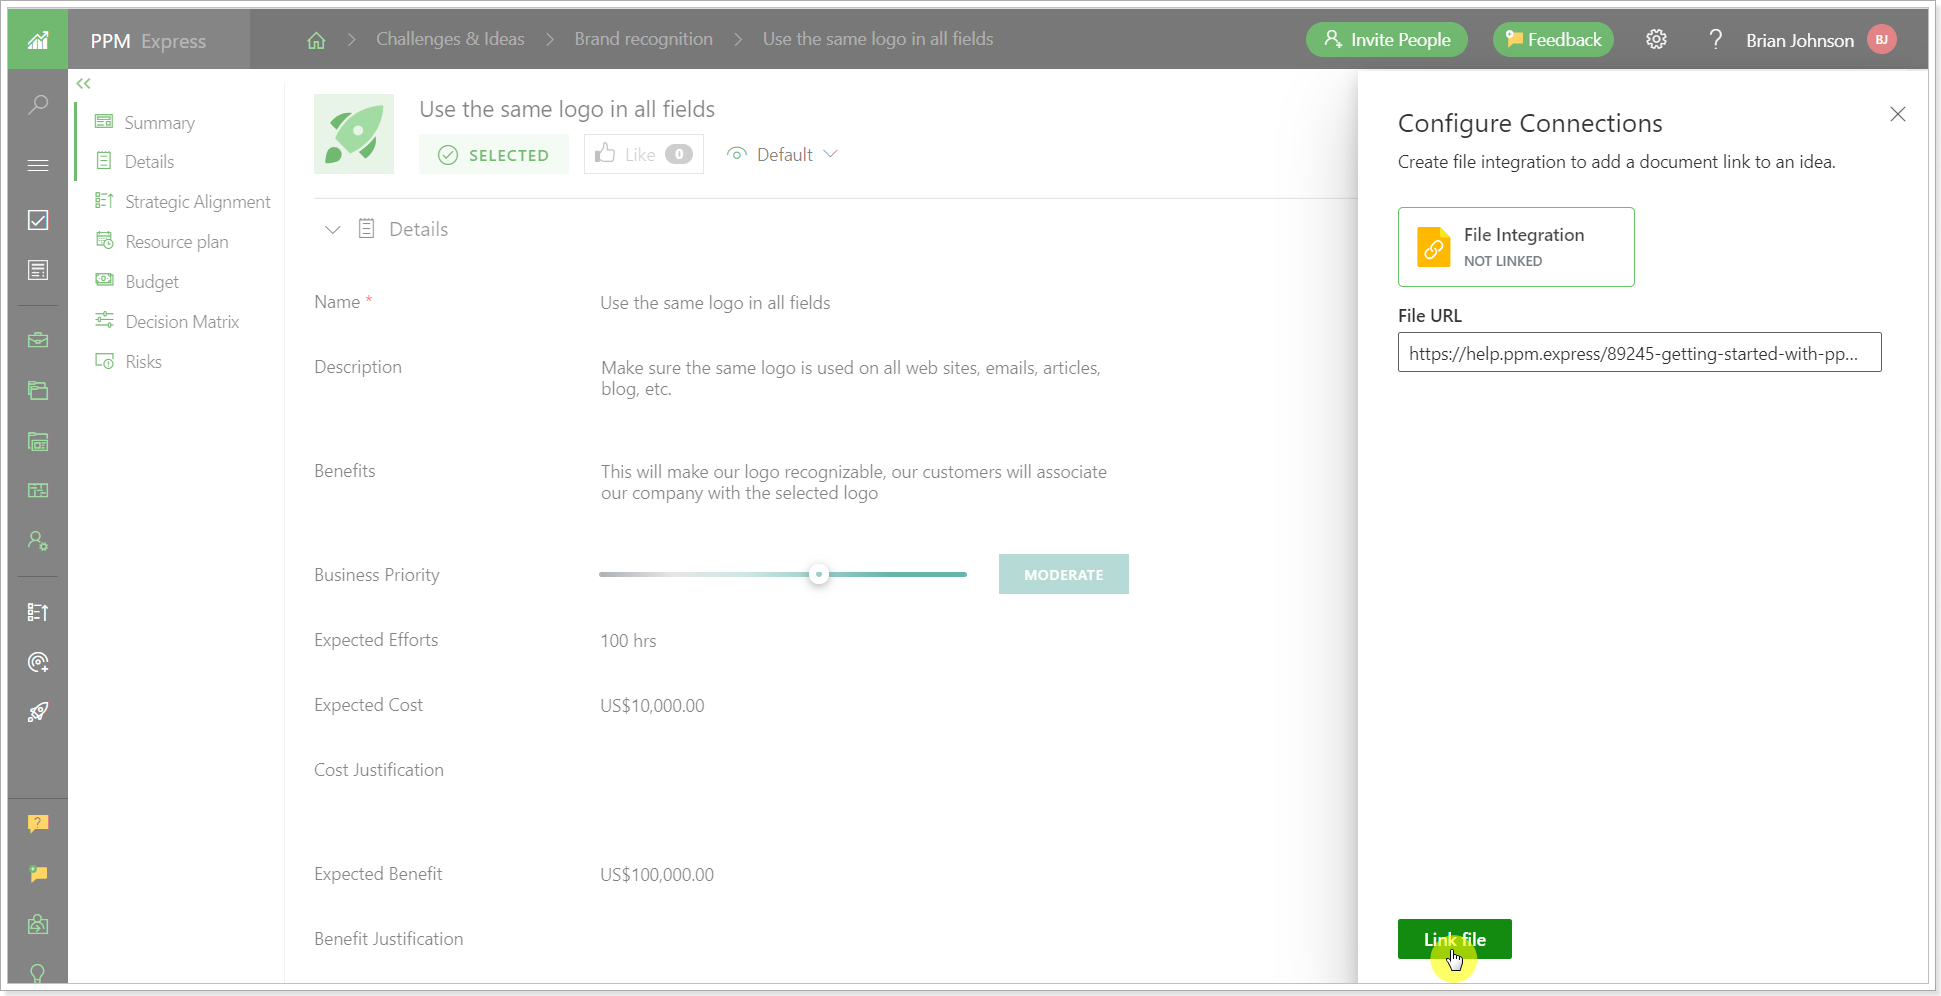
The file will become available for opening from the Idea dashboard.
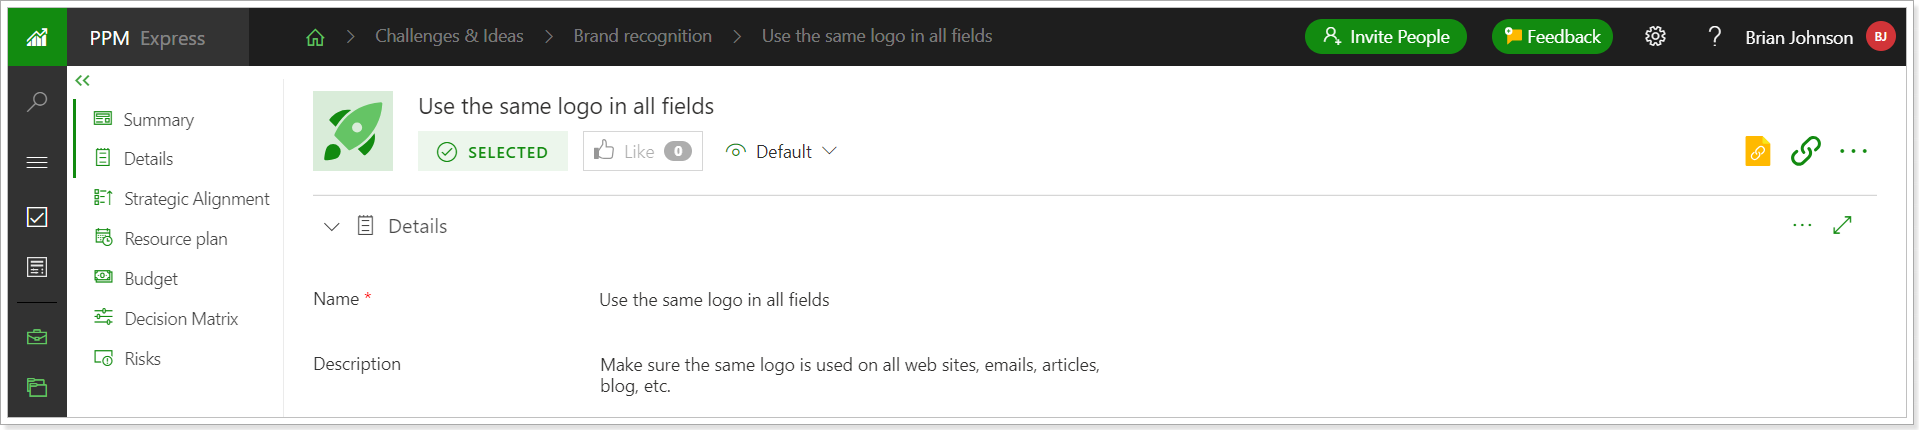
Release Notes 15.7 @June 08, 2023
1. Linking a PPM Express project with multiple parent work items was added to the Azure DevOps connection.
Before: it was possible to link only one work item from Azure DevOps to PPM Express and manage it as a separate project.
Now: it is possible to link a PPM Expres project to one or several work items from Azure DevOps and manage them as a separate project.
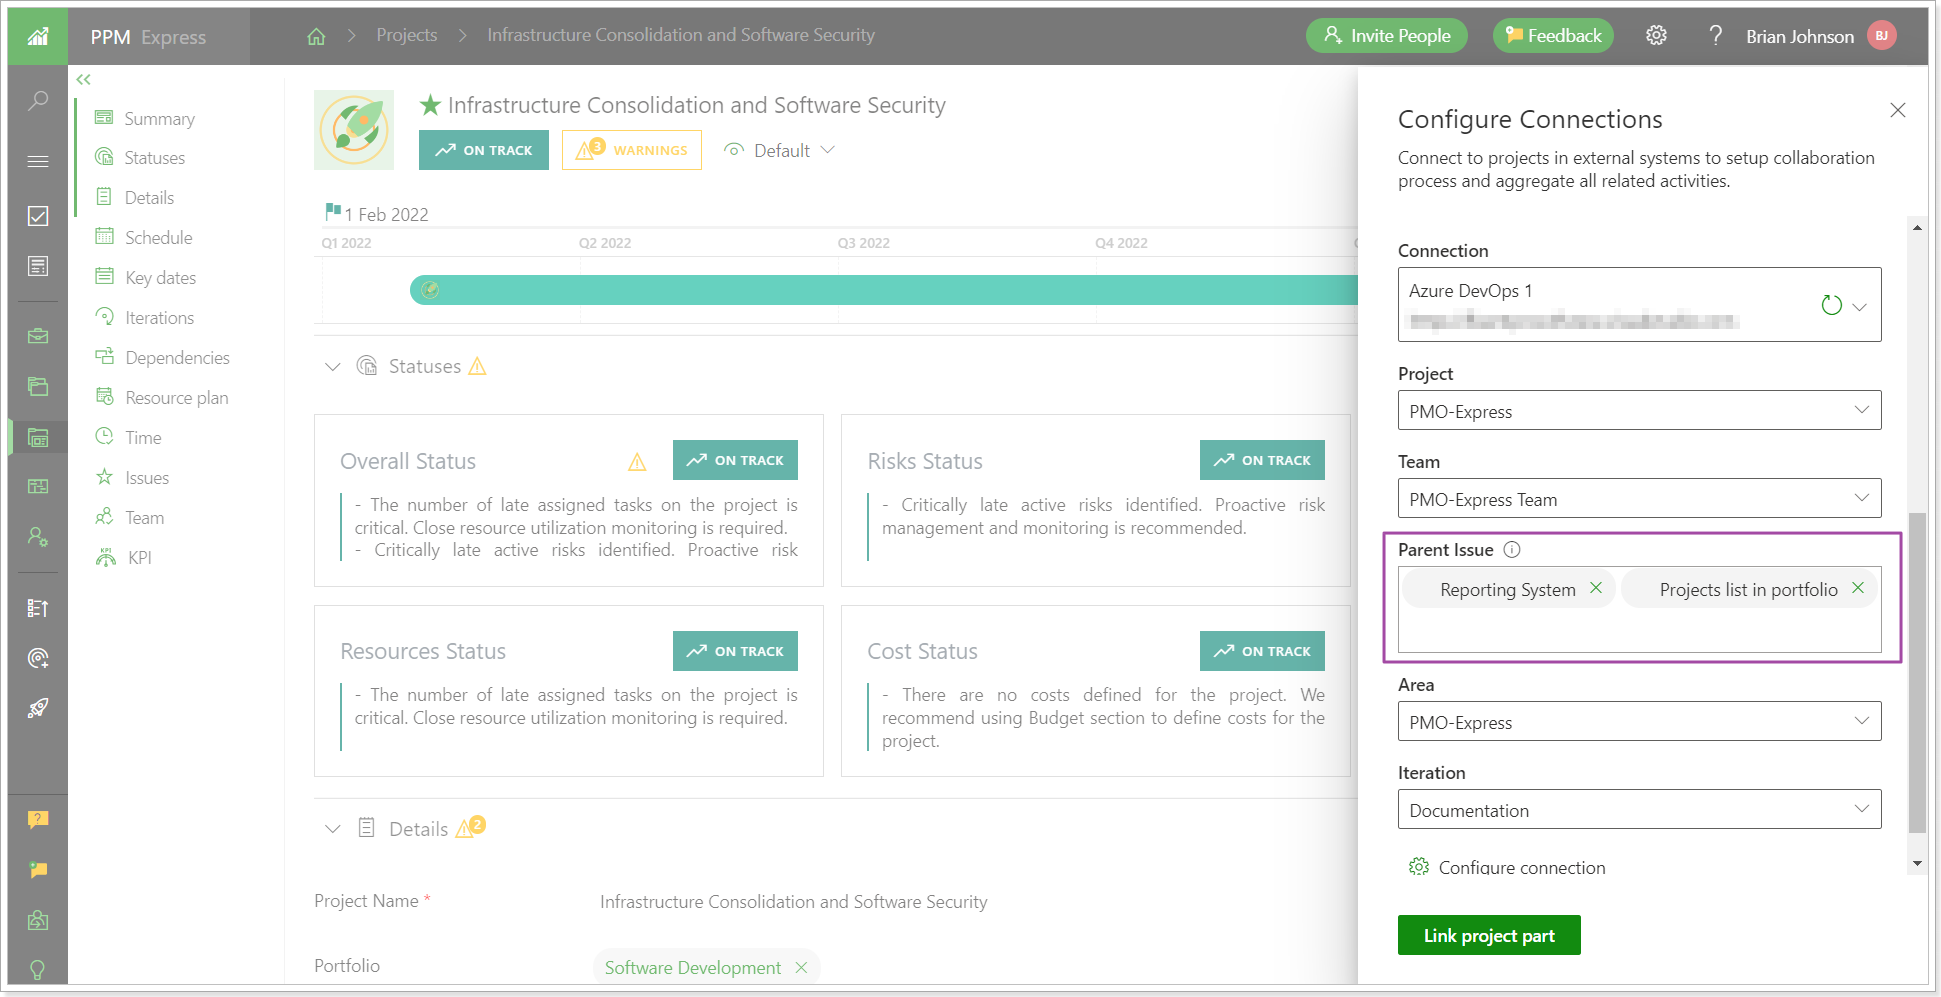
If you link the project to several Azure DevOps items, the whole project will be opened by clicking the Azure DevOps icon. If you link the project to one Azure DevOps item, it will be opened by clicking on the Azure DevOps icon.
It is also possible to link PPM Express Program to several Azure DevOps items.
2. A new RAID+ Registry PPM Express Report Pack is now available for download.
A new pack allows reviewing all Risks, Action Items, Issues, and Key Decisions within PPM Express, not only for one Project/Program or Portfolio, as it can be done directly from the PPM Express app, but to have a holistic view of all of them in one place. Lessons Learned and Change Requests are also included in the pack.
A RAID project management analysis that is available with this pack helps teams create a strategy for avoiding events and issues that may harm the project’s outcomes. It is important because it helps teams fully understand the project’s limitations and potential issues from the start and address them quickly and efficiently. An accurate and up-to-date RAID log allows project managers and stakeholders to avoid project delays by acting quickly if potential roadblocks become urgent and avoiding unpredicted costs related to project delays and adjustments.
RAID+ Registry pack provides valuable information for regular meetings where certain questions/items, e.g., like Change Requests are discussed in bulk. RAID+ report will show all the items that need to be reviewed in one place.
By default, only Active items are displayed in the reports for the In Progress or Not Started entities, but this filter can be changed to display everything if needed.
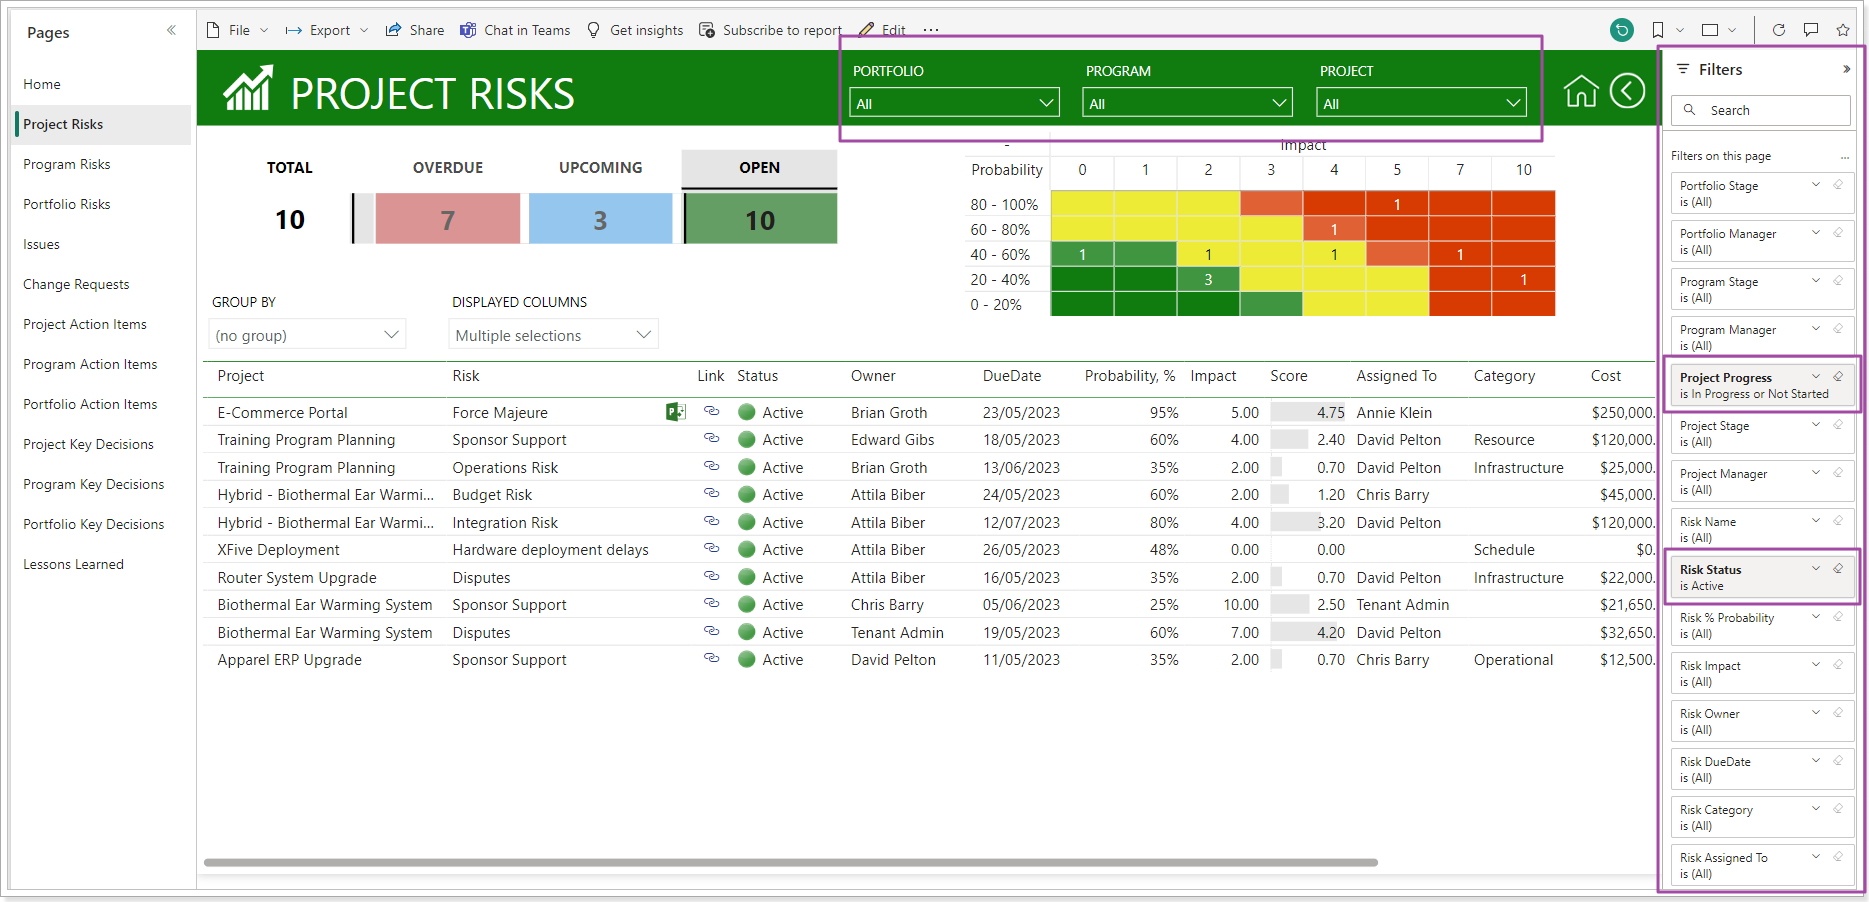
You can use filters, include/exclude columns, and group the information to display the information as needed. With RAID+ Registry filters and groupings managers can review Risks/Action Items etc that belong not only to a specific project/portfolio/program but also get a wider picture viewing for example Risks that belong to all projects in a specific portfolio.
Risks score is now available in the report (considering risks probability and impact) and the risks matrix is built on the risk score data.
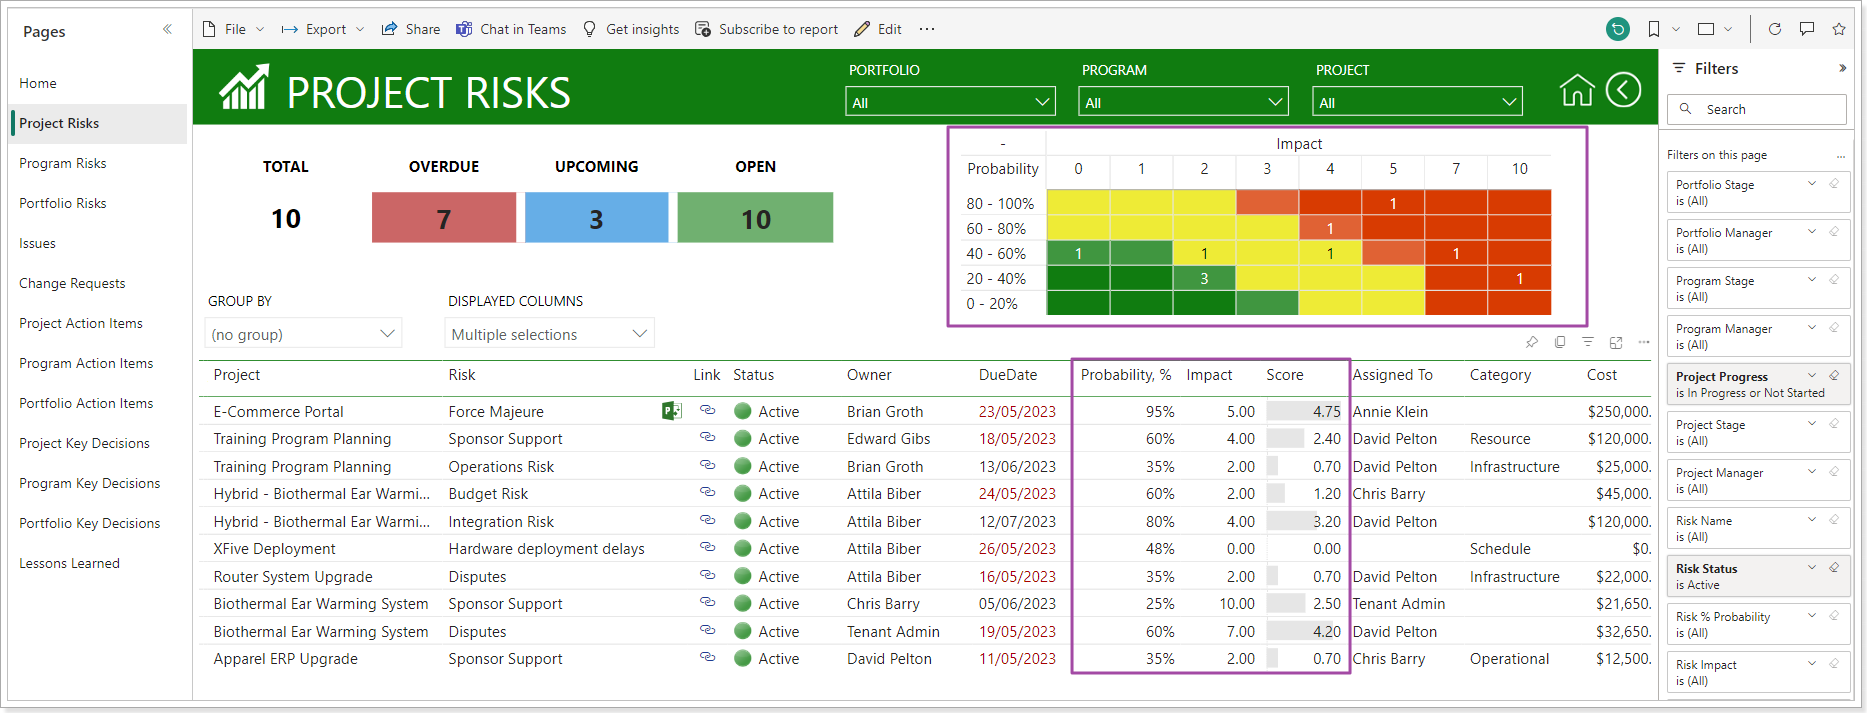
All visuals in the report are clickable and allow to filter the data displayed below accordingly.
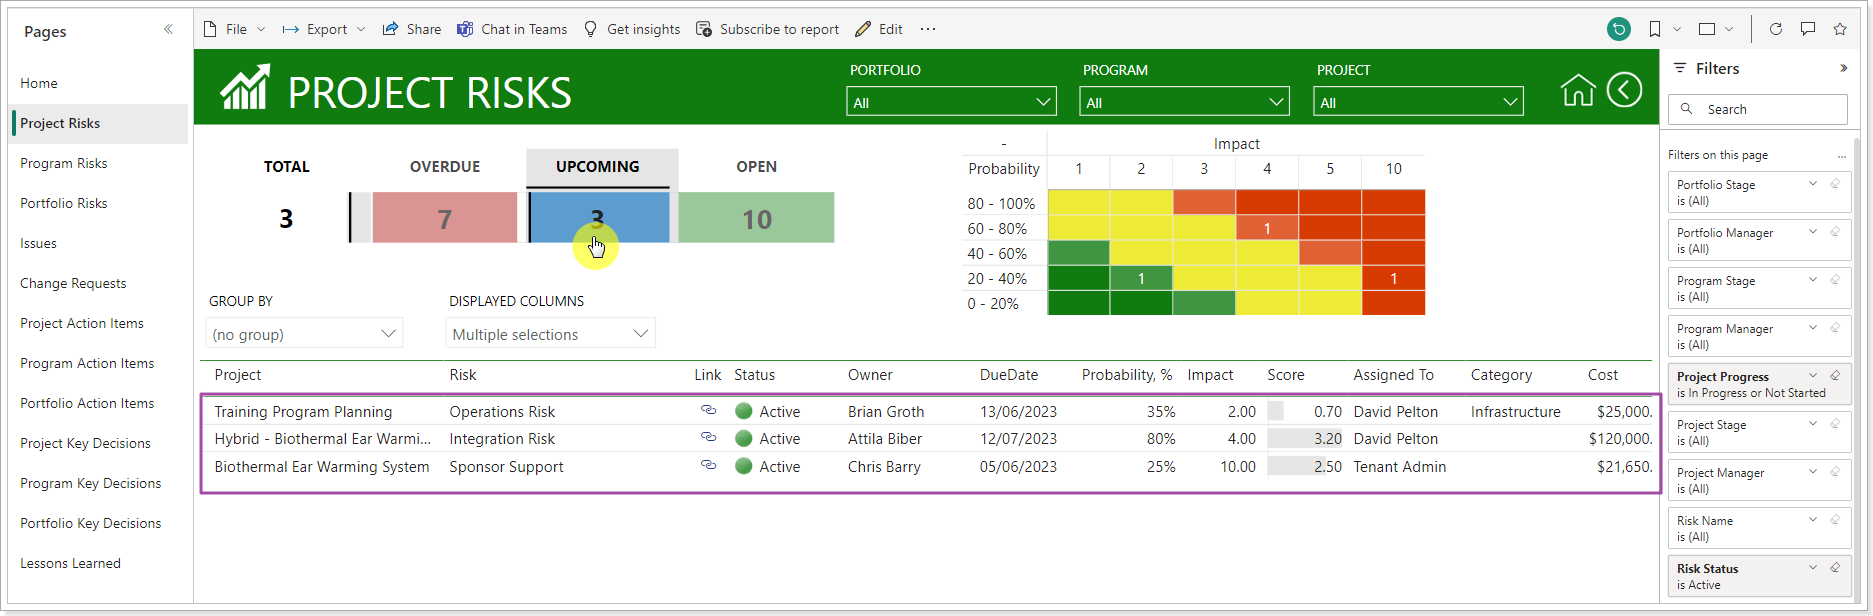
You can review and download the pack in the RAID+ Registry report pack configuration article.
Release Notes 15.6 @June 01, 2023
1. An option to calculate Project Progress by Story Points and Effort was added to the Jira connection.
Before: The Project Progres was calculated by the Elements Count without the possibility of changing this setting.
Now: There are three options available for progress calculation when the items are selected:
- Elements count
- Sum of Story Points
- Sum of Efforts
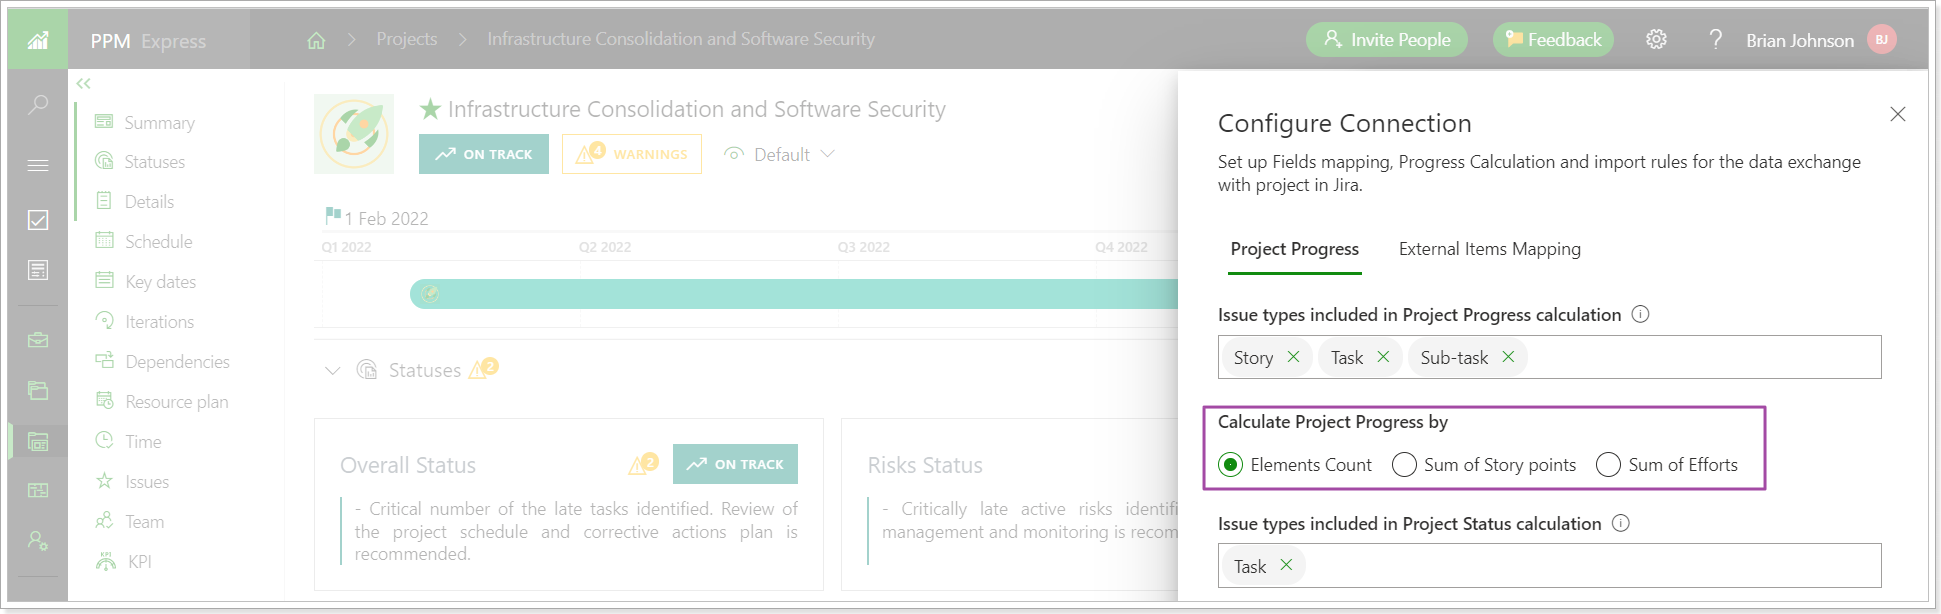
For the Sum of Story Points and Sum of Effort calculation, the progress will look like a ratio of the number of Story Points/Effort in issues marked as Closed to the total number of the Story Points/Effort in all issues.
Field mapping is configured for the 'Story Points' and 'Effort' PPM Express fields to be used in the Project Progress calculation.
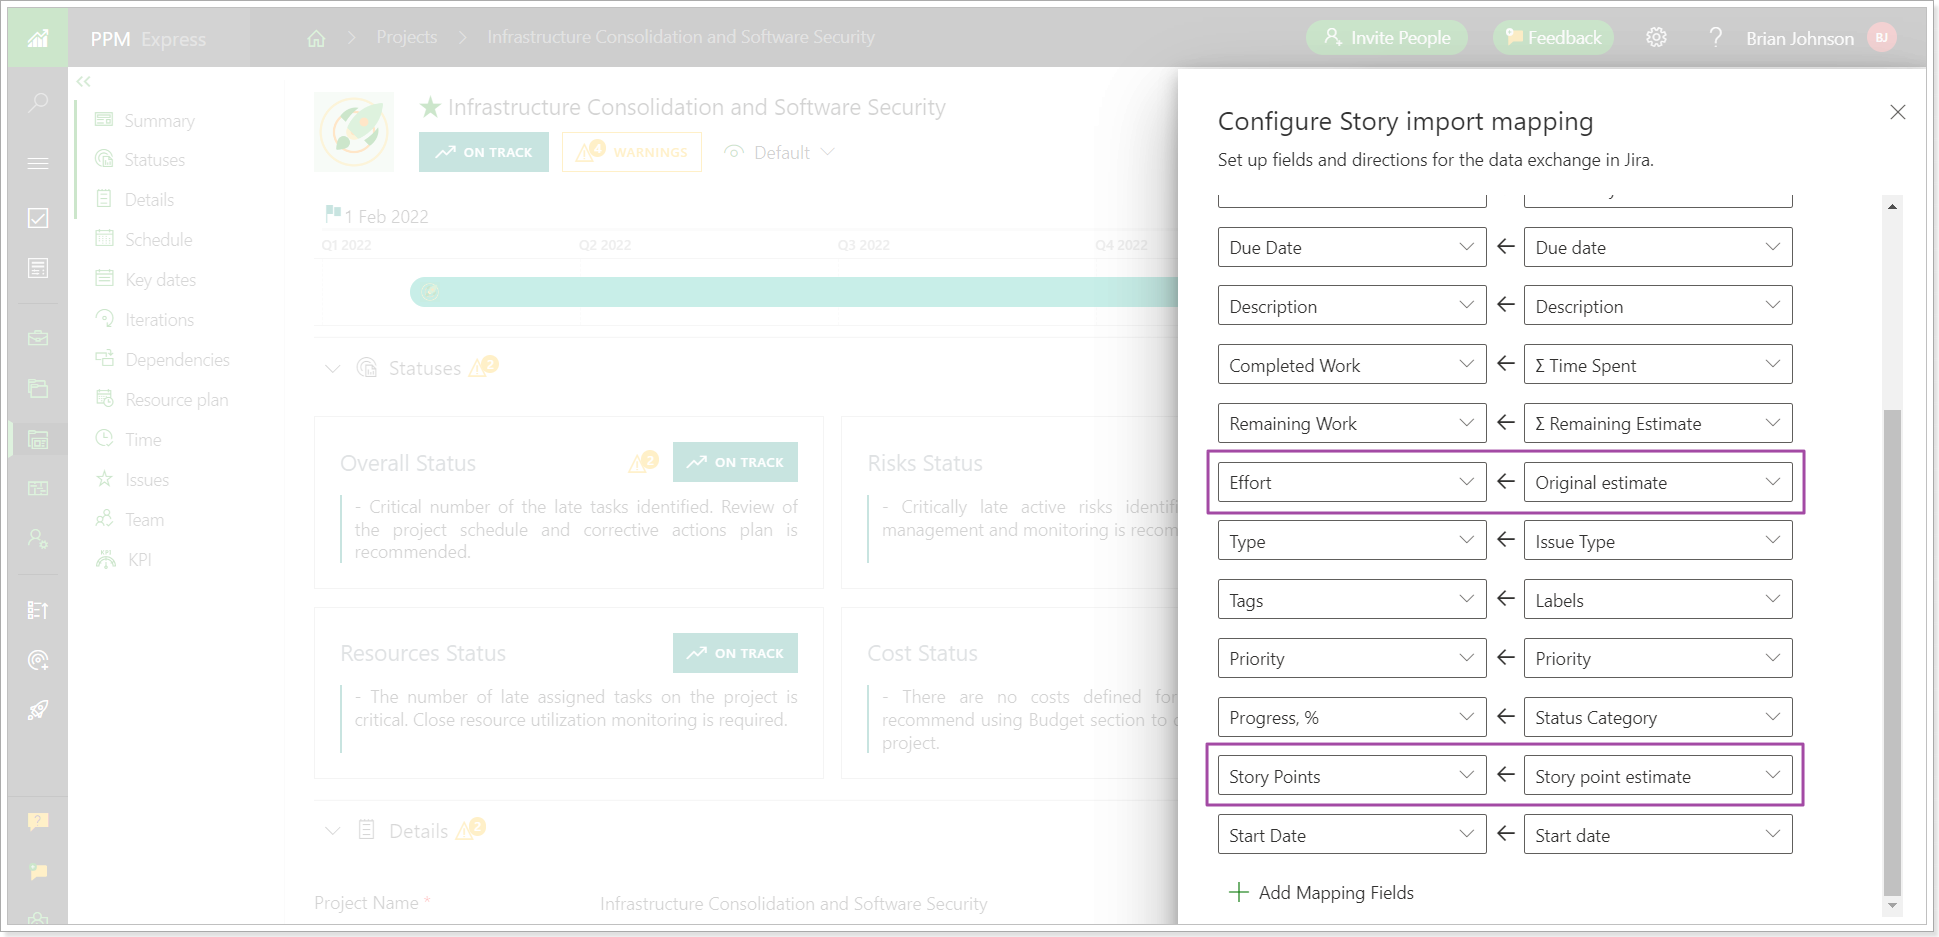
2. An option to select issues for Project Status auto calculation was added to the Jira connection.
Before: Only Bugs and Tasks were considered when calculating Resources and Schedule Project Status automatically.
Now: It is possible to include other issue types when calculating Resources and Schedule project statuses.
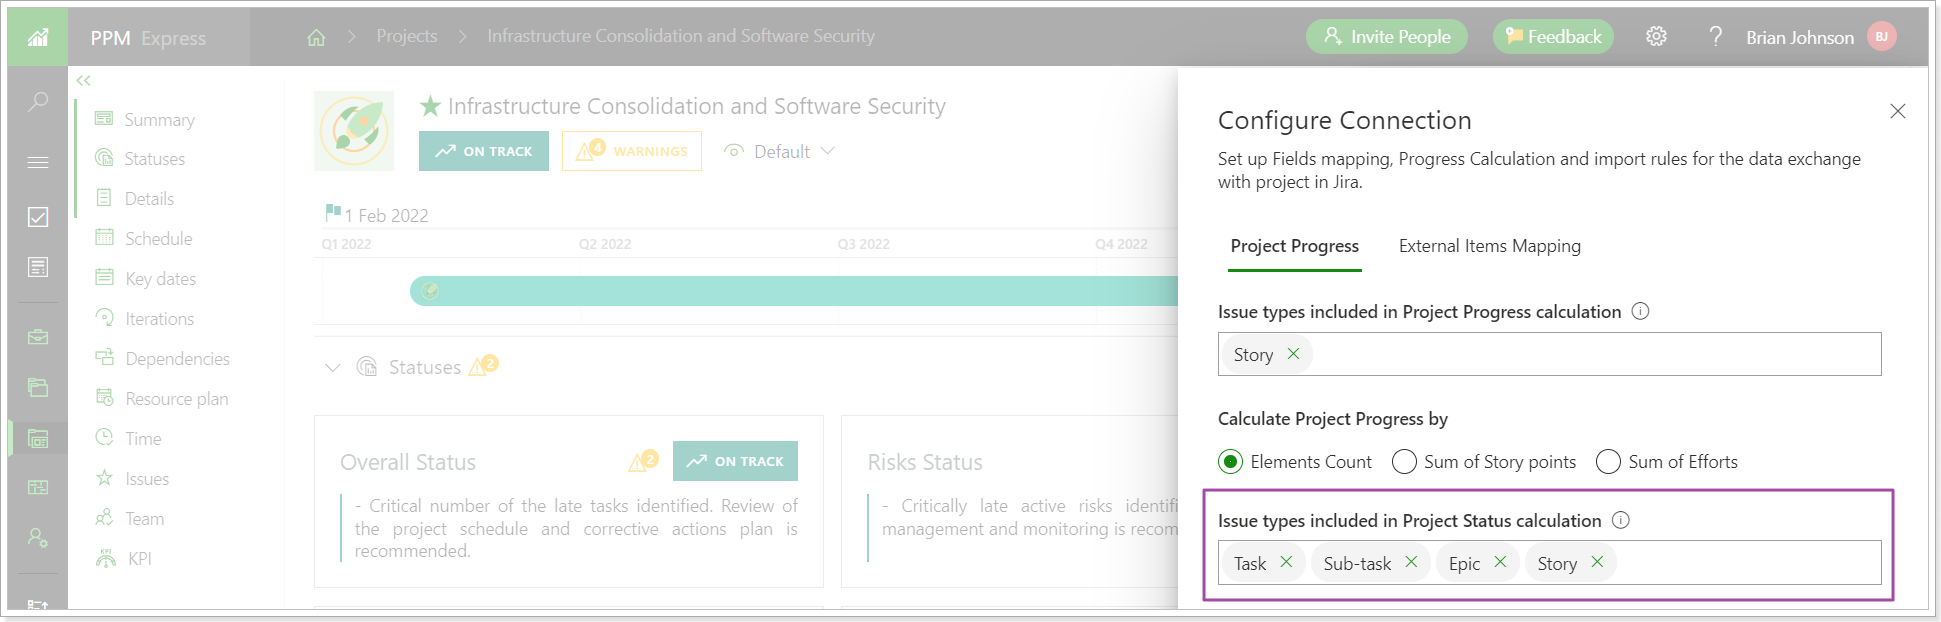
Release Notes 15.6 @May 25, 2023
1. The UI of the Sign up and Log in pages was redesigned.
The functionality did not change, only the User Interface was redesigned to show the Email option first.

2. Jira Connection page was redesigned to support custom hierarchy levels of issue types.
Before: When the Jira project was selected for linking, two checkboxes were available: Import Sprints (if this option was selected, users could select the Board and import its Sprints to the Iterations section) and Link to Epic, which allowed users to link the PPM Express project to only one Jira Epic instead of the whole Jira project.
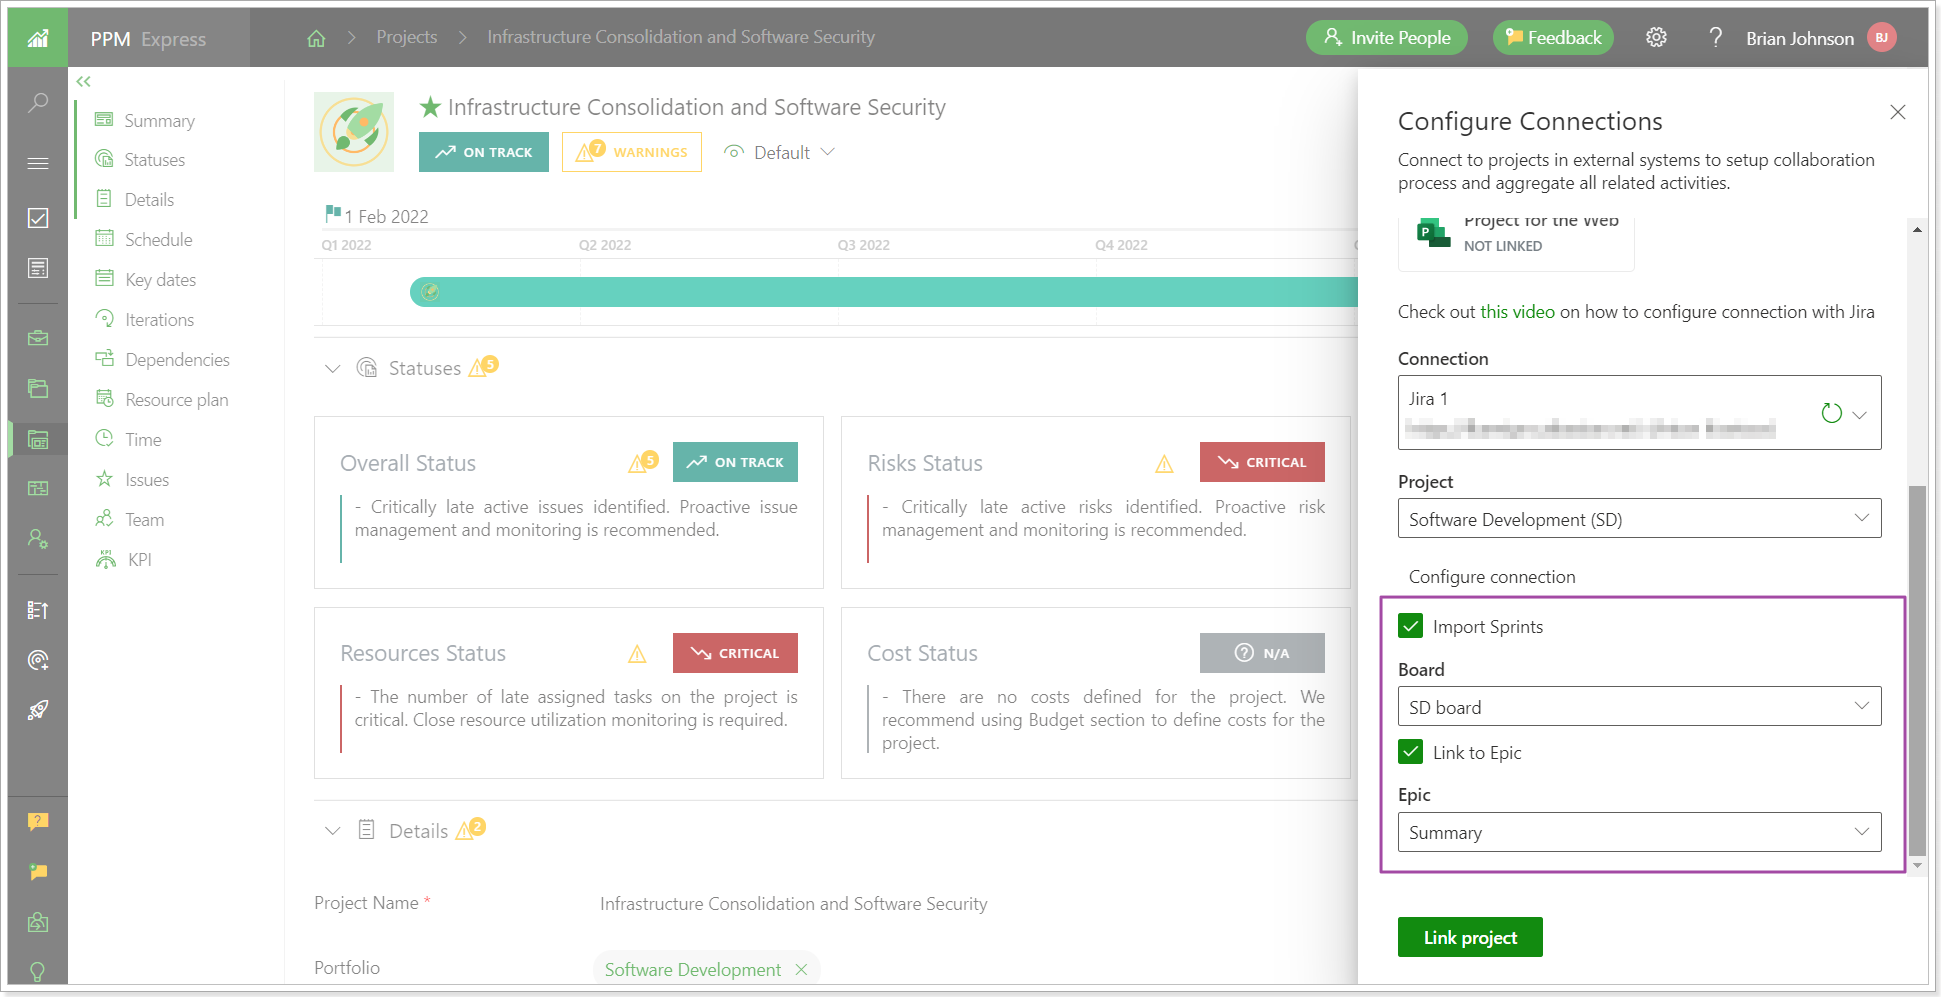
Now: The checkboxes have been removed, and there is a drop-down instead.
The Board drop-down allows selecting the Board and importing Jira Sprints from the selected Board to the Iterations project section.
The Parent Issue drop-down allows selecting the required issue(s) from the list and linking the PPM Express project to the selected issue(s) instead of the whole project. All Jira issue types are available for linking now.
You can link custom hierarchy levels with a PPM Express project if your Jira instance has custom hierarchy levels. If you have multiple Initiatives or Epics in Jira that you want to handle as a distinct project, you can now connect these items with a project in PPM Express. This allows you to manage all these work items together as a unified project.
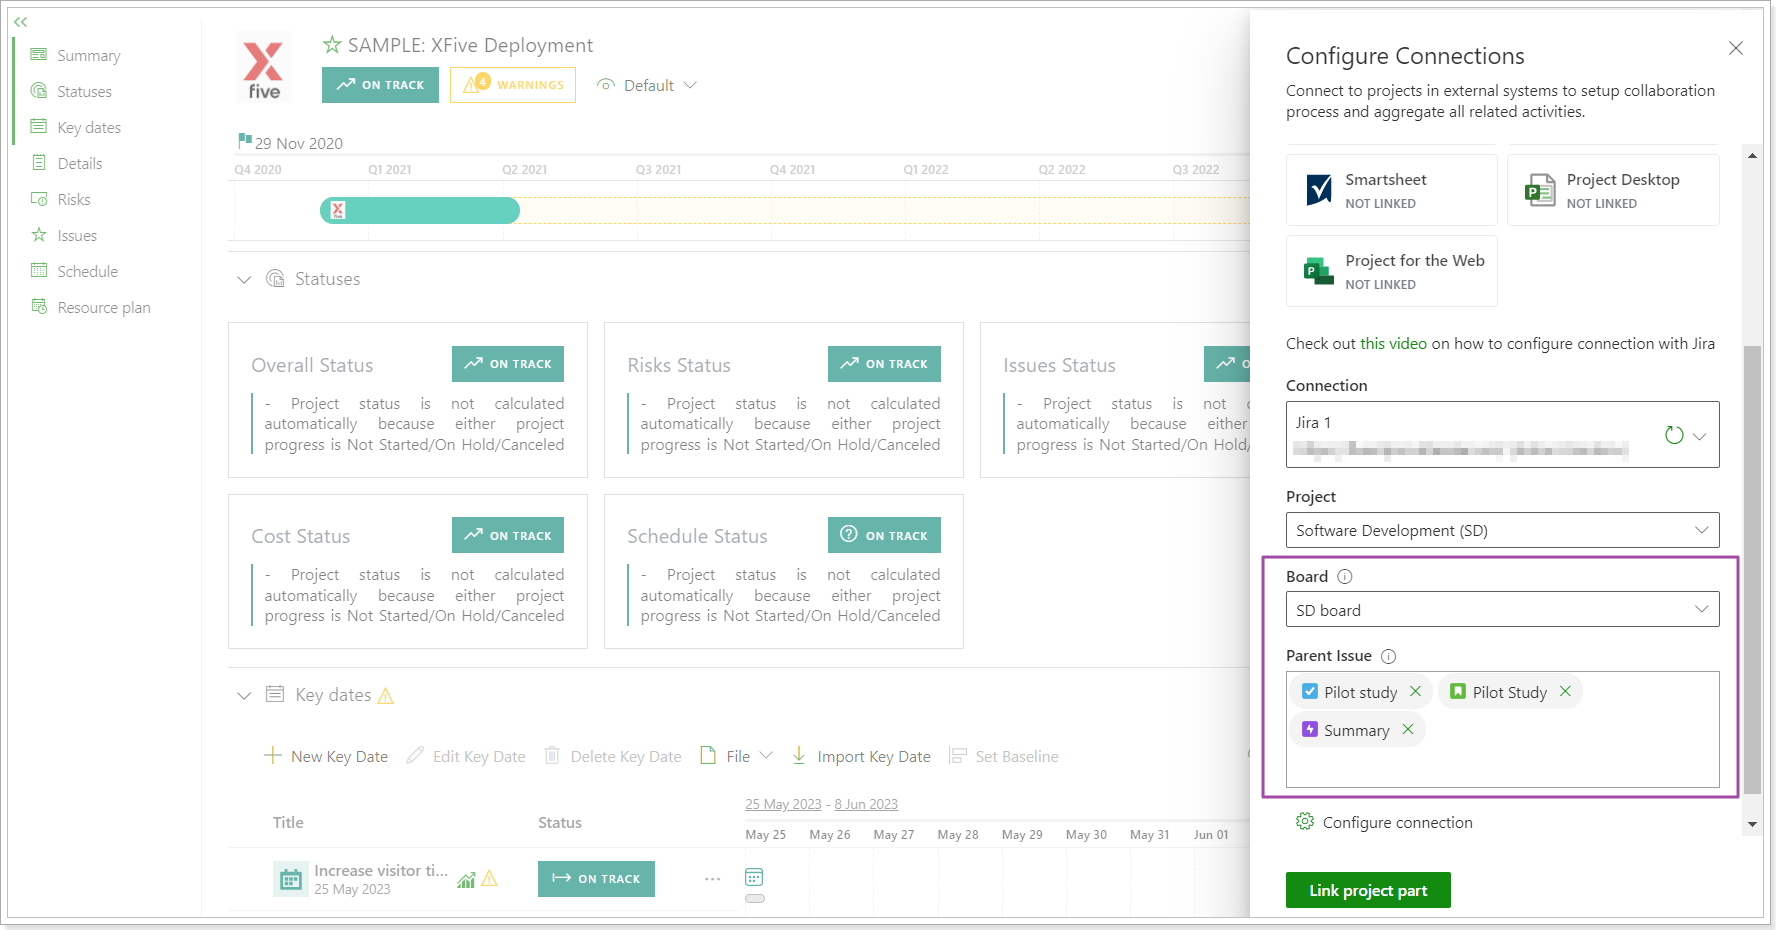
The Jira tasks page will show the list of the linked issues in this case and the hierarchy for each issue.
Release Notes 15.4 @May 22, 2023
1. PPM Express sections can now be opened in full-screen mode.
All PPM Express dashboard sections (Key Dates, Iterations, Details, Tasks, Insigts, etc.) can now be opened in full-screen mode for better viewing and editing.
If the section is opened in full-screen mode, all items become available at once, not only the first ten, making navigation and editing easier and faster.
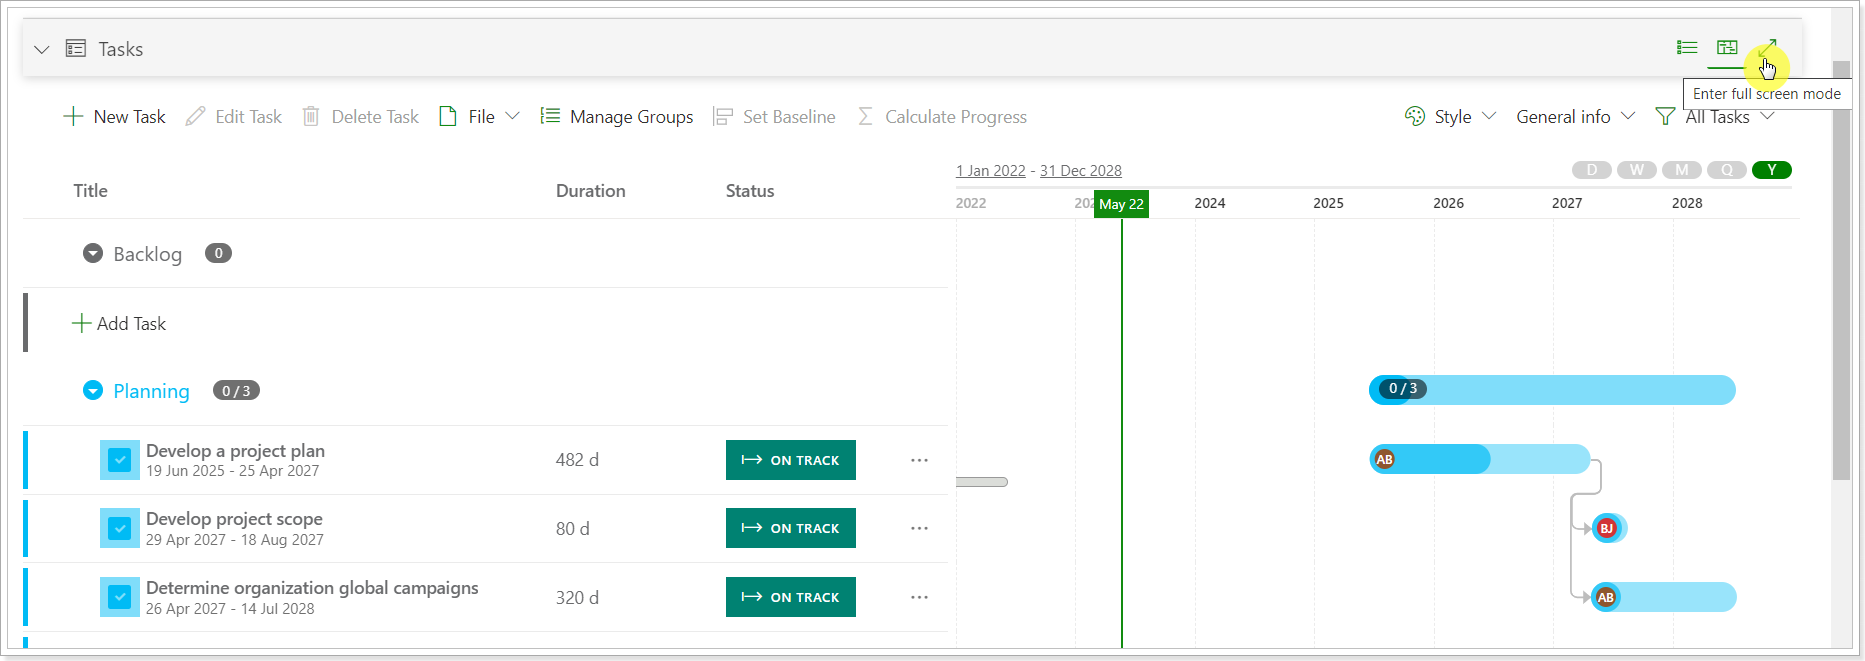
Please note: The Budget section can be opened in Full-screen mode but will not be expanded for the whole page. If you have a lot of items, it will be necessary to use the scroll option.
2. The appearance of the multi-line fields was improved.
The appearance of all multi-line fields was improved. It is now possible to open the field box and review full information instead of using the scroll option.
For example, you can open the Description field information using the 'Show more' option.
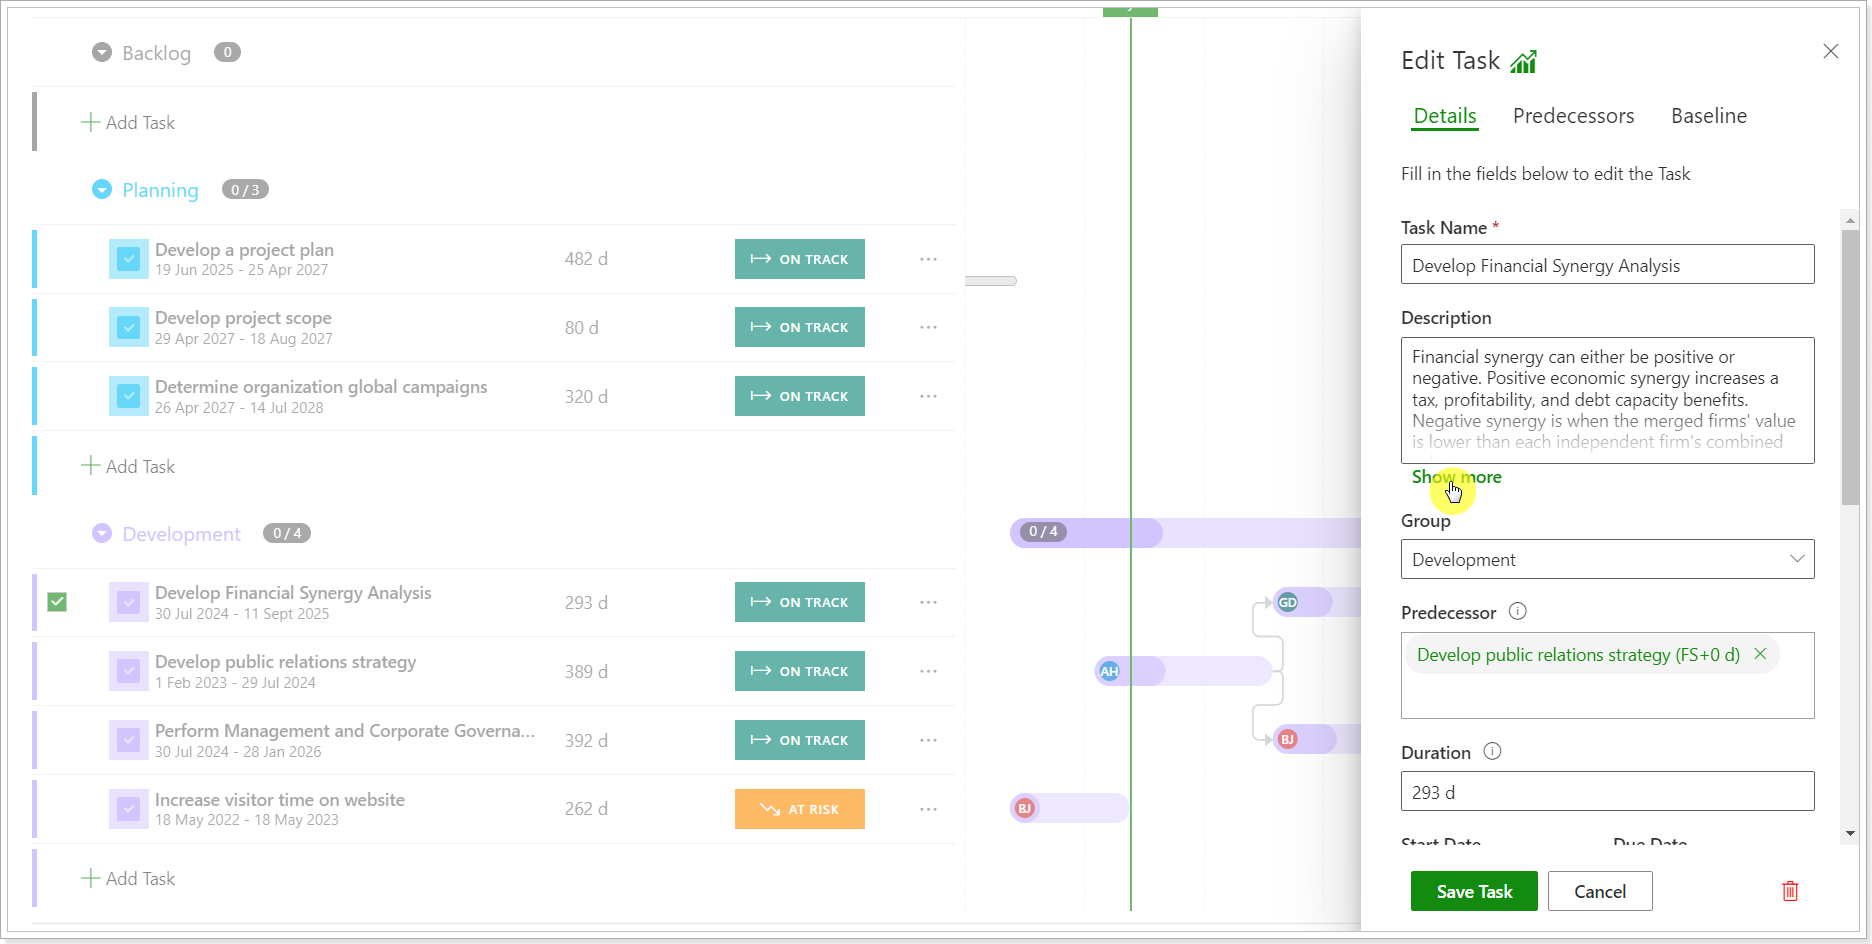
If you click on the field and start editing it, it will also be fully opened.
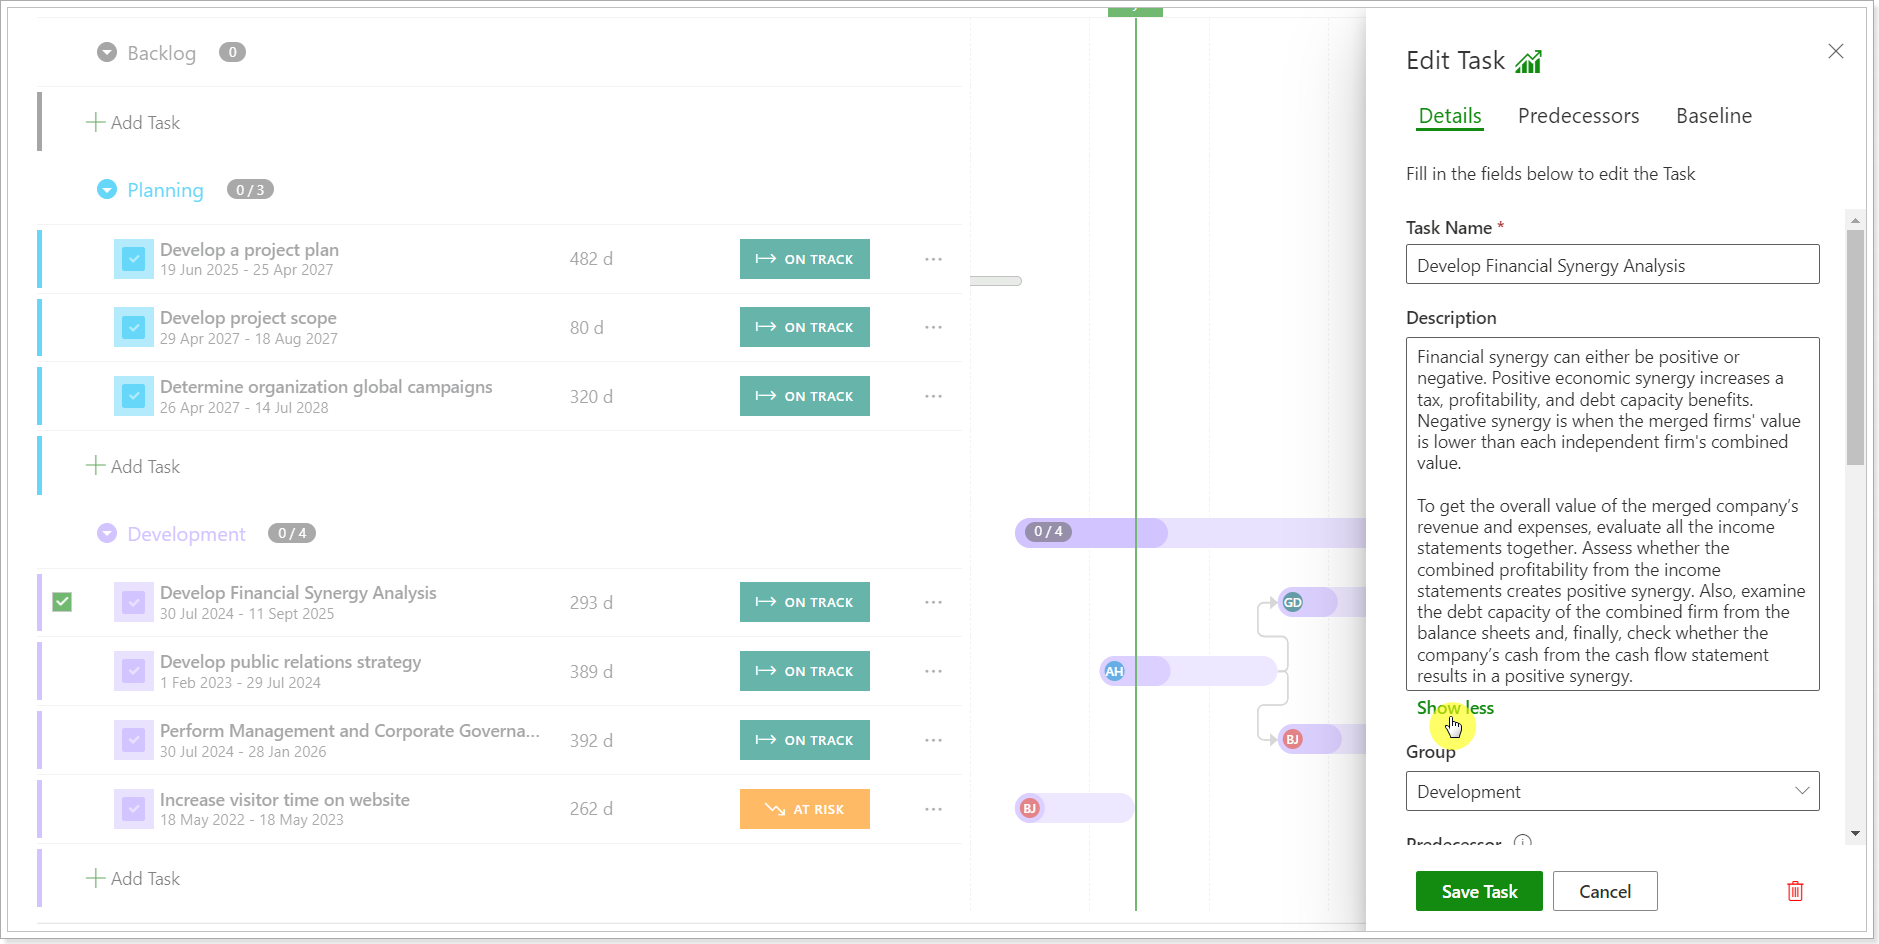
Release Notes 15.3 @May 17, 2023
1. An option to choose a color in the field of the 'Select' type will be added.
With the nearest release, users can add colors to the PPM Express system and custom fields of the 'Select' type. This functionality helps users visually designate their project/portfolio/program states, custom statuses, etc.
For example, the 'Project Stage' filed values can be colored by opening the field for editing and selecting the colors for each value.
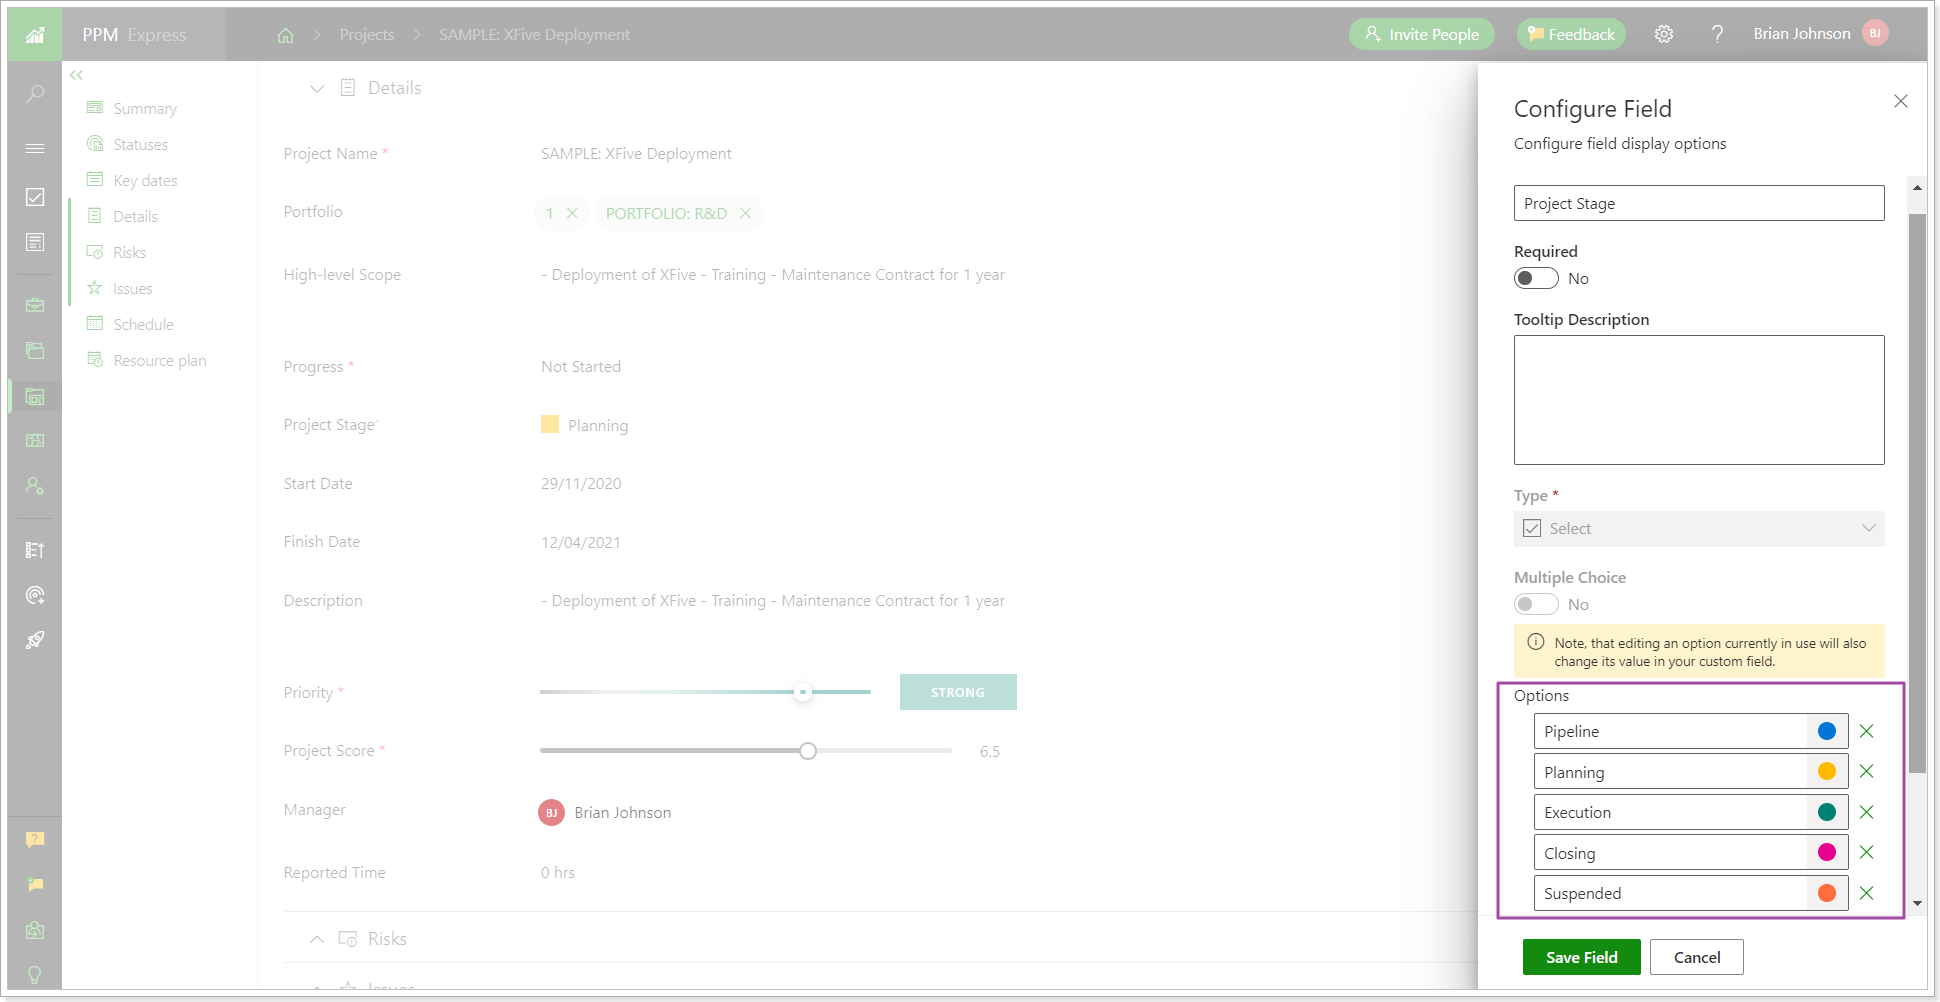
When the colors are added, each stage will be colored accordingly.
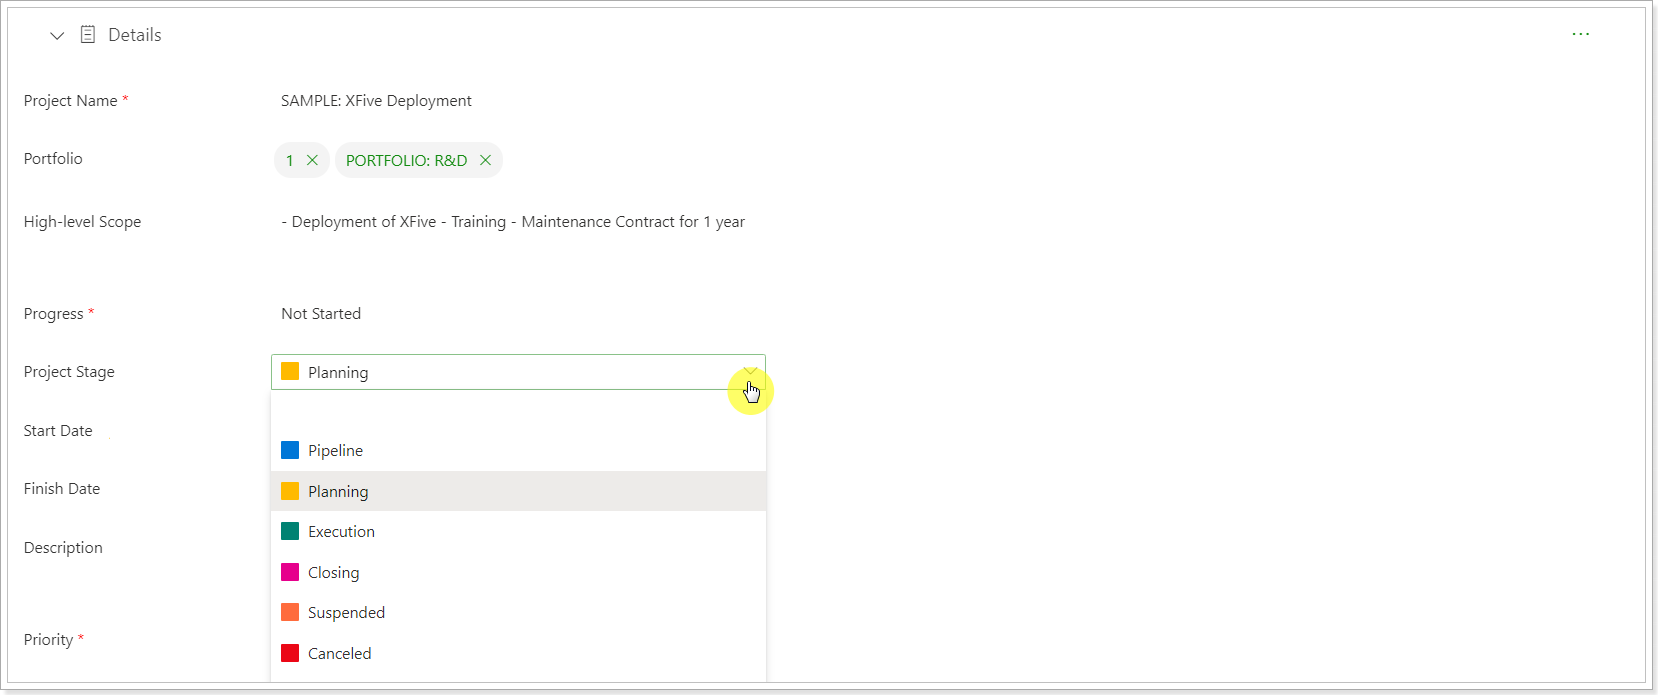
The colored fields will also appear on the timeline tooltips and table views of items.
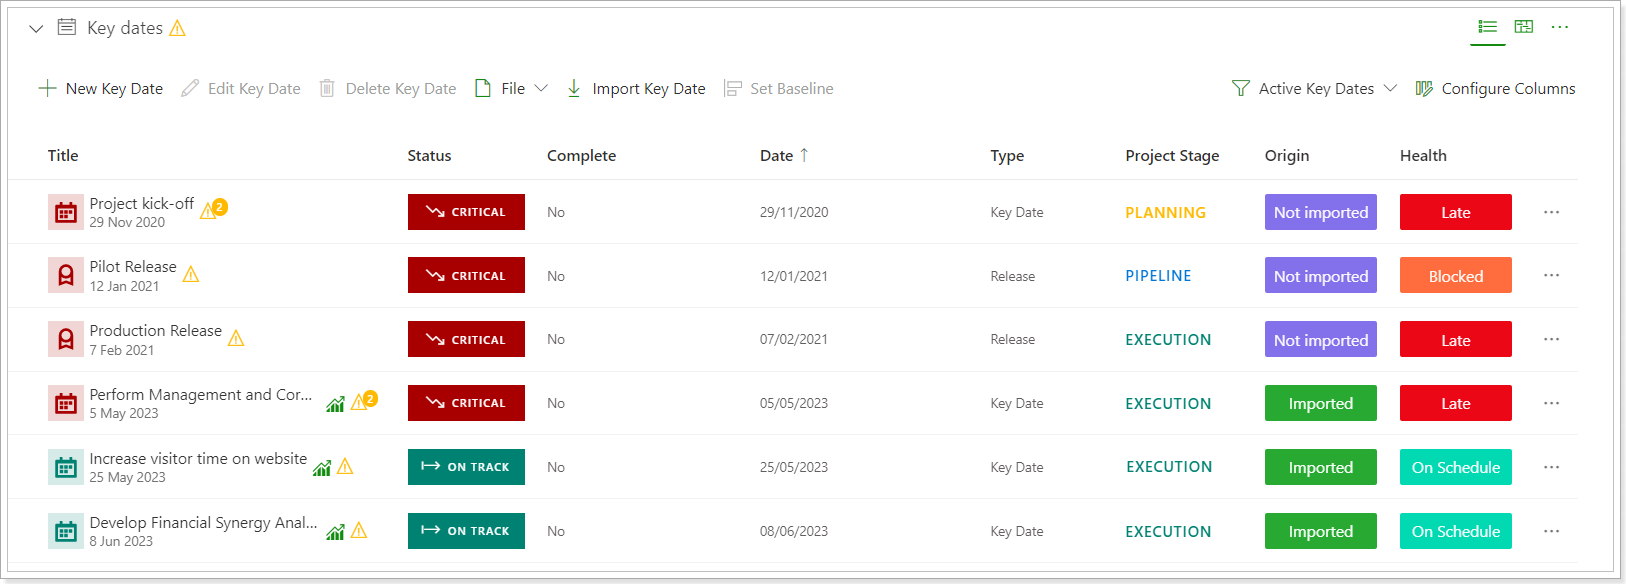
2. Baseline can be set for Key Dates.
The Baseline can be set for all PPM Express Key Dates. To set the baseline, select the Key Dates and click the Set Baseline button (the Baseline is created for the Date field).
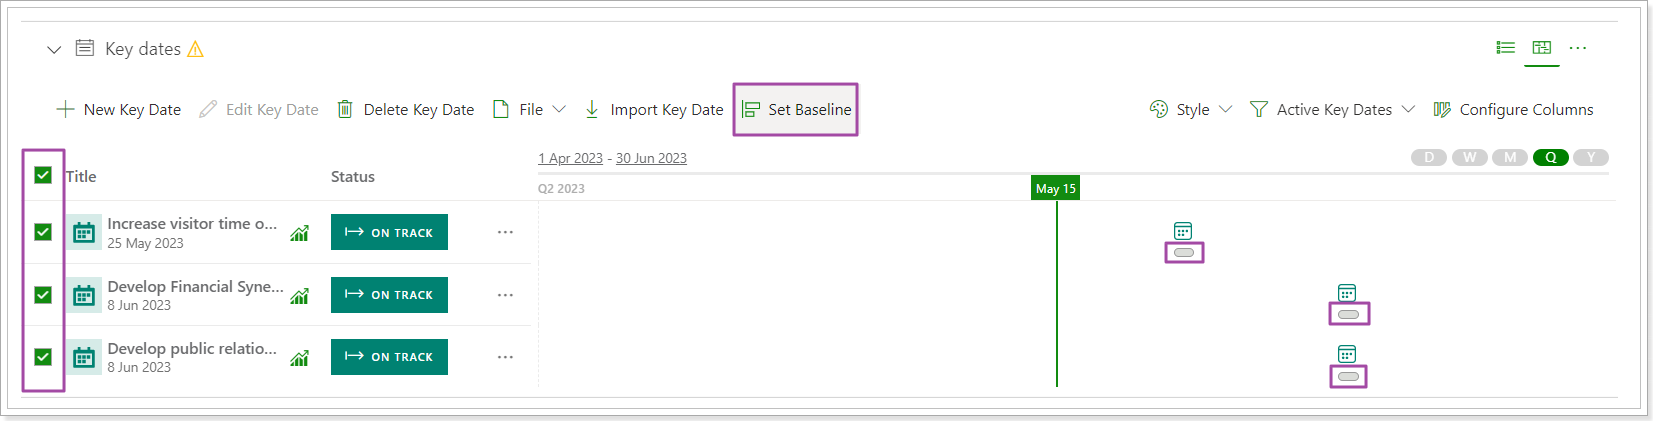
If you open the Key Date for editing, the Baseline tab becomes active once all required fields are filled in.

To remove the Baseline mark from the timeline view, click on the 'Style' option and disable the Show Baseline option.
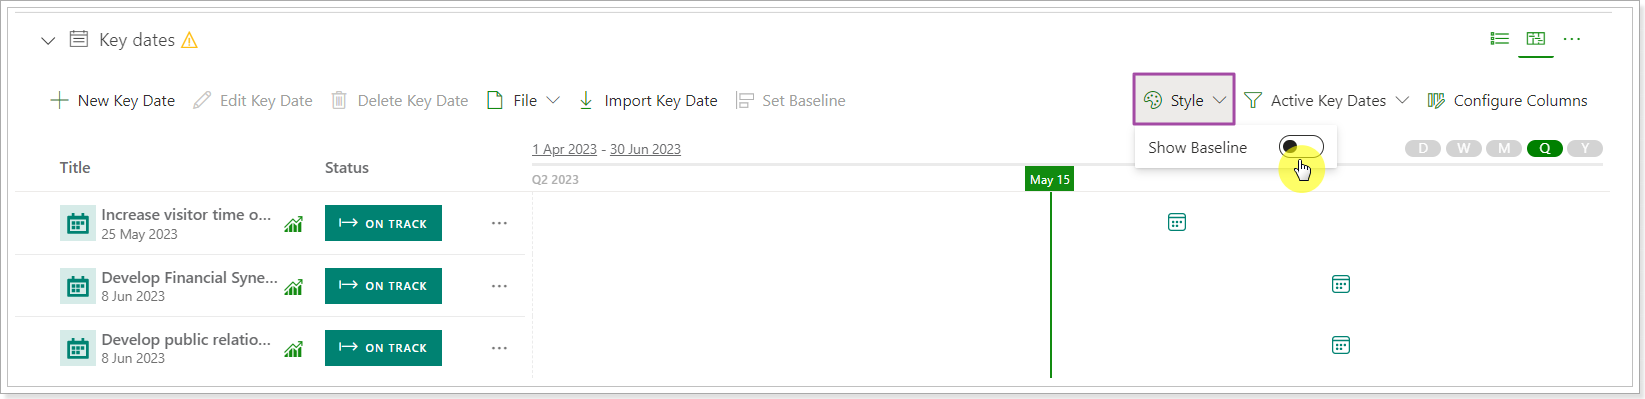
The Baseline will be read-only for rolled-up Key Dates (imported from Project or Program to Program or Portfolio level). For example, if the Key Date is imported from Projects to Portfolios, the Baseline is set in Projects. On the Portfolio dashboard, the Set Baseline option will be disabled in this case.
It is also possible to set the Baseline for the Key Dates imported from the external systems.
Release Notes 15.0 @April 24, 2023
1. PPM Express Tasks hierarchy will be introduced.
Changes to the PPM Express Tasks and the tasks hierarchy will be released in several phases. The first phase will include the sub-tasks functionality and the manual roll-up (by clicking the Calculate Progress button) of the specific summary task fields (see the list of the fields below).
New options will be added to the task menu:
- "Add subtasks" adds a subtask below the chosen task, hierarchy tree will be expanded automatically upon adding a new subtask.
- "Outdent" moves tasks a level up in the hierarchy level.
- "Indent" moves tasks a level down in the hierarchy level.
- "Insert task above" adds tasks above a chosen task. The task will be added to the same hierarchy level as the selected one.
- "Calculate progress" performs the recalculation process and roll-up data to the selected task (option is available only for summary tasks). “Calculate Progress” becomes enabled if one or several summary tasks are selected.
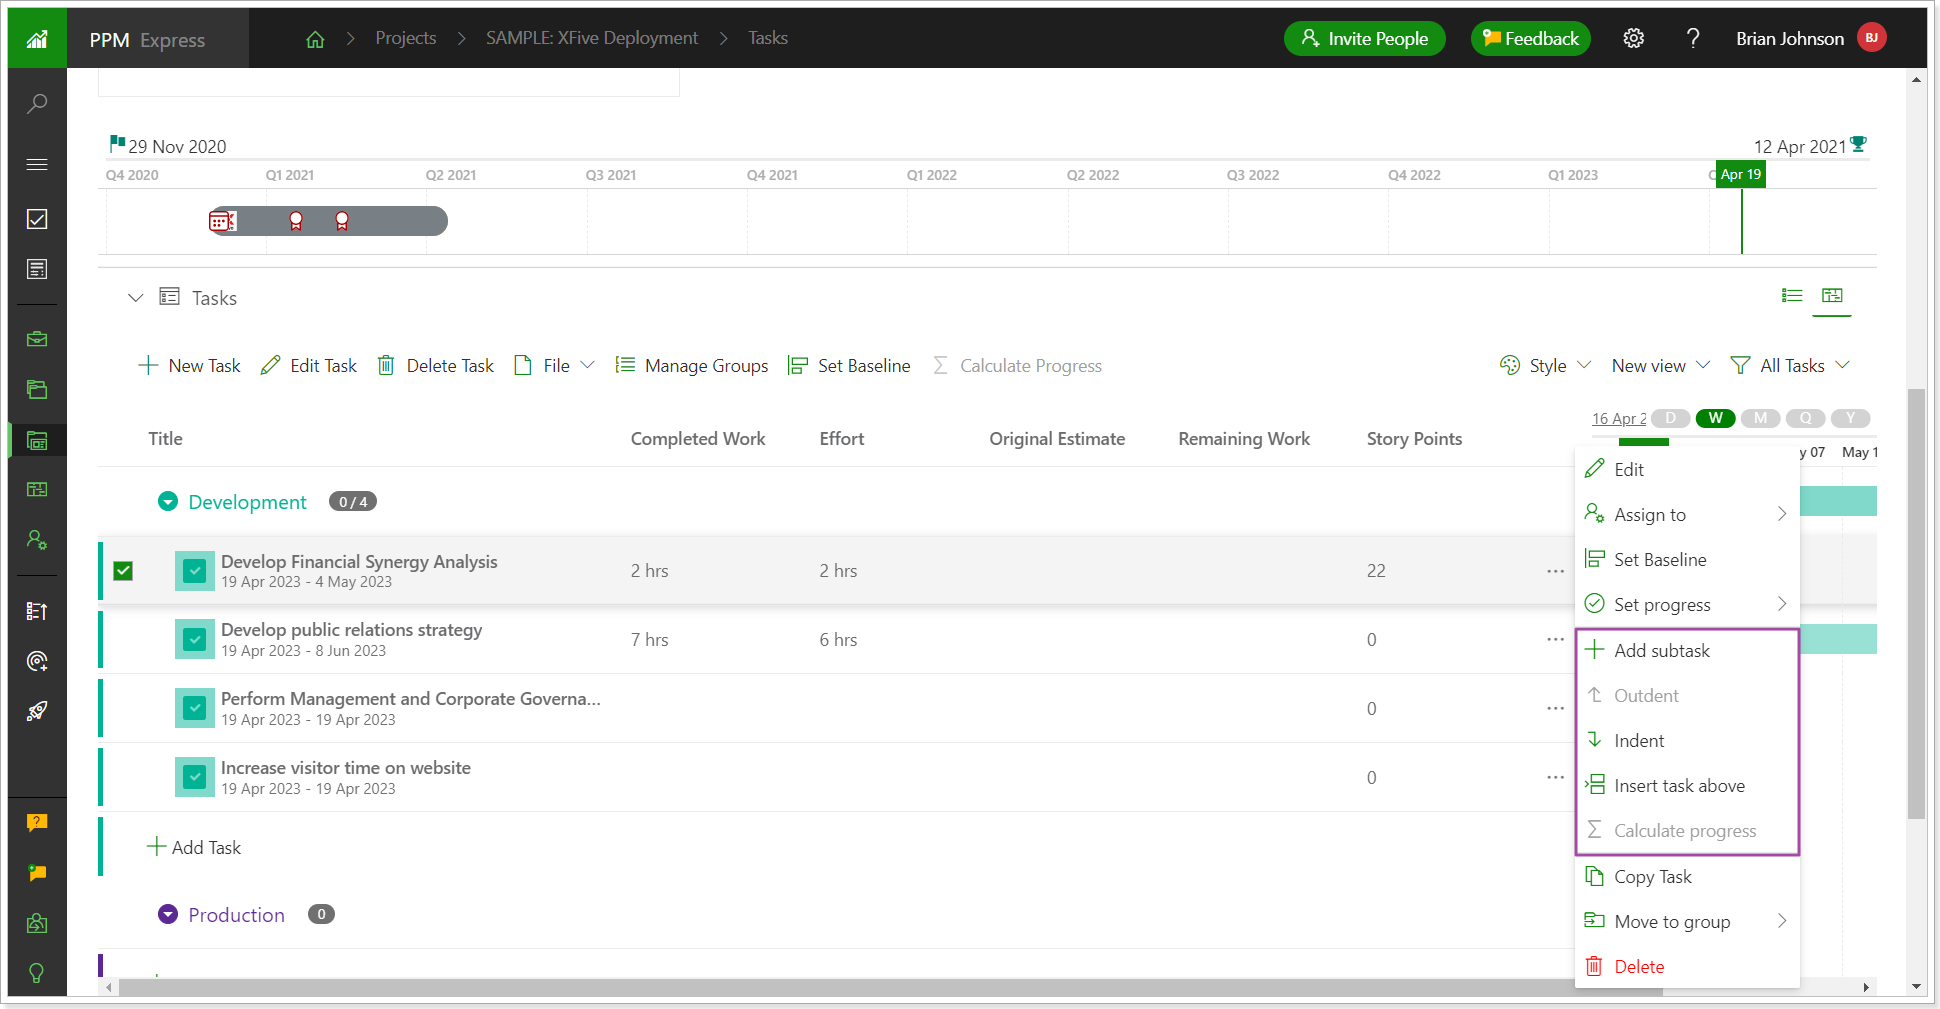
If the parent task is moved to another group, all related child subtasks will be moved too. When users select to delete a task that has subtasks, these subtasks will also be deleted together with the task.
A roll-up calculation of the summary task fields will be implemented for the following existing fields:
- Effort
- Completed Work
- Remaining Work
- Original Estimate
- Story Points
For the fields below data will also be recalculated for the summary task (not as a roll-up, but based on the sub-task field values):
- Start Date – the earliest start of the sub-task is taken into account
- Due Date – the latest finish of the sub-task is taken into account
- Duration – the number of working dates for the sub-tasks is taken into account
- Progress, % - calculated by a formula ((Completed Work/Effort)*100%)
In the first phase, the roll-up calculation will be performed on demand, after the user will explicitly select a summary task(s) and click the “Calculate Progress” button.
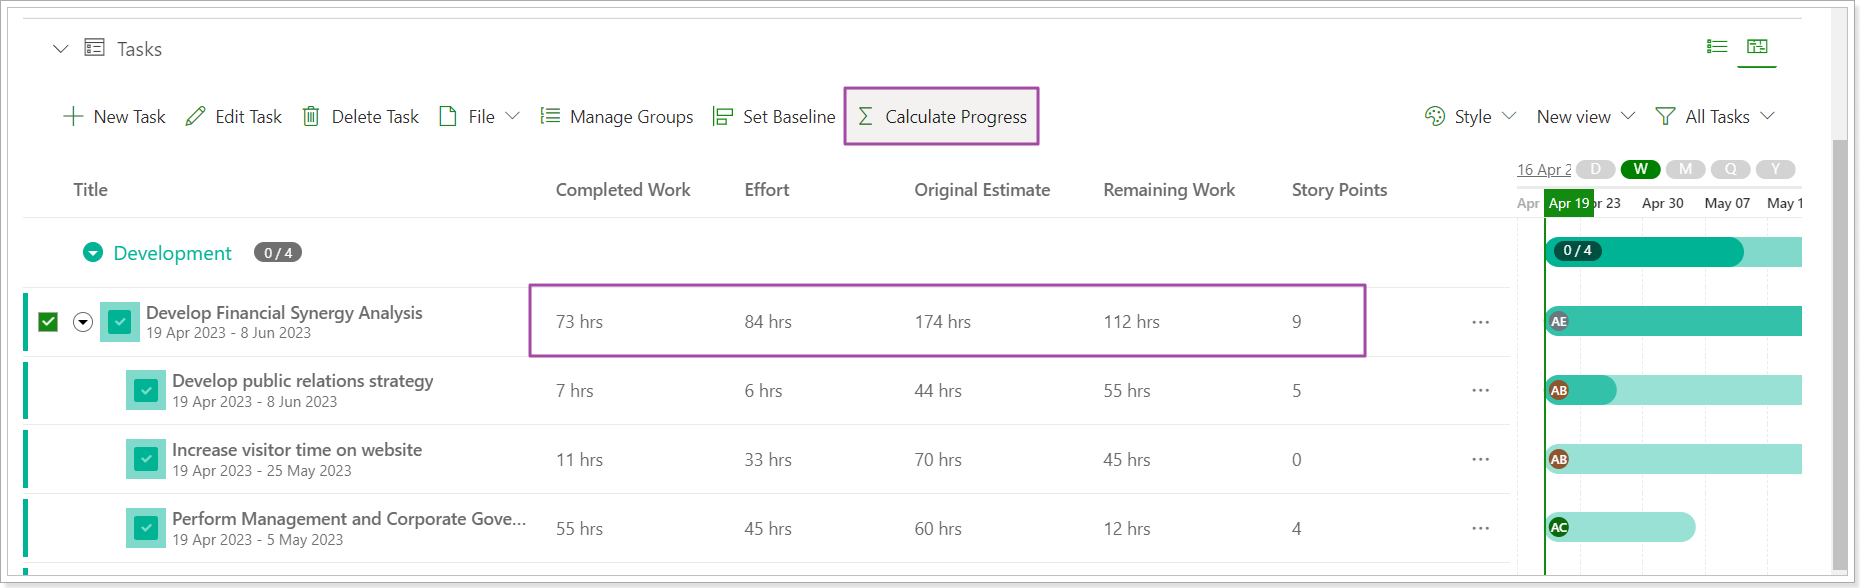
This functionality will have the following limitations:
- 10 hierarchy levels will be supported.
- Drag&Drop functionality will be available only for collapsed hierarchy tree.
- Tasks hierarchy will not be supported in .csv file and API.
- If the hierarchy tree is collapsed the child tasks are not exported to .csv file (only tasks that are selected and visible on UI will be exported to .csv).
- If a predecessor is defined for a summary task, and this predecessor will not allow to set the summary task’s Start or Due Date as the earliest/latest Start/Due Date of non-summary tasks, then the summary task’s Start/Due Date should remain as defined by predecessor even when “Calculate Summary Task” is clicked.
In the next phases, in addition to the on-demand roll-up, we will be introducing auto-calculation and rollup for progress-related fields, i.e. horizontal & vertical auto-calculation for tasks, summary tasks, and subtasks (for PPM Express schedule).
Release Notes 14.9 @April 6, 2023
1. The permission model for the Business Challenges and Ideas module in PPM Express was improved.
Before: Users with 'Manage Challenges and Ideas' permissions could create challenges, activate or reject the ideas within these challenges, and delete ideas and challenges. All users who have these permissions could review and edit all challenges and ideas on the Business Challenges page, even the ones where they are not managers. The Business Challenges and Ideas module was available for viewing for all users and team members within the PPM Express tenant.
The permission model did not allow for access at the Business Challenge level, which could limit organizations from having department or team-specific challenges. We understand the need for a more granular permission model and have taken steps to address this issue.
Now: With the redesigned permission approach, similar to that used for projects, programs, portfolios, and roadmaps, the Business Challenges and Ideas module is now more flexible. Users can now limit access to all or specific business challenges. This will allow employees of a particular department or project to access only relevant challenges and ideas.
The new permission model offers the following options for Users:
- Create Business Challenges
- Edit all or selected challenges
- Collaborate on all or selected challenges (read-only access to challenges with the ability to view ideas in this challenge, vote for ideas of other users, and submit their own idea)
Team Members can now collaborate on all or selected challenges with the ability to view ideas in this challenge, vote for ideas of other users, and submit their own idea.
Please note: The current permissions of both users and team members will be preserved and mapped to the new permission model. You can then choose to grant more granular permission to challenges and ideas.
We hope that this update will enhance your experience with PPM Express and provide better control over access to Business Challenges and Ideas. We value your feedback and are looking forward to hearing from you.
Release Notes 14.8 @March 29, 2023
Before: The calculation of Project Progress for Jira connection involved specifying issue types to be included in the calculation and mapping Jira statuses to PPM Express progress categories. While this approach was quite flexible, it was not very user-friendly regarding setup.
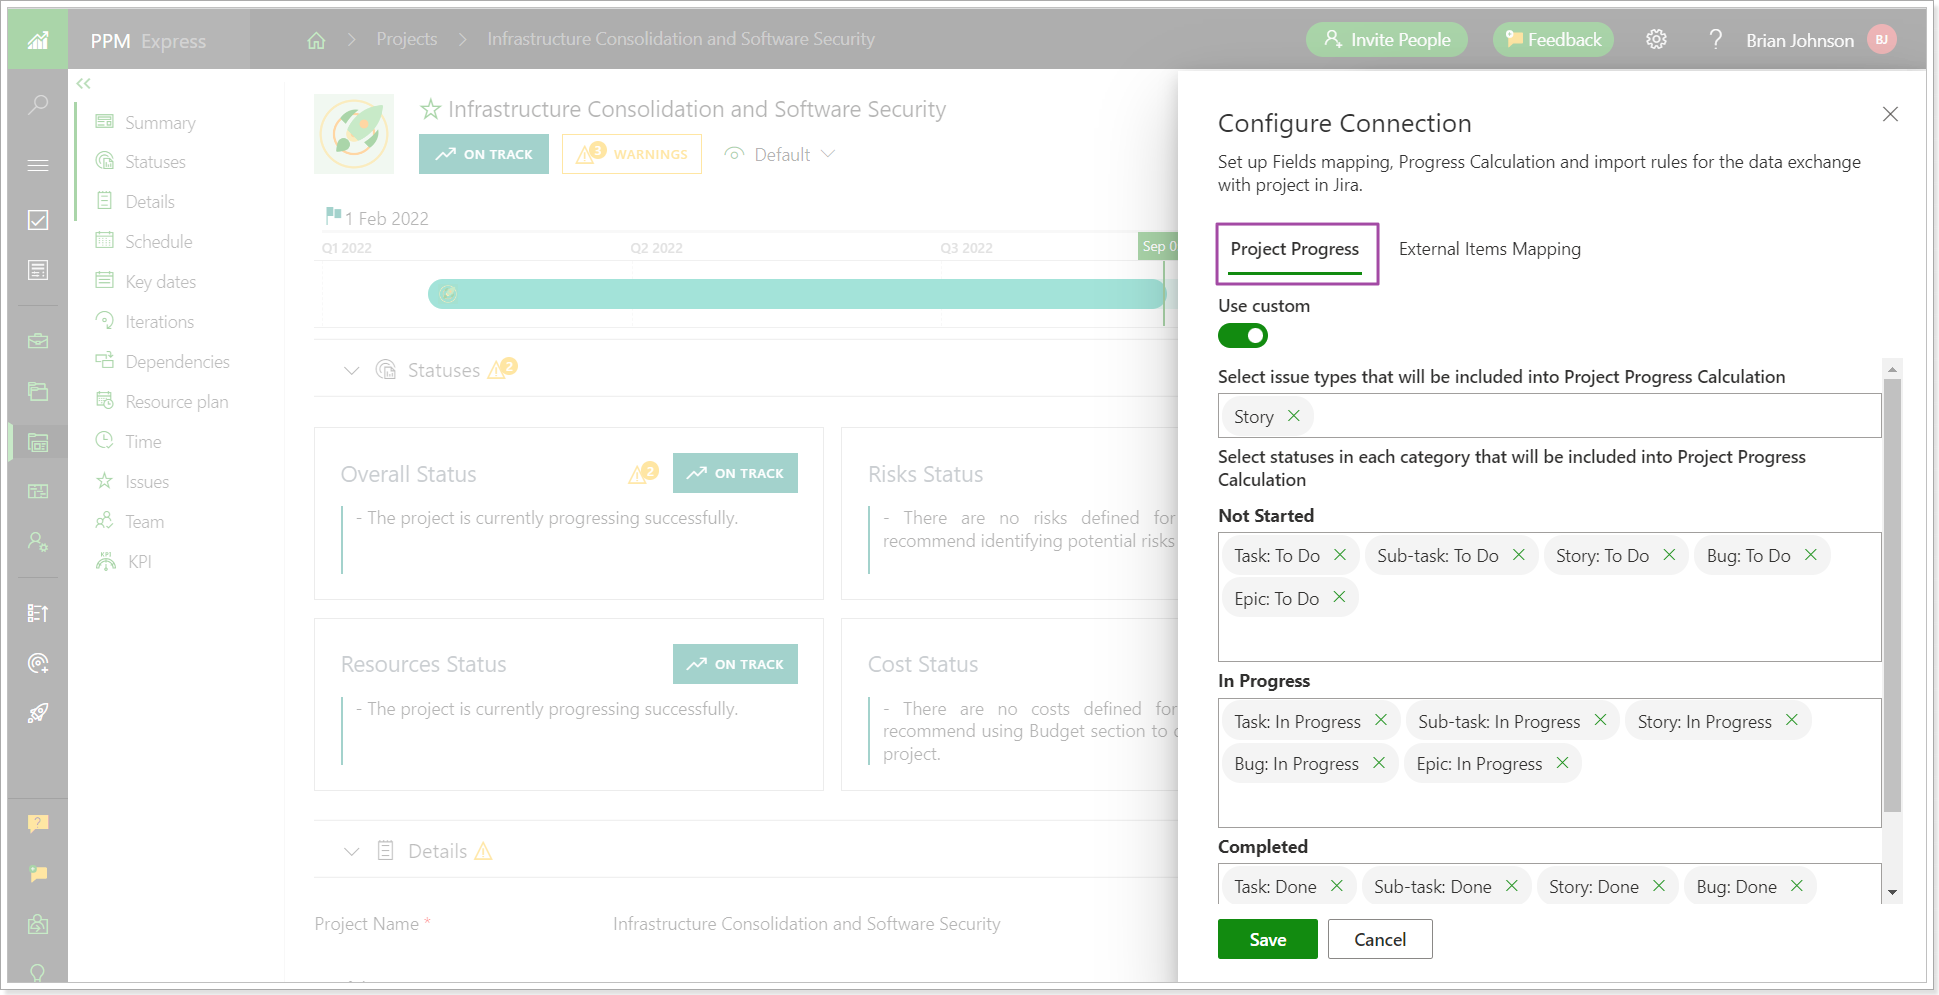
Now: Project Progress calculation will be done by specifying issue types and mapping the PPM Express "Progress" field and Jira "Status Category" field for each issue type that needs to be included in the calculation.
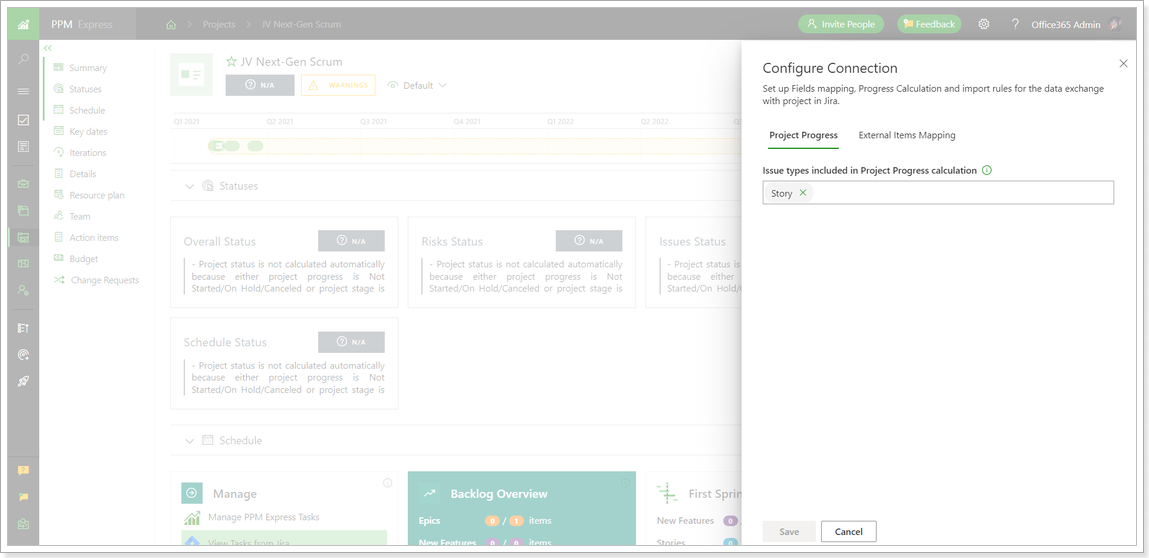
.png)
Issue types currently selected for Project Progress in your Jira projects will be preserved.
Please note: If you had previously used the default setting for calculating project progress, the value for project progress will remain the same. However, if you had enabled the 'Use custom' toggle and mapped the statuses with PPM Express progress categories in a unique way different from the default, the project progress value may be recalculated based on the new rules.
If you want to continue mapping the PPM Express 'Progress' field and Jira 'Status' field instead of Jira "Status Category" field, you can do so by mapping these two fields in the 'External Items Mapping' tab for each issue type that needs to be included in the calculation.
.png)
You will also need to specify the transformation rules, as in the example below.
.png)
.png)
Please note: If you manually changed the default mapping between the PPM Express "Progress" field and Jira "Status Category" field, your mapping will not be overwritten after release. If you want to calculate Project Progress for your Jira projects, please ensure that the PPM Express "Progress" field and Jira "Status Category" field are mapped together by reviewing the fields mapping.
Release Notes 14.7 @March 22, 2023
1) The export/import to/from .csv file functionality was added to Calendar Exceptions.
It is now possible to export/import Calendar Exceptions to/from .csv file. This functionality is available for the Calendar Exceptions on the tenant level and per resource.
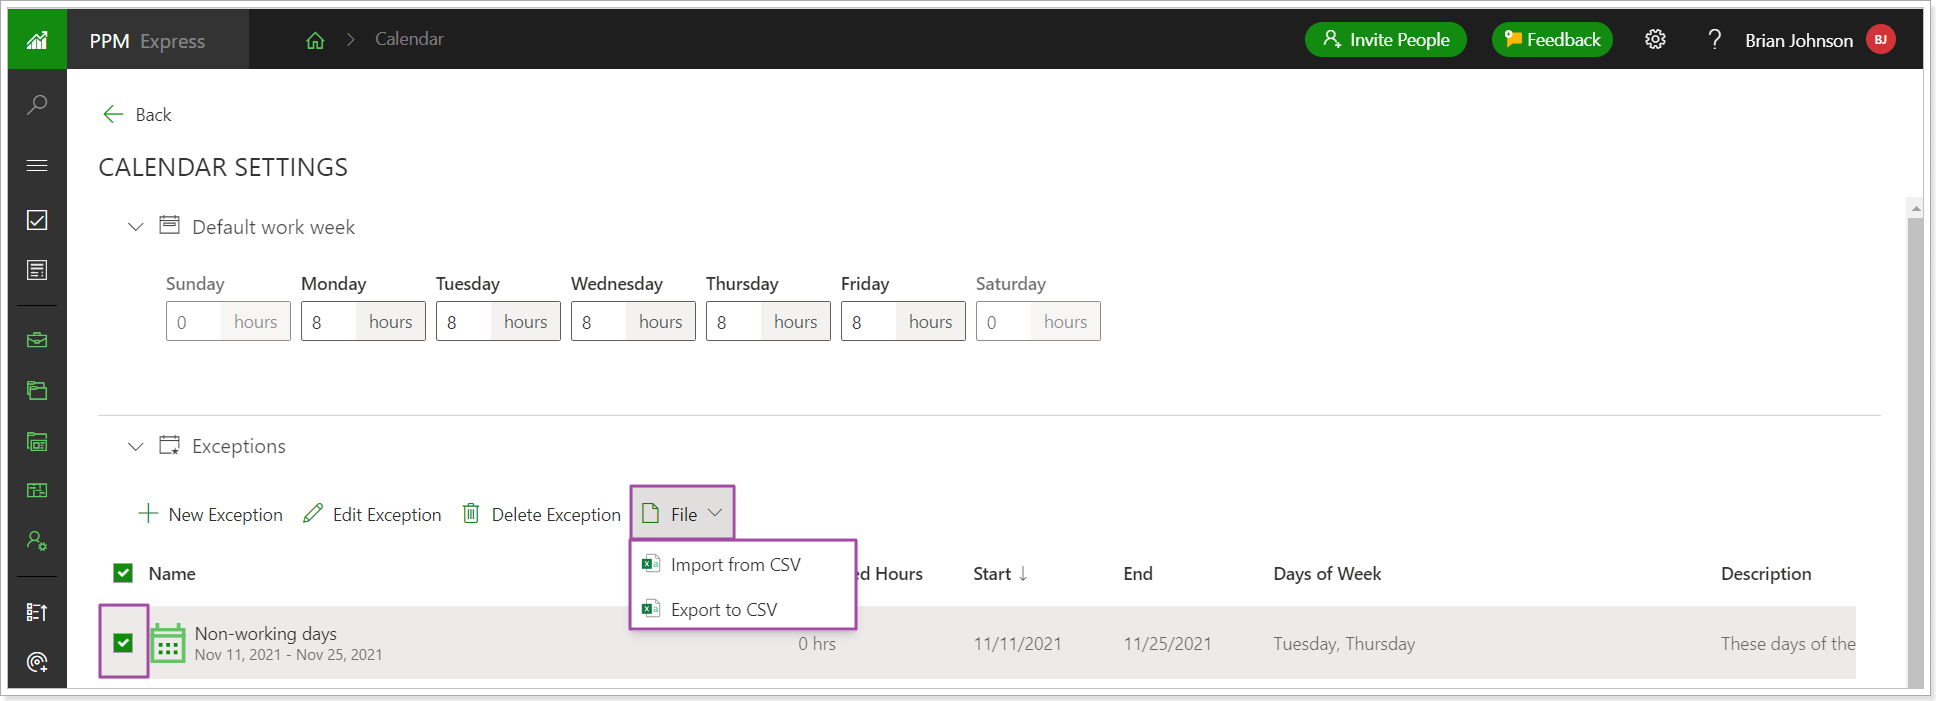
If calendar exceptions are created in the .csv files and imported to PPM express, make sure there is a start and finish date (or a start date only) for all exceptions. The exception will not be imported if there are no start and finish dates.
If the exception is created for one week or less, the Days field will not be editable, all days of the selected period will be included in the exception. If the exception is created for more than one week, you can exclude the necessary days of the week.

2) It is now possible to switch on synchronization with Azure AD without sending invites to users.
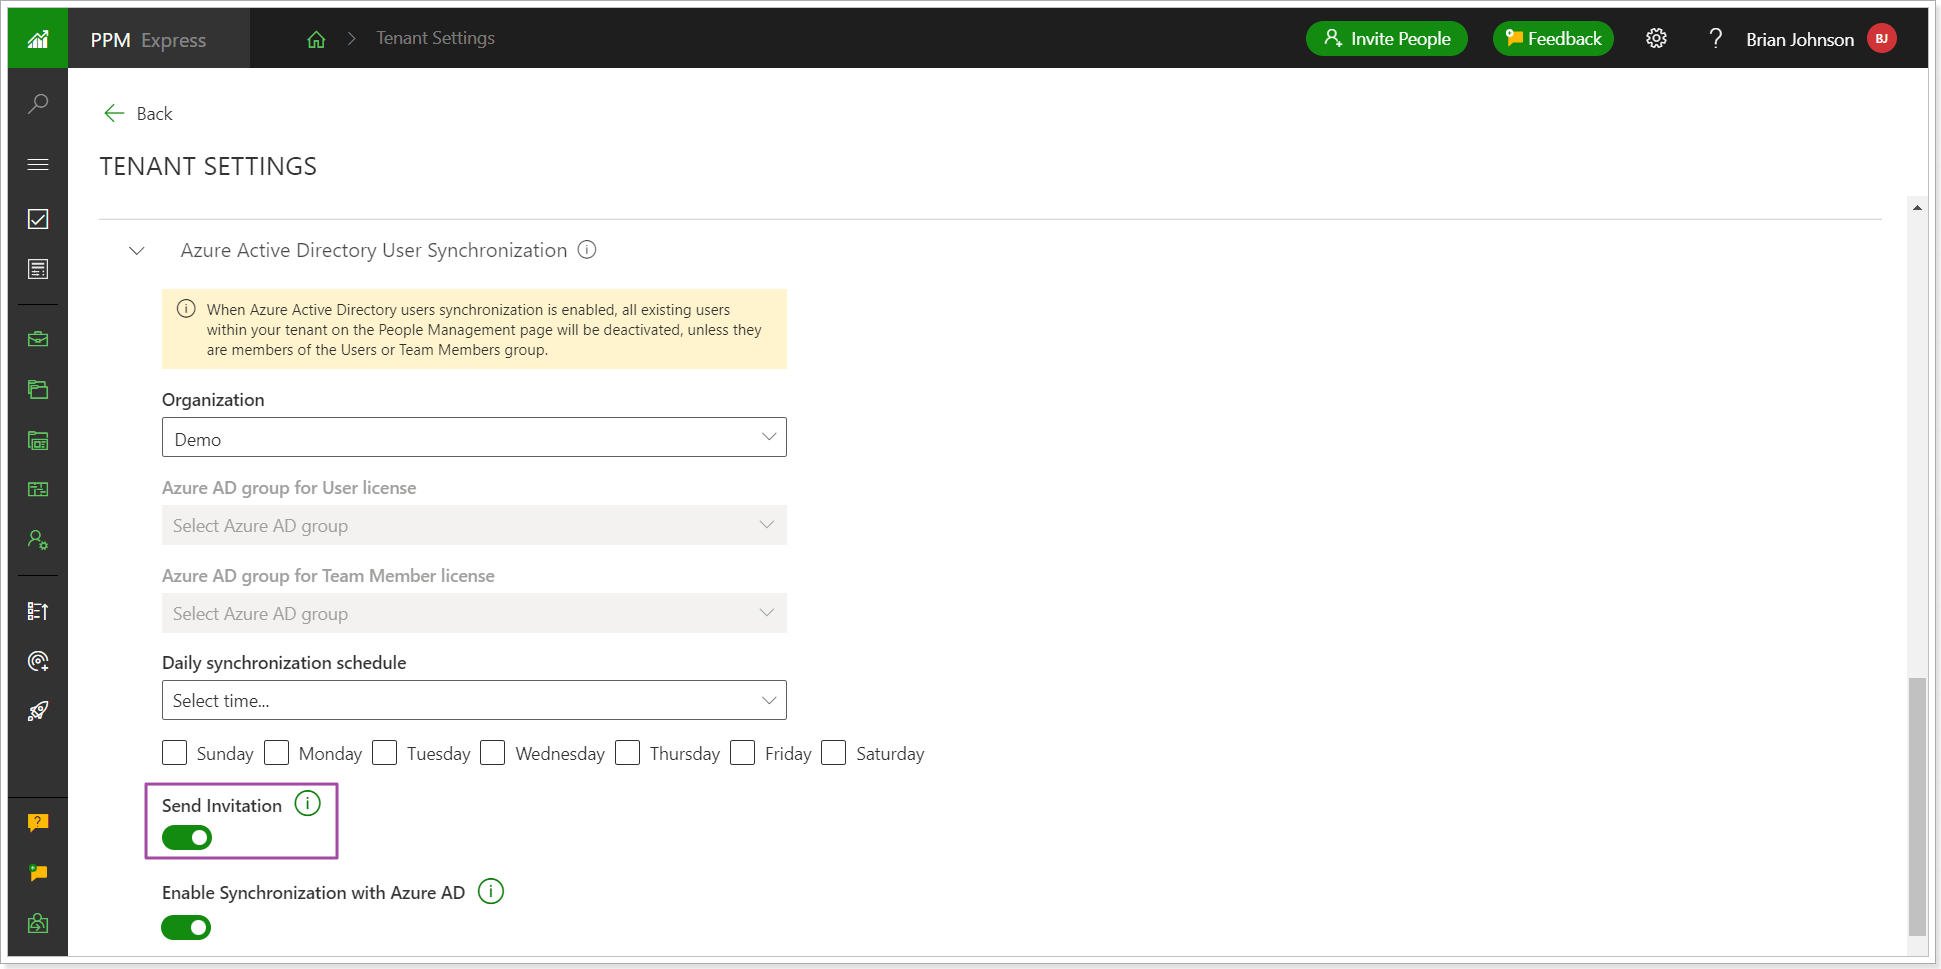
The user invitations can be turned on separately and sent to all or selected users set in Azure AD groups. Open the People Management page, select the users, and click the 'Resend invitation' button.
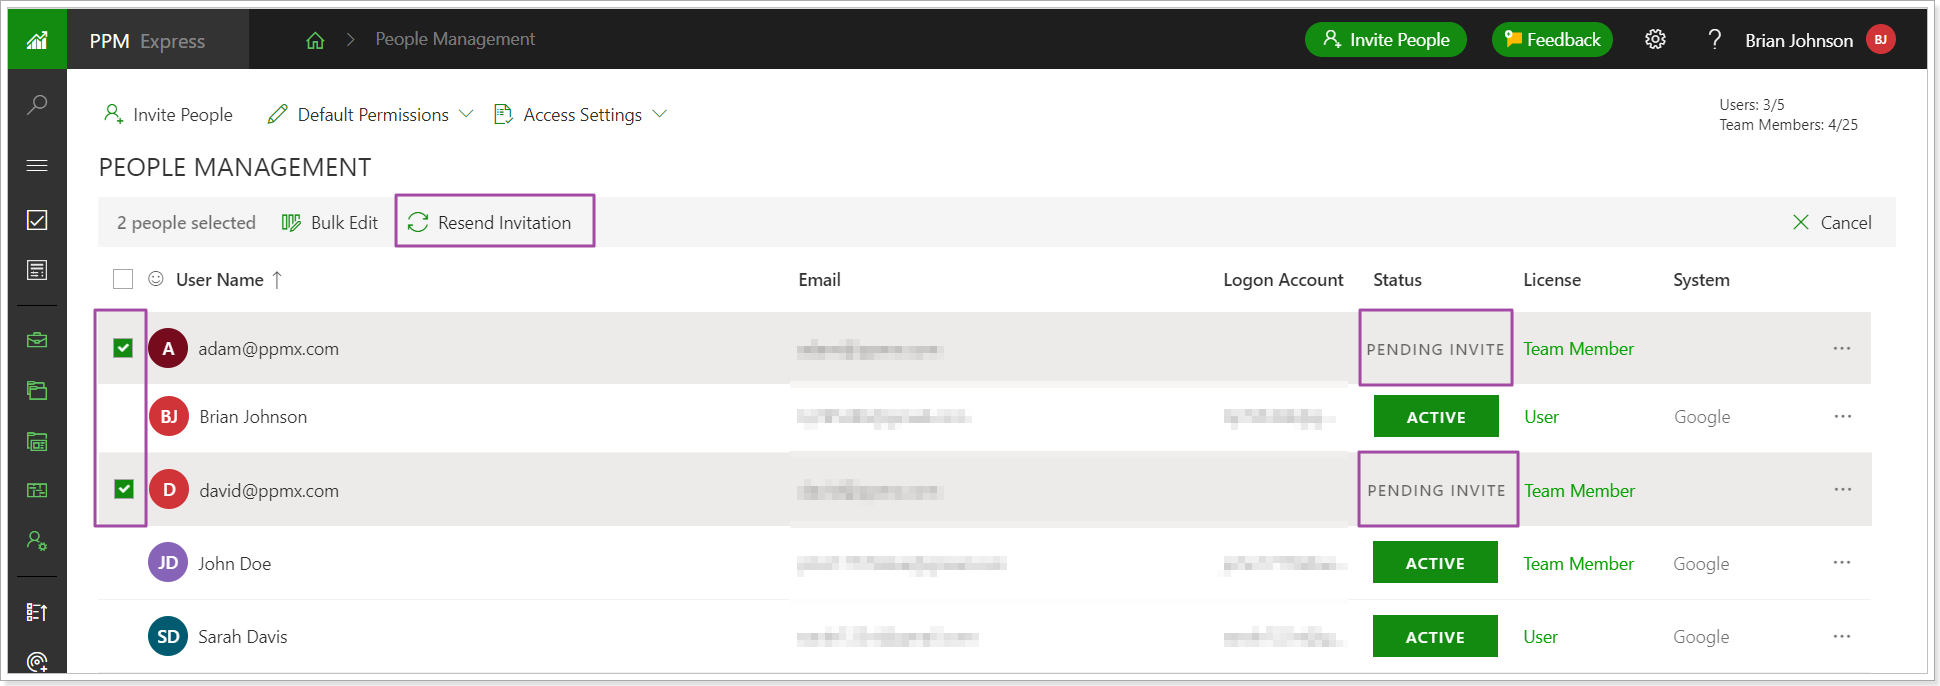
3) Dependencies between items can now be exported into the .csv file via the ‘Export to PNG option’.
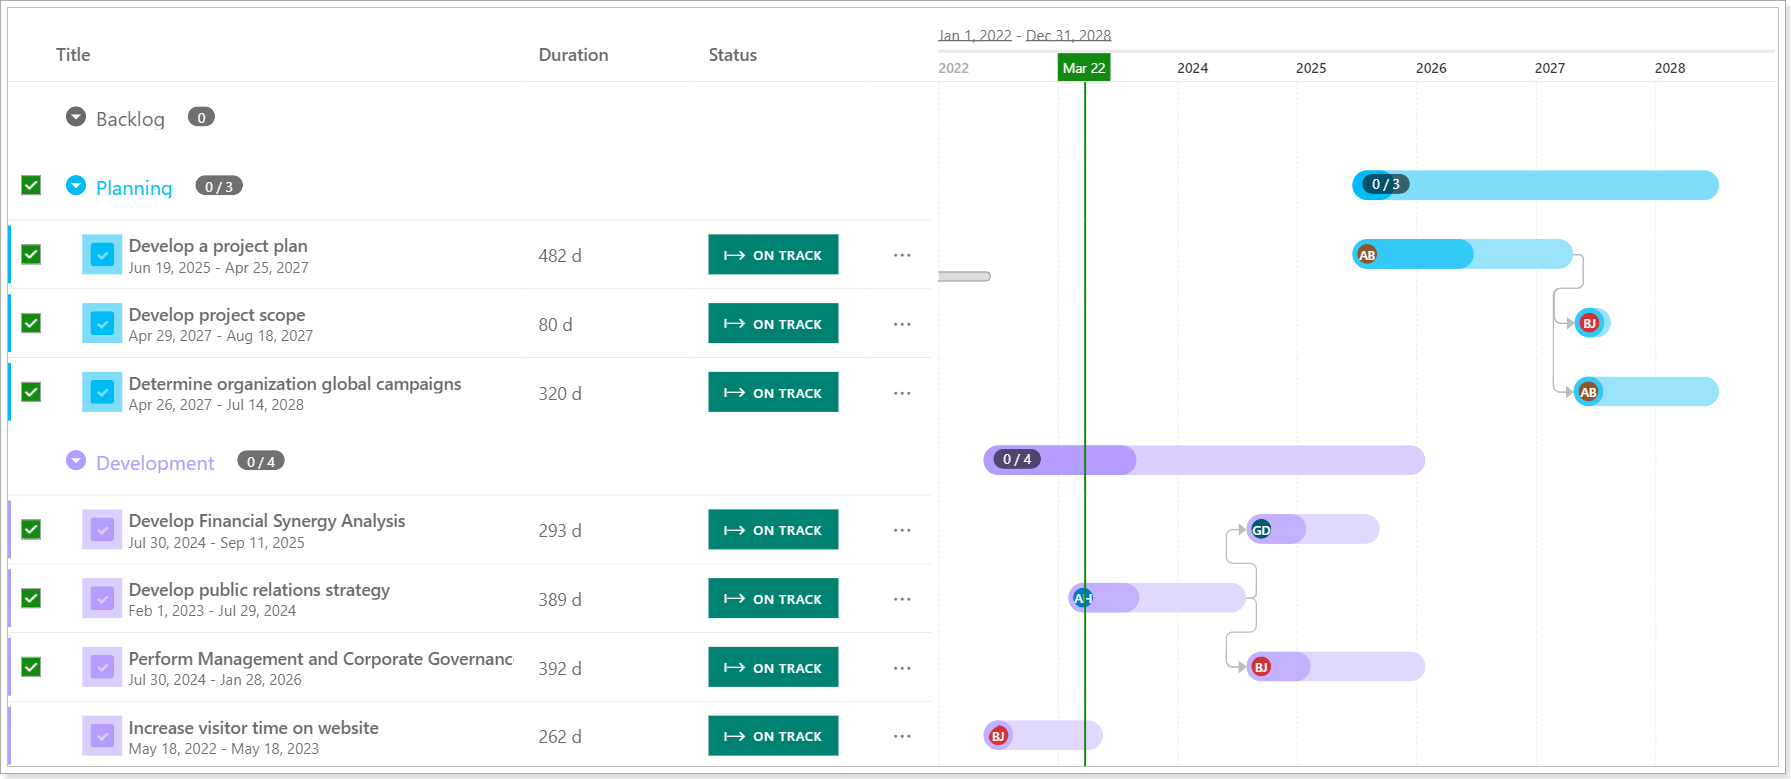
Release Notes 14.6 @March 20, 2023
1) Resource Workload and Governance report packs were added to the Reporting page and are now available from PPM Express for download and configuration.
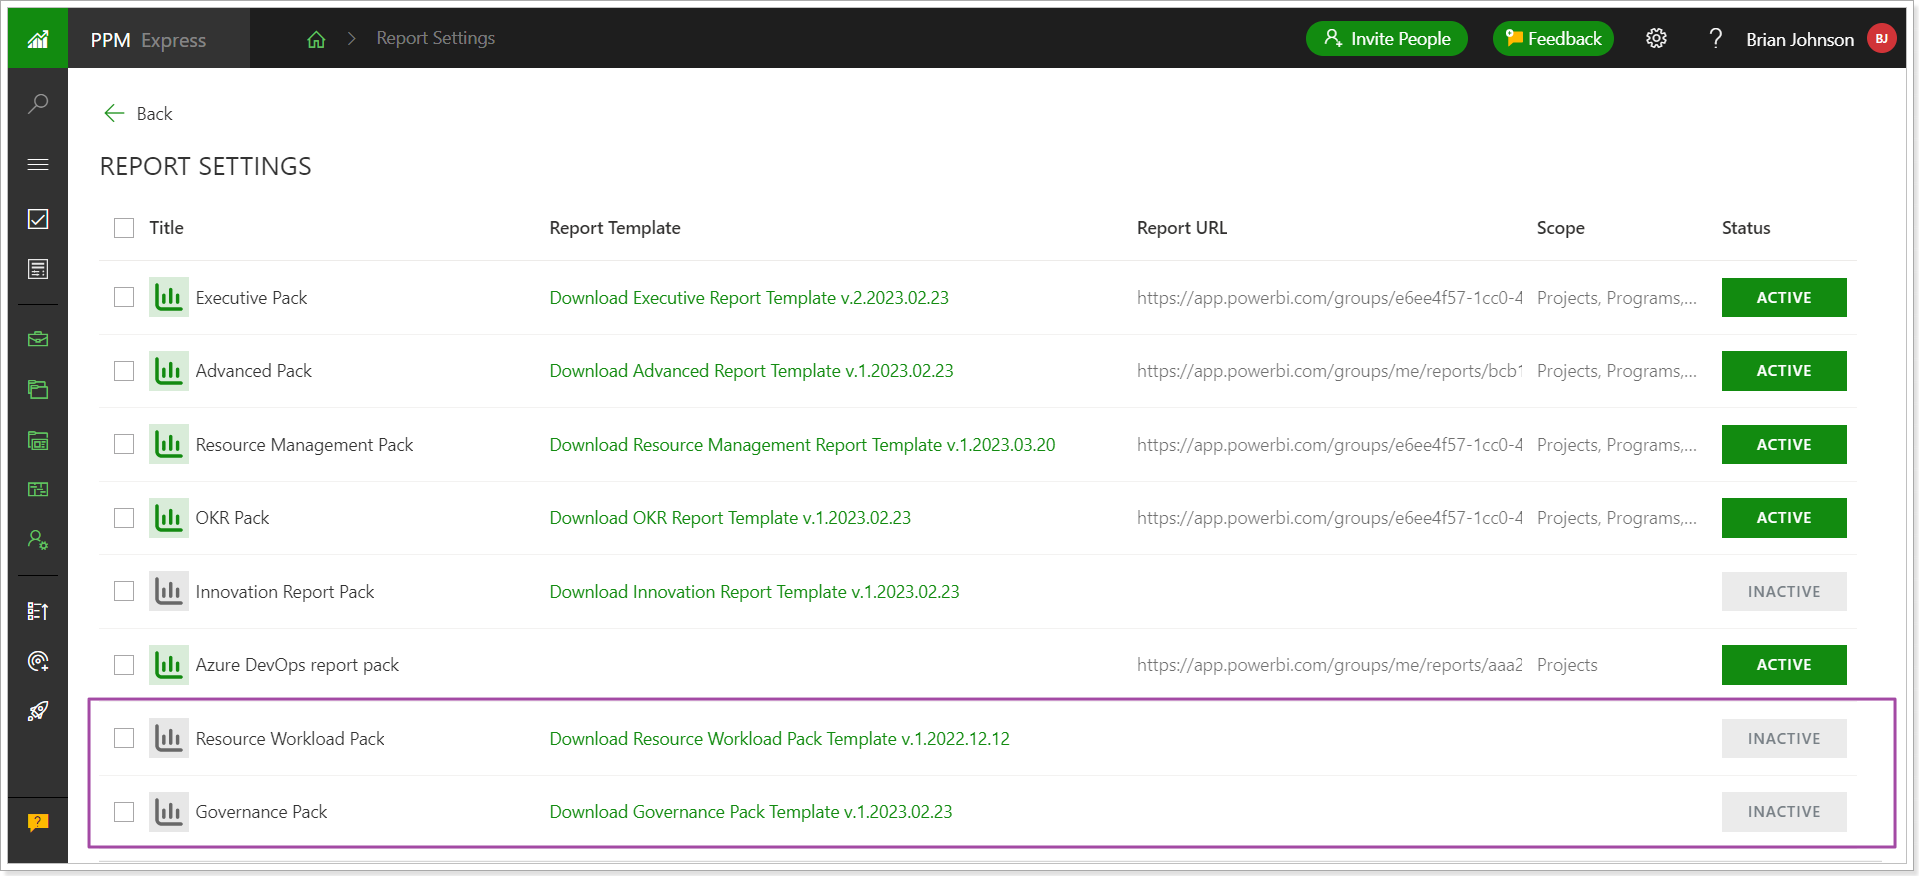
2) Synchronization of tasks custom fields for Project for the Web connection is now available.
Project for the Web task custom fields are available for the mapping and synchronization if the Tasks custom fields Token is provided for the connection. The following fields are compatible:
Project for the Web Custom Field type |
PPM Express Field |
Notes |
Text field |
|
The mapping with PPM Express Select type fields works with or without the Transformation rules. The mapping with Priority and Impact custom fields works if values are the same in the mapped fields, or with the set Transformation rules |
Date field |
|
|
Number field |
|
For Slider and Progress % fields – values are set to the field in PPM Express if it is within the possible field range (ex. 1-100). The mapping with Impact type fields works with the Transformation rules (ex. 1 -> Strong) |
Yes/No field |
|
|
Choice field |
|
The mapping with PPM Express Select type fields works with or without the Transformation rules. The mapping with PPM Express Project Stage, Status, Impact, Priority fields works without the Transformation rules if values are the same in the mapped fields, or with the set Transformation rules. For Status field – the Task Status auto calculation should be turned off. The mapping with Slider custom fields and Progress % field works only with the Transformation rules. |
Release Notes 14.4 @March 06, 2023
1) Project for the Web connection: Mapping of the project-level fields is now configured per connection.
Before: The mapping for project-level fields was configured per project.
Now: Mapping of the project-level fields is now configured per connection. When the mapping is configured for one project, it will be applied to all newly imported and linked projects.
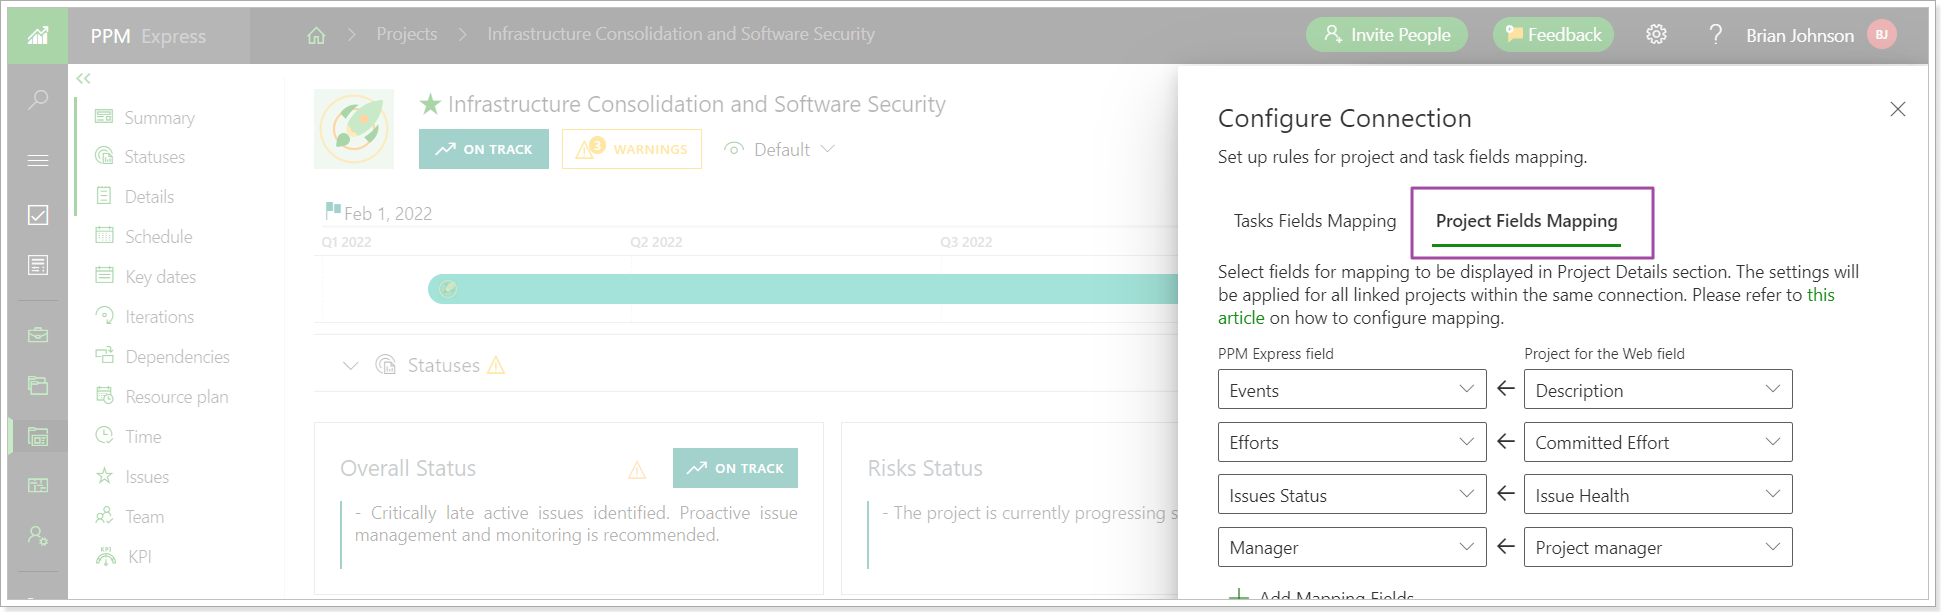
2) Users from nested groups in Azure AD are now also available for synchronization with PPM Express users.
Before: When users were synchronized from Azure Active Directory, and the synchronized group included other groups, users were not synchronized from the related groups.
Now: When users are synchronized from Azure Active Directory, and the synchronized group includes other groups, users are now synchronized from the related groups.
3) Key Result formulas were updated for Objectives.
Before: The progress for Key Results was calculated automatically by the following formula: (Current Value - Start Value) / (Target Value - Start Value) * 100
Now: The Start Value field was added to the Key Result project field to align with the Key Result from Objectives.
The progress can be calculated automatically or manually. Also, the direction value was added to the Key Results (Growth, Reduction, Above threshold, Below threshold). If the direction is set to Growth or Reduction, then the same old formula is applied: (Current Value - Start Value) / (Target Value - Start Value) * 100. PPM Express also checks the Start/Target values and shows warnings if there is data inconsistency. For example, if the Growth direction is selected, but the Start Value is higher than the Target one.
If the Above Threshold value is selected for direction, the Key Result progress will be 0 until the Current Value is the same as Target. As soon as the values are the same or the Current Value is higher, the progress is set to 100%.
If the Below Threshold value is selected for direction, the Key Result progress will be set to 100% when the Target is achieved or the Current Value is less than the Target.
The same logic is applied to the Objectives.
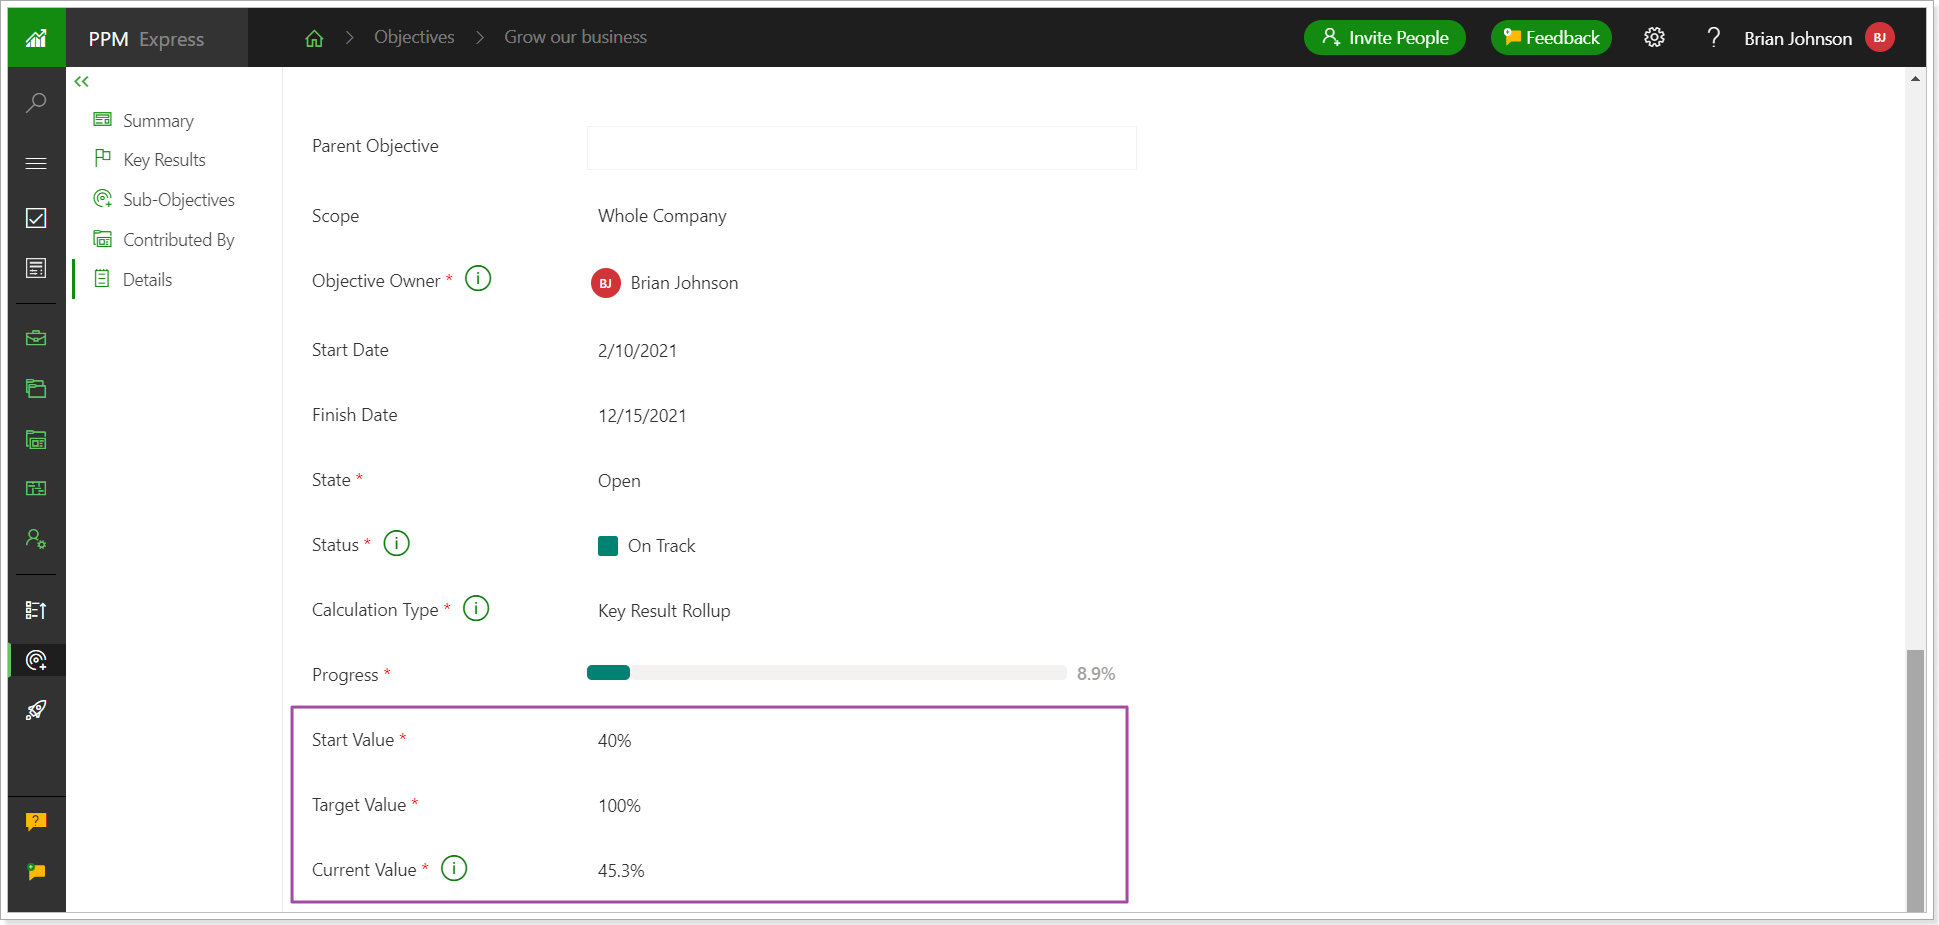
Release Notes 14.1 @February 20, 2023
The Schedule project section was redesigned for Azure DevOps to become more flexible.
The Schedule project section for Azure DevOps connection has a new view to display the information for all needed work items clearly and granularly.
The Schedule section includes the following information cards: Backlog Overview, Current Iteration Backlog, Current Iteration Progress, and Iterations.
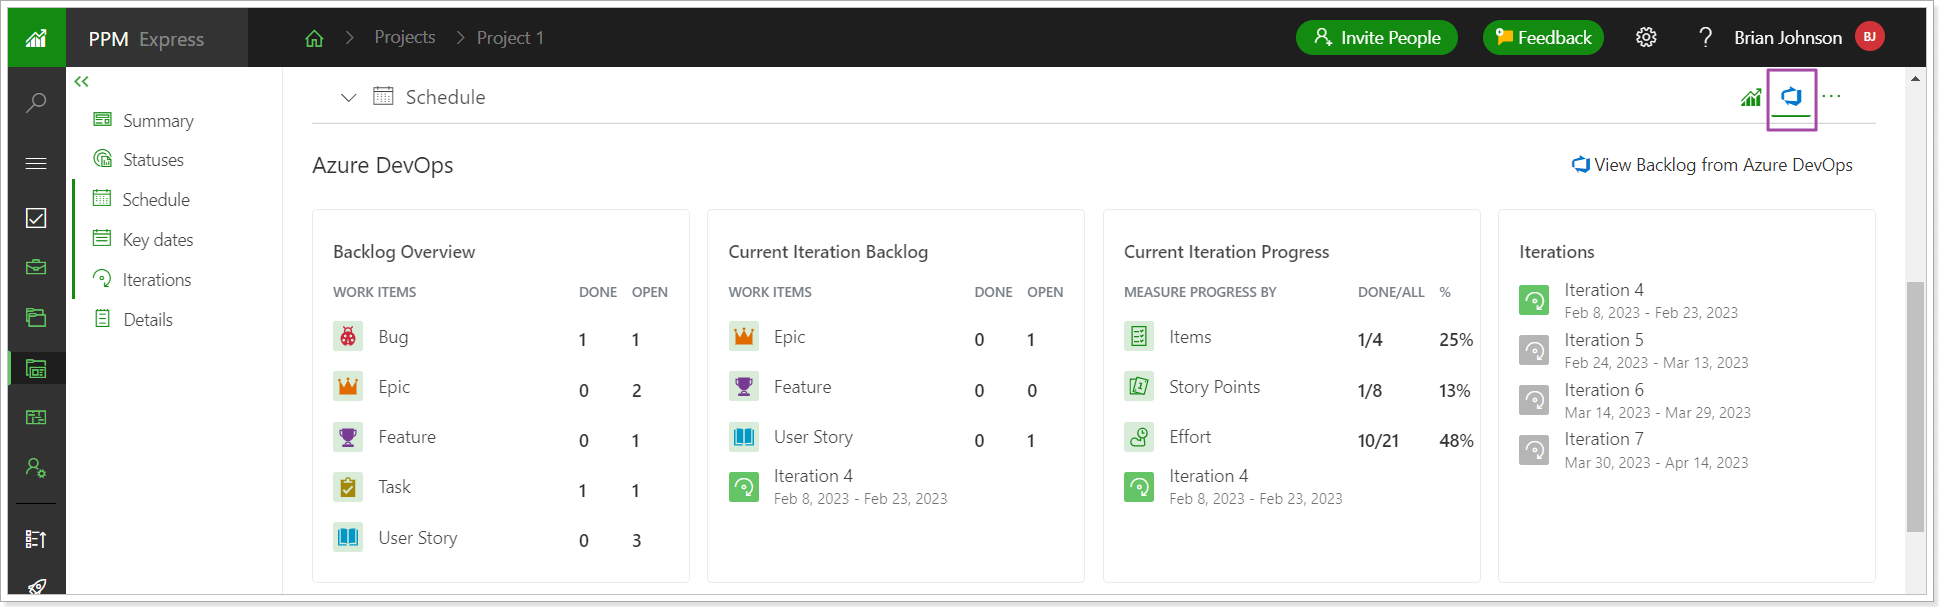
These cards are configurable. To start editing the cards, click on the ellipsis button => Configure.
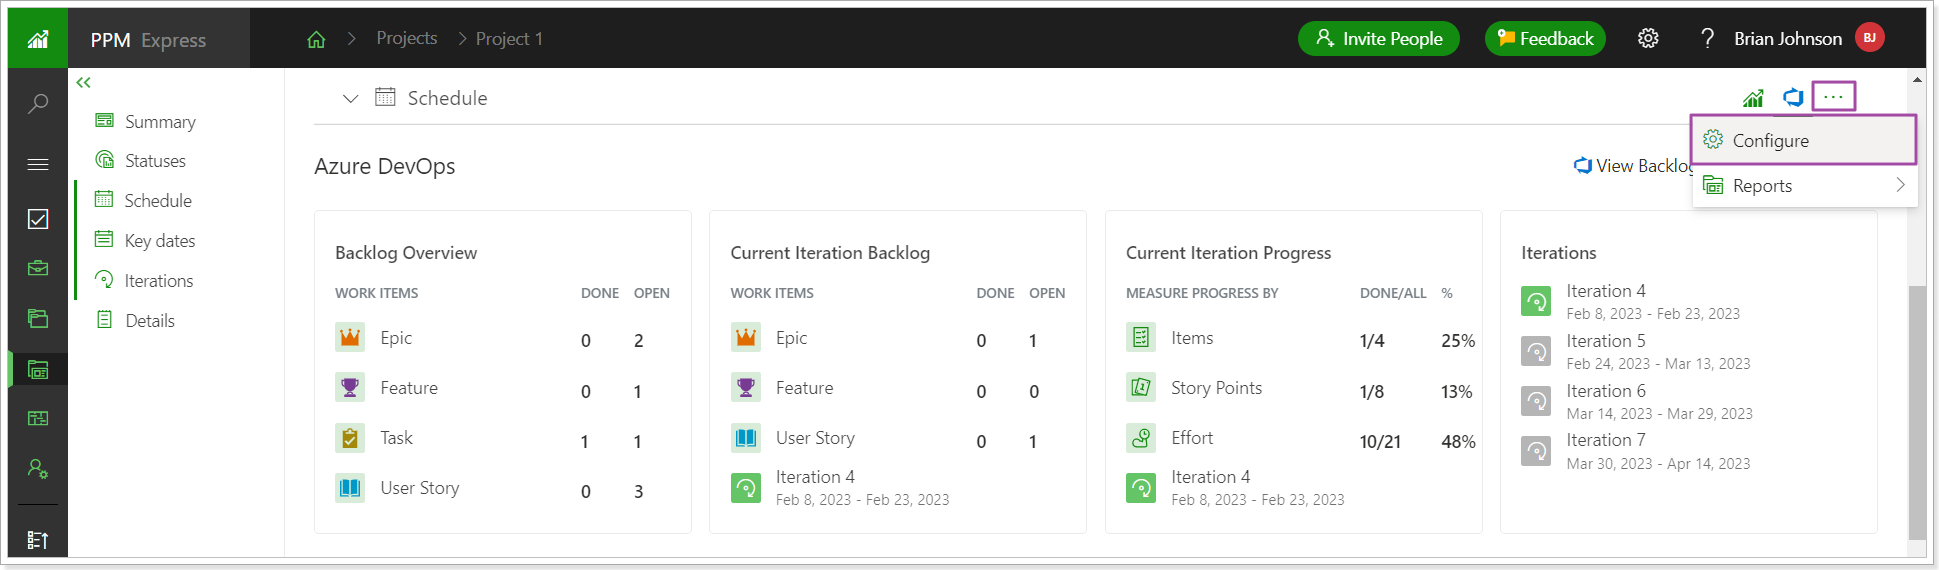
By opening the Configure View menu, users can edit the list of the information cards displayed in the Schedule section.
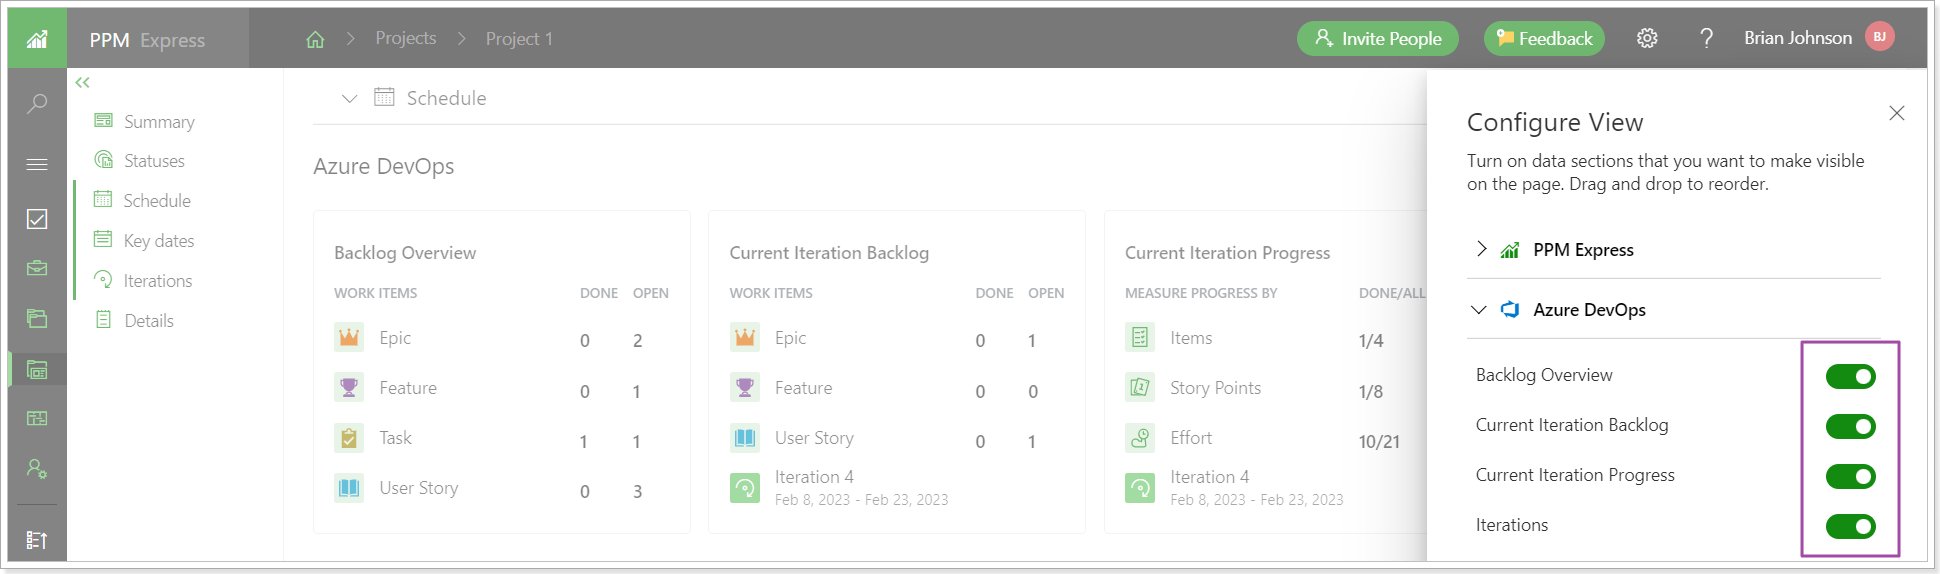
Also, the list of items included in the Backlog Overview and Current Iteration Backlog cards can be edited by clicking on the gear button next to the card name.
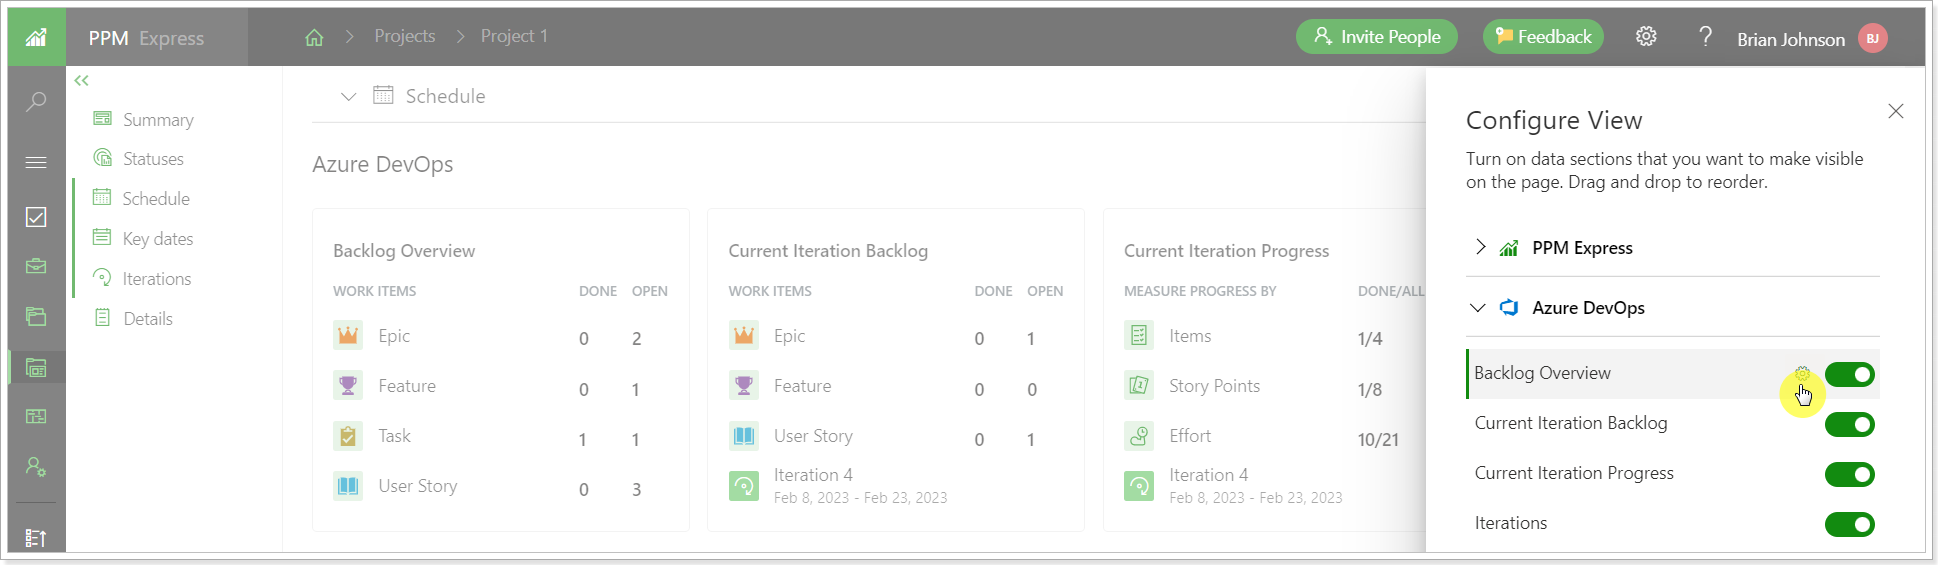
The selected items appear on the information card immediately.
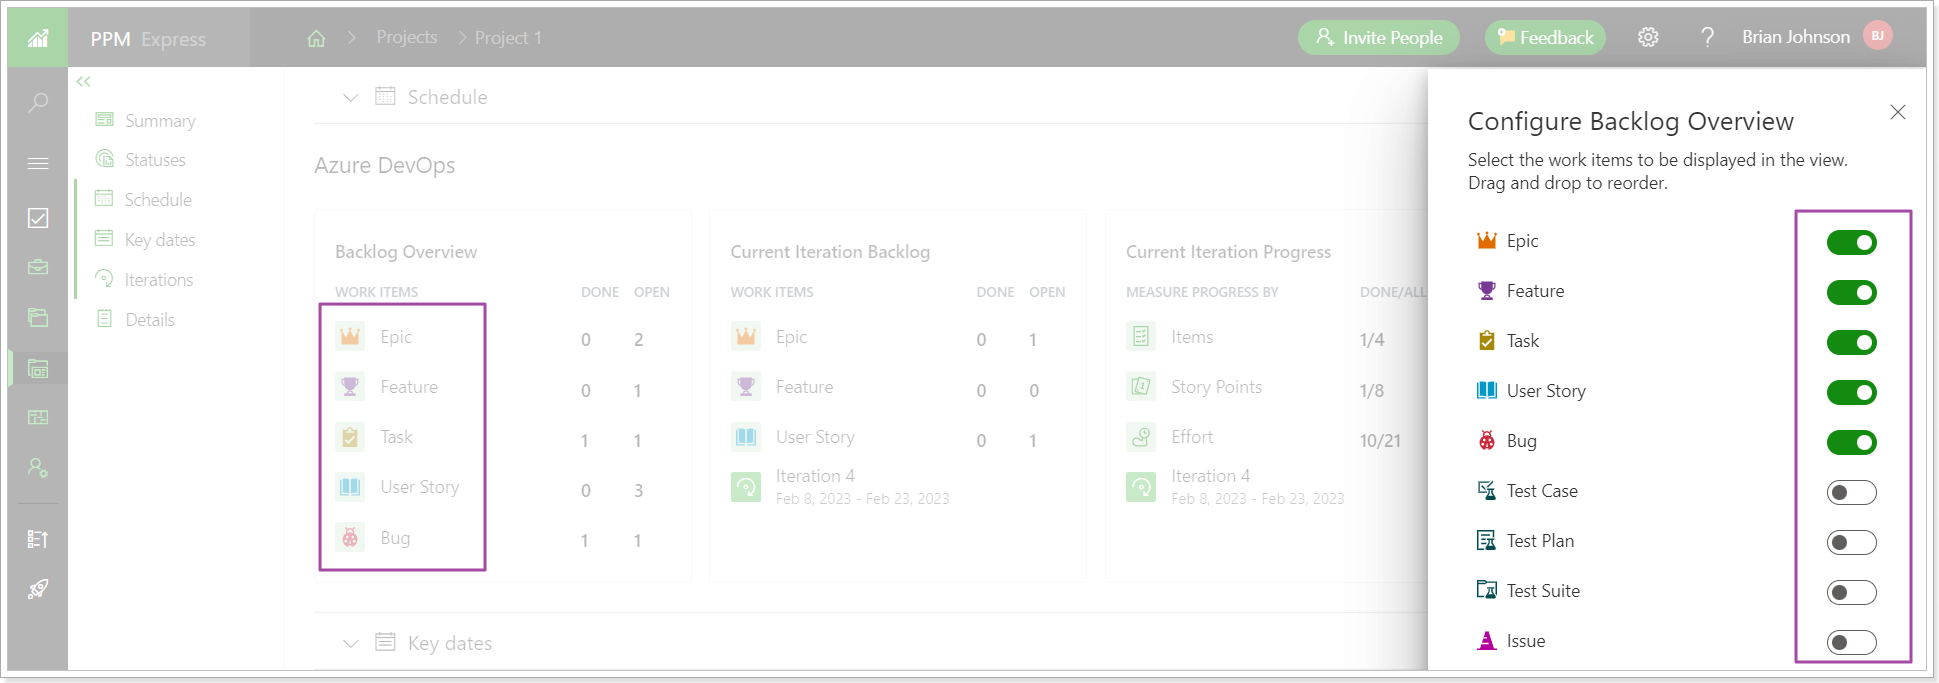
By creating multiple views and including a different set of items on the information cards for each view, it is possible to limit access for certain users to the information in the Schedule section.
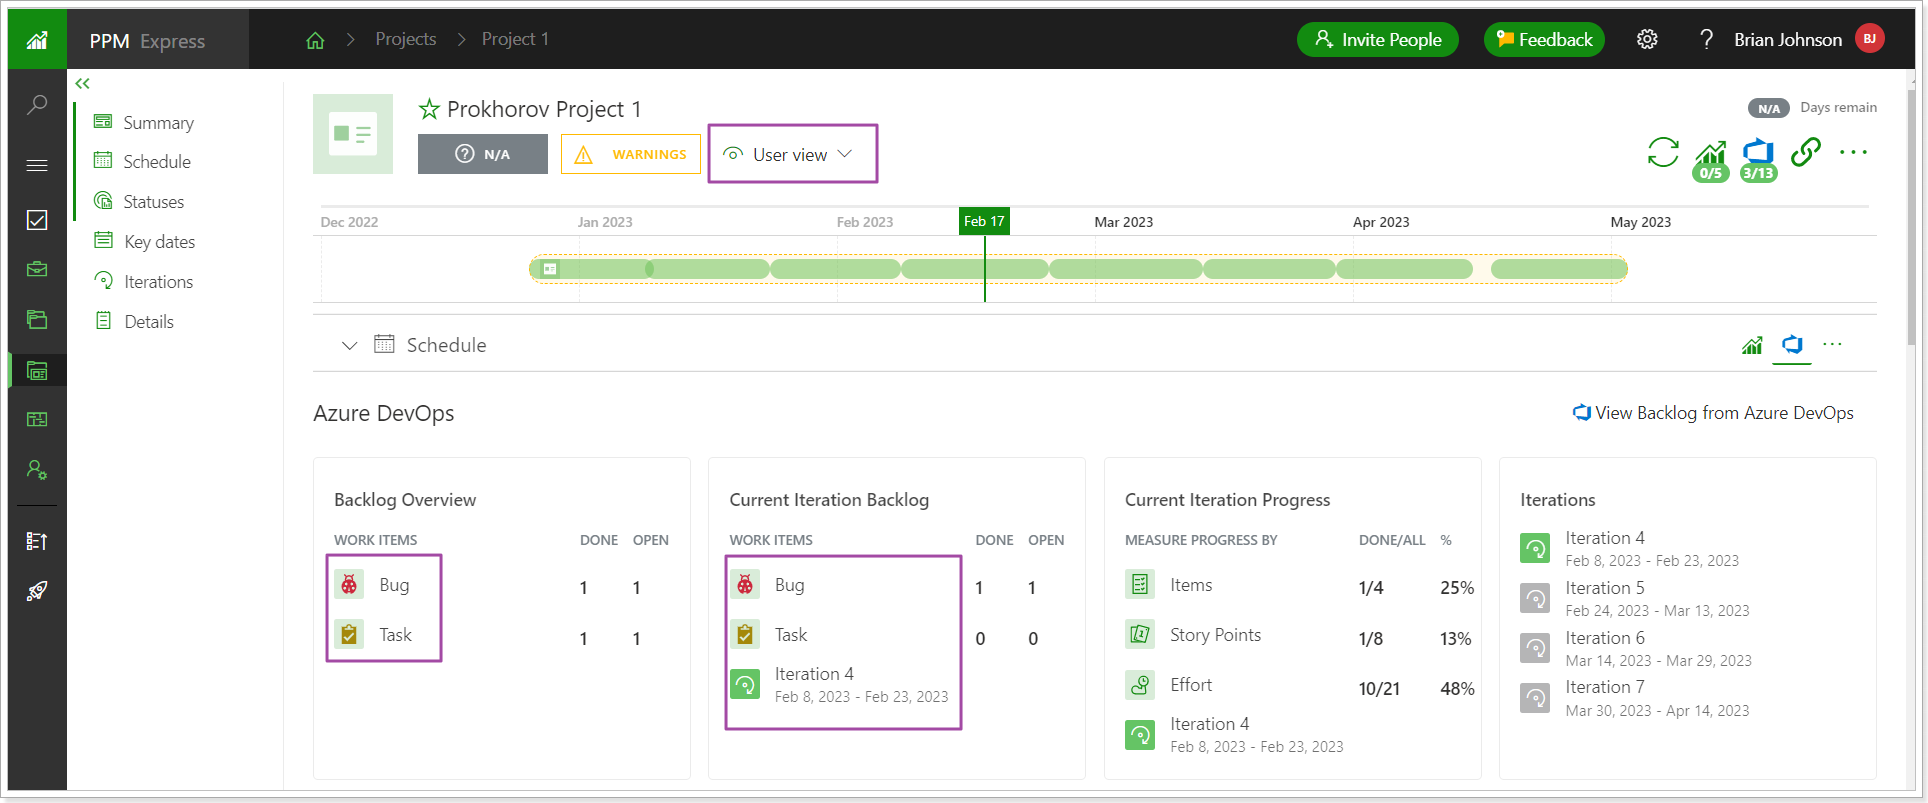
Please note: Only users with Manage Configuration permission and users who have permission to edit the project can configure the view of the Schedule section for Azure DevOps.
Clicking on each number next to the items, the Azure DevOps tasks page will be opened filtering the information by the selected item and value.
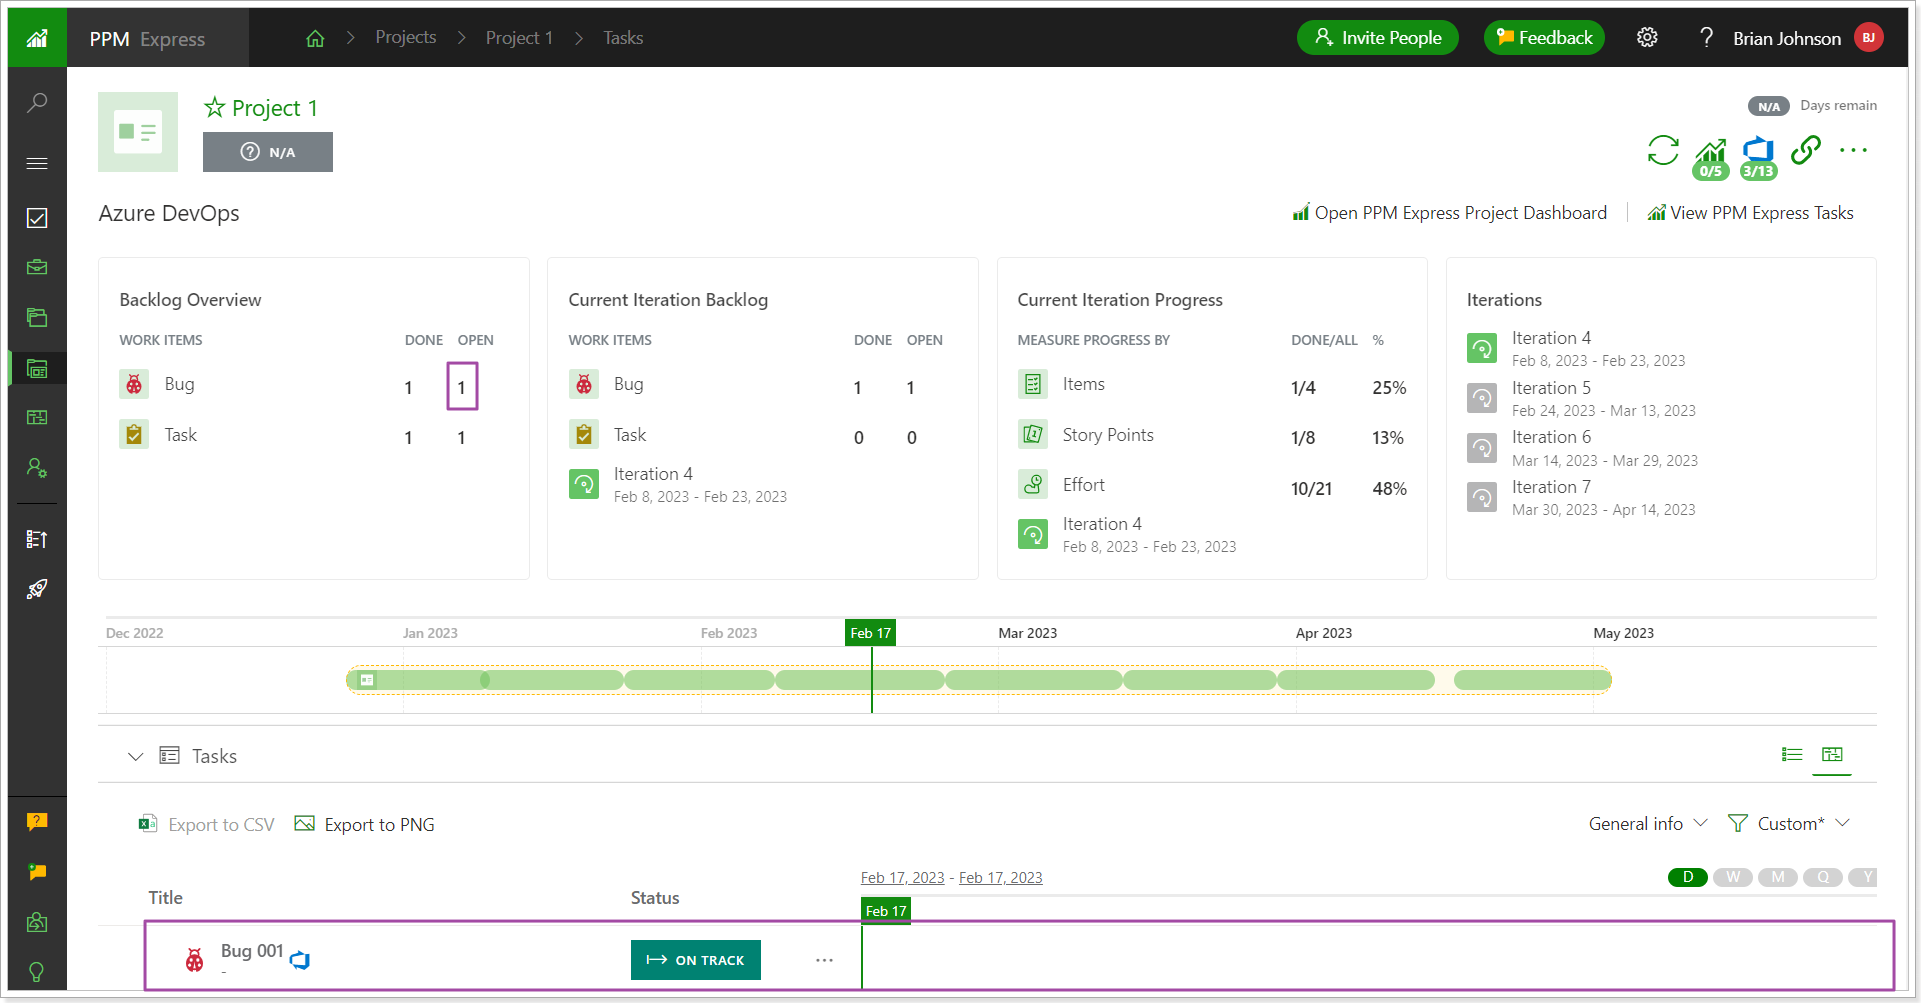
By clicking on the 'View Backlog from Azure DevOps', the Azure DevOps tasks page is opened.
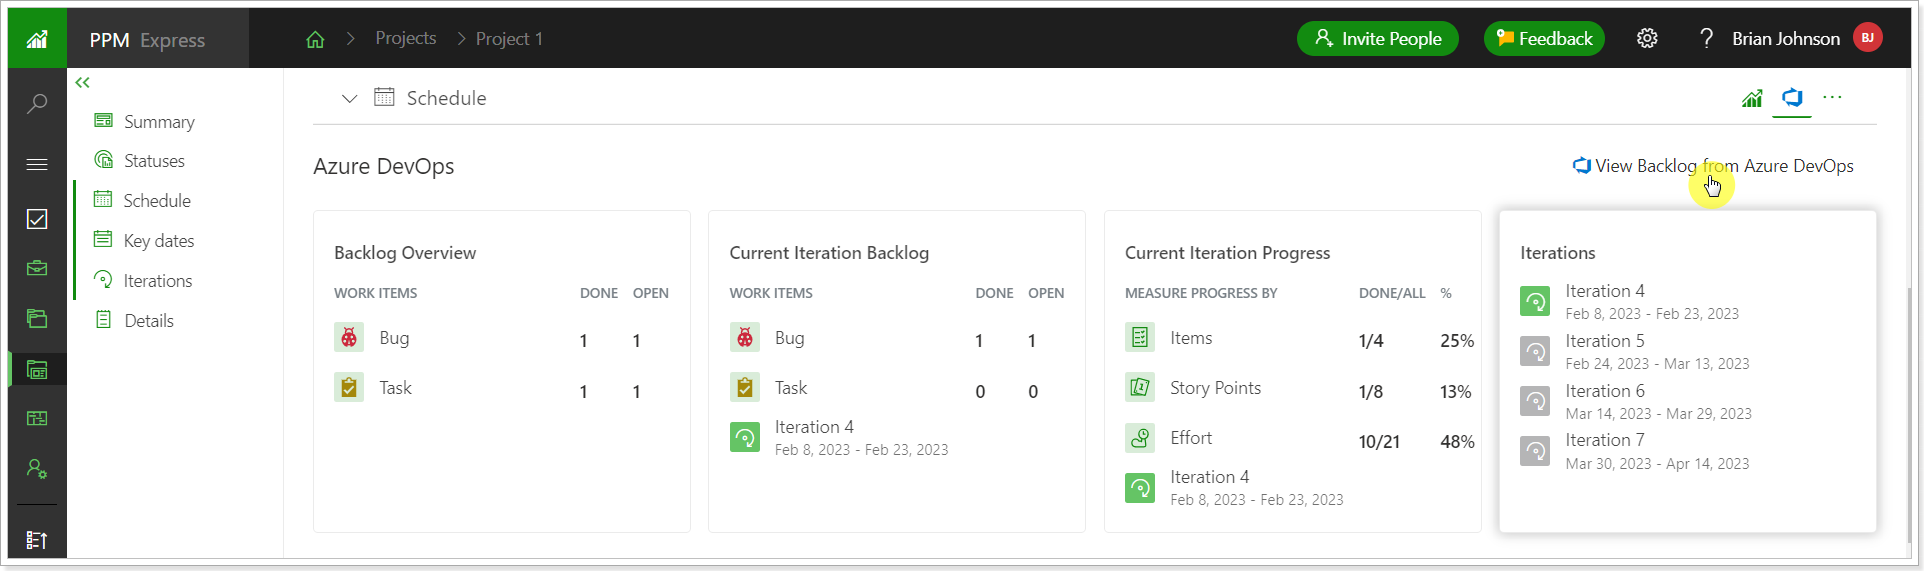
Release Notes 13.2 @January 26, 2023
The settings for the roadmap tooltip configuration were added.
A new setting allows disabling roadmap tooltips. This toggle enables/disables the tooltips for all entities: lanes, bars, and key dates. The tooltips are disabled by any user, per roadmap.

Also, it is now possible to configure the information displayed on the tooltip. The tooltips are configured separately for each entity: lanes, bars, key dates.
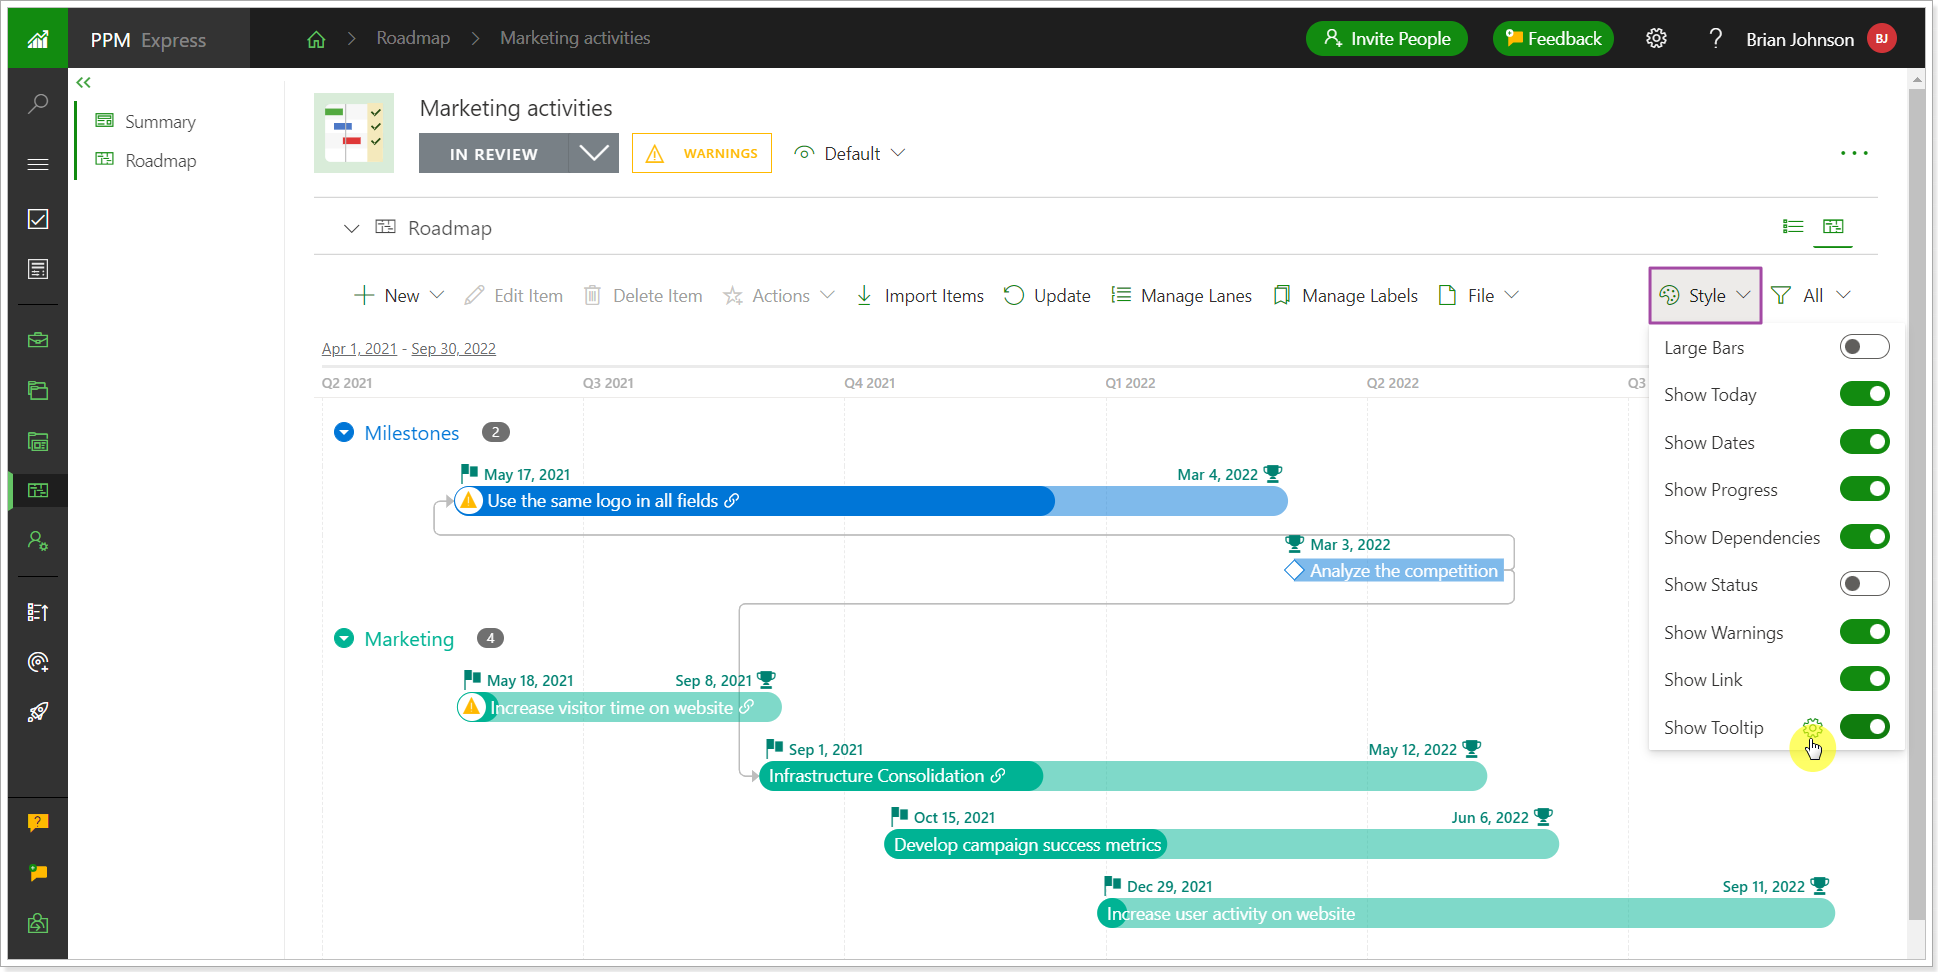
For lanes, only default fields are available for selection, as it is not possible to create custom fields for lanes.
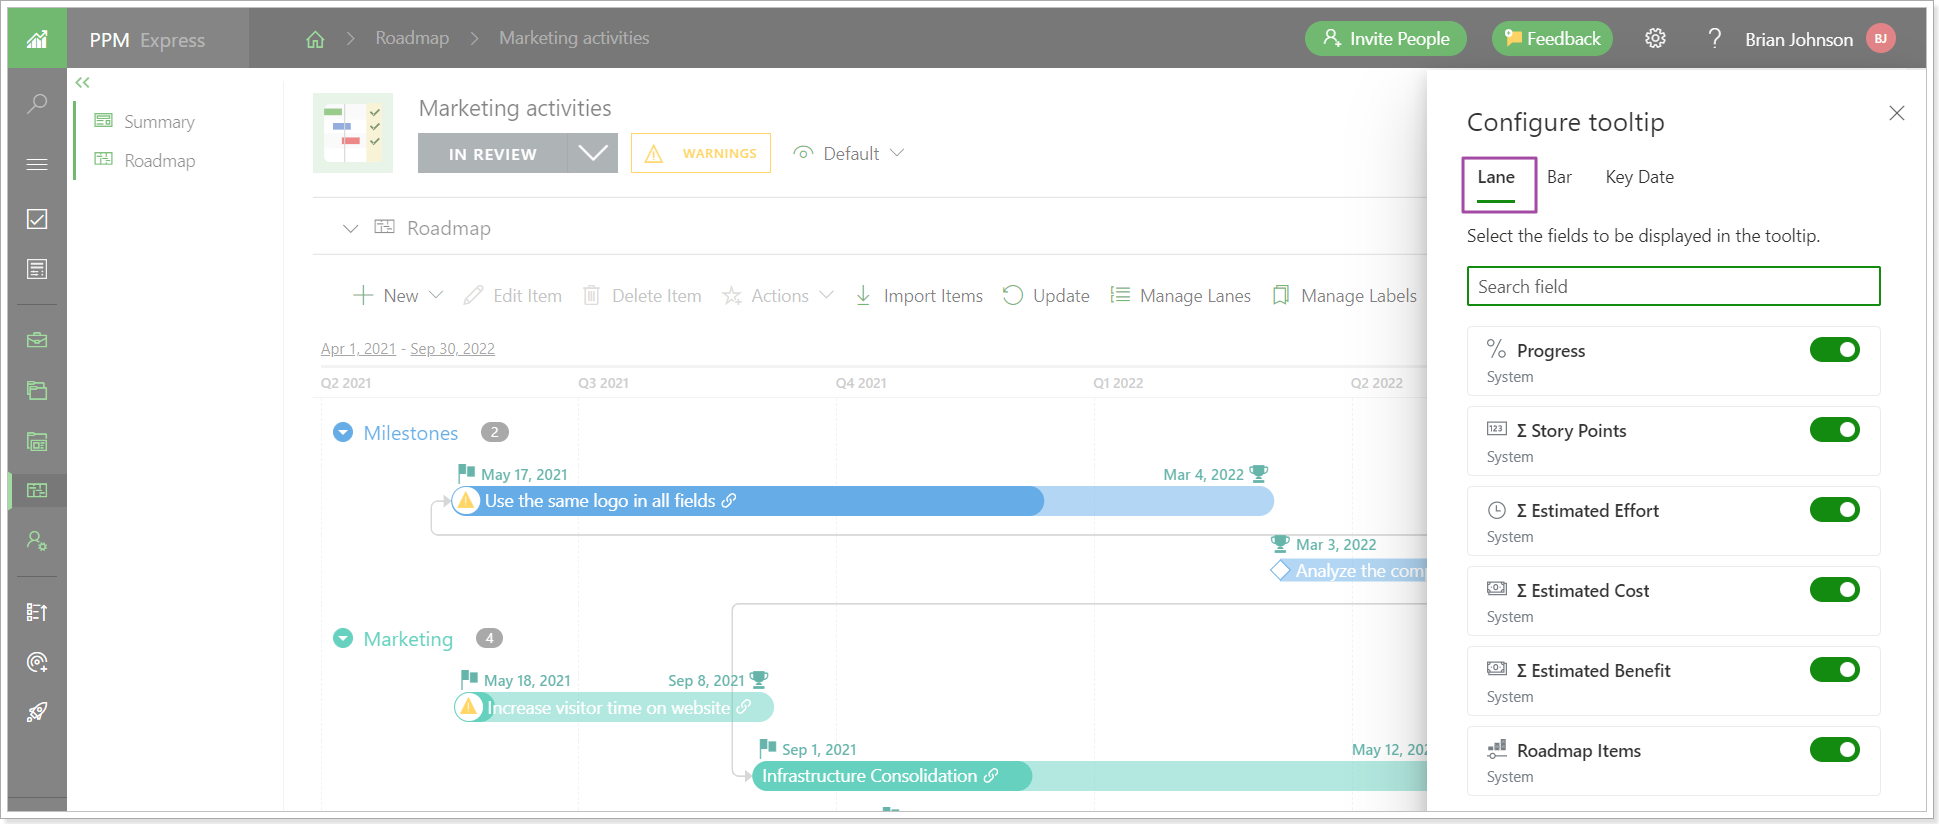
For bars and key dates, default and custom fields are available.
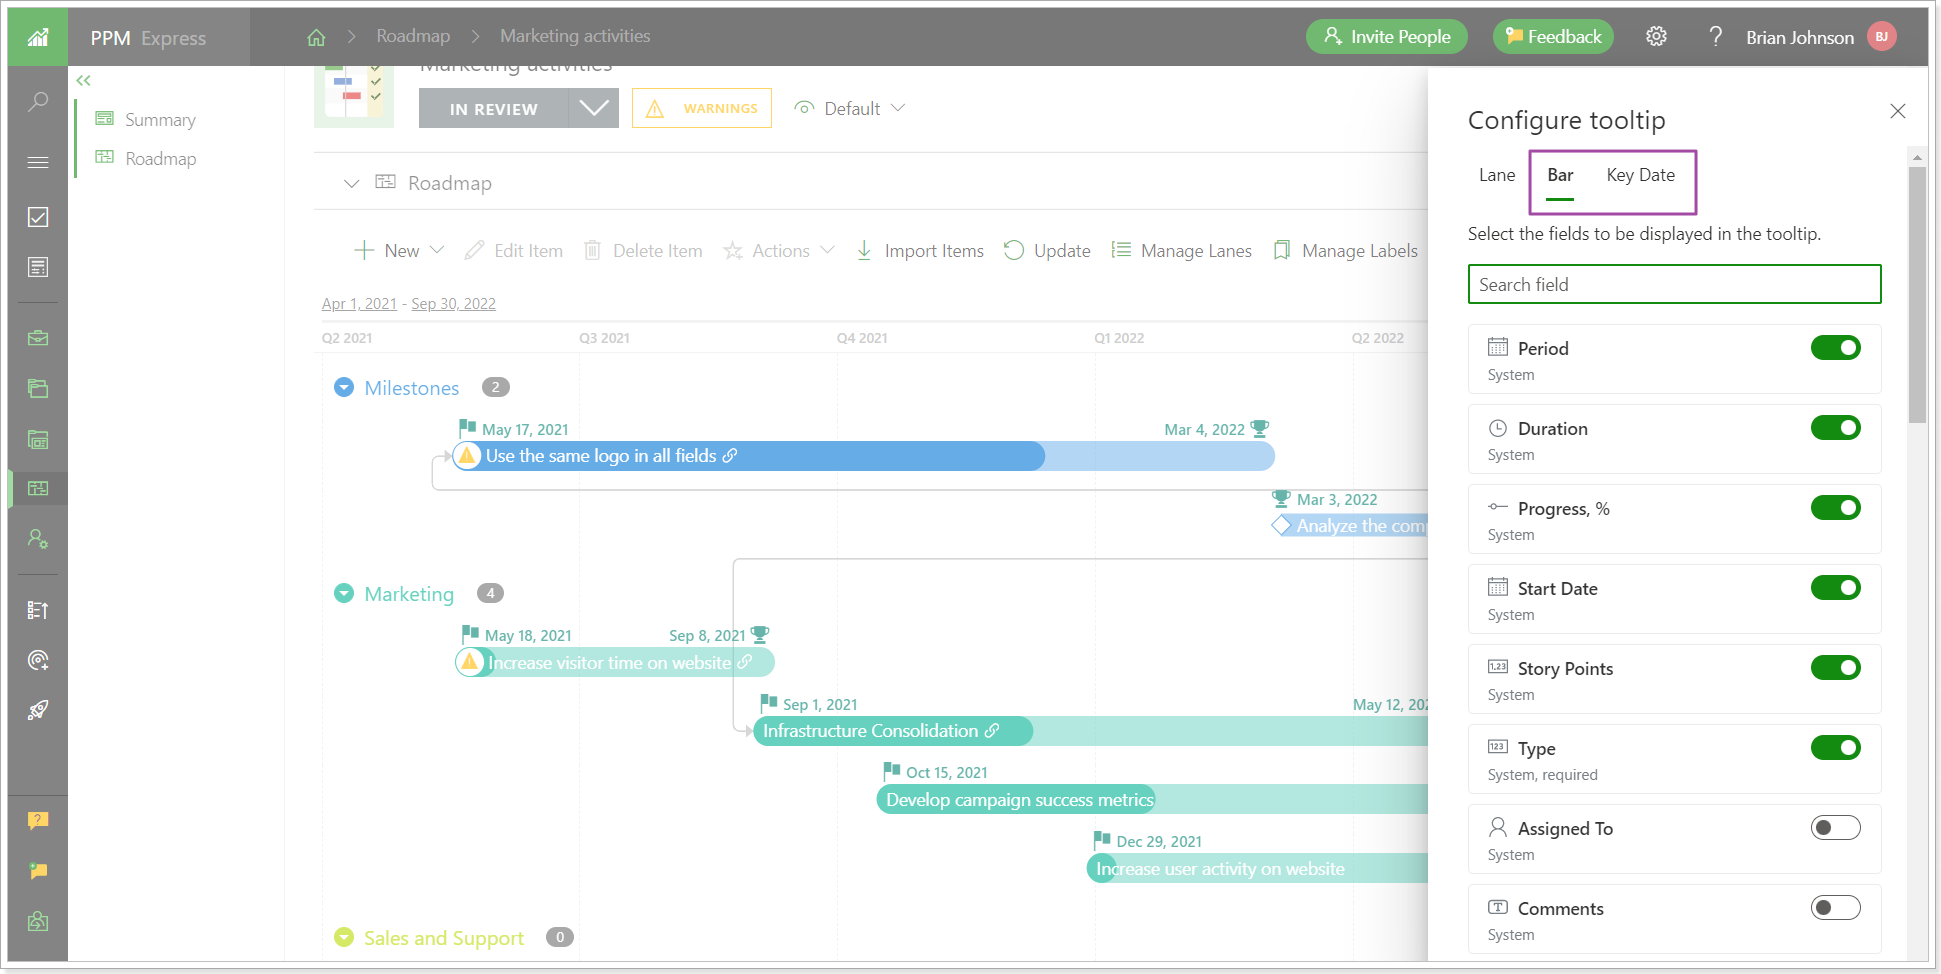
The set of the tooltip fields is saved per roadmap and is not shared between roadmaps. The newly configured tooltip becomes available for all users with access to the roadmap.
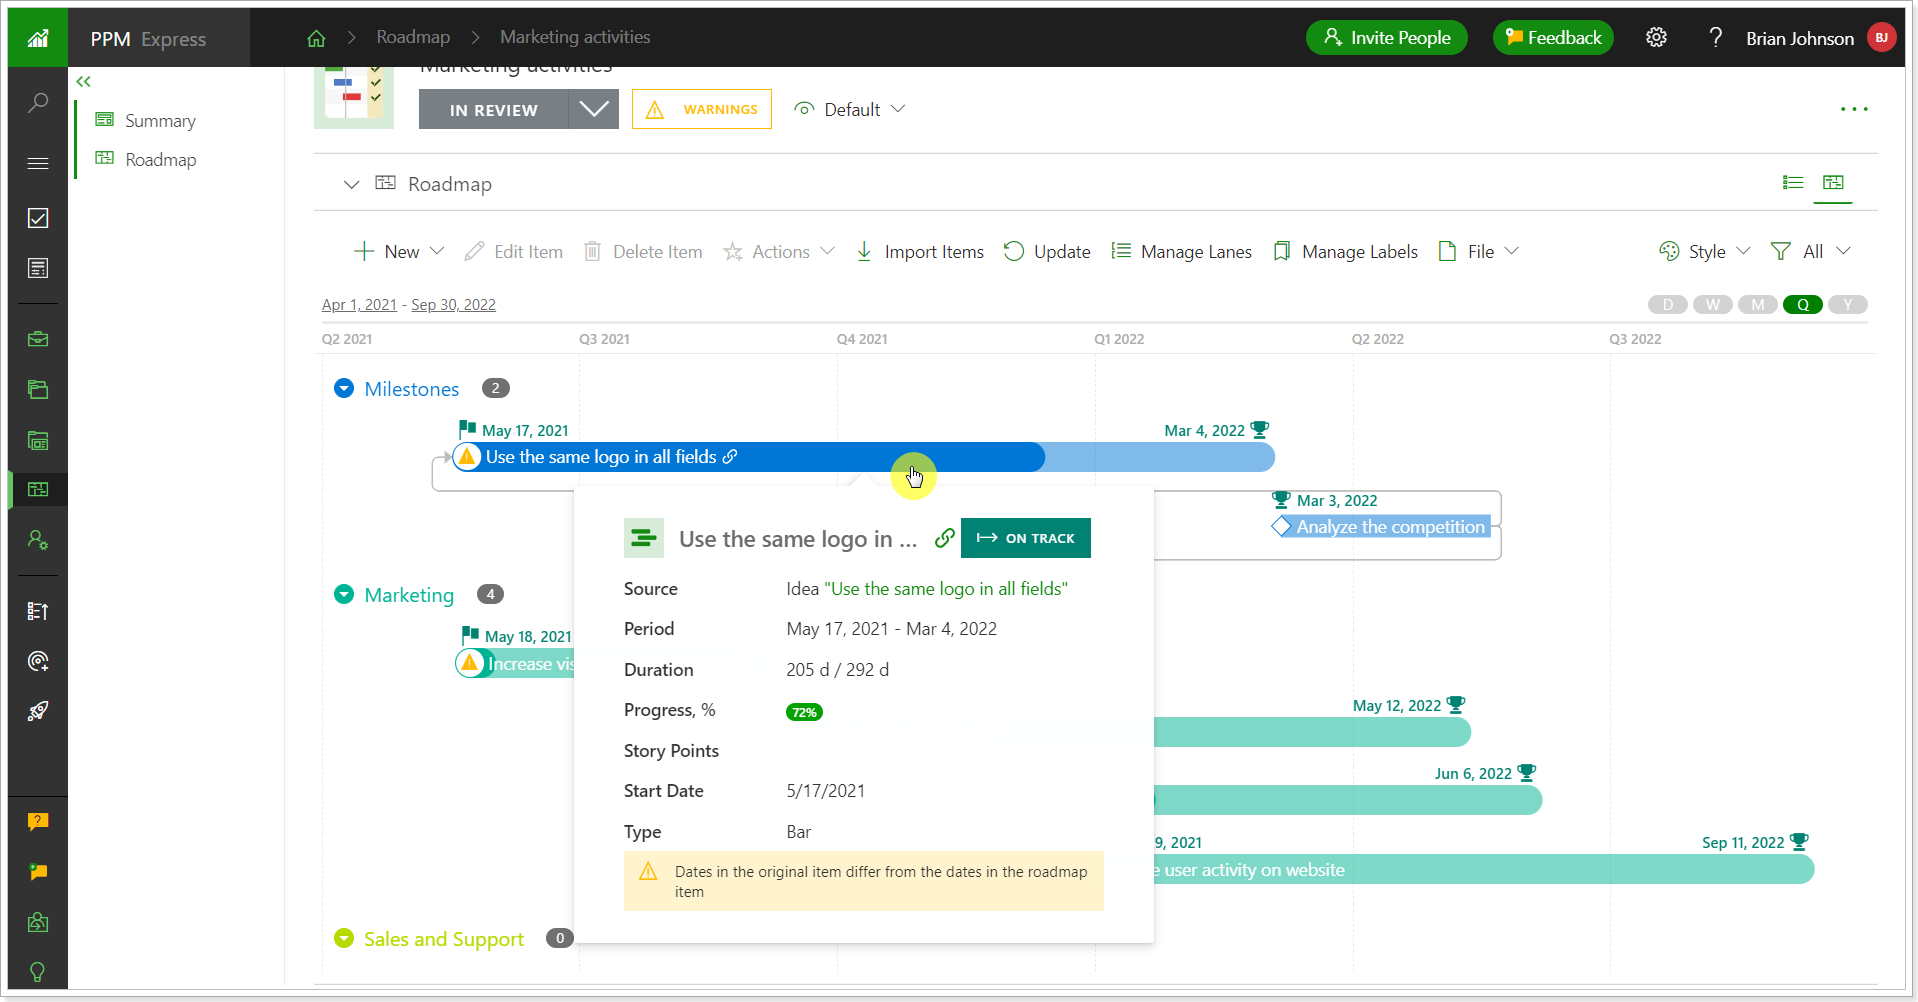
Only Roadmap Managers and users with Manage Configuration permission can edit the roadmap tooltips.
Release Notes 13.1 @January 23, 2023
Configure Fields menu was redesigned for better field creation, management, and navigation.
Before: The Configure Fields/Columns menu was presented as a list of fields where you could enable/disable the fields, rearrange the fields and create new custom fields. The information for each field (its type, if it is required, custom or OOB) was available on the field editing page. If the field was enabled, the drag-and-drop option was used to rearrange the field position.

Now: The Configure Fields/Columns menu is now presented as a list of small boxes with fields where you can enable/disable the fields, rearrange the fields and create new custom fields. The information for each field (its type, if it is required, custom or OOB) is now available on the field box. If the field is enabled, it is moved up to the enabled fields automatically, so all enabled fields are now displayed in the beginning of the field list. A search option is now available to quickly find the field you need.
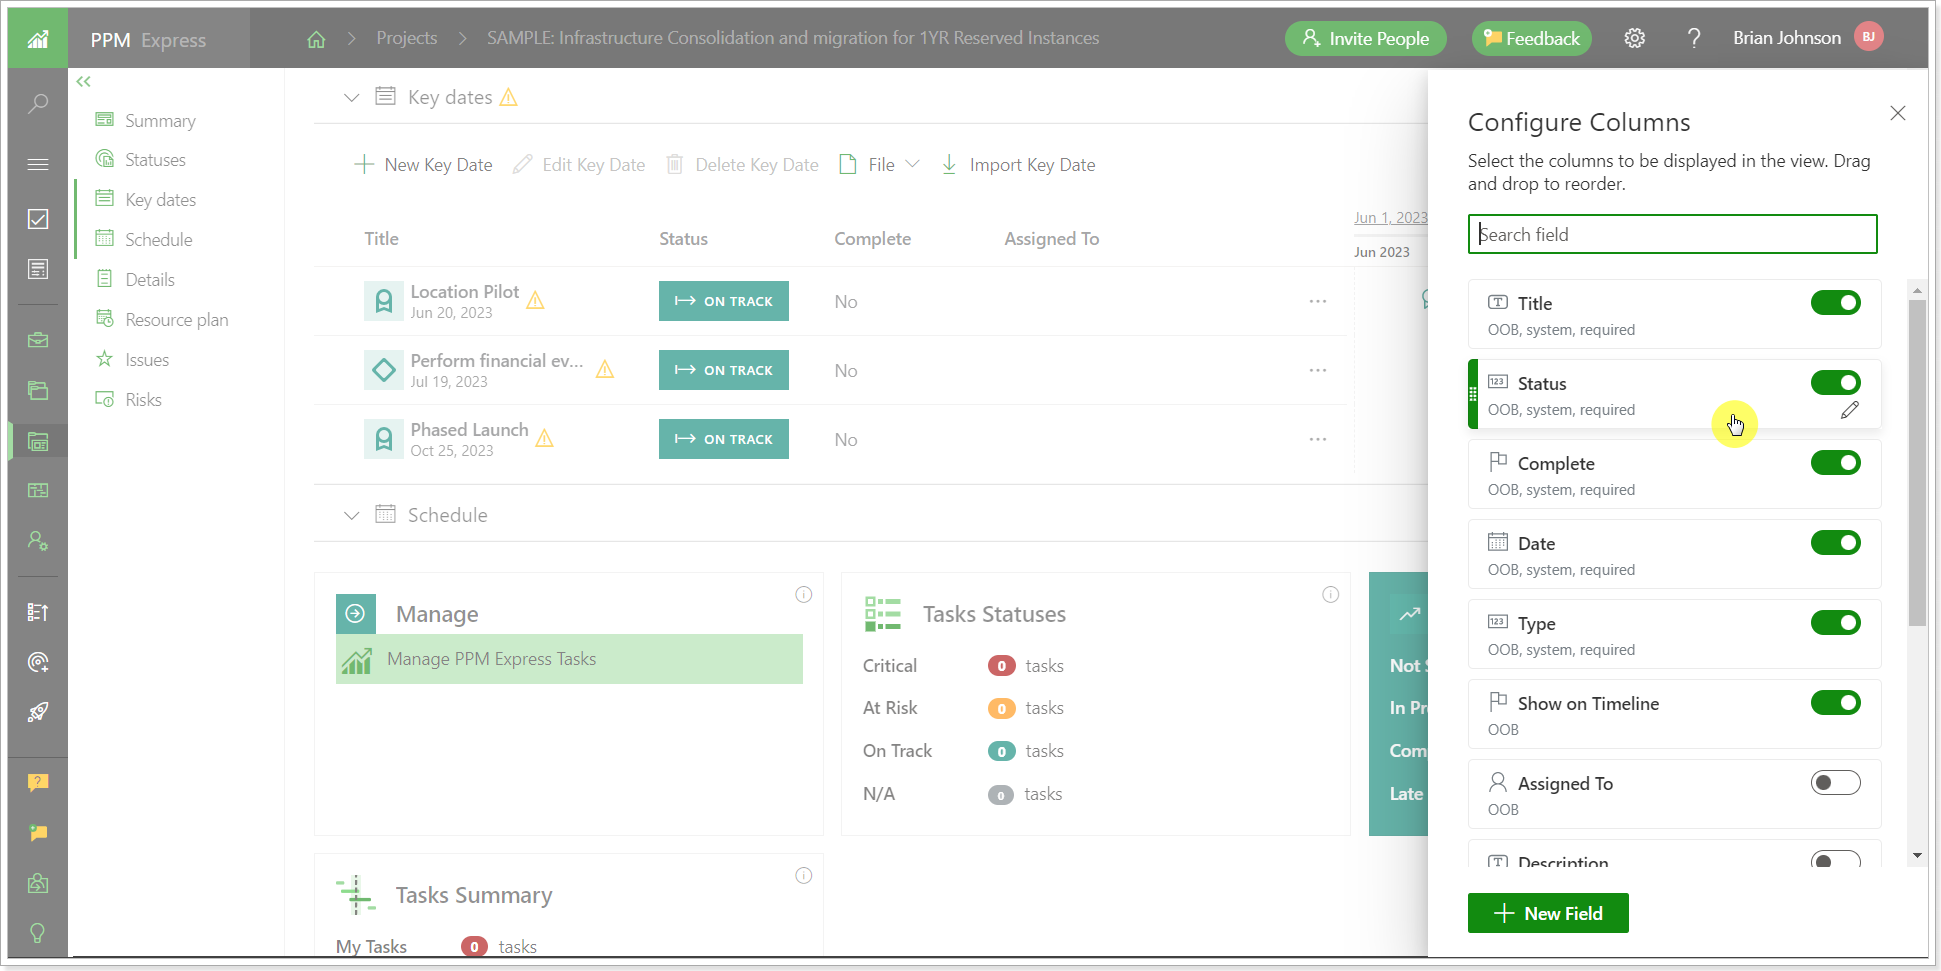
When a new field is created, it is enabled by default and marked as New, so it is easy to find.
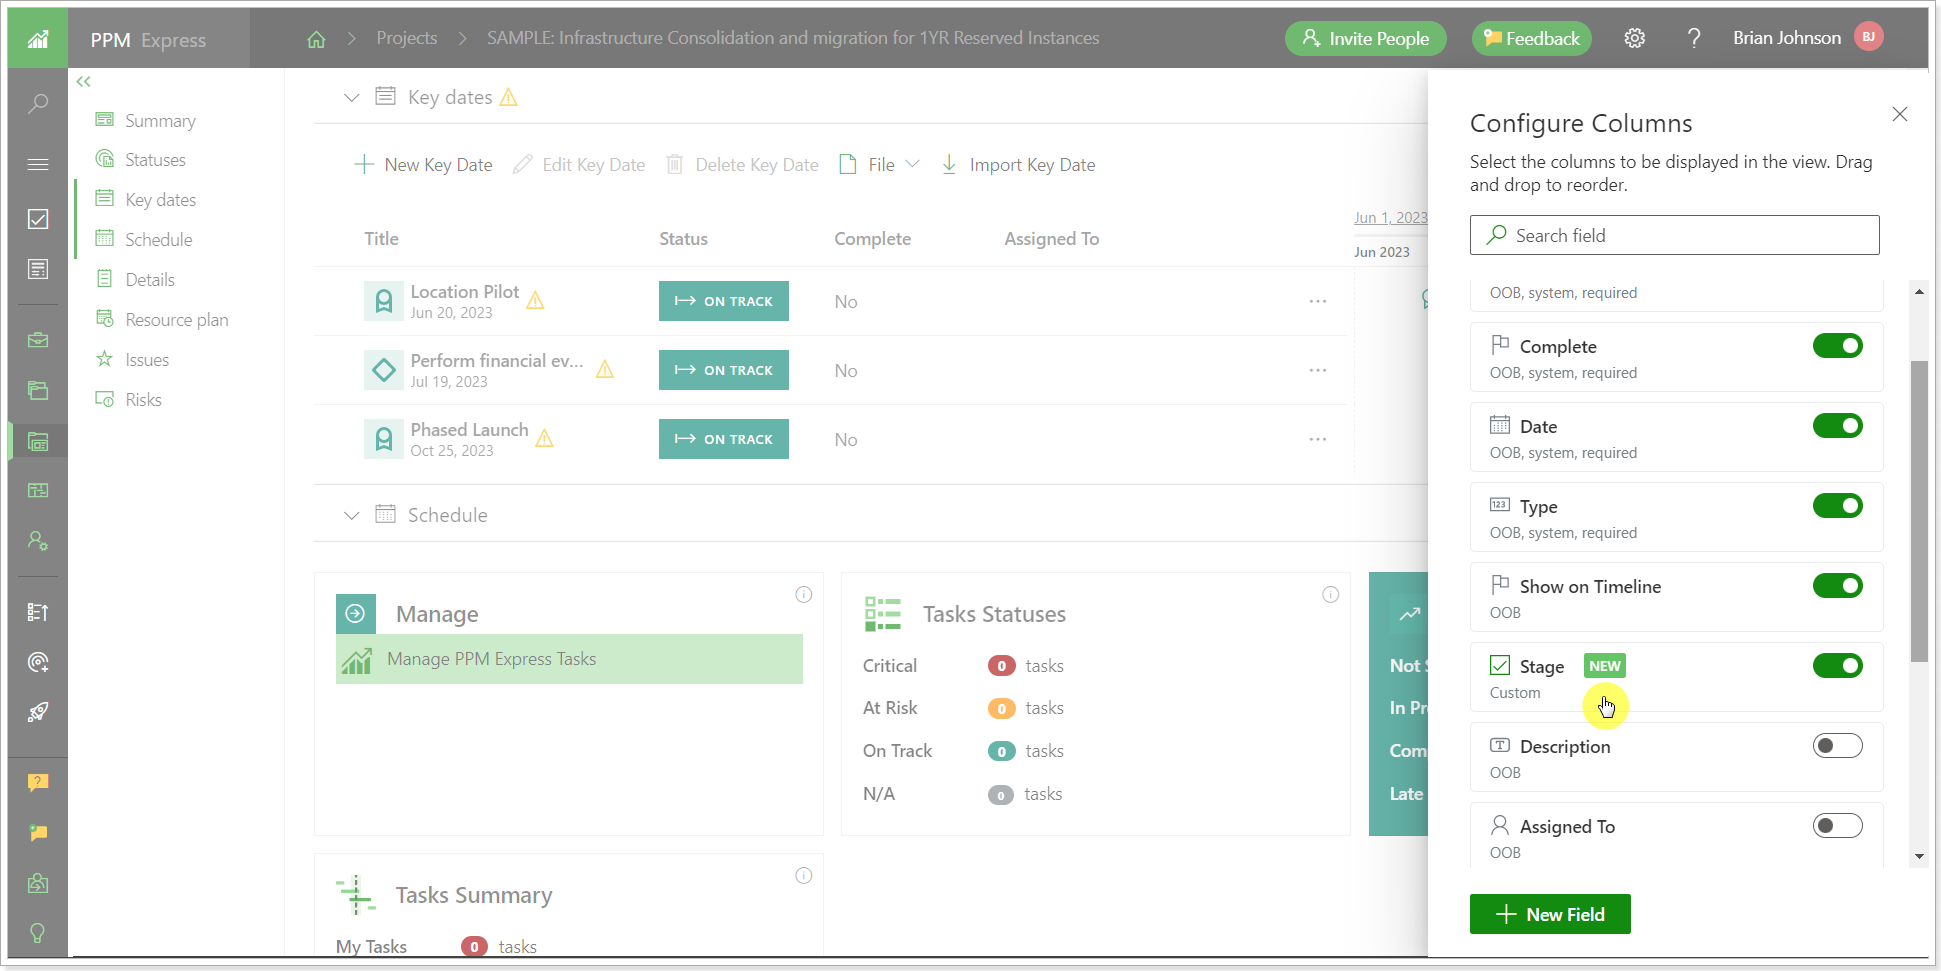
Also, a detailed description was added for all field types.
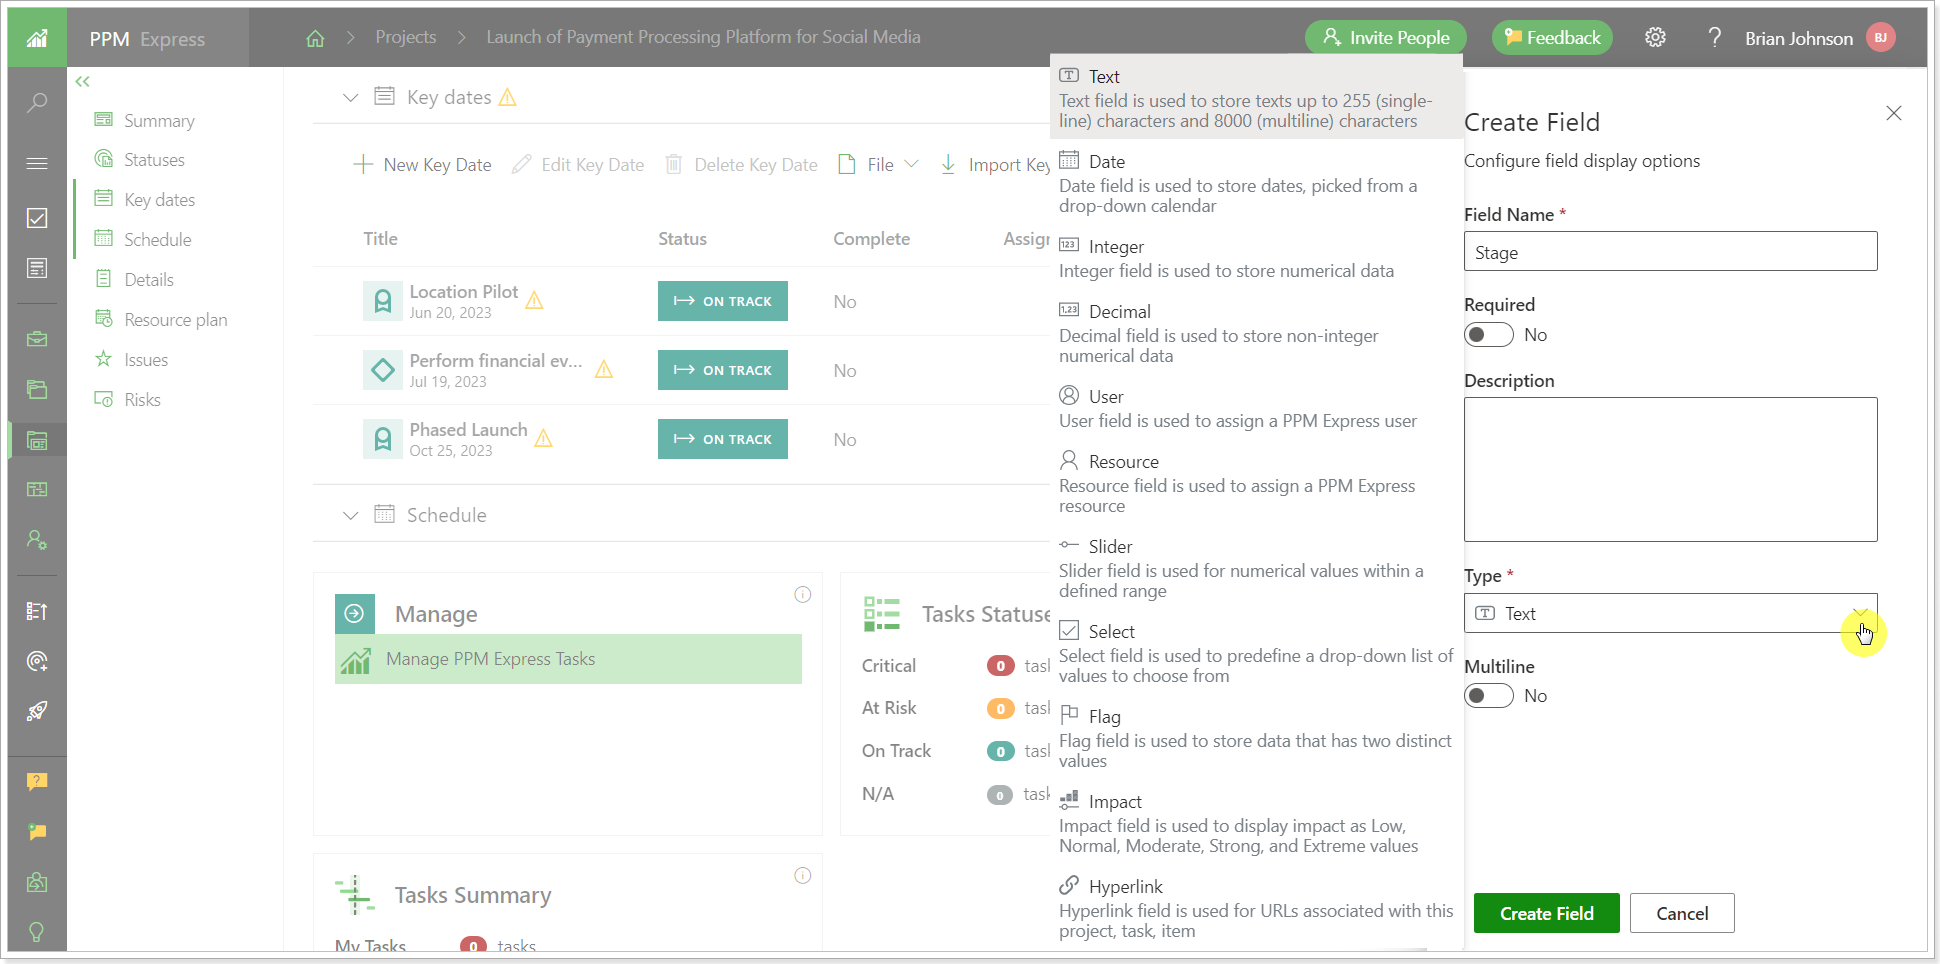
These changes are not applied to views and filters fields yet.
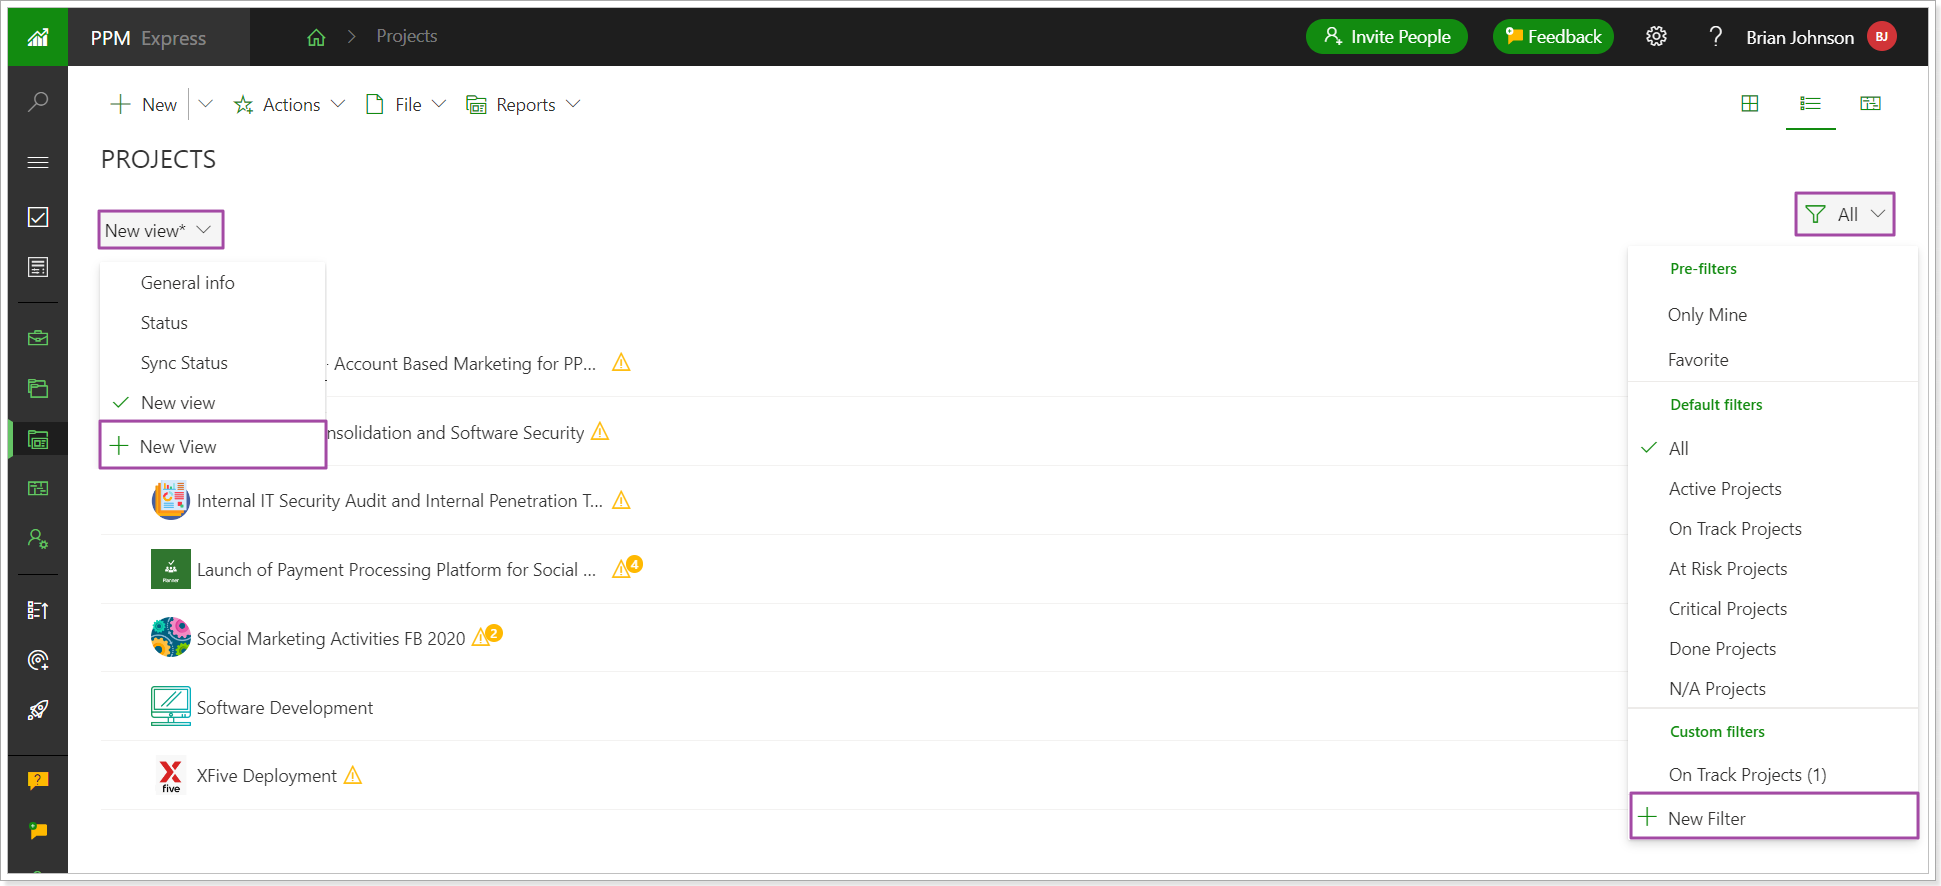
Release Notes 12.10 @January 12, 2023
Synchronization of Azure Active Directory users with PPM Express users was added to PPM Express. The option can be configured from the Tenant Settings page.
The Azure Active Directory Synchronization option allows synchronizing users from Azure Active Directory groups to the PPM Express Project Management page.
Also, using this option, the license type is applied in bulk, and the default set of PPM Express permissions can be set for all users from the selected Azure AD group according to their license. To create a default set of permissions, open the People Management page -> Default Permissions and set permissions for each license type as required.

When users are synchronized, the permissions can be edited manually for each user separately, if required.
To synchronize users from Azure AD, establish a connection between Office 365 and PPM Express. Next, create two groups in Azure AD (or use the existing ones), users from one group will be synchronized as Team Members, users from the second group will be synchronized as Users. Configure and enable the synchronization on the Tennant Settings page. For more details please refer to this article.
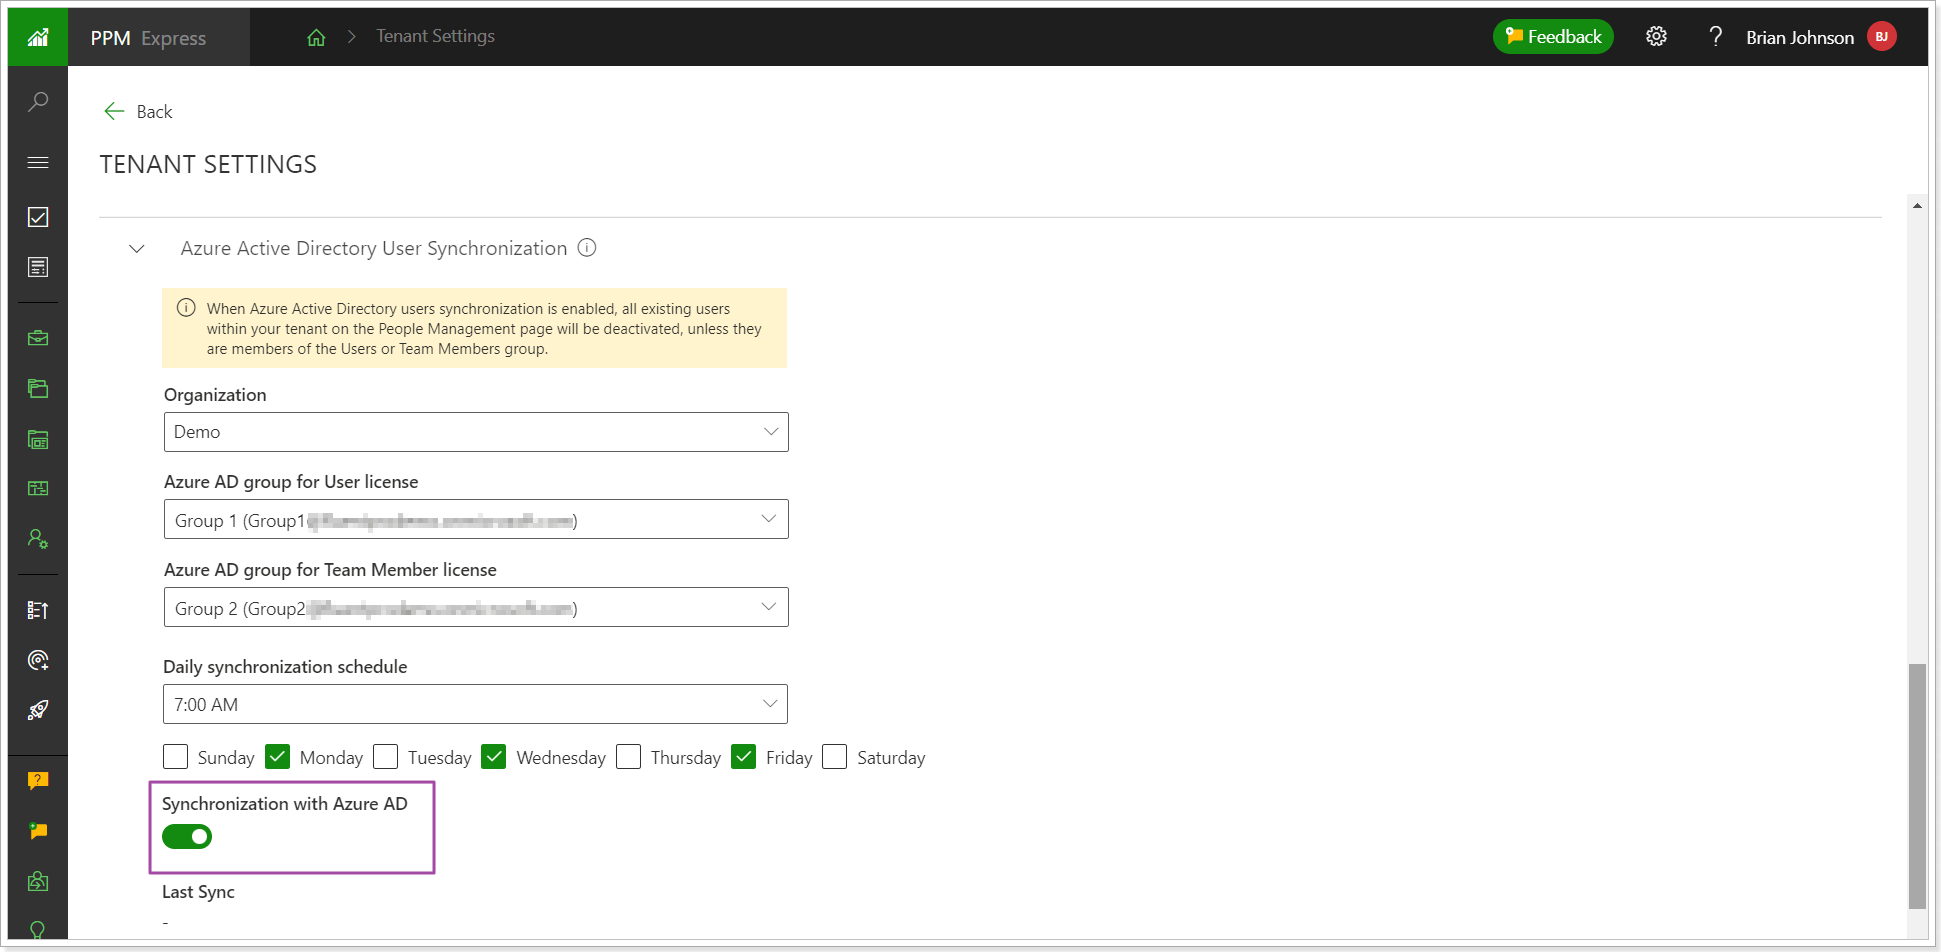
Please note: When Azure Active Directory users synchronization is enabled, all existing users within your tenant on the People Management page will be deactivated, unless they are members of the Users or Team Members group from Azure Active Directory. Users with Administrate app permission will not be deleted even if they are not members of any Azure AD group selected for synchronization.
When the Azure AD synchronization is enabled, the 'Invite users', 'Autoregistration', and invitations via Project sharing are disabled in PPM Express. Users can join PPM Express only through Azure AD synchronization.
Release Notes 12.8 @December 28, 2022
A new option will be added to set a default layout for new ideas of a particular Business Challenge.
When a new idea is created, a layout set as default for all newly created ideas is applied. The default layout for all new ideas is set on the Idea page -> Layouts and views -> Edit Layout -> Set as default.
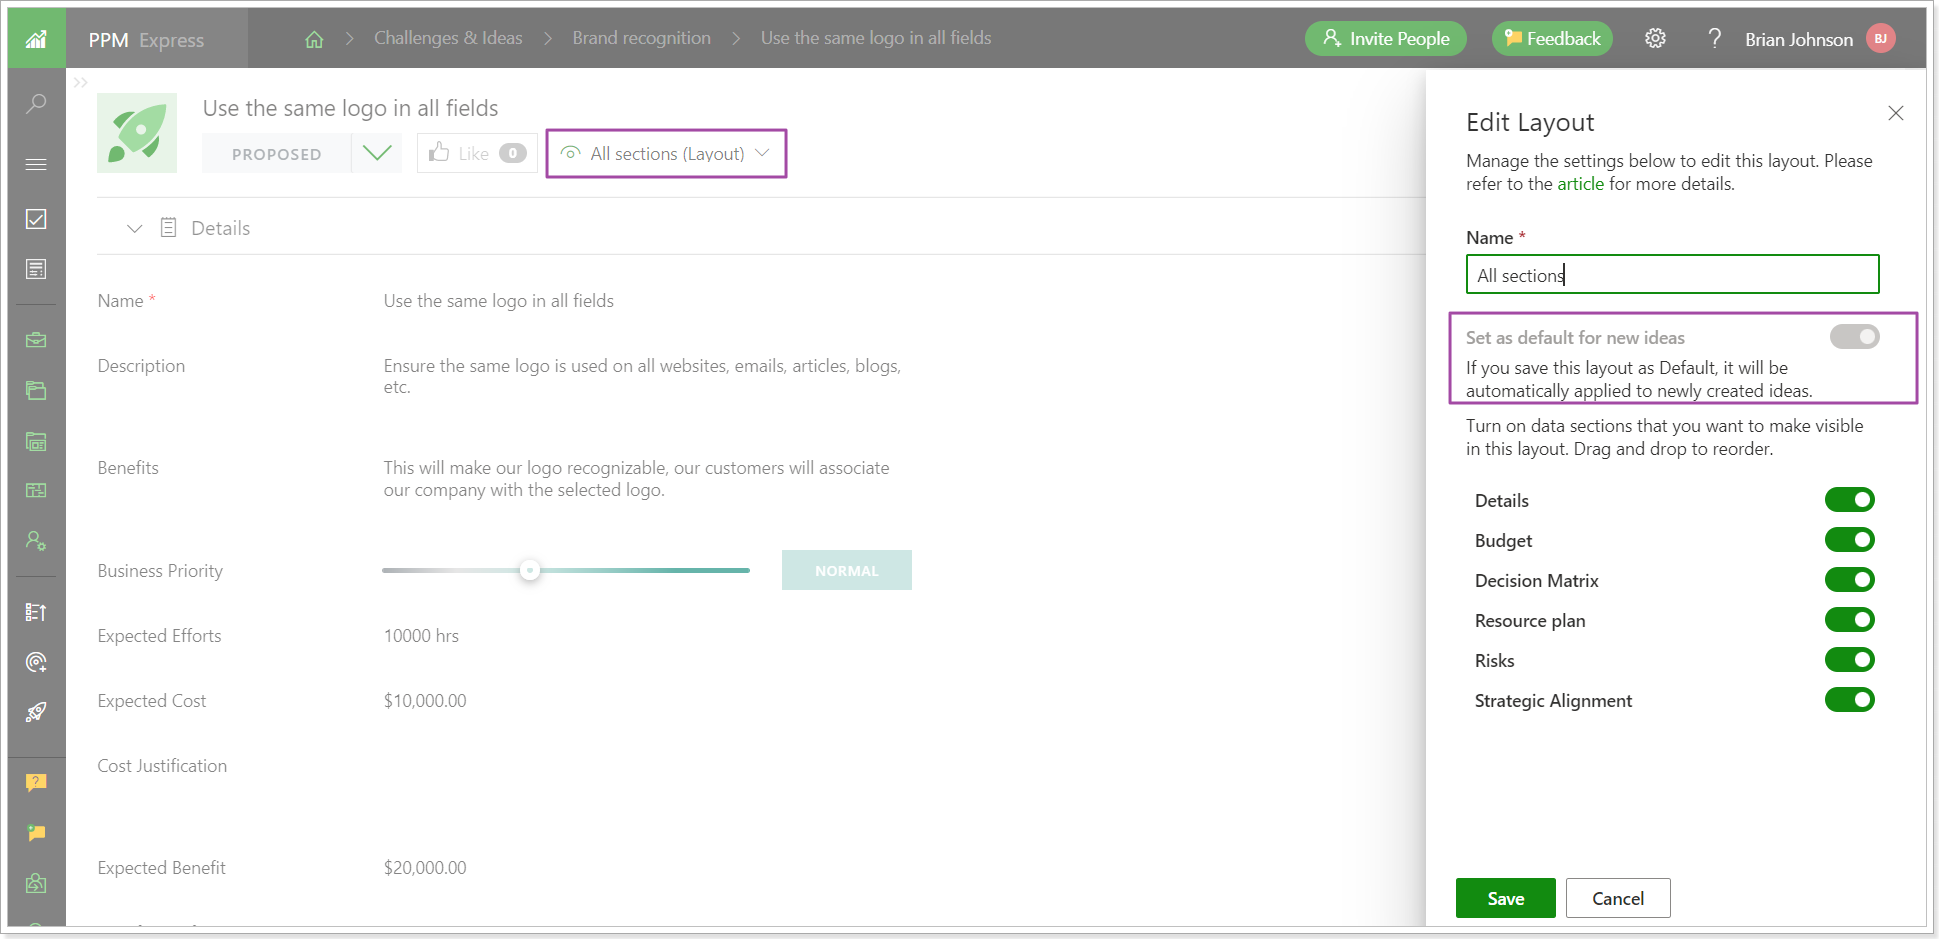
The selection of the sections will be removed from the Create idea page, and a default layout with a certain section list will be applied instead.
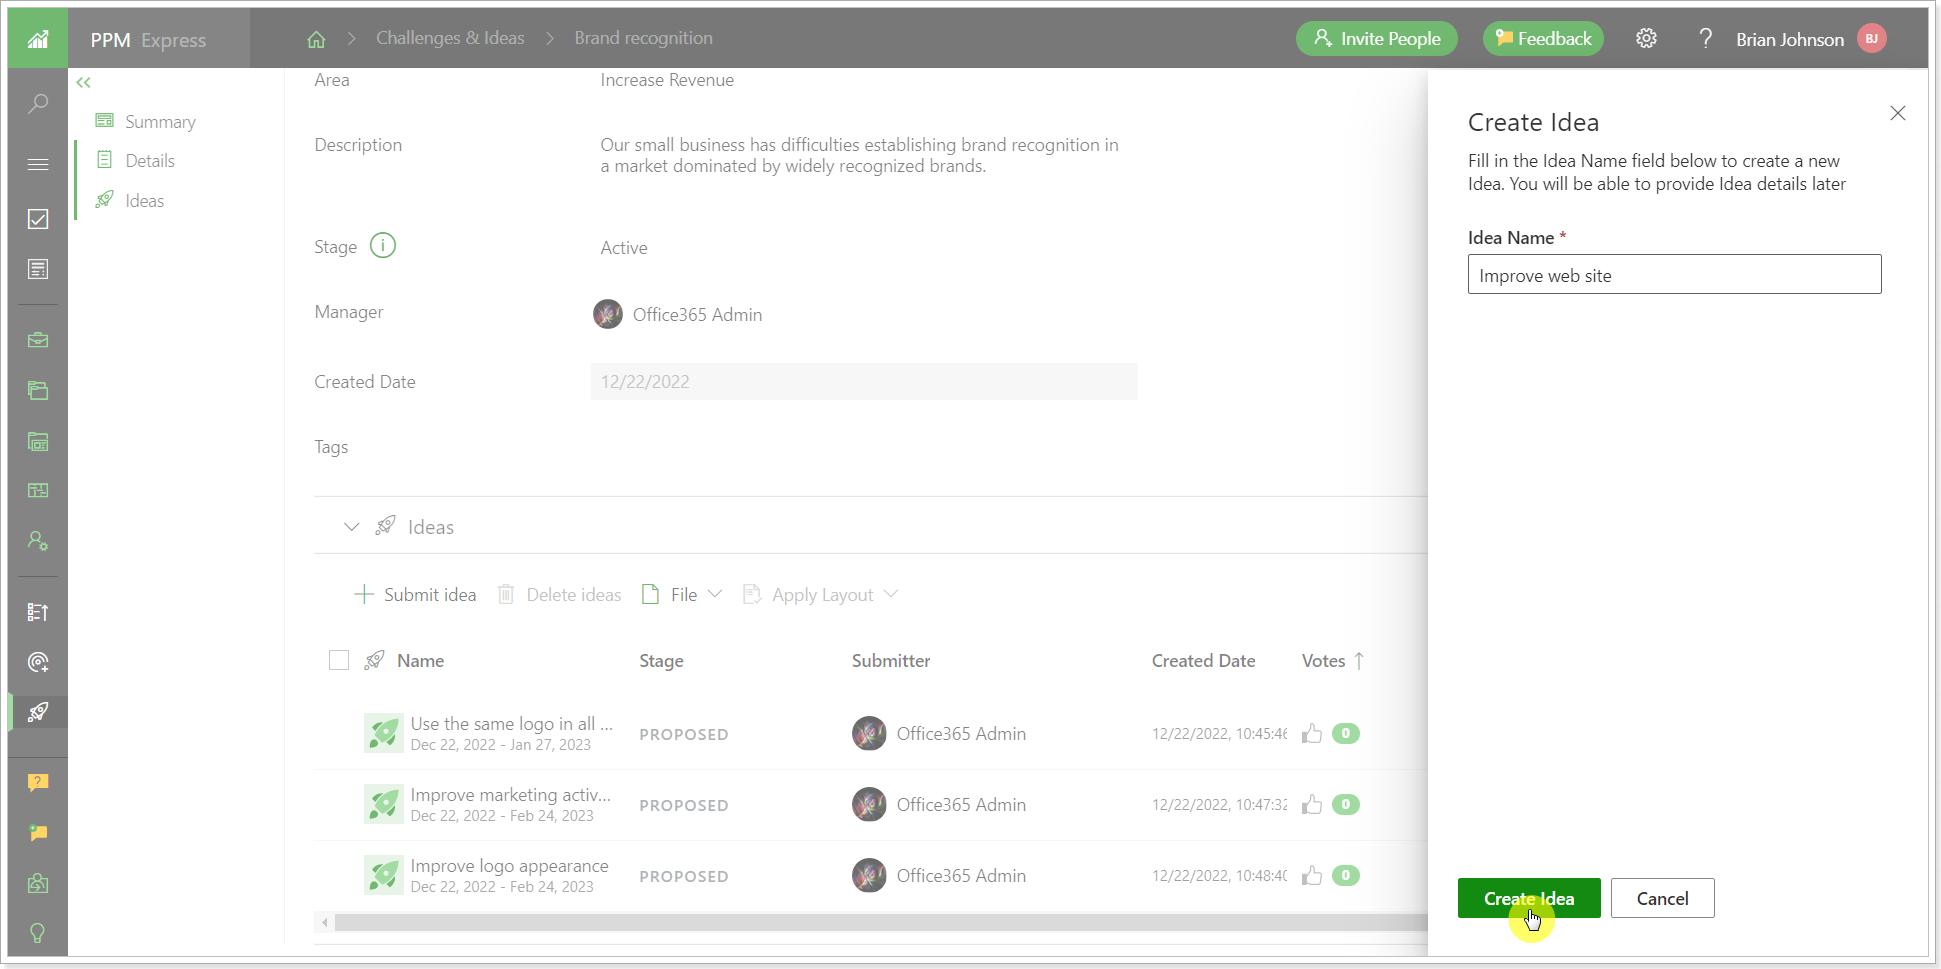
Sometimes there is a need to create all new ideas with a different layout for a certain Business Challenge only. For example, if one Challenge is used for internal requests and another for customer feedback, then the ideas for such challenges should appear in different formats (layouts).
For this case, a new option will be added to overwrite the default idea layout for a particular Business Challenge. All newly created ideas within this particular Business Challenge will be created with a different layout by default.
To set a default layout for new ideas of a certain Business Challenge, open the Business Challenge page and click on the ellipsis button. Navigate to the 'Set Idea Layout for this Business Challenge' option and choose the default layout for all new ideas of this Challenge.

When a new idea is created for this challenge, the selected layout will be applied by default, despite the general setting for all ideas of other Business Challenges.
To apply the same layout to all existing ideas of a Business Challenge, select the ideas, open the Apply Layout option and apply the required layout to all selected ideas.
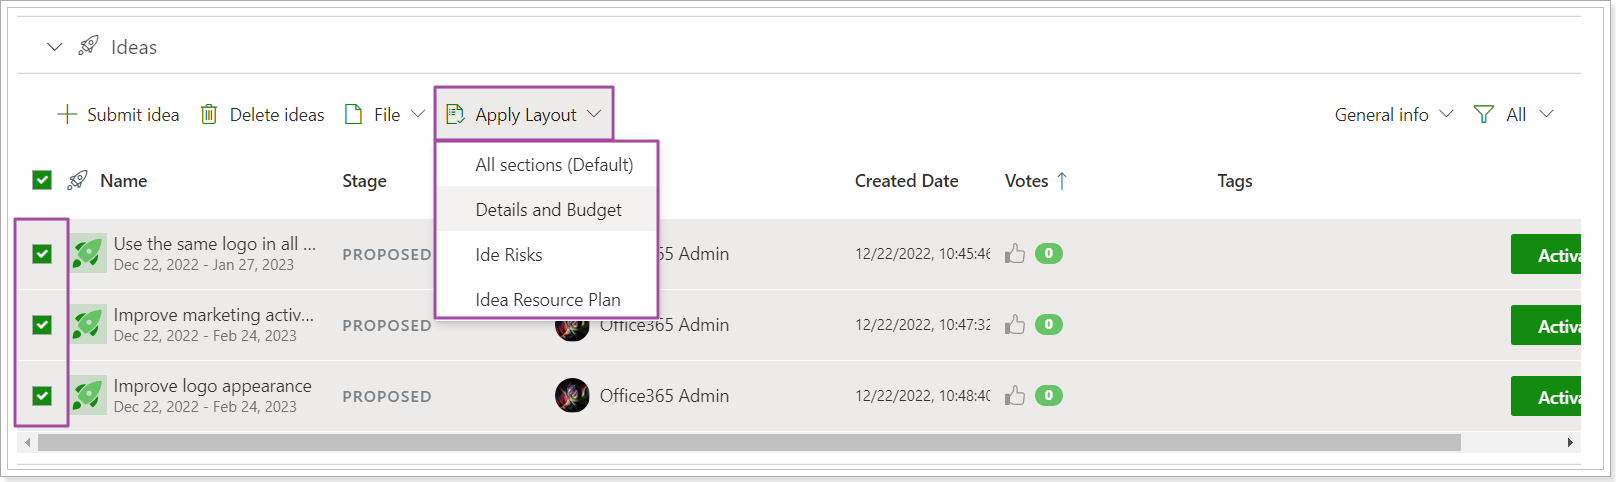
Please note that if you have more than 10 ideas in the list, the list should be opened to apply the layout for all ideas. Otherwise, the layout will be applied to the first 10 ideas in the list only.
Release Notes 12.5 @December 6, 2022
The ‘Change request’ option was added to the My Space page. Notifications are now sent to Requesters/Deciders/Users assigned when a new change request is created and then when its decision is changed.
Three new fields were added to the Change Requests project section for a better flow of submitting the requests and then tracking their status by all users who are involved in this process:
- Due Date
- Assigned to
- Status

When a Change request is assigned to a resource for implementation (Assigned to), the assignee and the requesters will be aware of the changes and status of this Change request. The following notifications will be sent on creating/editing Change Requests:
1. When a resource is assigned to a change request in the ‘Assigned to’ or ‘Deciders’ fields, an email is sent to this resource.
2. Each time when the Decision field is edited in a Change Request (e.g. from Pending to Approved, etc.), an email is sent to people assigned in the ‘Assigned to’ and ‘Requesters’ fields.
For notifications to be sent, PPM Express notifications should be enabled on the tenant level.

Also, the Change Requests will now appear on the My Space page (for users from the 'Assigned to' field) and can be opened and edited from this page directly.

Release Notes 12.1 @November 14, 2022
1. The 'Configure Columns' option was replaced with ‘Views’ in the Ideas section.
Before: Configure Columns option was used to edit the fields that appear in the Ideas section of the Business Challenges.
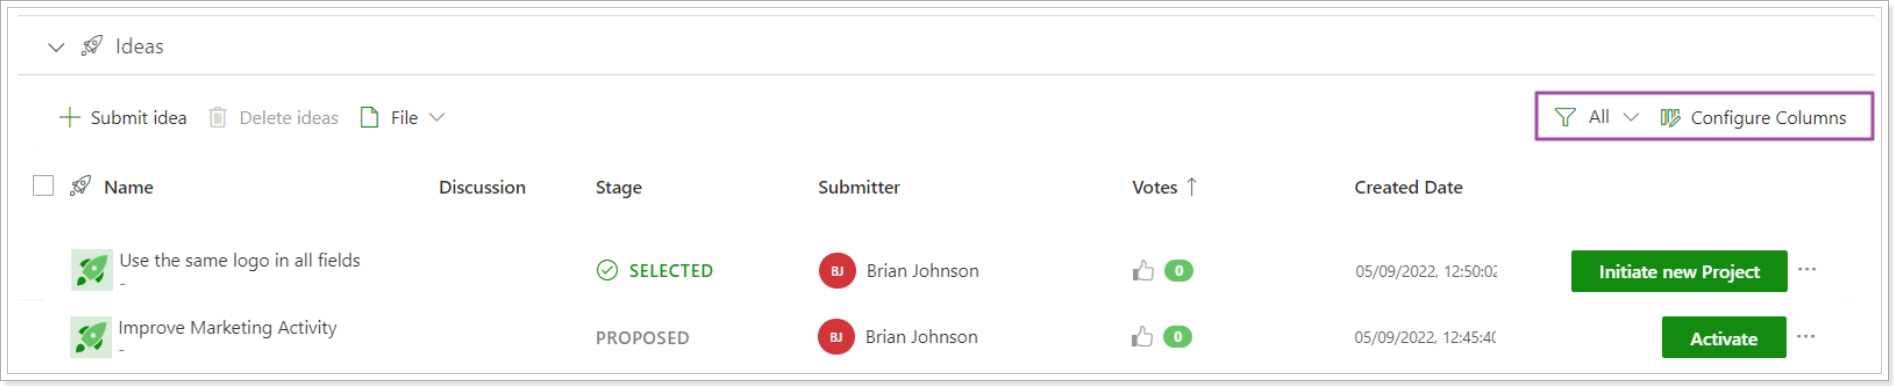
Now: The Views option is used to configure which fields are displayed within the Ideas section.
The non-editable 'General Info' view is applied by default. This view contains the fields in such order:
- Name
- Stage
- Submitter
- Created Date
- Votes
- Tags
You can create custom views and include the fields you need for each view. As soon as the views are created, you can switch between the views to review the required information quickly.
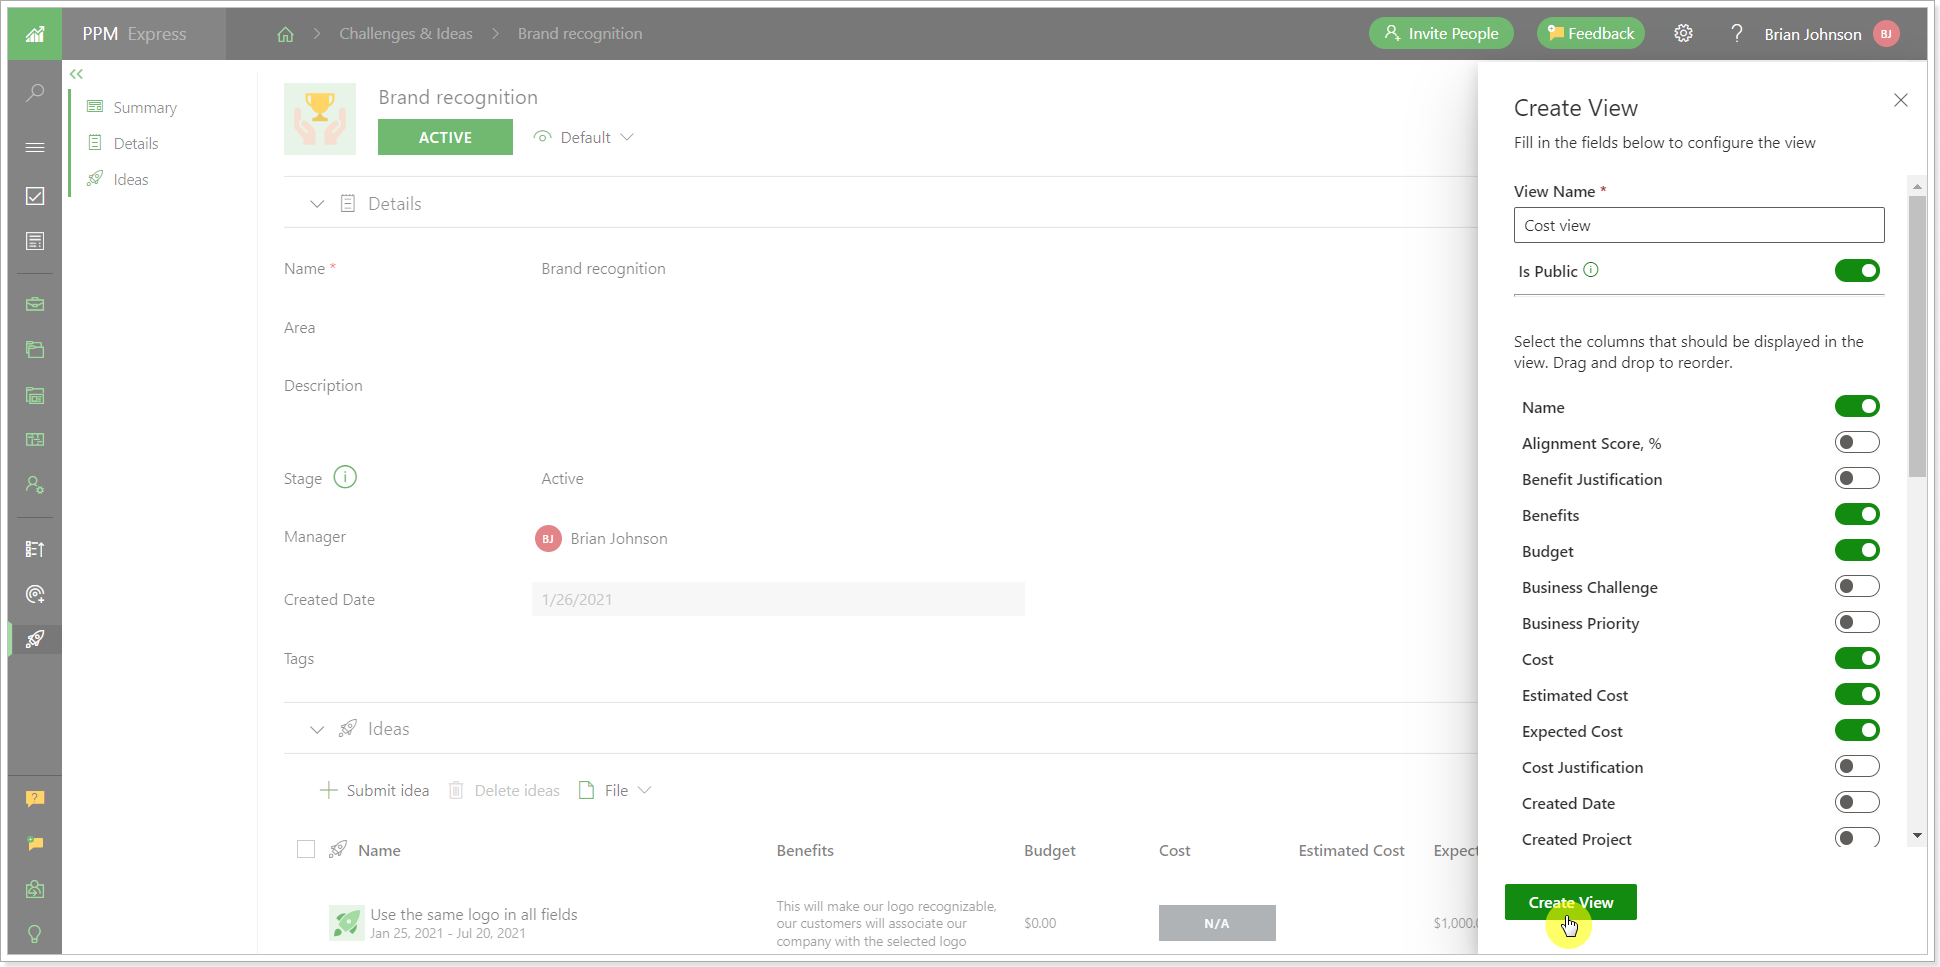
Custom views can be edited and deleted.

Release Notes 11.17 @October 31, 2022
1. Soft Dependencies and different Dependency types are now available in PPM Express task management.
Before: There was only one type of dependency: Finish to Start. If the dependency was added, the start date of the dependent task was read-only. It switched automatically to the next day of the predecessor task finish date.
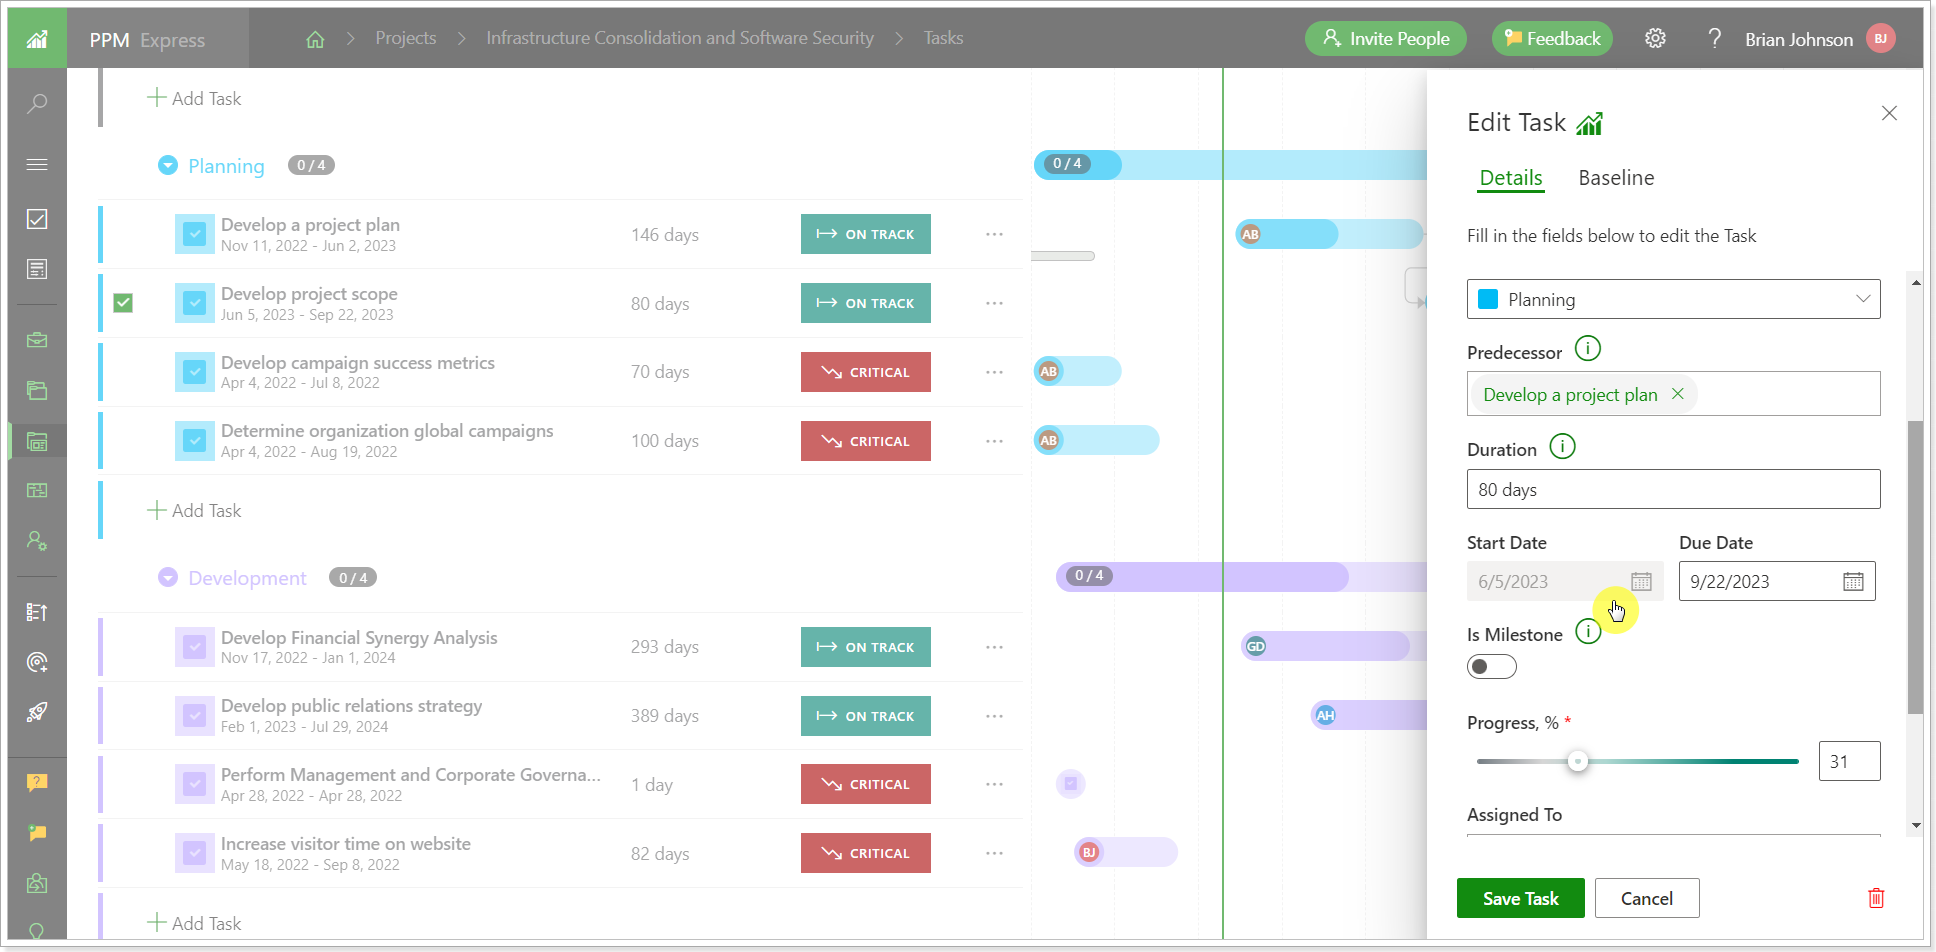
Now: There are four types of dependencies:
- Finish-to-Start (FS): Task B starts after Task A is finished.
- Start-to-Start (SS): Task B starts the same day as Task A.
- Finish-to-Finish (FF): Task B finishes the same day as Task A.
- Start-to-Finish (SF): Task B finishes the same day as Task A starts.
An additional tab was added to the Edit Task window: Predecessors (predecessors can be added on this tab).
The lead and lag time was added for internal tasks dependencies:
- When you add lead time to a task, work on that task overlaps work on its predecessor.
- When you add lag time, you delay the start time of the successor task.
Finish-to-Finish dependency with zero lag is used by default.
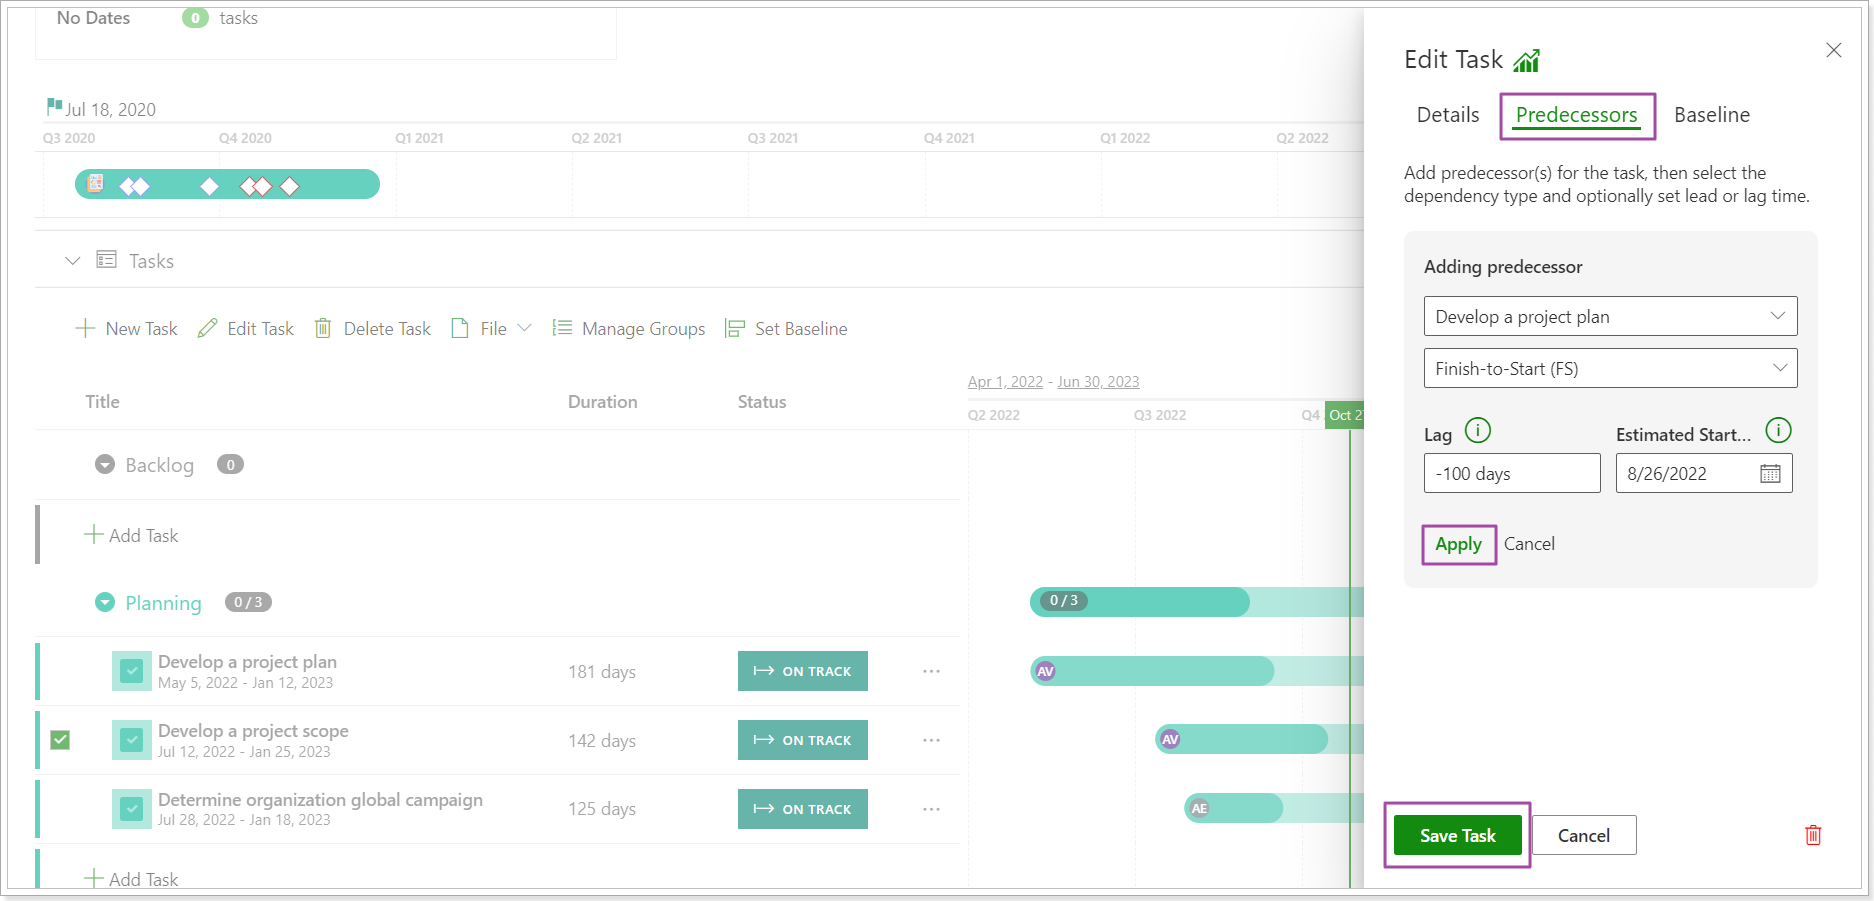
Dependencies can now be deleted from the timeline directly. Also, using the drag-and-drop option you can change the start date and the finish date of the dependent task (the lag time will be also changed automatically if the start date is changed).
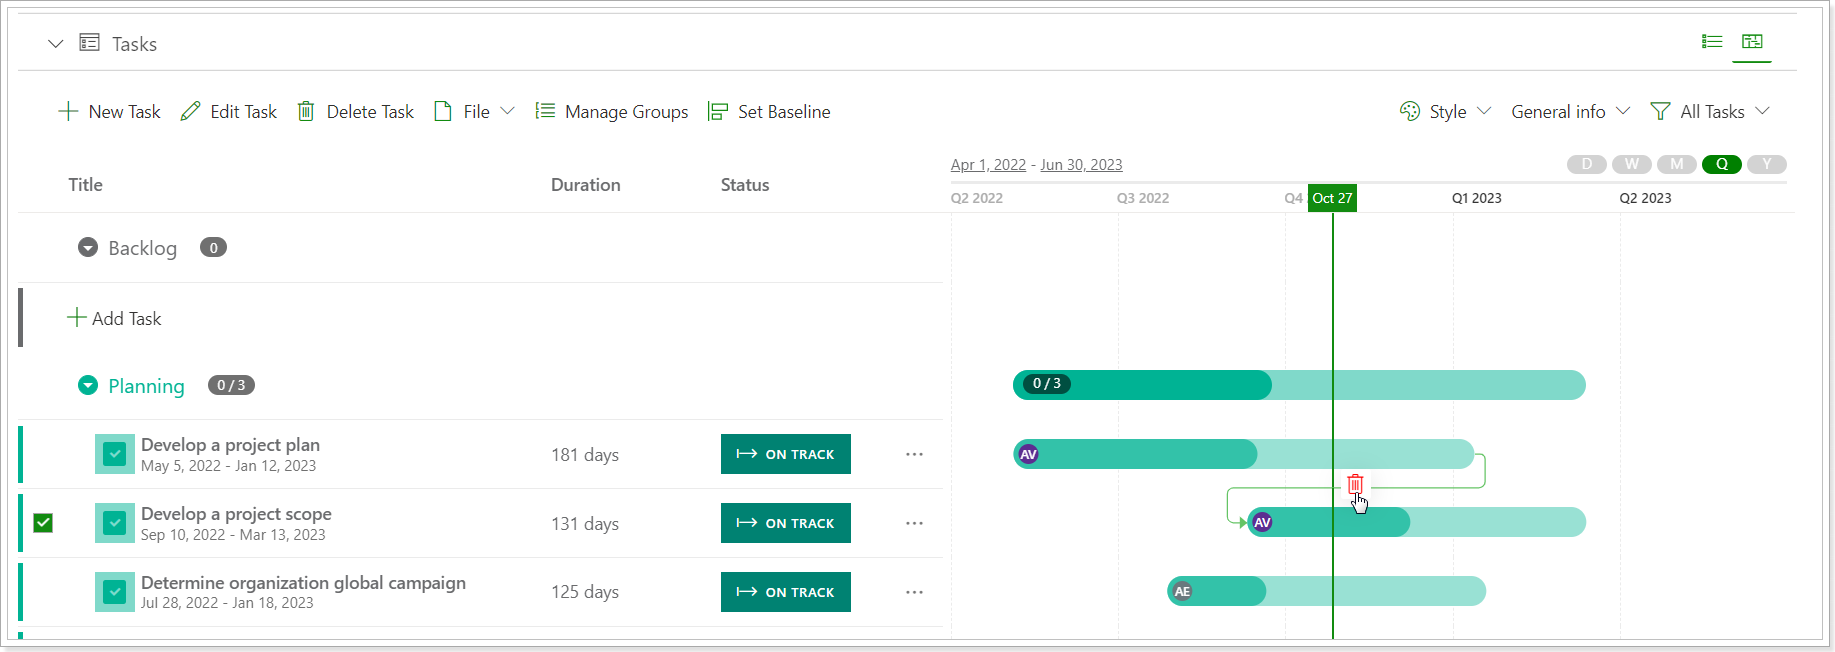
2. It is now possible to open the project tasks page from the Projects page directly.
This option is available from all views: card, timeline, and table. Clicking on it, you can open the PPM Express tasks page or the tasks page of the linked system if any.
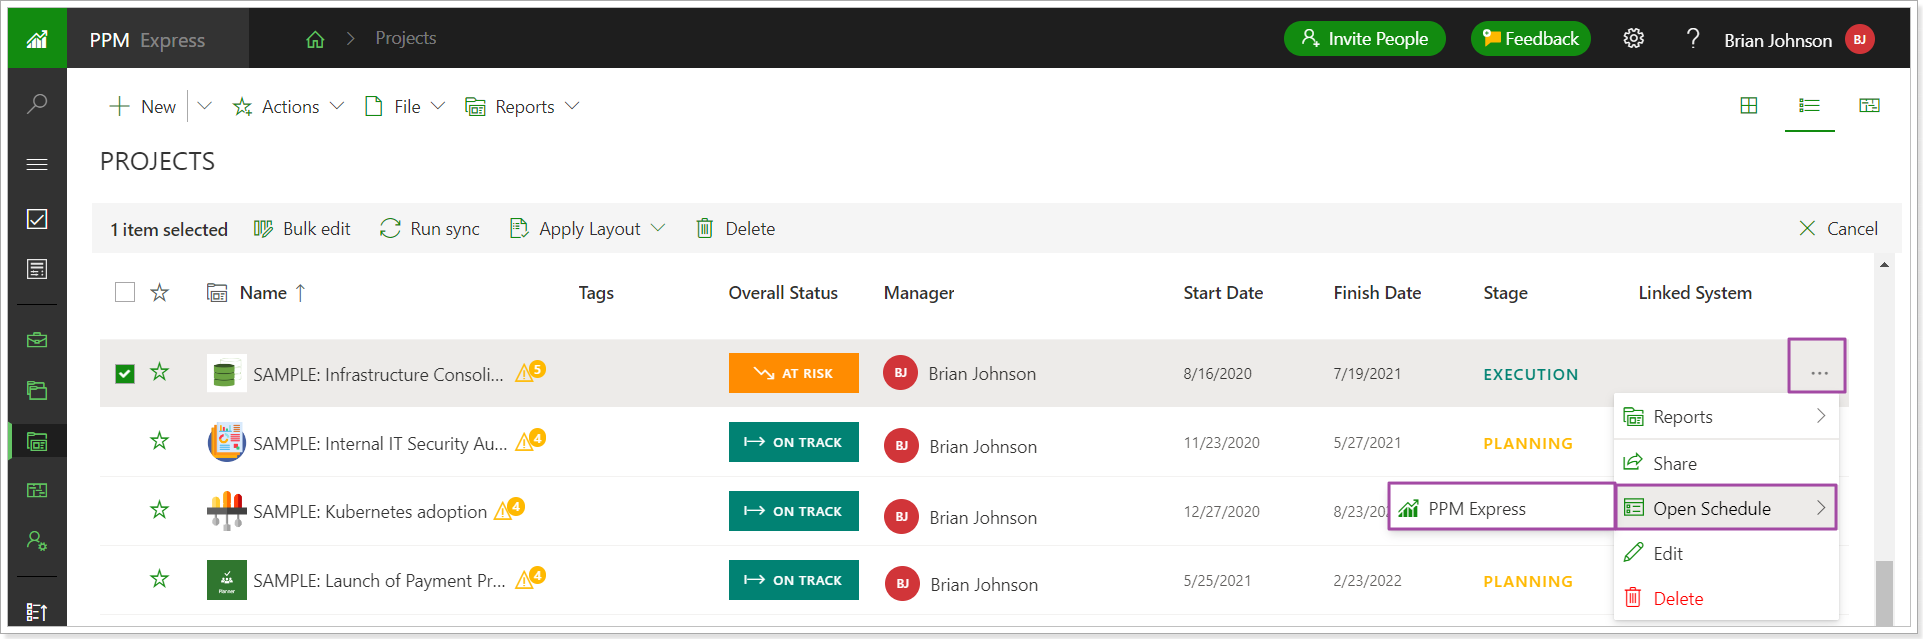
3. It is now possible to open the PPM Insights page from the Project dashboard.
To open the PPM Express Insights page from the Project dashboard, click on the ellipsis button to open the settings and select the PPM Insights option. The Insights page will be opened displaying the information for the project you are working with (the corresponding filter is applied automatically).
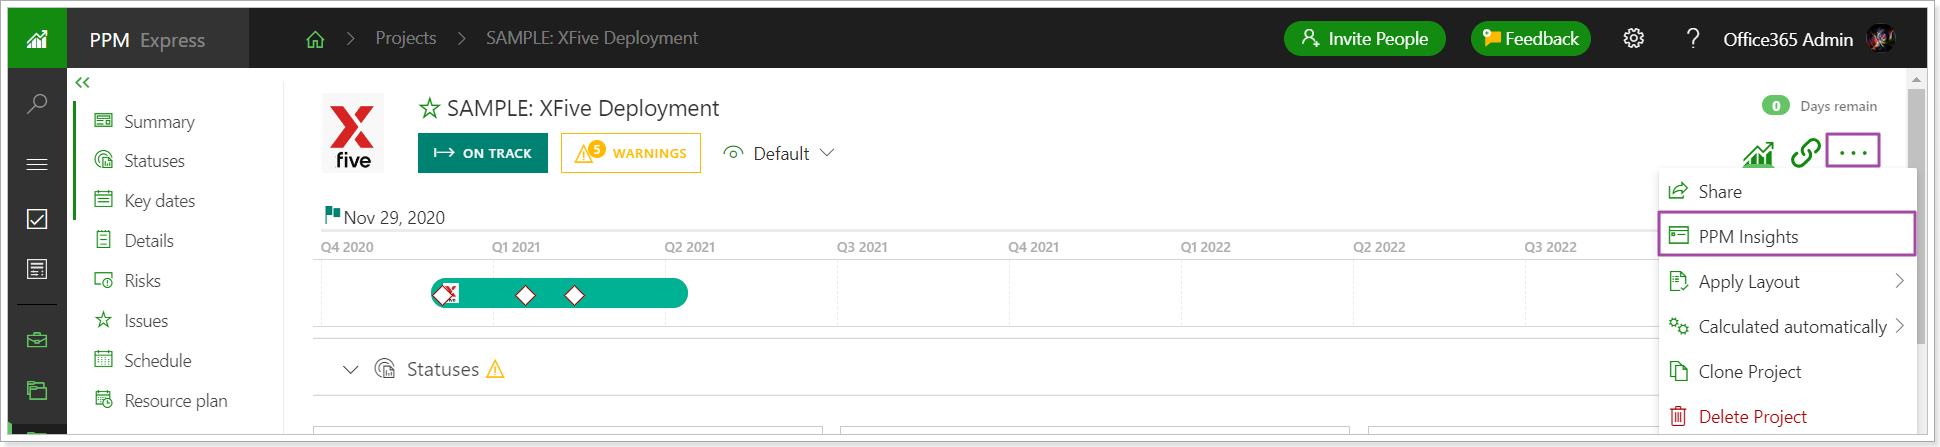
Release Notes 11.14 @September 28, 2022
1. The Resource allocation process and navigation were improved.
Before: The ‘Set Planned’ button was used to allocate resource(s) for the project. This button was available from the grid, from the panel, and from the ellipsis button. Also, when adding a resource to your project it was possible to allocate resource(s) at once. If the Start and Finish dates for the project were not set, the resource could be allocated for a period of six months. It was not easy to change the allocation period to match the project dates or certain time period.
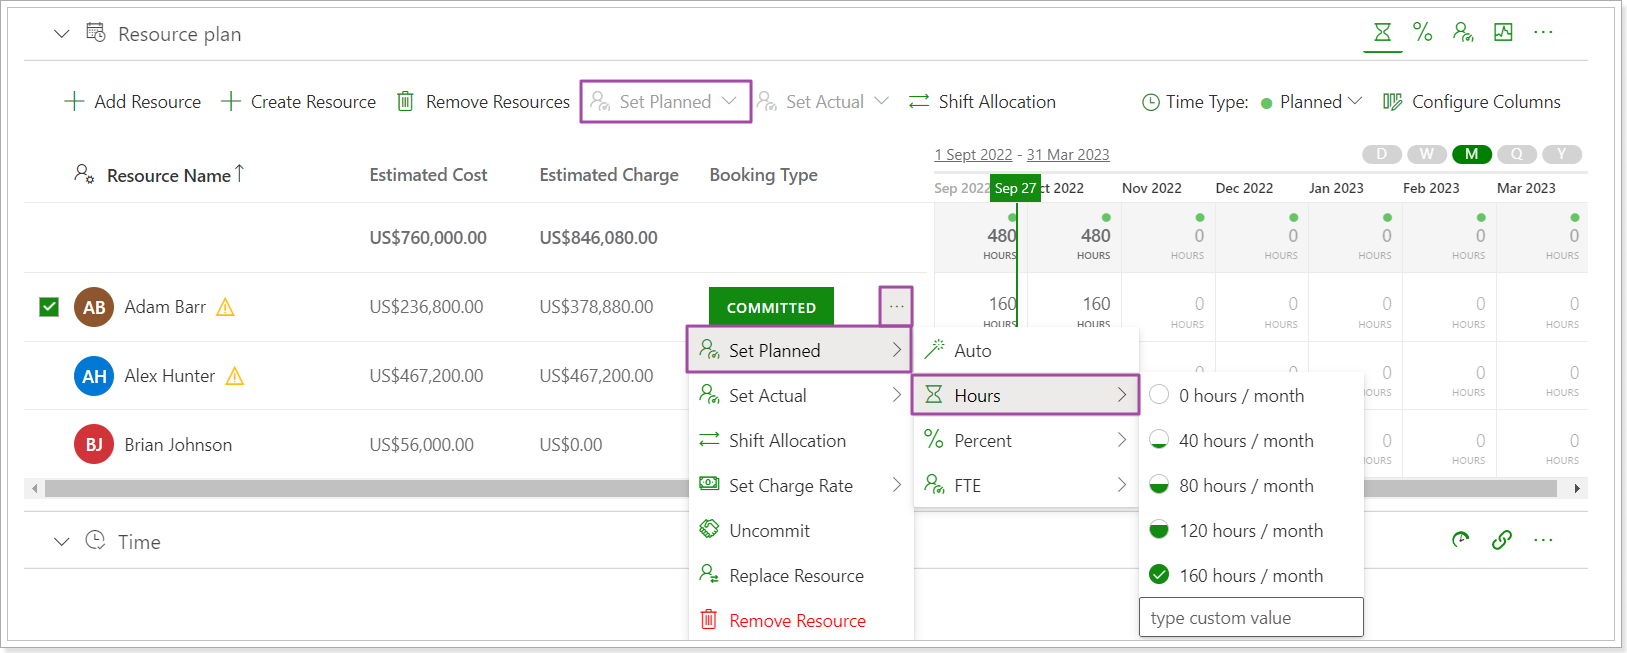
Now: The ‘Set Planned’ button was changed to ‘Allocate’. Adding a resource and allocating it are two separate steps now. First, you search and add a resource to the project (by name, skills, tags). Then, you plan the resource(s) hours for the project. If you need to allocate the resource(s) for a day, week, month, quarter, or year, use the ‘Allocate’ button from the grid and be sure to set the needed time scale. To allocate resource(s) for project dates or any other certain time period, use the ‘Allocate’ button from the ellipsis or from the panel. On the ‘Allocate Resource’ panel, you can now see the project dates, current allocation period of the selected resource(s), and type of allocation. The project dates will be set per default, but you can also set a custom period instead. The same panel was also added to the ‘Set Actual’ option to allow a user to quickly specify actual hours for the whole project or specific time period.
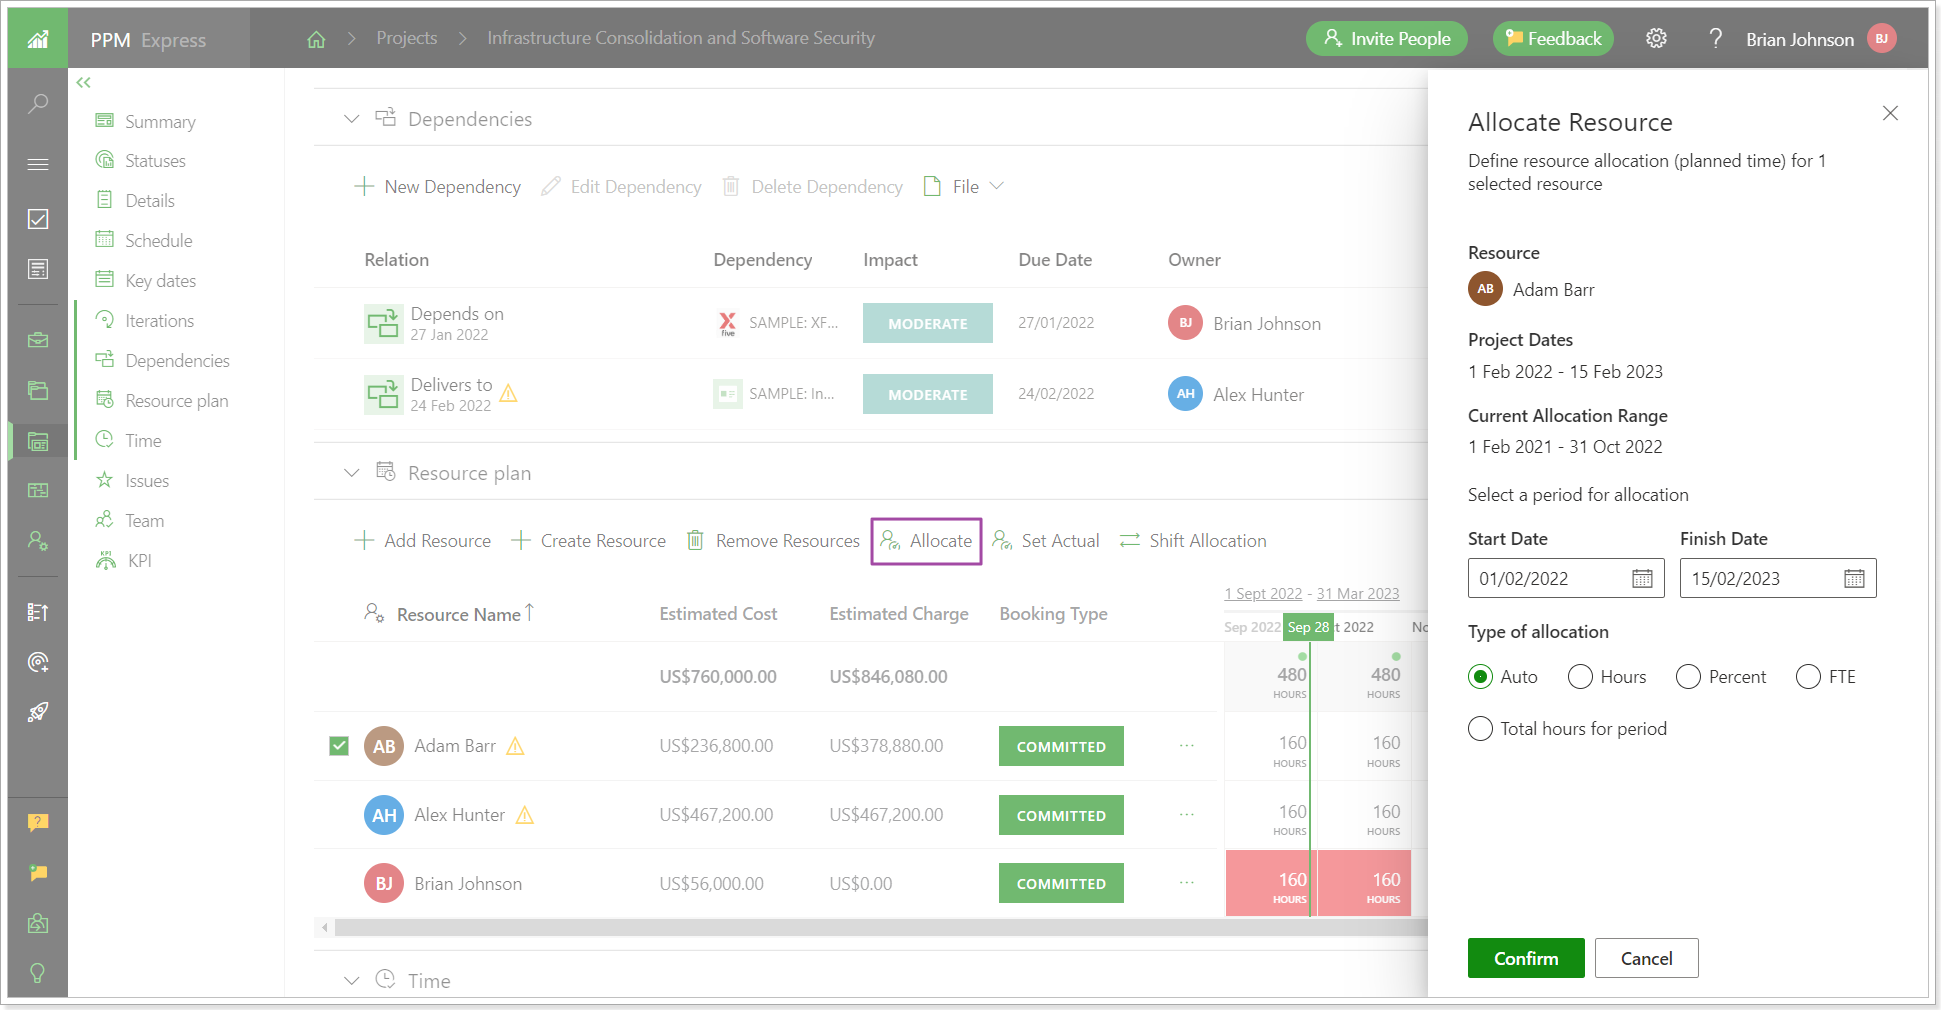
Release Notes 11.13 @September 21, 2022
1. A new View ‘Resource Management’ was created for new PPM Express tenants.
The Resource Management view contains the following sections:
- KPI section (with pre-defined KPIs)
- Team Section
- Resource Plan section
This view is used to quickly review the information for Resources, and track the related KPIs with Project Team and Resources.
The same View can be also created manually by existing users.
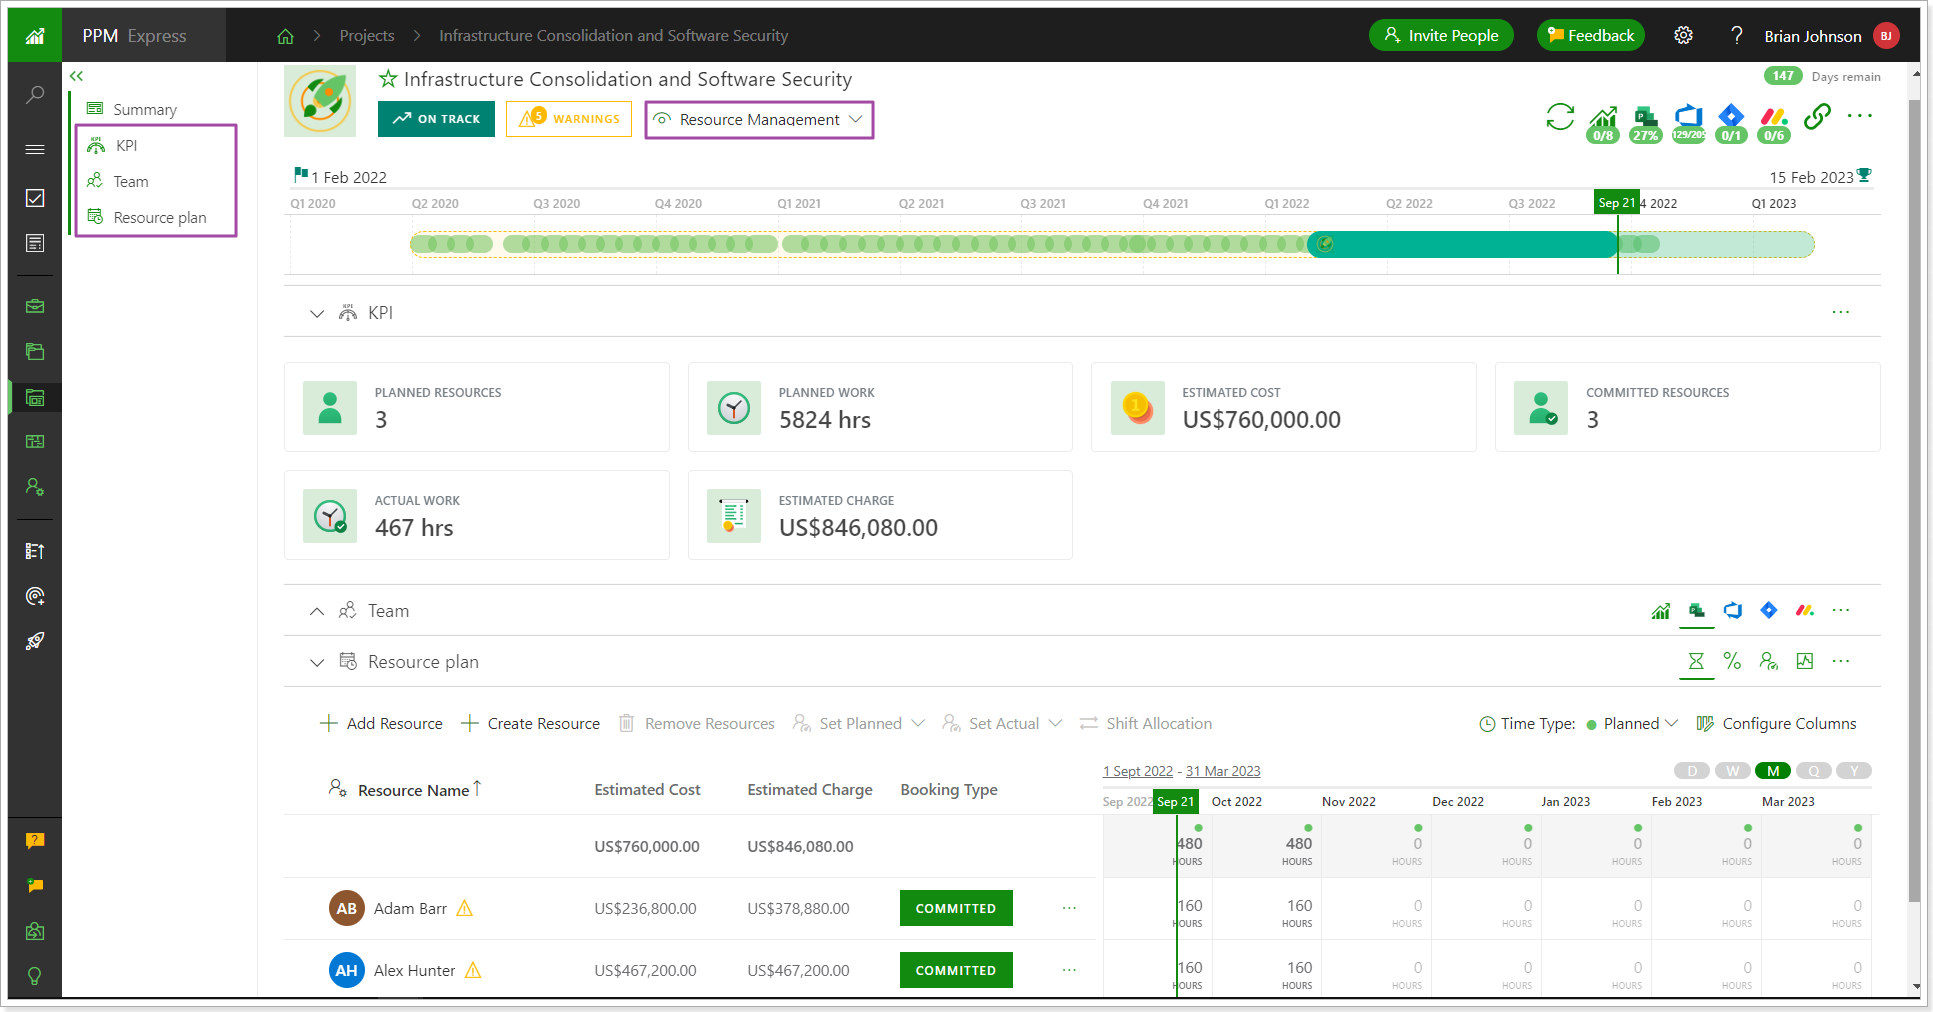
1. New fields were added to the Project Details section.
The Following fields are selected by default in the KPI section of the Resource Management view of the Project Dashboard.
- Planned Resources (the number of planned resources in a resource plan)
- Committed Resources (the number of committed resources in a resource plan)
- Planned Work -> calculated field 'Total Planned'
- Actual Work -> calculated field 'Total Actual'
- Estimated Cost (calculated field)
- Estimated Charge (calculated field)
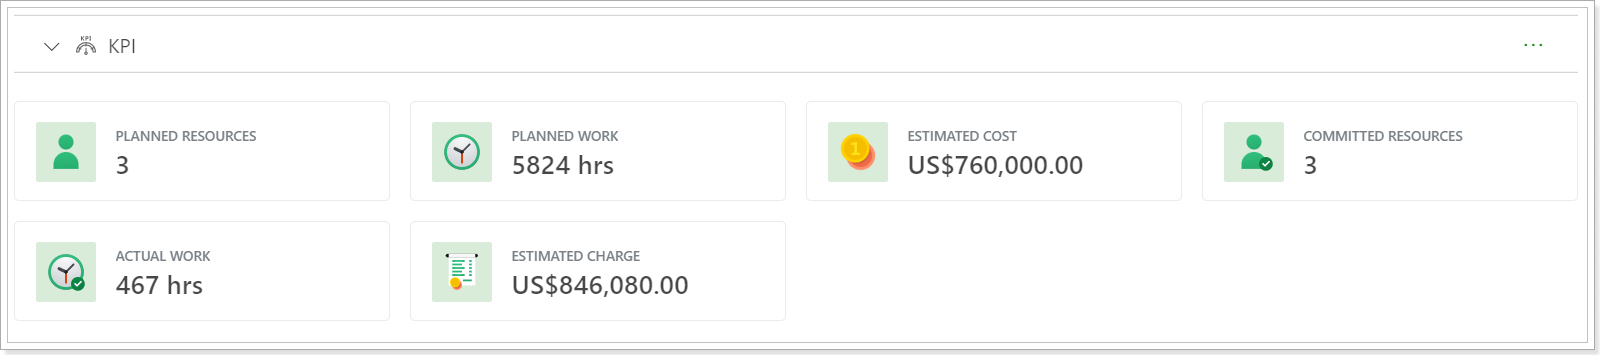
Release Notes 11.11 @September 12, 2022
1. The field ‘Skills’ was added to the Resource Dashboard.
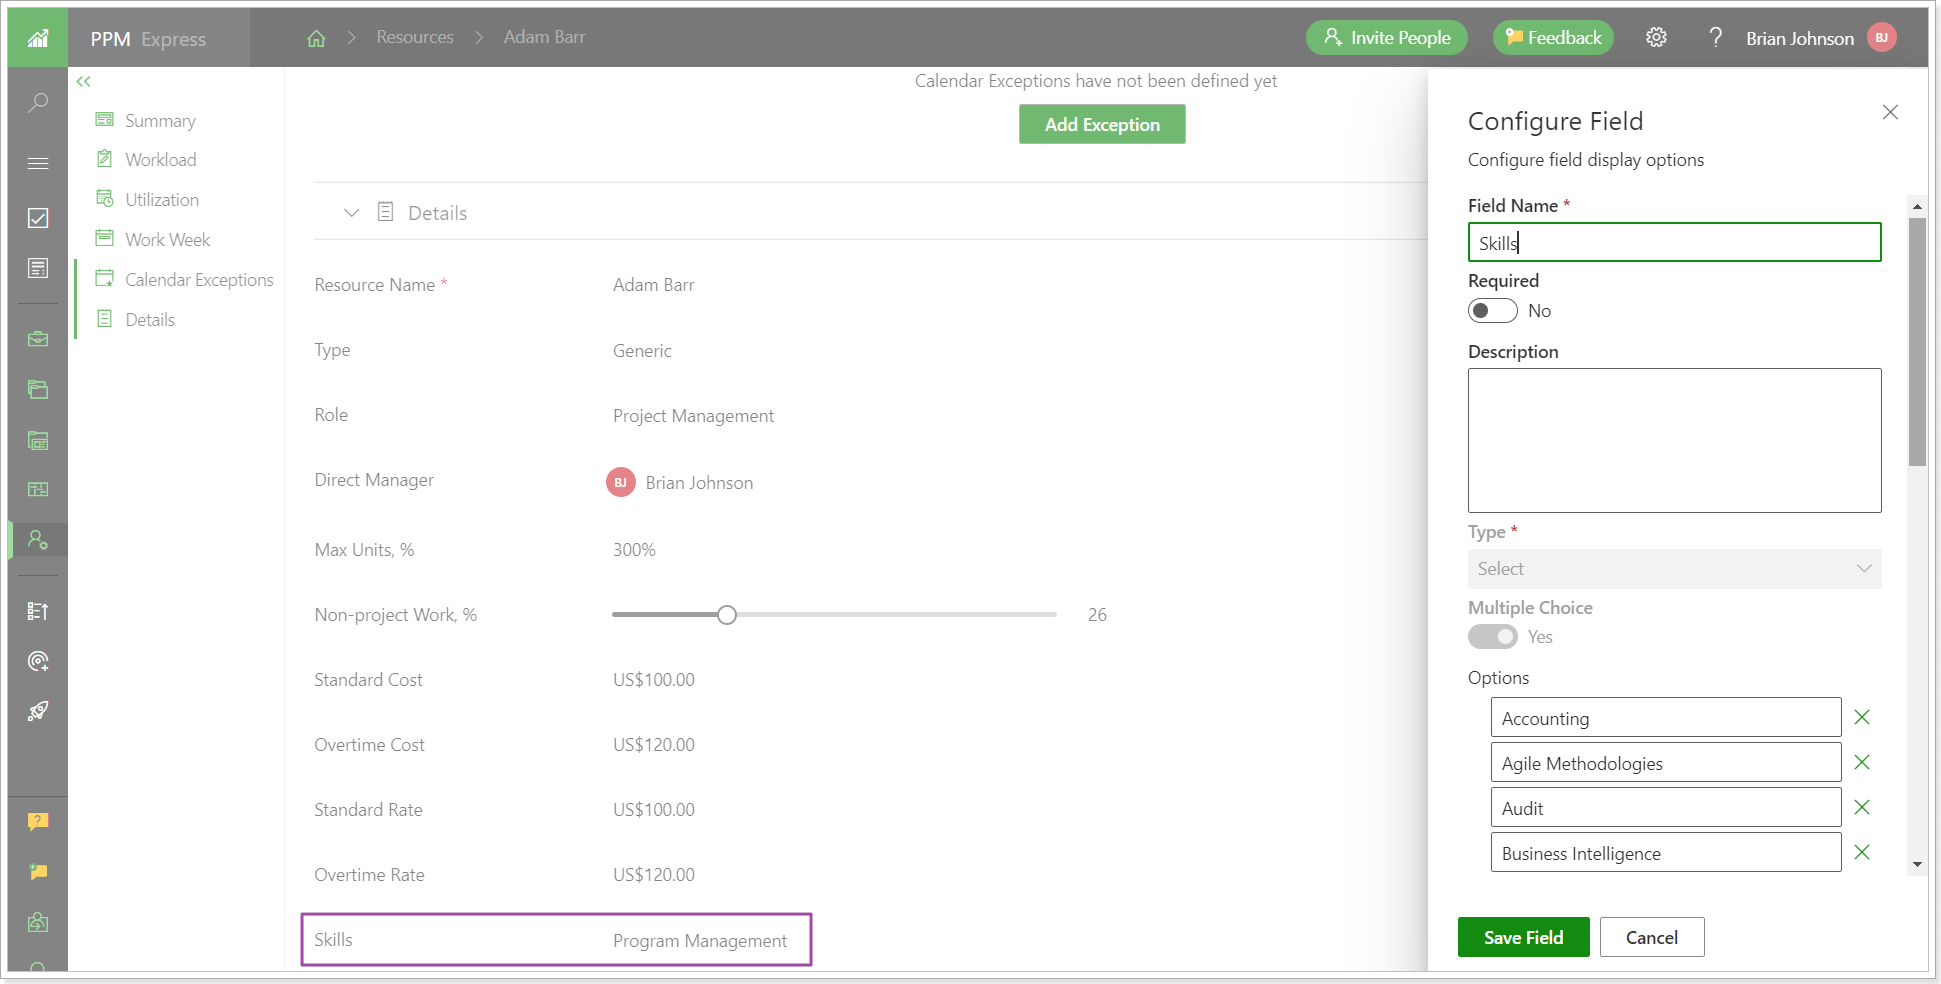
You can add skills to your resources and then search for resources by skills when assigning them to projects.
 2. The field ‘Parent Name’ was added to the field mapping of the Azure DevOps connection.
The 'Parent Name' field allows bringing the name of the parent elements in addition to the Parent ID to the task details.
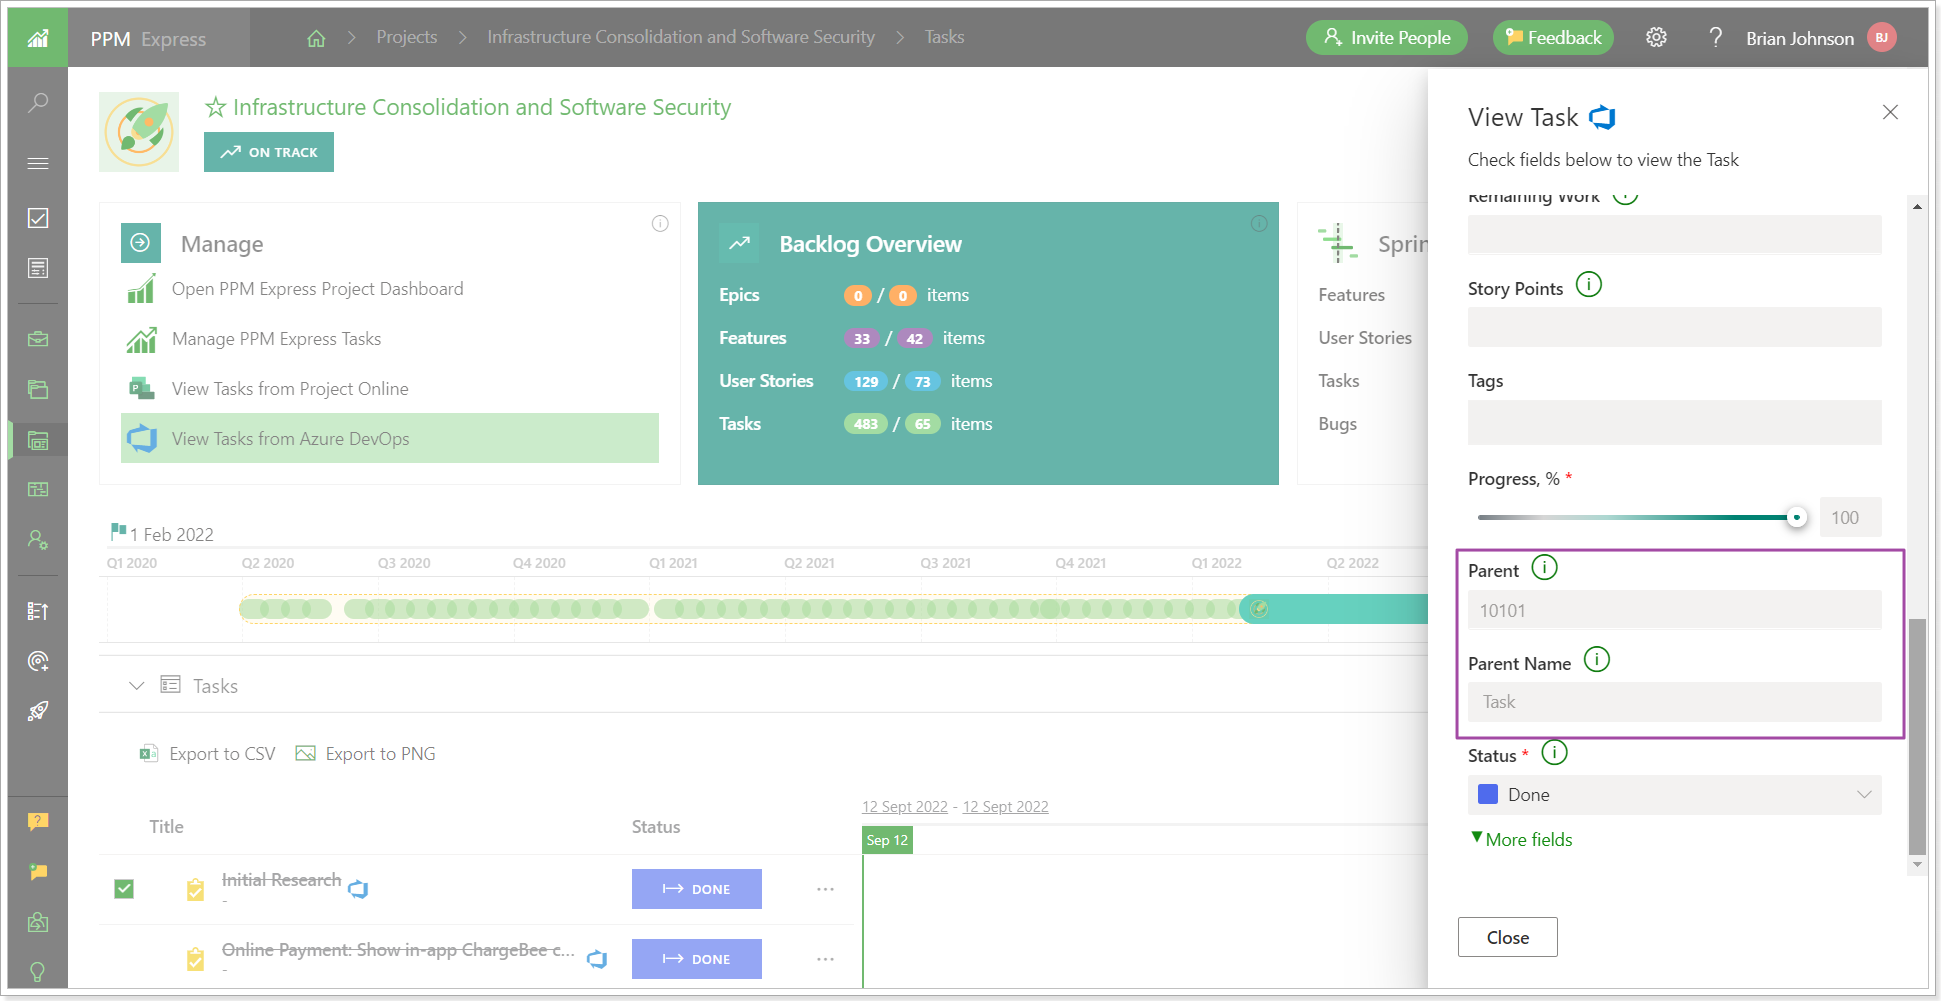
3. It is now possible to synchronize items marked as Milestones in Monday.com as milestones to the PPM Express Schedule section.
To bring items marked as milestones, the mapping should be done correctly while configuring the scenario: Due Date -> Timeline Finish, Start Date -> Timeline starts, Is Milestone -> Timeline isMilestone.
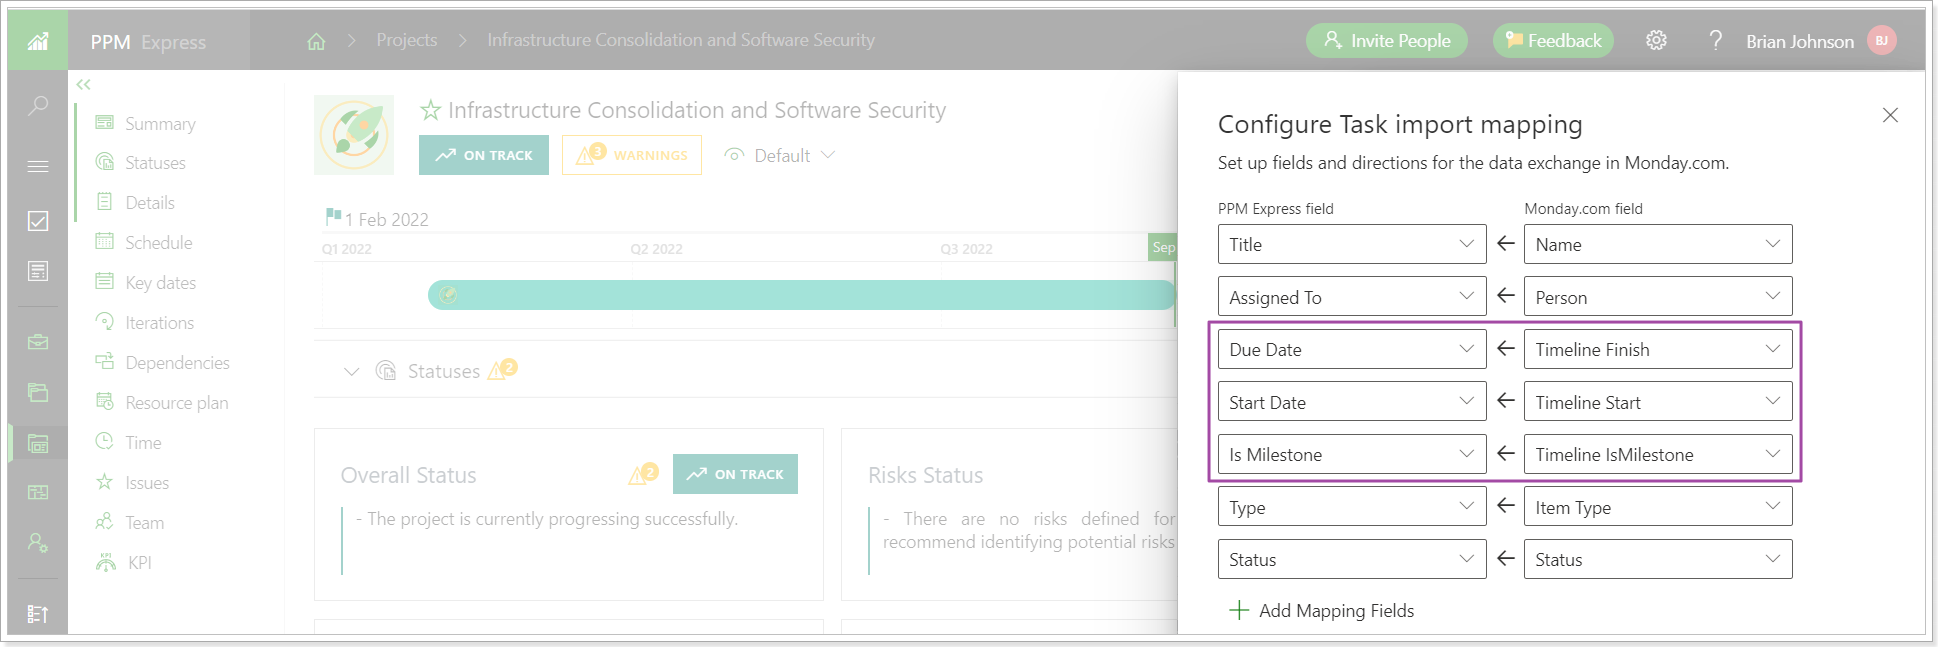
In this case, the tasks will be created and marked as 'is milestone' in the Schedule section and milestones will be created in the ‘Key Dates’ section of a Project when the synchronization is completed.
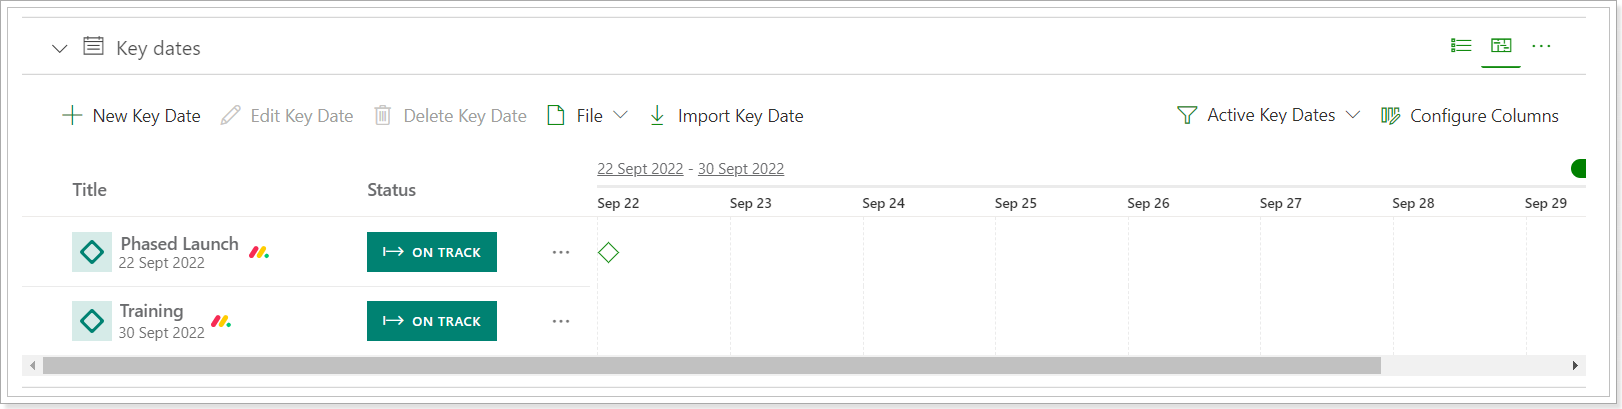
Release Notes 11.10.2 @ September 5, 2022
1. An option to define the “Non-project Work” for a resource was added on the Resource Dashboard page.
If a resource is engaged for some kind of non-project work, this can be defined in a specific field that was added to the Resource Dashboard Details section. In this case, the capacity for this resource will be recalculated accordingly on the projects.
2. It is now possible to define the Max Units for Resources as >100% to allow planning of work on a resource level as a team.
This may be useful for cases when in the project planning stage there is a need to assign generic resources for tasks. For example, you can set Max Units to 300% for Marketing generic resource. When it comes to the step of assigning users, you can set the required value for each resource out of the planned 300 % for a generic resource.
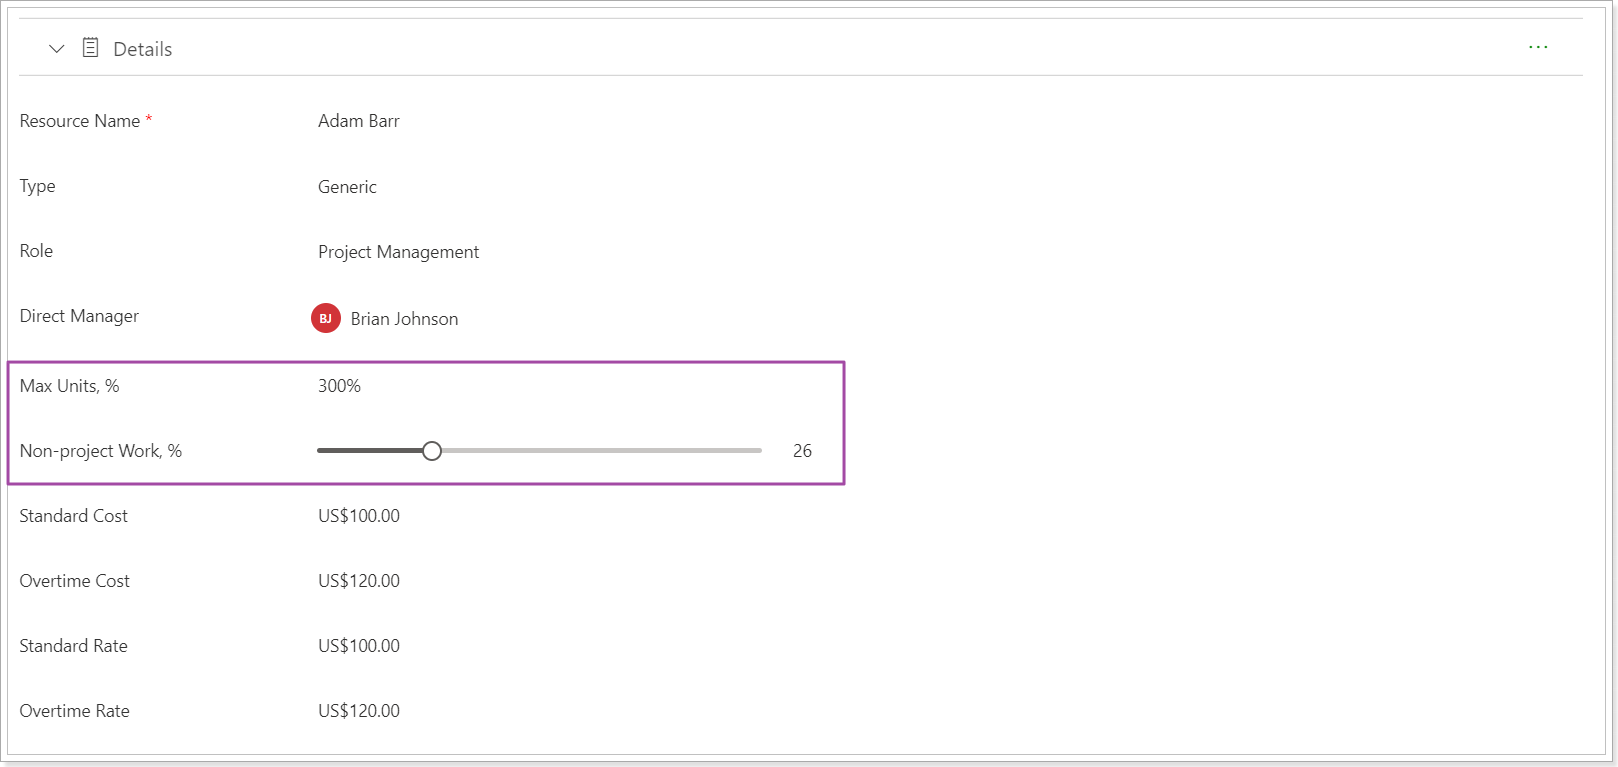
3. The wording for the views and layouts option was changed, and the word ‘Layout’ was added when the layout is selected in the ‘Default’ drop-down.
Before: The layout name was displayed when selected.
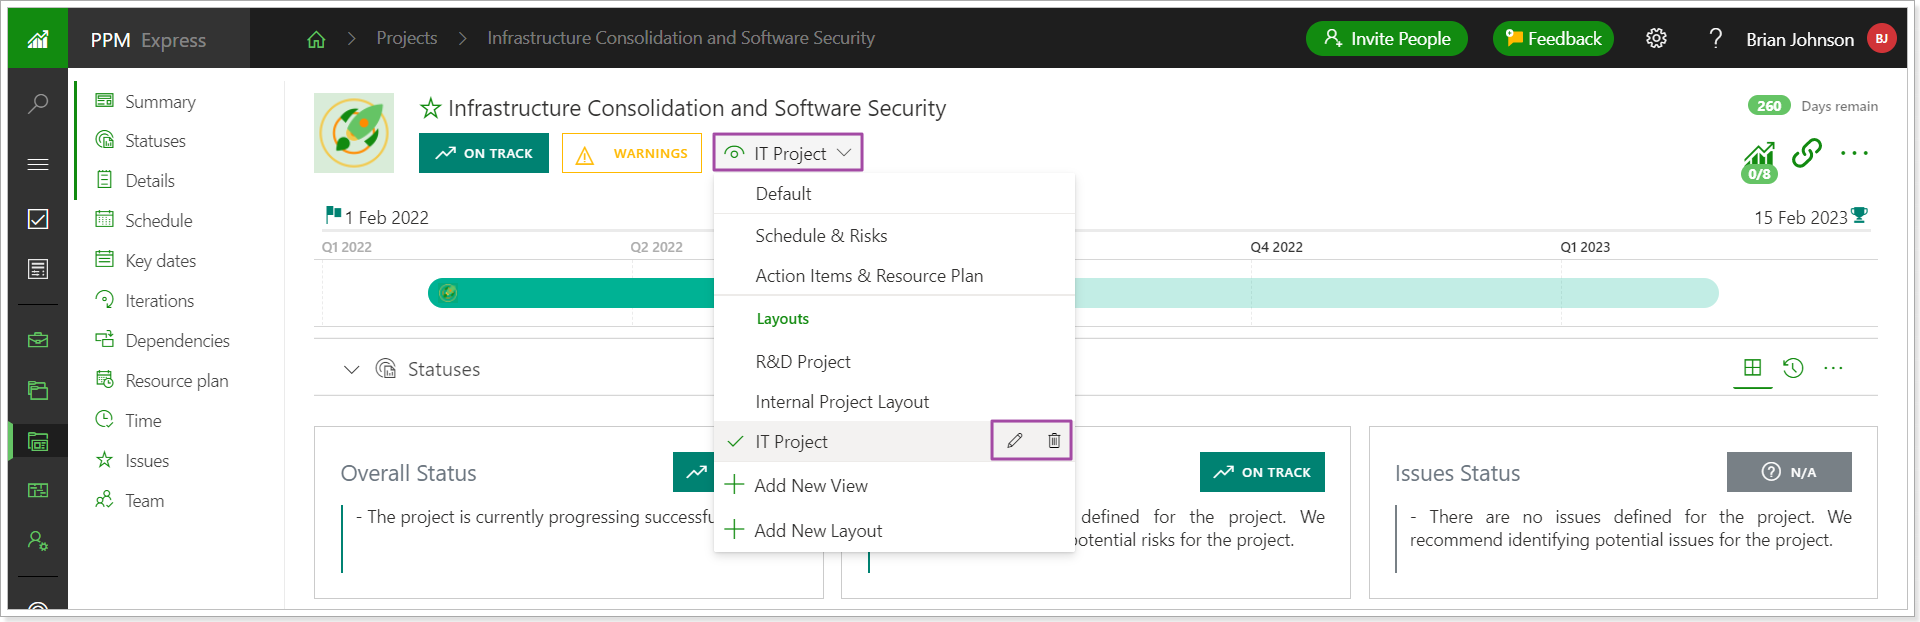
Now: The word 'Layout' and the layout name are displayed.

4. The tabs on the Configure Connection pane were renamed to Project Progress, External Items Mapping, and Project Mapping (for Monday.com, Jira, and Azure DevOps connections).
Before: The tabs were named Project, Progress, and Tasks.
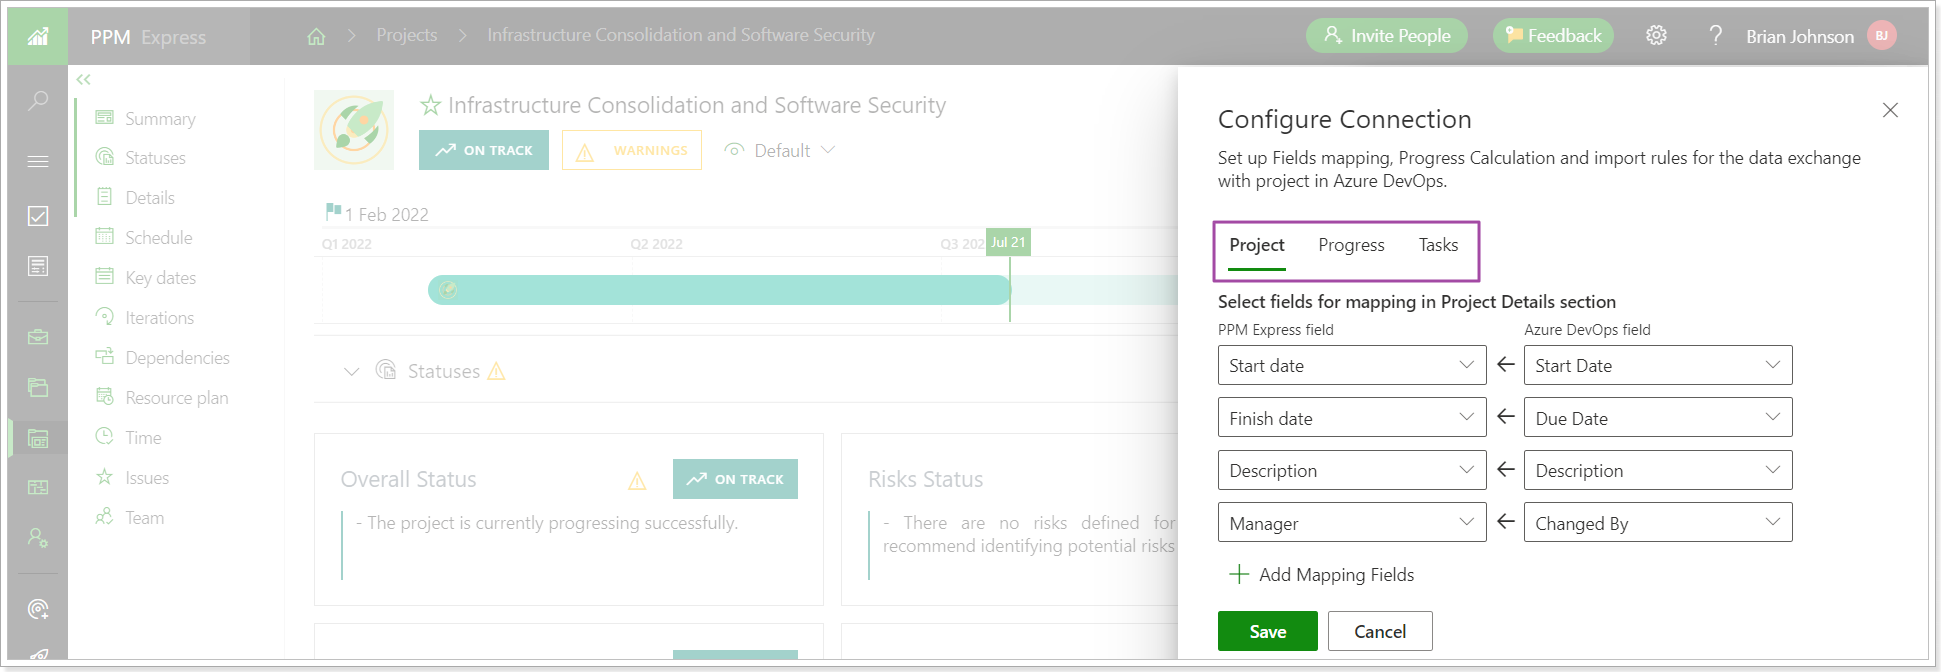
Now: The tabs are named Project Progress, External Items Mapping, and Project Mapping.
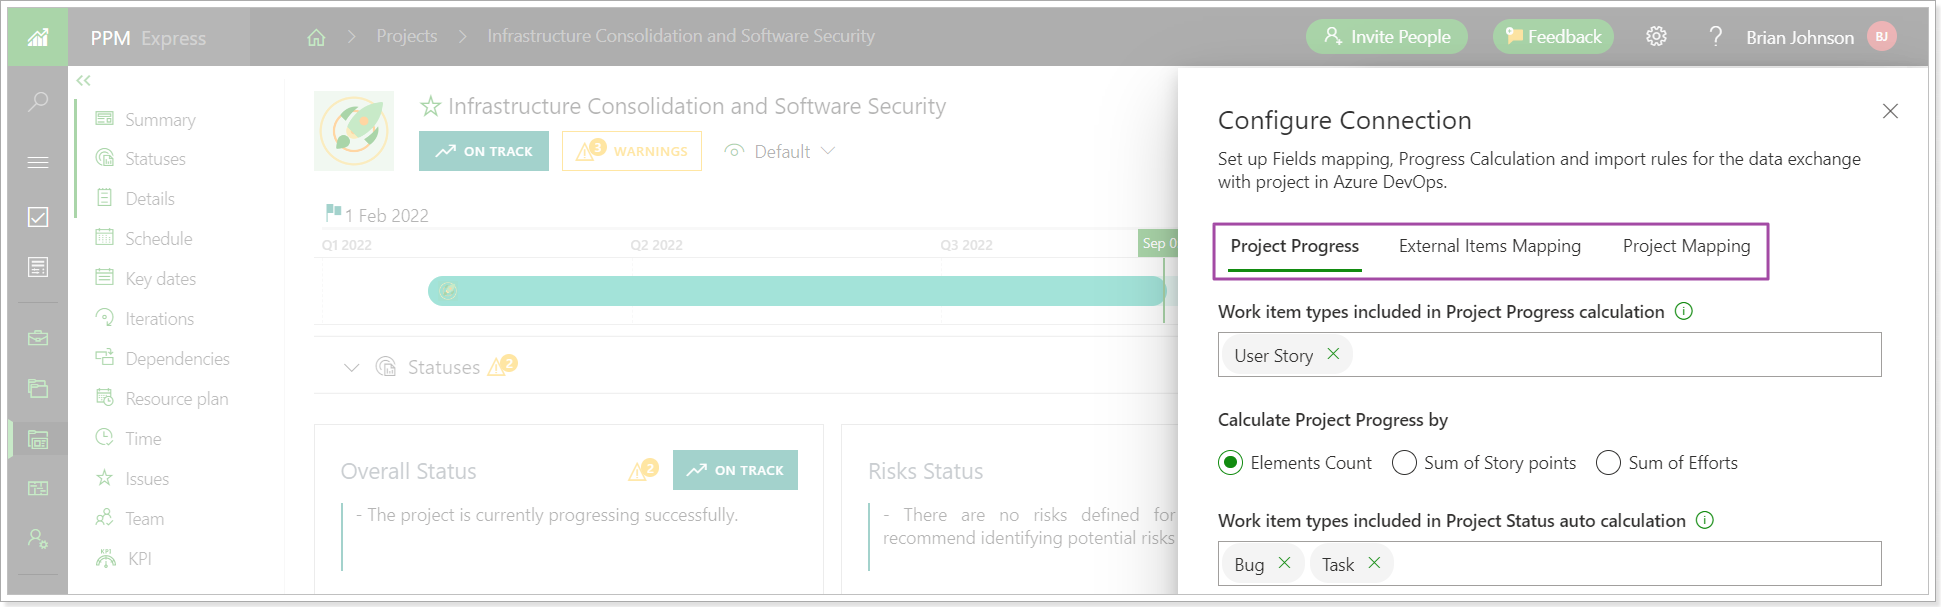
5. Import/Export of Ideas to/from .csv file option was added to PPM Express.

6. The values in the fields (both OOB and custom fields in Ideas and Projects) are now copied over when a project is created from an idea if the corresponding fields are completely matched by type and name.
Release Notes 11.9 @ August 31, 2022
1. It is now possible to select any Work Item type to be displayed in the Azure DevOps Iterations section.
Use the Configure Columns menu to add the required Work Item Types (default and/or custom) to the Iterations section.
Please note: It is possible to select only those Work Item Types that were selected when configuring the Azure DevOps connection (on the Tasks tab, which is used to set the Work Items that need to be synchronized from Azure DevOps).
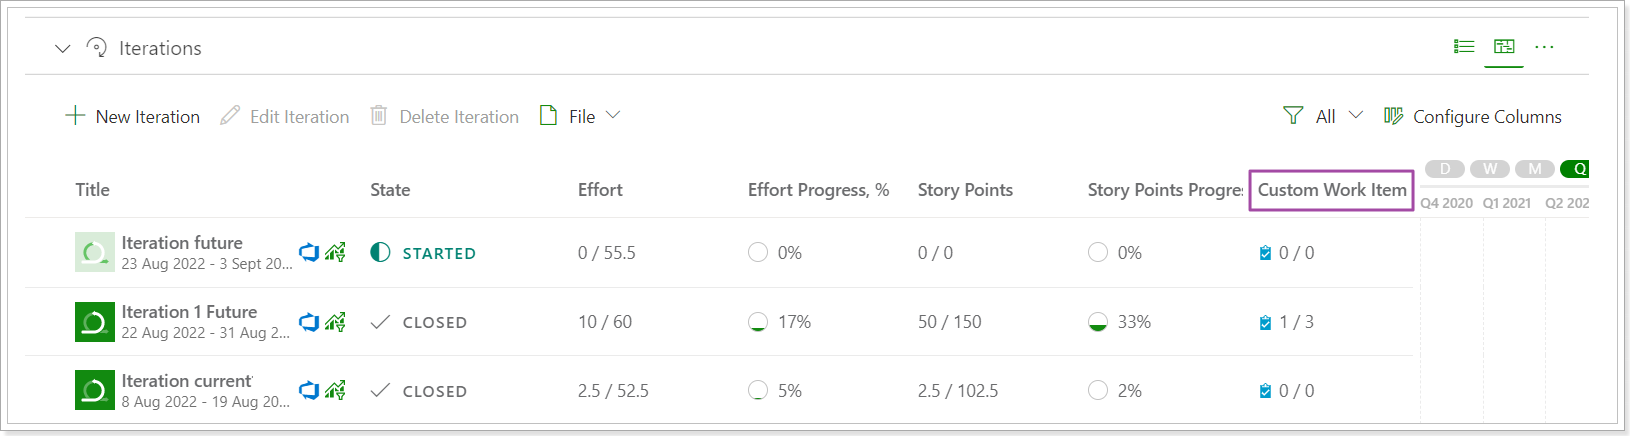
2. The following fields were added to the Iterations section for Jira and Azure DevOps: Effort, Effort Progress, Story Points, Story Points Progress.
Effort and Story Points - is the ratio of values from all completed items that are in this iteration to the total number of items.
Effort Progress and Story Points Progress - is the ratio of values from all completed items that are in this iteration to the total number of items in percentage.
For example, if the sum of all Story Points on items that belong to the Current iteration is 200, of which the sum of Story Points on items with the Completed state is 100, the Progress will be 50%.

Please note: The fields mapping for the Effort and Story Points should be configured for the values to appear in these fields (it is set by default, but if any changes, please make sure there is a mapping for these fields configured).
3. It is now possible to open the Azure DevOps task page from the Iterations project section filtering it by Iteration.
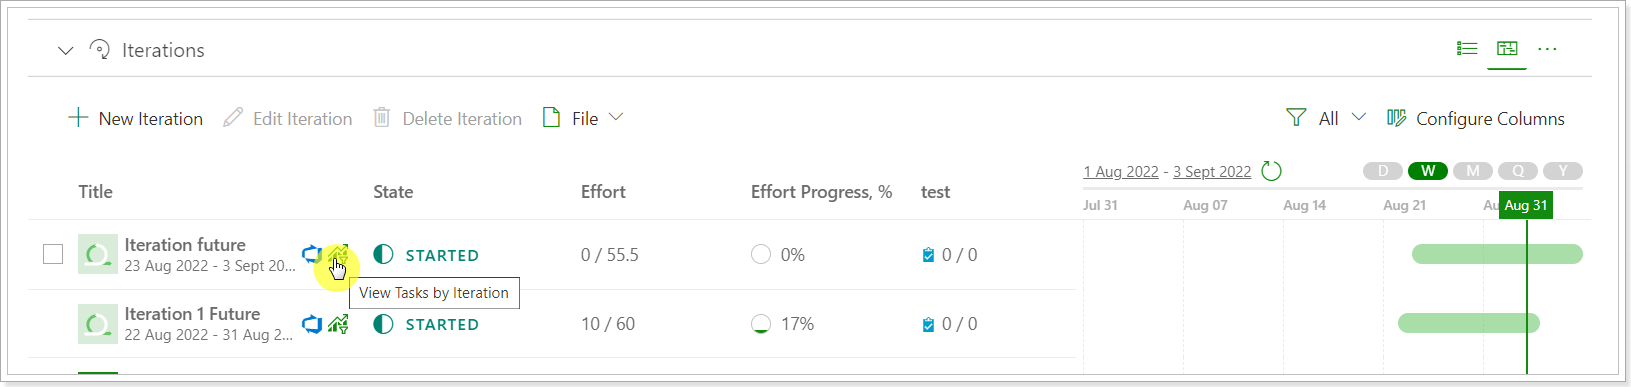
Release Notes 11.3 @ August 3, 2022
1. The 'KPI' section was added to Project Dashboard.
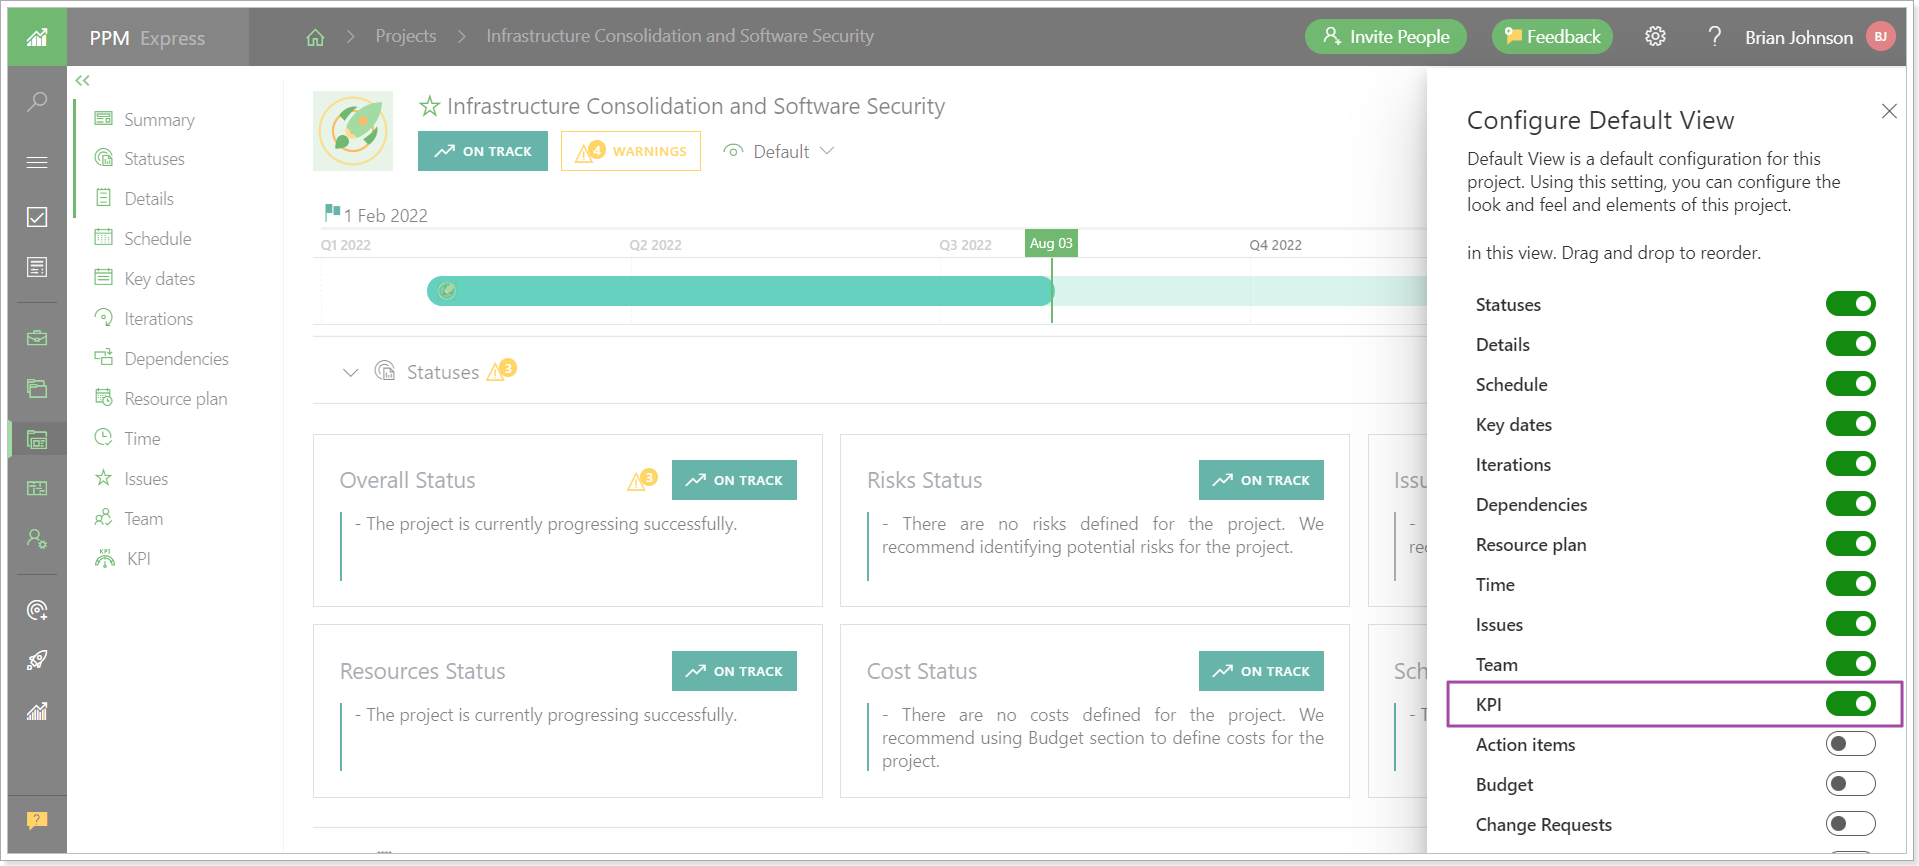
You can edit the KPI section, add and remove the fields you need to display in this section. It is an easy and visual way to monitor some metrics and details on the Project level.
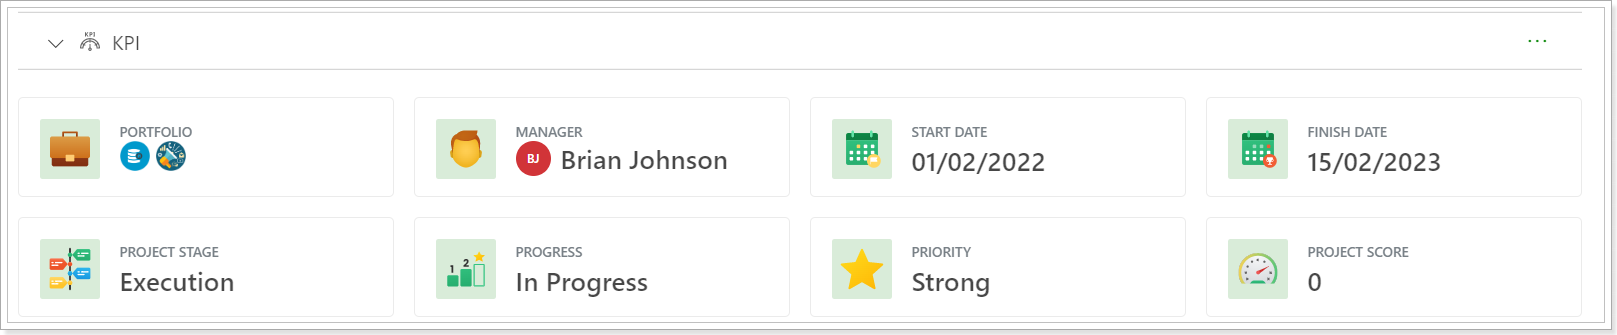
Also, it is possible to edit the KPI section in different ways for different views. For example, you can create a Resource Plan view and customize the KPI section to show only the fields that are important for the resource plan. If you create a Budget view, you can customize the KPI section to show the important fields for the budget, and add the budget section to this view only.
2. An ability to calculate Project Progress by Story Points and Effort was added to the Azure DevOps connection.
Before: The progress for the Azure DevOps connection was calculated by the number of work items (general number and the number of completed ones) added on the Progress tab while configuring the connection.
Now: There are three options available for selection:
- Elements count
- Sum of Story Points
- Sum of Efforts
Please note: It is required to add field mapping for Story Points filed and Effort field to use them in Project Progress calculation.
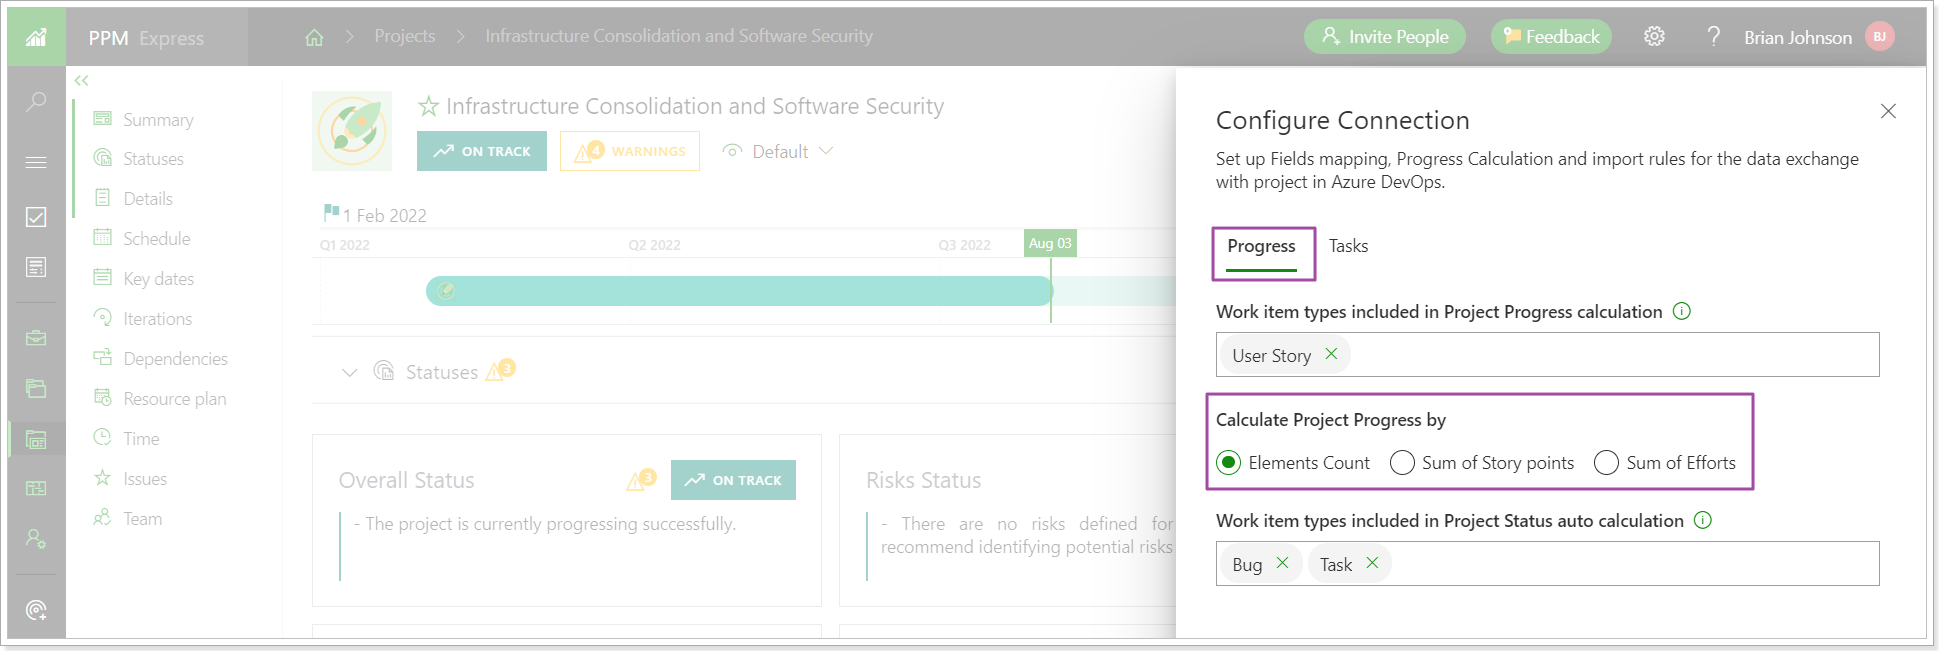
3. The way how groups and group counters are displayed based on filter results was improved for the My Assignments and My Space pages.
Before: When the filter was applied to the My Assignments or My Space pages and there were no items to display according to this filter, the group names and the overall number of items within each group were still shown.
Also, if there were any items to show according to the filter, they were displayed as a list, and the roup names and the overall number of items within each group were still shown.
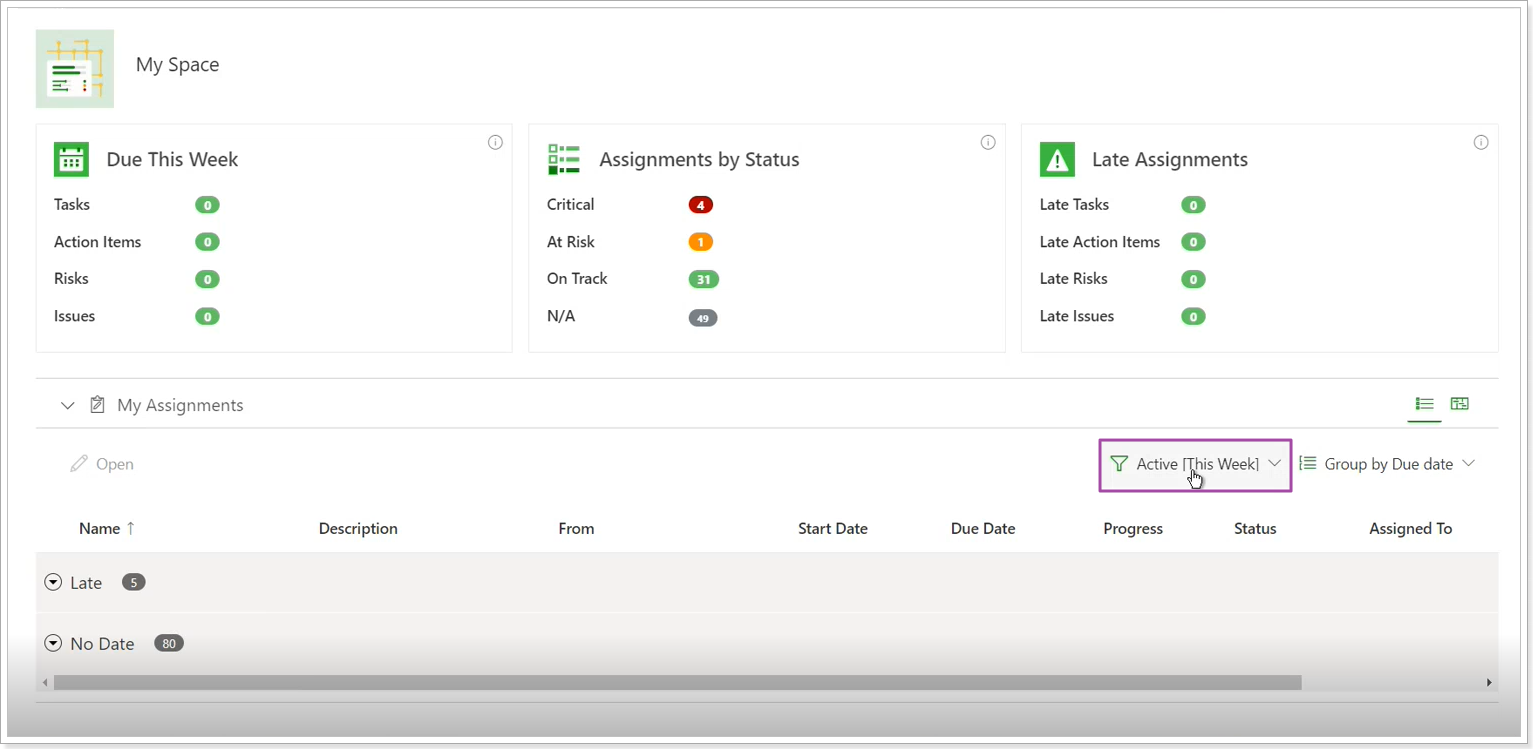
Now: If there are no items to display according to the filter selected, the 'Results not found' message will appear.
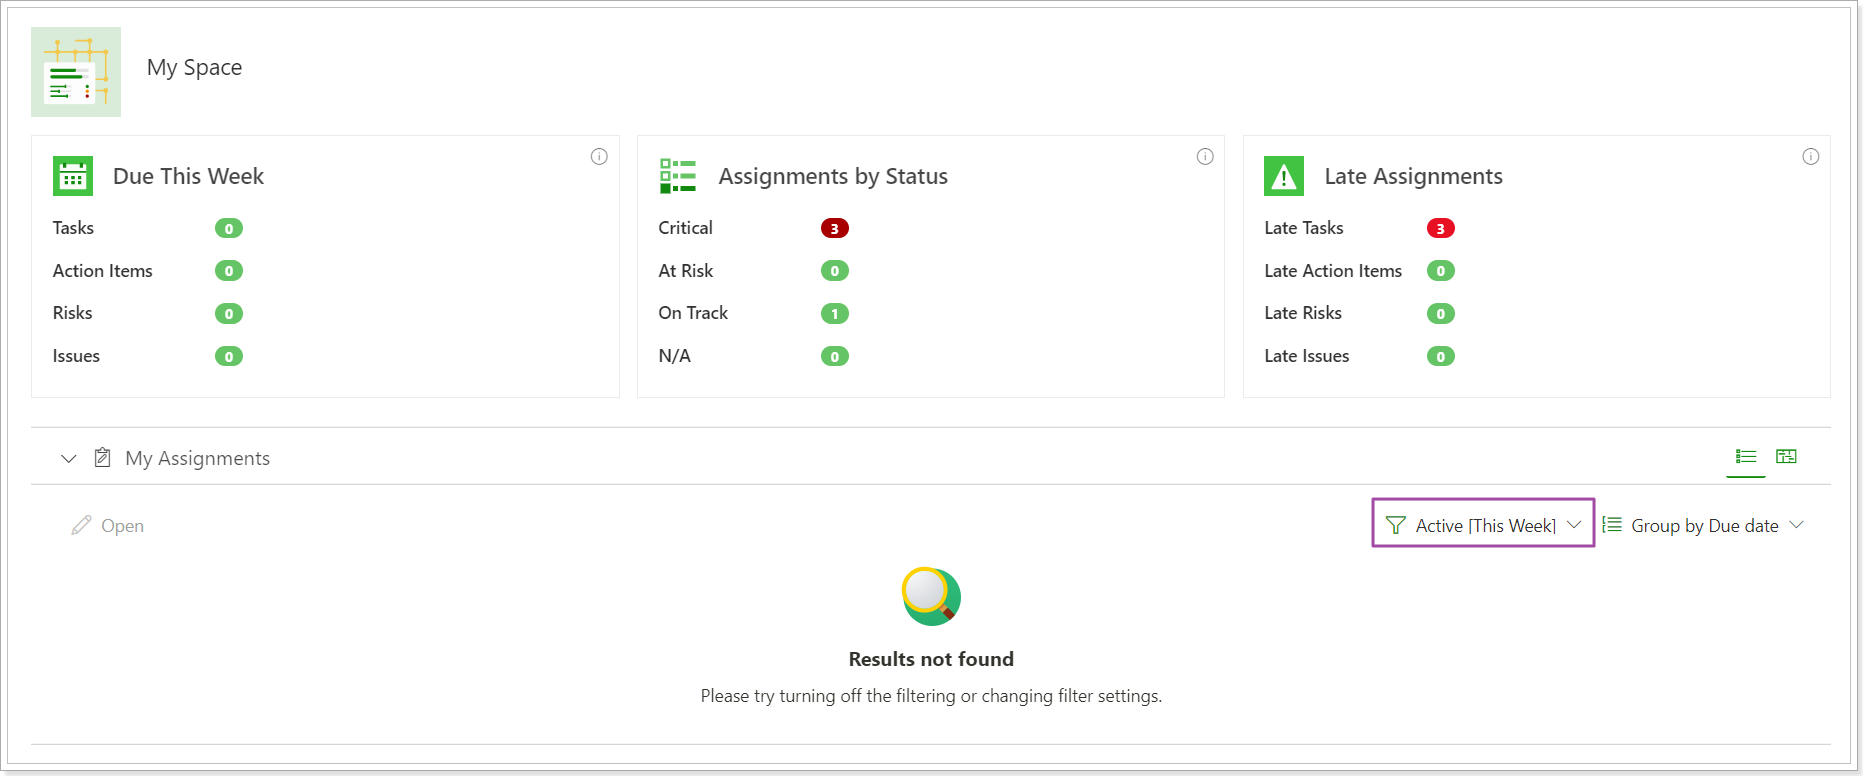
Also, if there are any items to show for the selected filter, the number of the items on the list only will be displayed next to the group name.
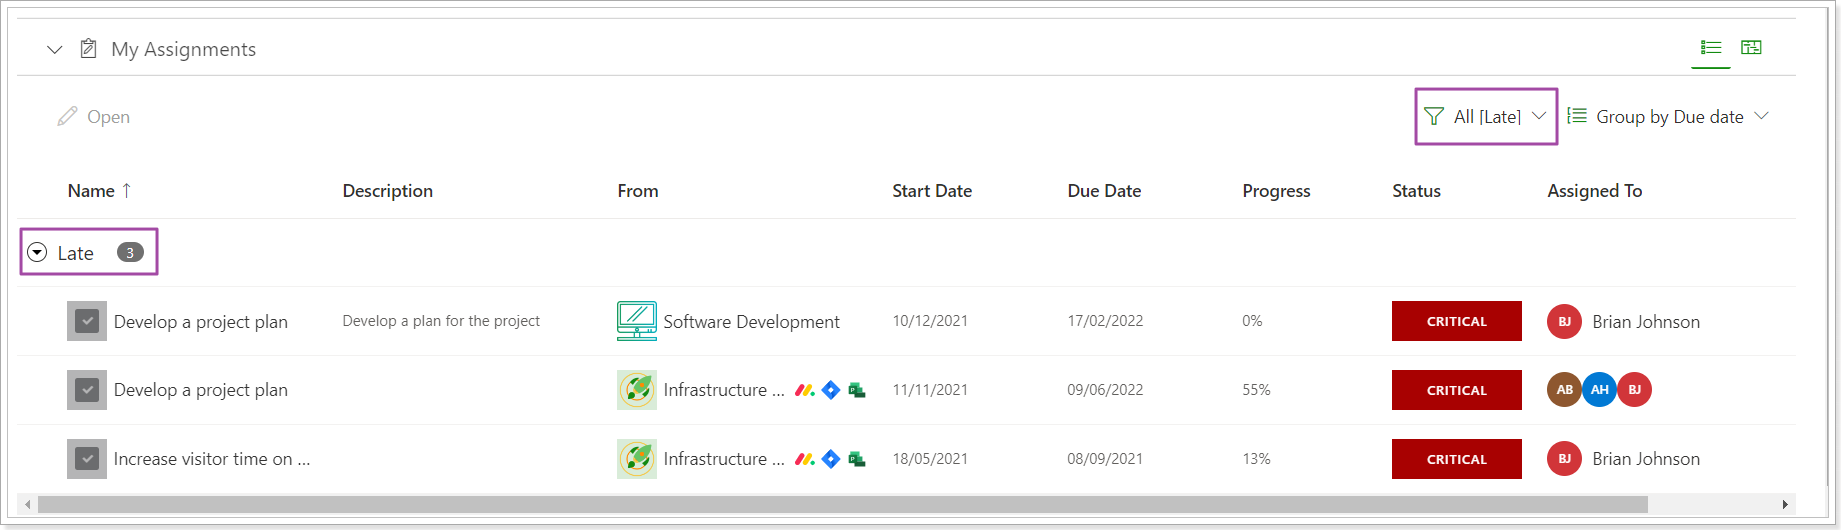
Please note: The 'Results not found' message was added to all pages and sections in case the filter was applied and there are no results to show.
Release Notes 11.2 @ July 27, 2022
1. New functionality was added to the Monday.com connection:
- A PPM Express program can be now linked to Monday.com.
- Projects can be now imported from Monday.com to PPM Express.
- Resources can be now imported from Monday.com to PPM Express.
2. An ability to quickly view resource assignments for a certain period of time from the Resource Plan project section was added.
It is now possible to select a certain period of time and review the resource assignments from the Resource Plan project section for the selected dates. For this purpose, select the required time frame, navigate to the resource in question and click on the View Assignments button.
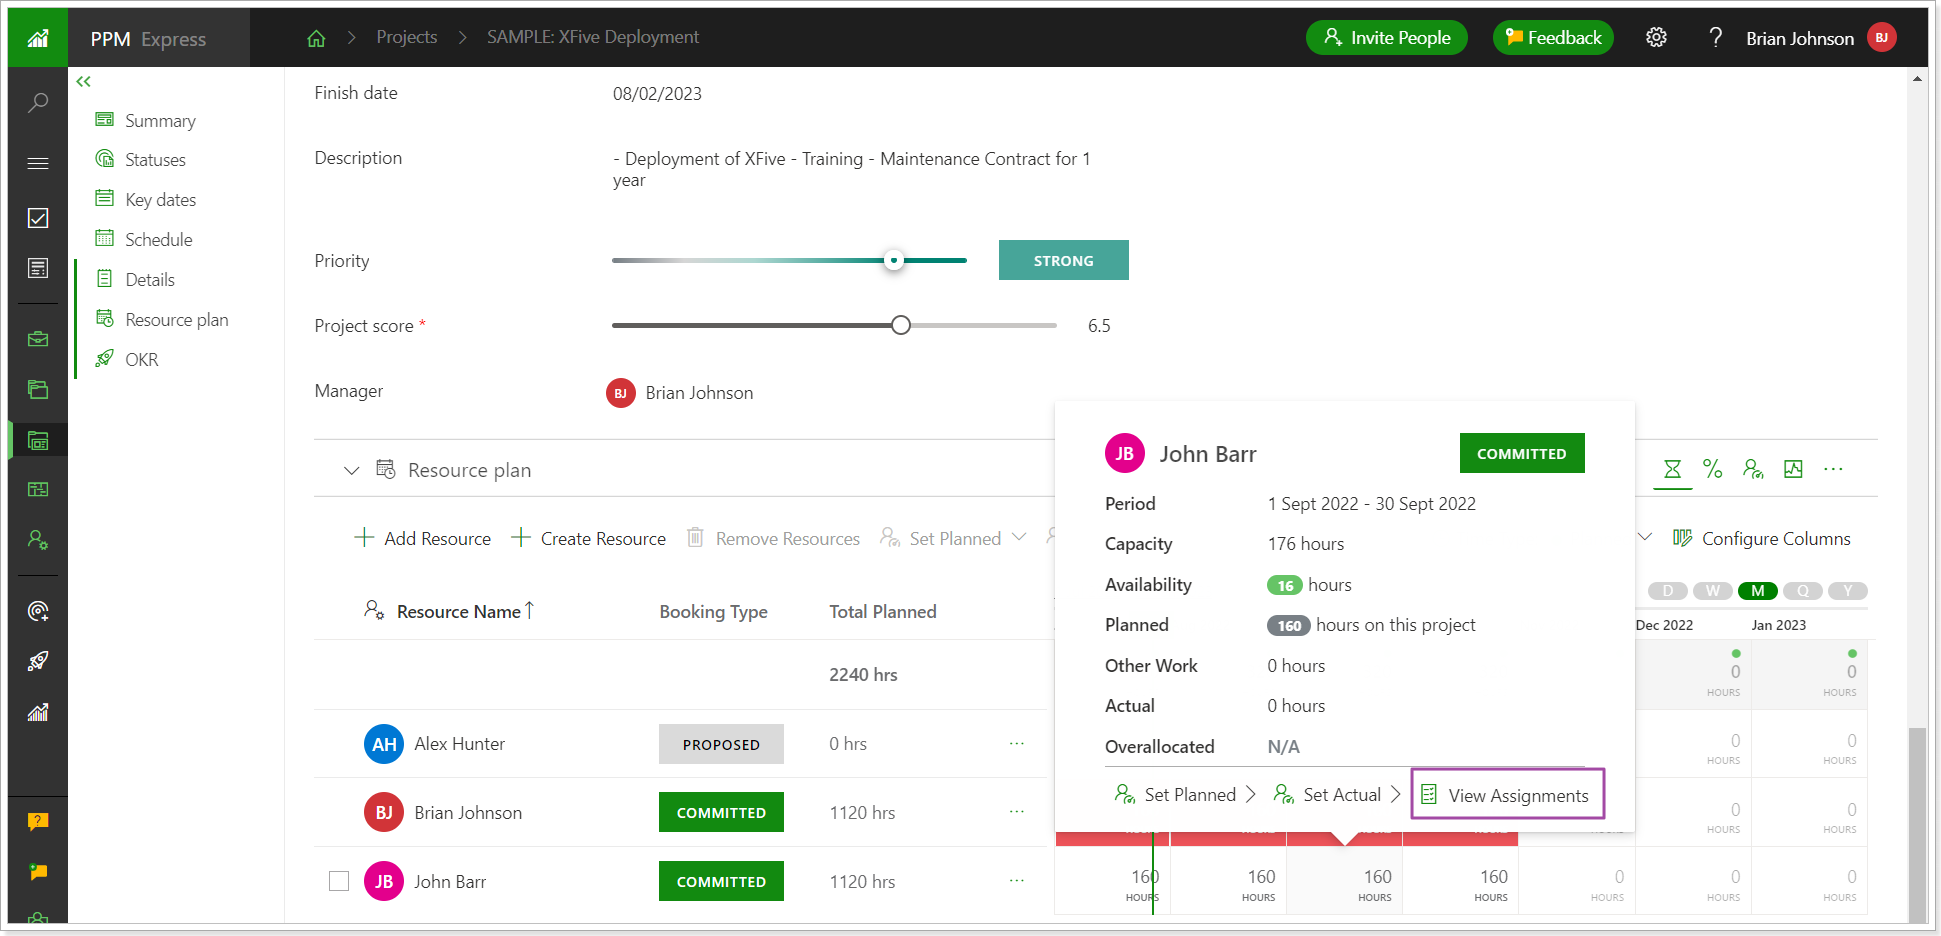
The resource page will be opened and the workload for the selected period will be available in the Assignments section.
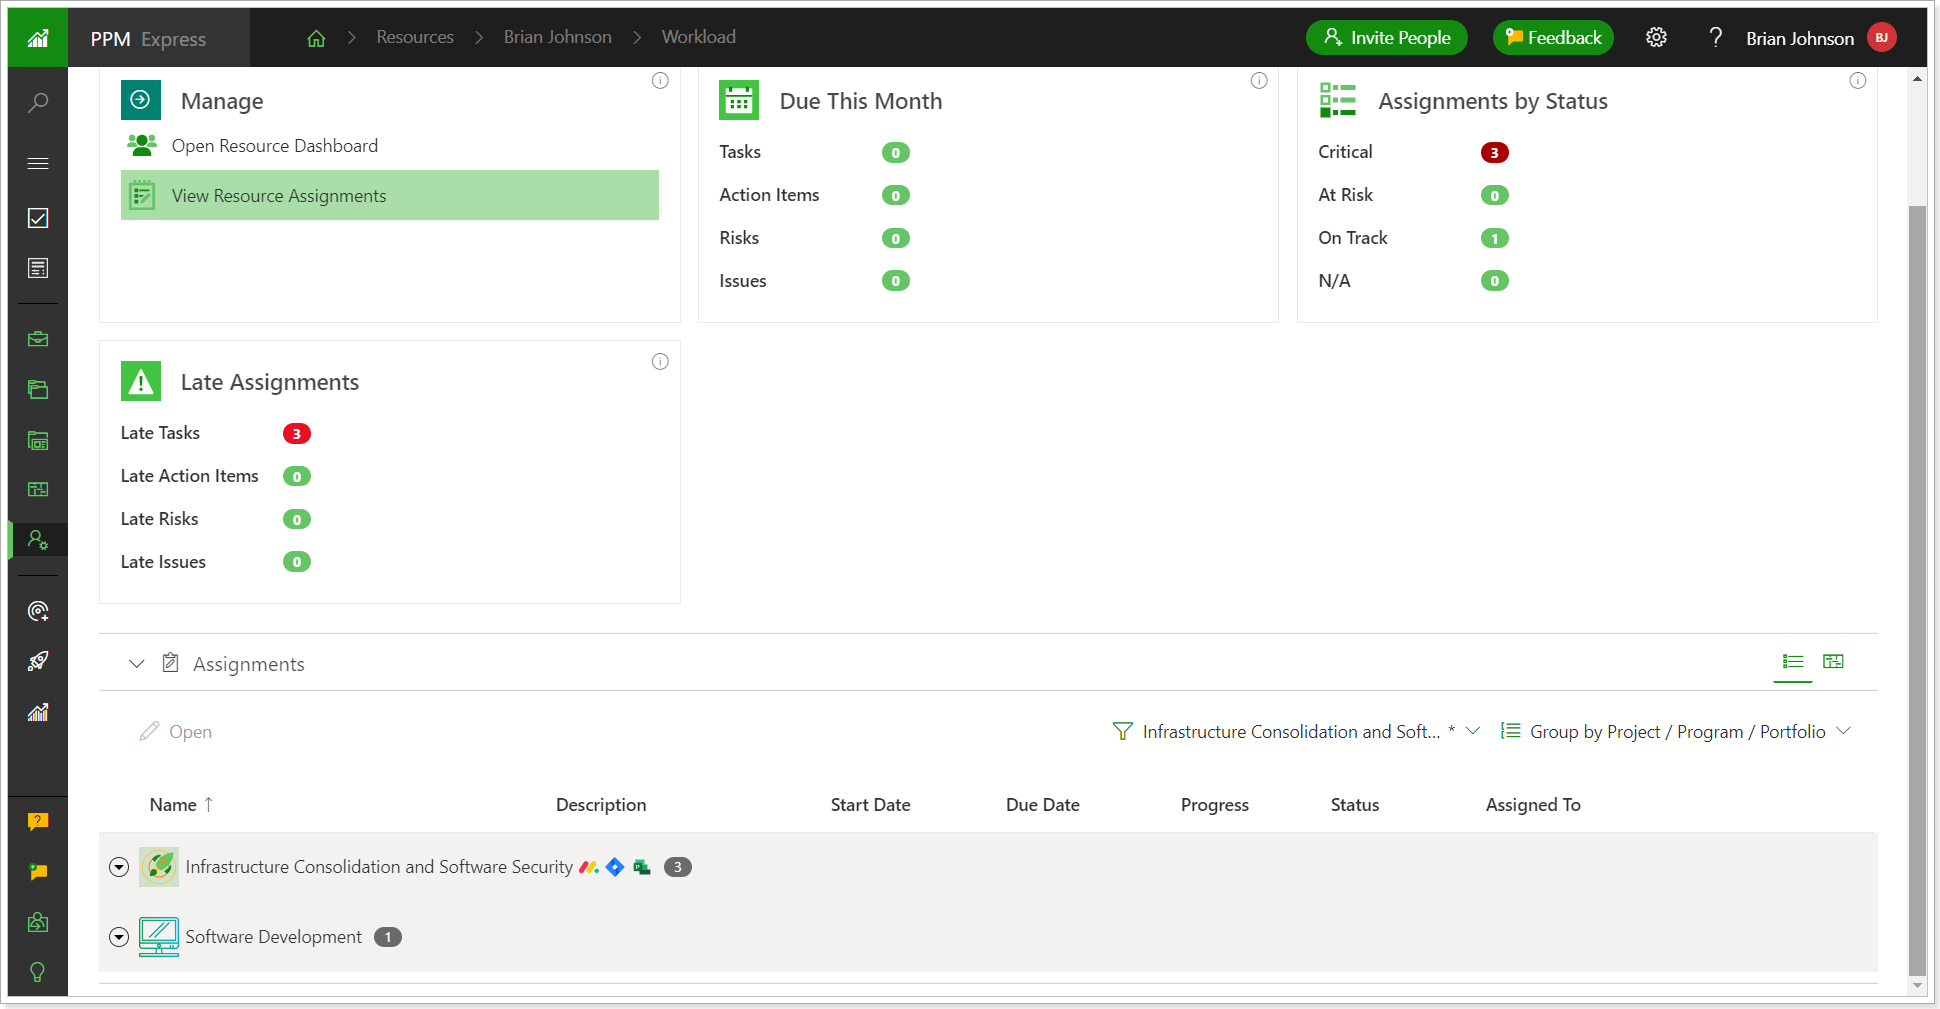
Release Notes 10.28 @ July 18, 2022
An 'Email' option was added to the sign-up and log-in page.
A new 'Email' option allows users to sign up for the PPM Express application and create a PPM Express tenant using any email provider account (besides Office 365 and Google).
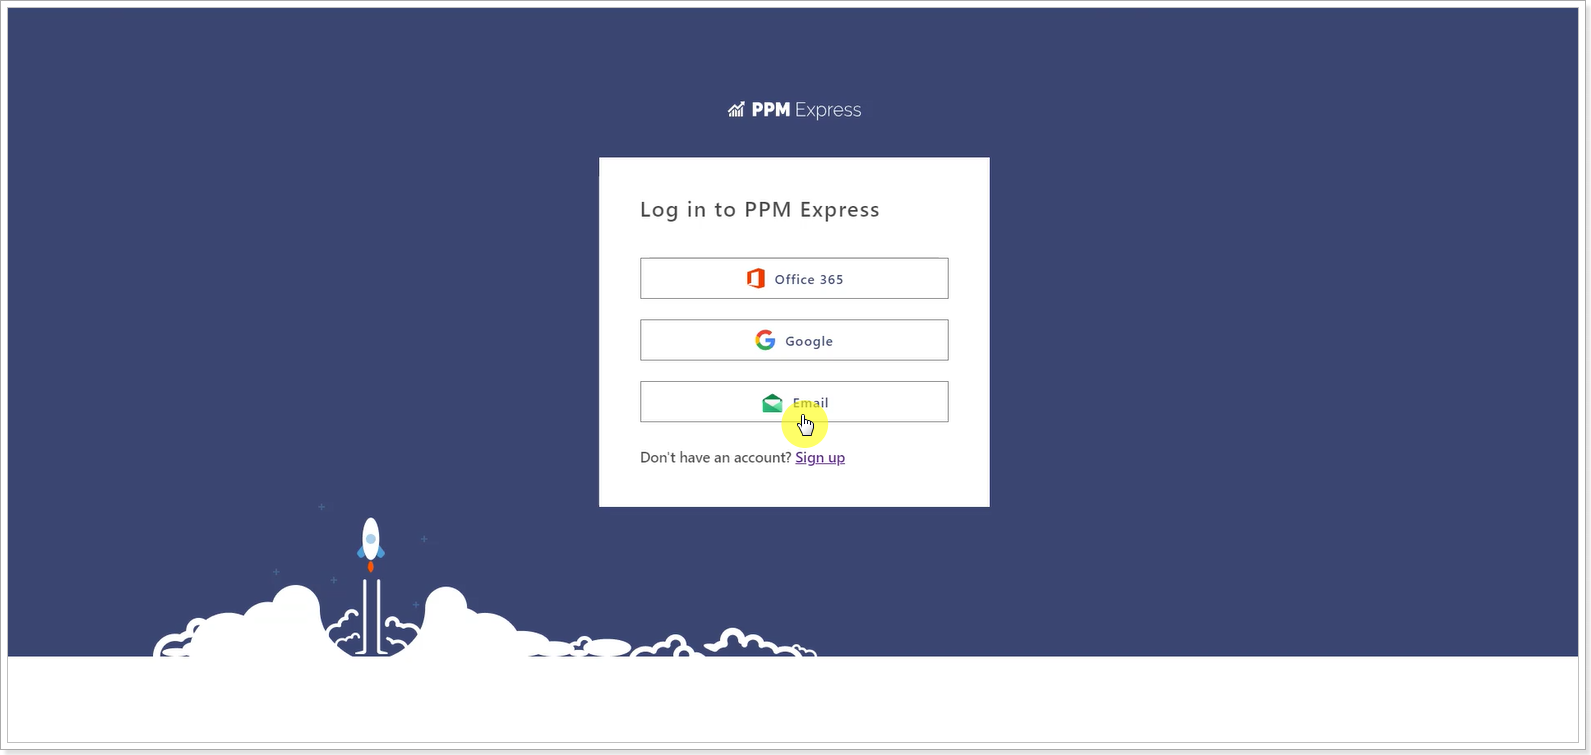
Users can sign up for PPM Express by providing their email, verifying it, and creating a password.
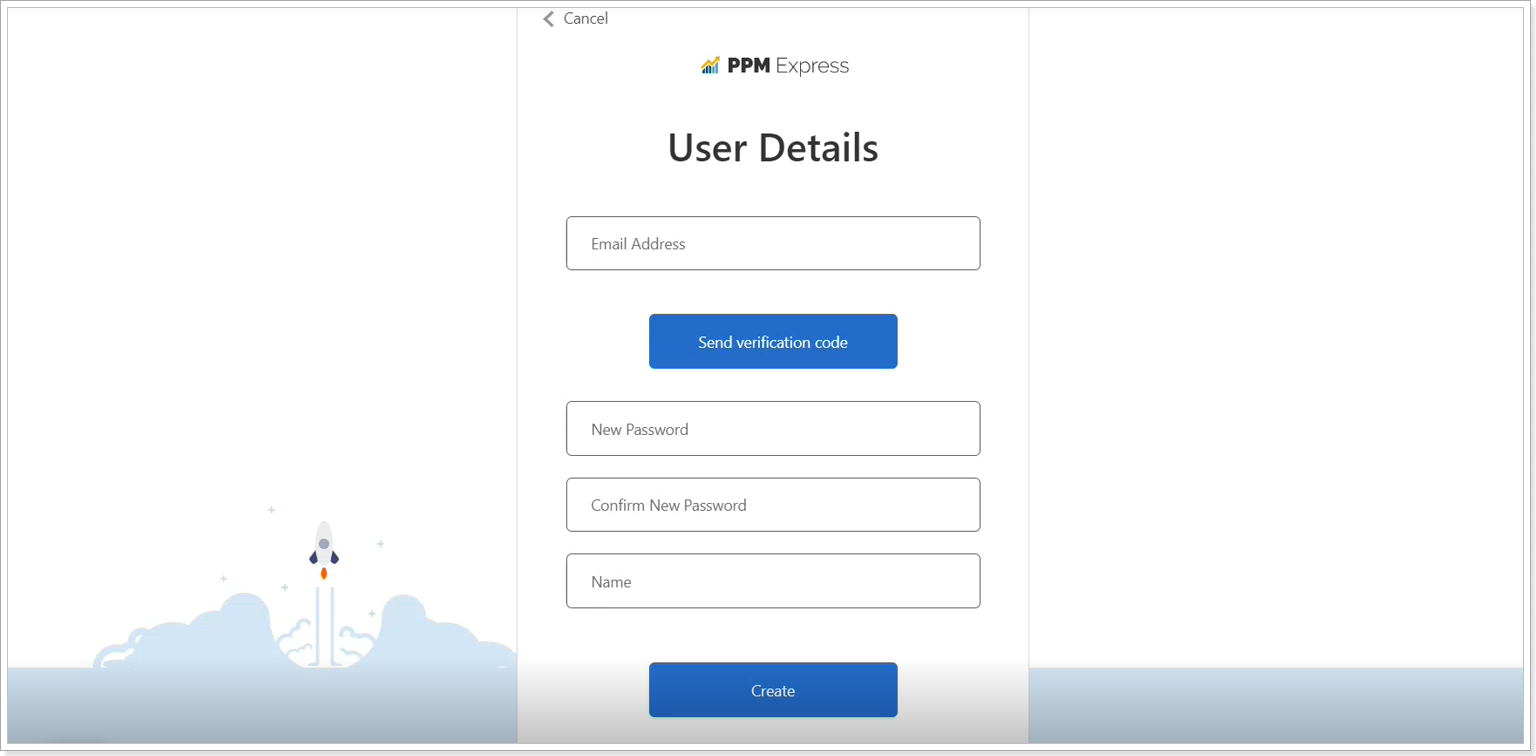
After this, users get to the regular PPM Express registration page where they can provide the details and select the PPM Express plan.
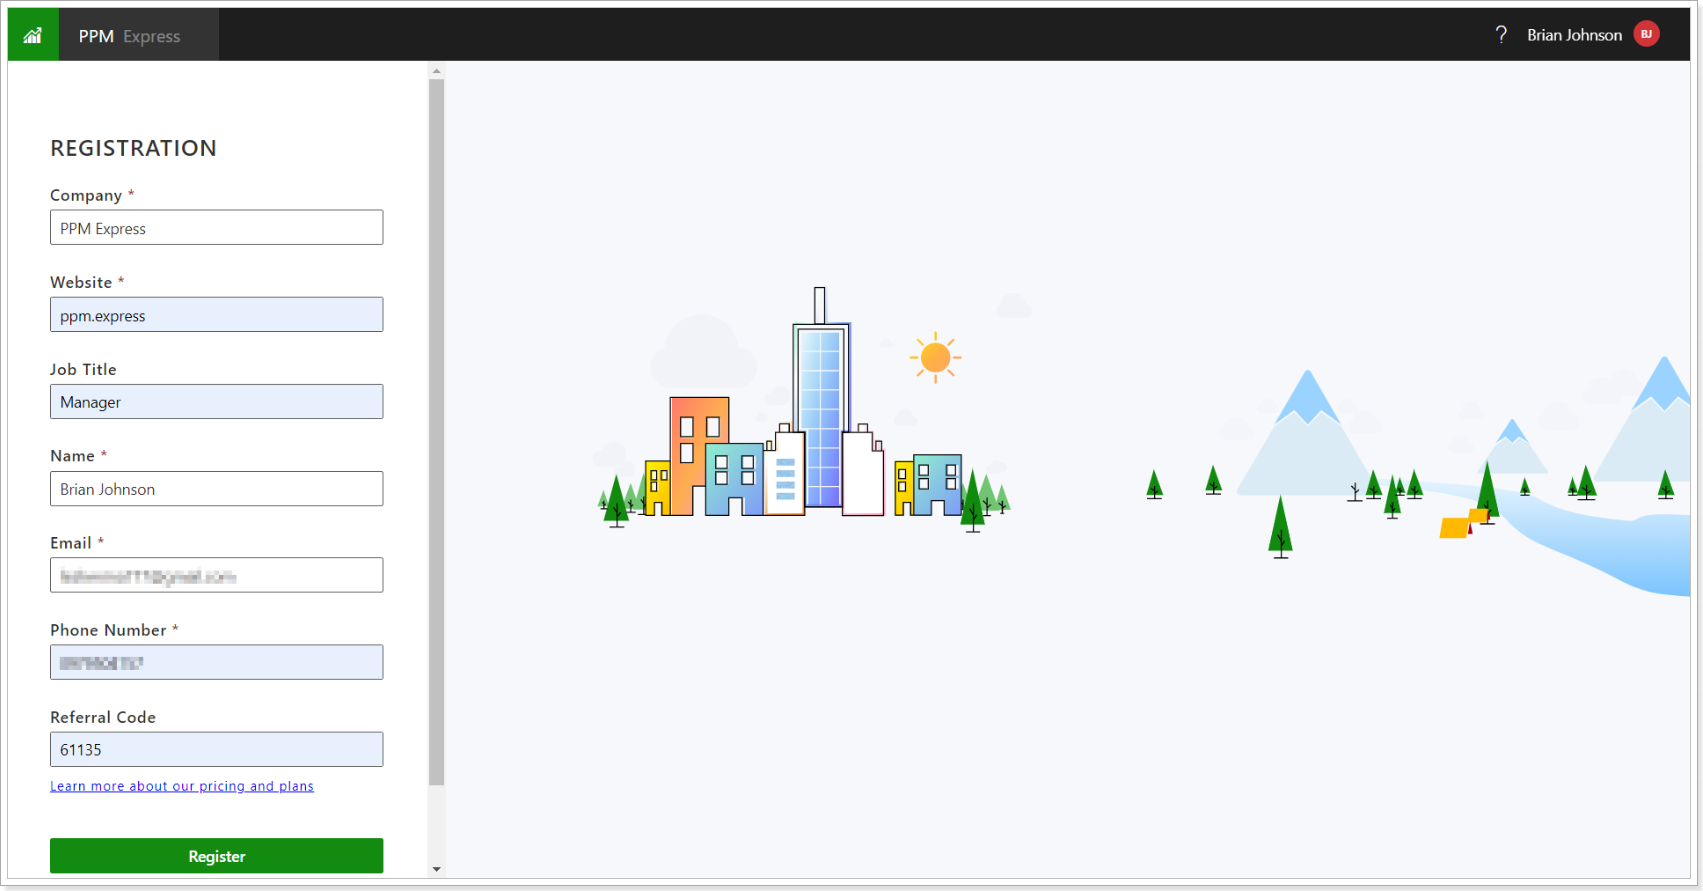
When the tenant is created, the PPM Express administrator can invite other users by email. Users can join this PPM Express tenant by the invitation link using any email account (not necessarily the one where they received the invitation).
Release Notes 10.27 @ July 11, 2022
The Roadmap dashboard was redesigned for easier navigation, layouts and views were added to this page.
Before: There were two pages on the Roadmap dashboard: Roadmap and Details. The KPI section was available on the Details page. There were no views and layouts on the Roadmap dashboard.
Now: The Roadmap page now consists of one page. Layouts and views are added to the Roadmap dashboard. There are three default views that you can switch between to see the required information: Roadmap, Details, and Roadmap with KPI.
These views are editable, you can add fields to these views as required. However, you cannot delete these three default views.
Also, you can create new custom views and layouts as needed. It is also possible to share the Roadmaps with other users by a certain view.
To create and manage views and layouts users should have Manage Configuration permission.
.png)
Release Notes 10.25 @ June 16, 2022
The 'KPI' section was added to Roadmaps Page.
This section allows organizations to quickly review all the updates for the information from the Details section including our rolled-up calculated fields such as Estimated Effort, Estimates Cost, Story Points, etc. It is an easy and visual way to monitor some metrics and details on the Roadmap level.
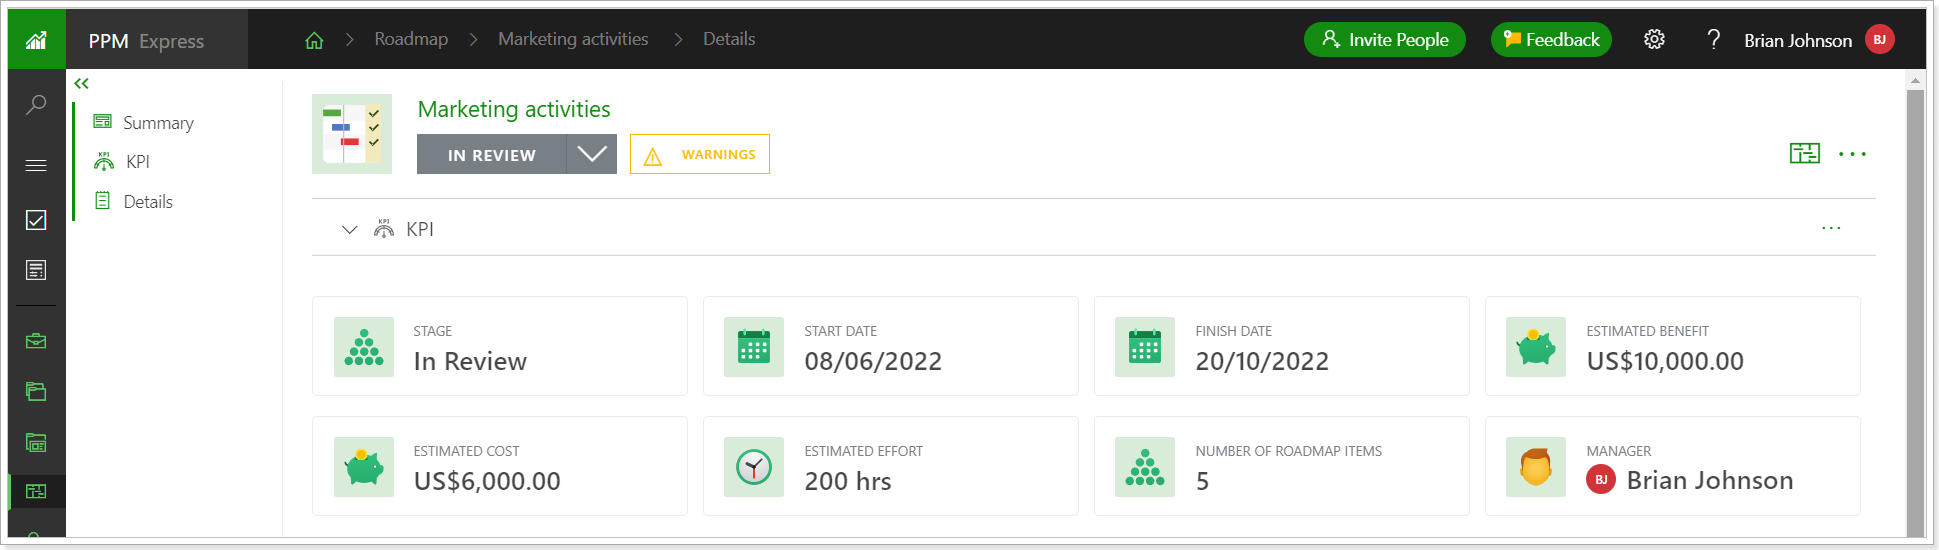
You can change the information displayed in the KPI section by clicking on the ellipsis button and selecting the fields you need from the list.
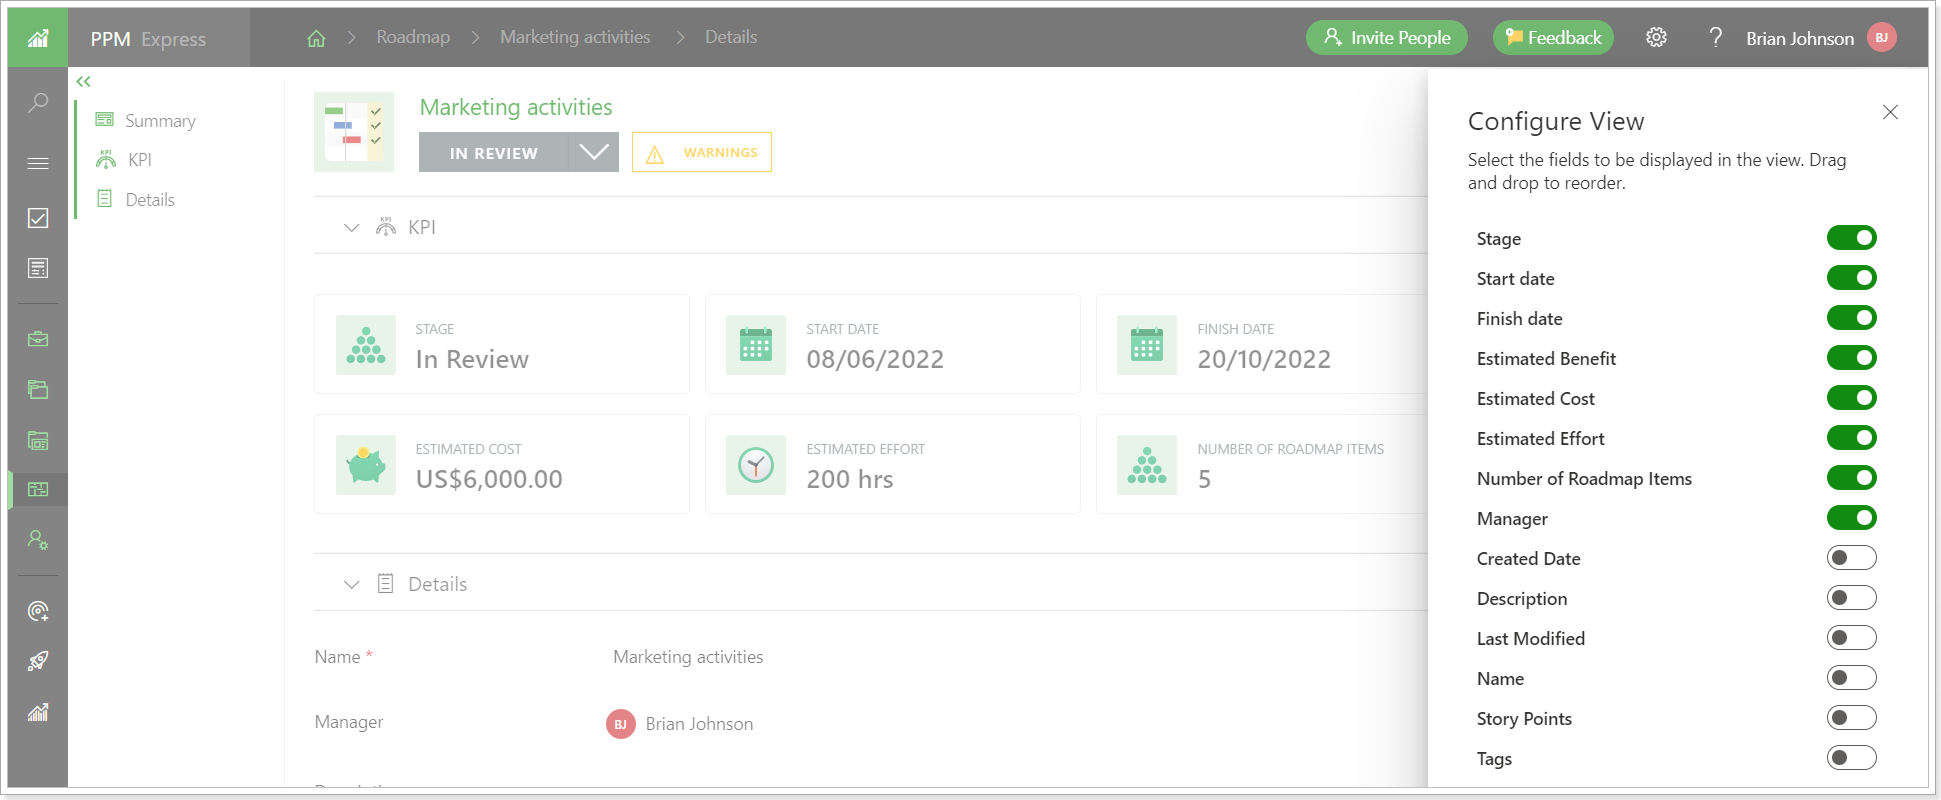
Please note that the roadmap sections can be configured by users with 'Manage Configuration' permission only.
In our next releases, we plan to add the KPI section to the timeline view as well.
Release Notes 10.22 @ May 31, 2022
1. Redesign for layouts and views.
In this release, the design for layouts and views will be changed for easier navigation. The menus for managing layouts and views will be separated. The functionality of views and layouts as well as the permission rules will not be changed. Also, the layouts you have already created will be preserved.
Let’s recall a few use cases where you can use layouts and views in your project, portfolio, etc.
As there are different project types and approaches for project management, you might need a different set of project sections to manage your project. The set of project sections may differ for an IT project and an internal project, for example. PPM Express allows creating a separate layout for each project type.
Users who create and manage configuration (Manage configuration permission) on the tenant level can create several layouts with a certain set of project sections, and columns for each project type using the drop-down on the left.
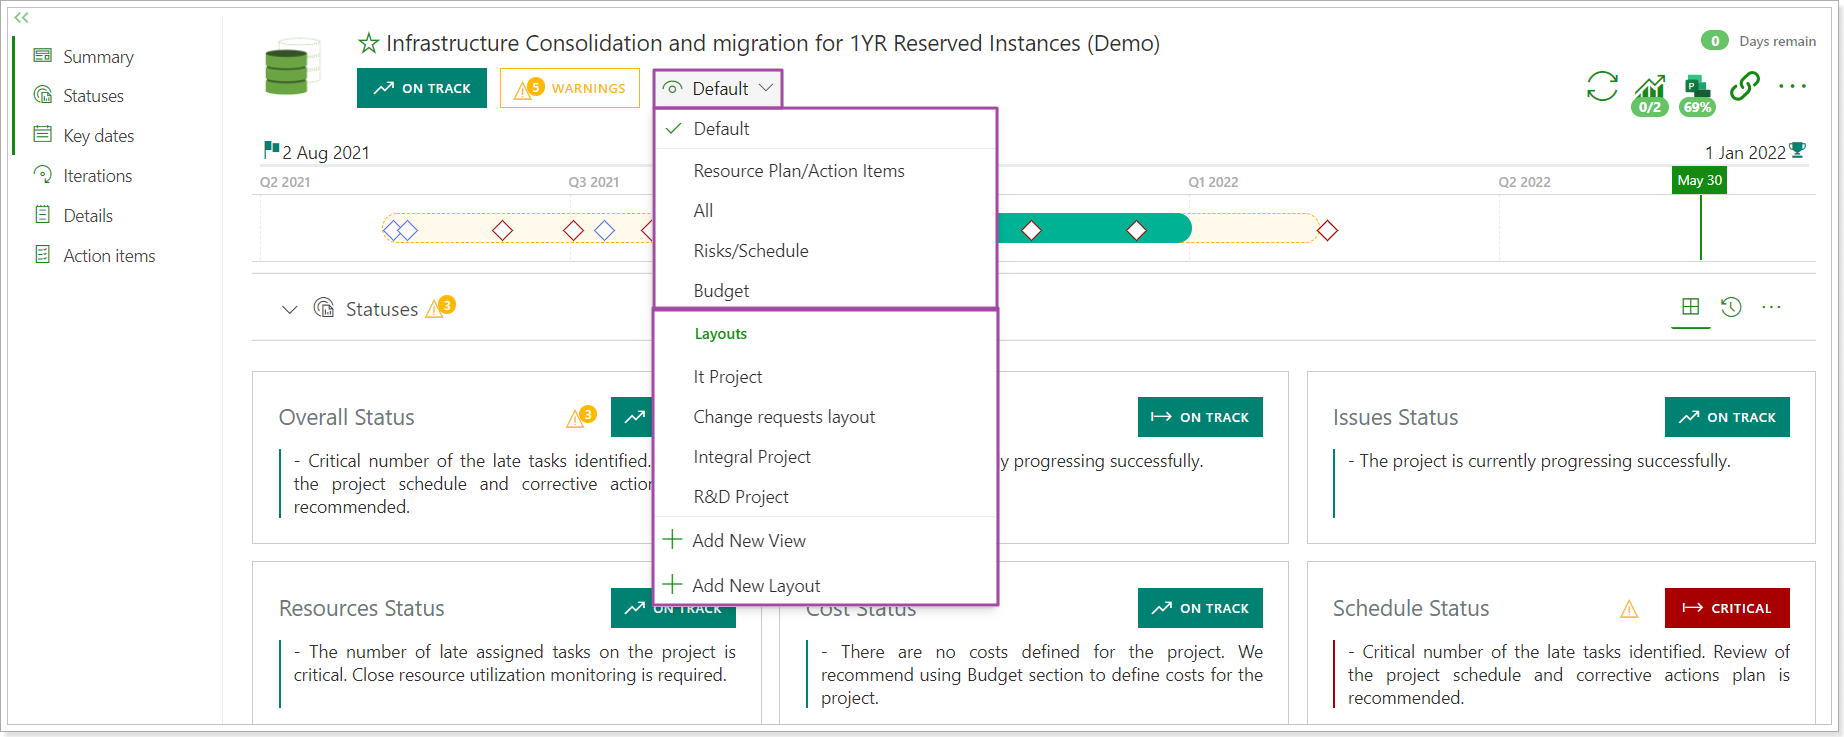
Project Managers can then apply the required layout to their projects using the 'Apply layout' option on the right. This will help standardize the way Project Managers work on their projects and the data they are expected to have within a certain project type.
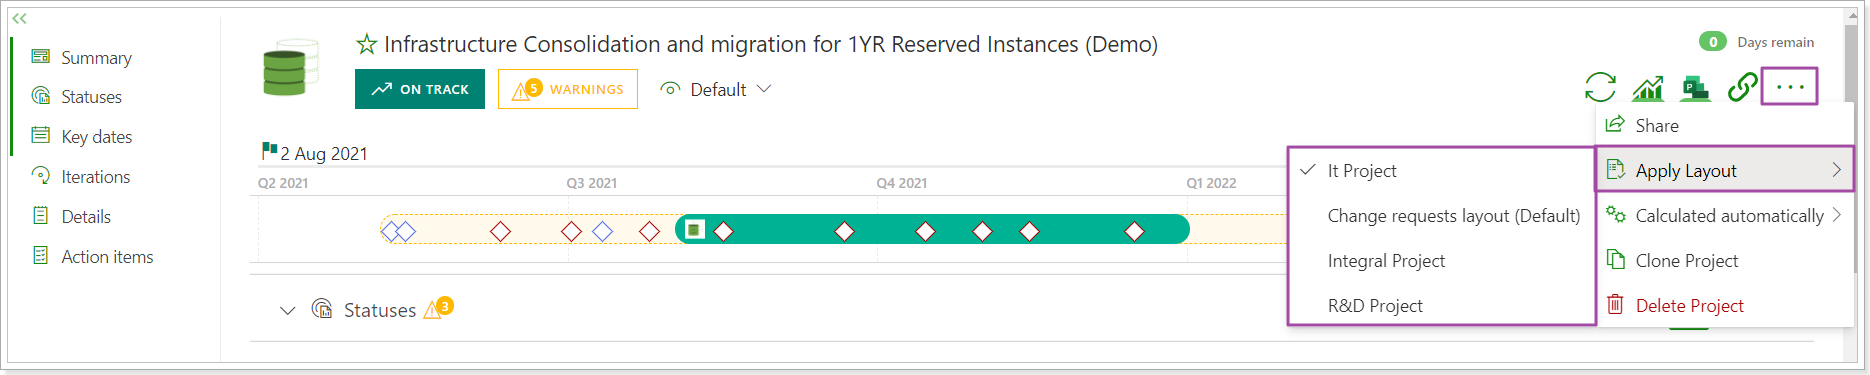
Views are used to quickly switch between a certain set of project sections allowing Project Managers to quickly view/analyze/edit only those sections that they need at the moment (for example, Resource Plan and Schedule, Actions Items, and Risks).

Release Notes 10.21 @ May 25, 2022
1. Import page for Azure DevOps was redesigned for easier navigation.
It is now possible to easily select the projects and the work items for importing to PPM Express as projects or programs. It is also possible to preserve the hierarchy when the Azure DevOps project will be imported as a program and its work items will be imported as projects included in this program.
This applies to the items even if the first item (for example Azure DevOps project) was imported earlier and is already added to PPM Express. This rule applies only to the items displayed on the import page (if some of them were not selected or hidden using the filters, they will not be counted in the hierarchy).
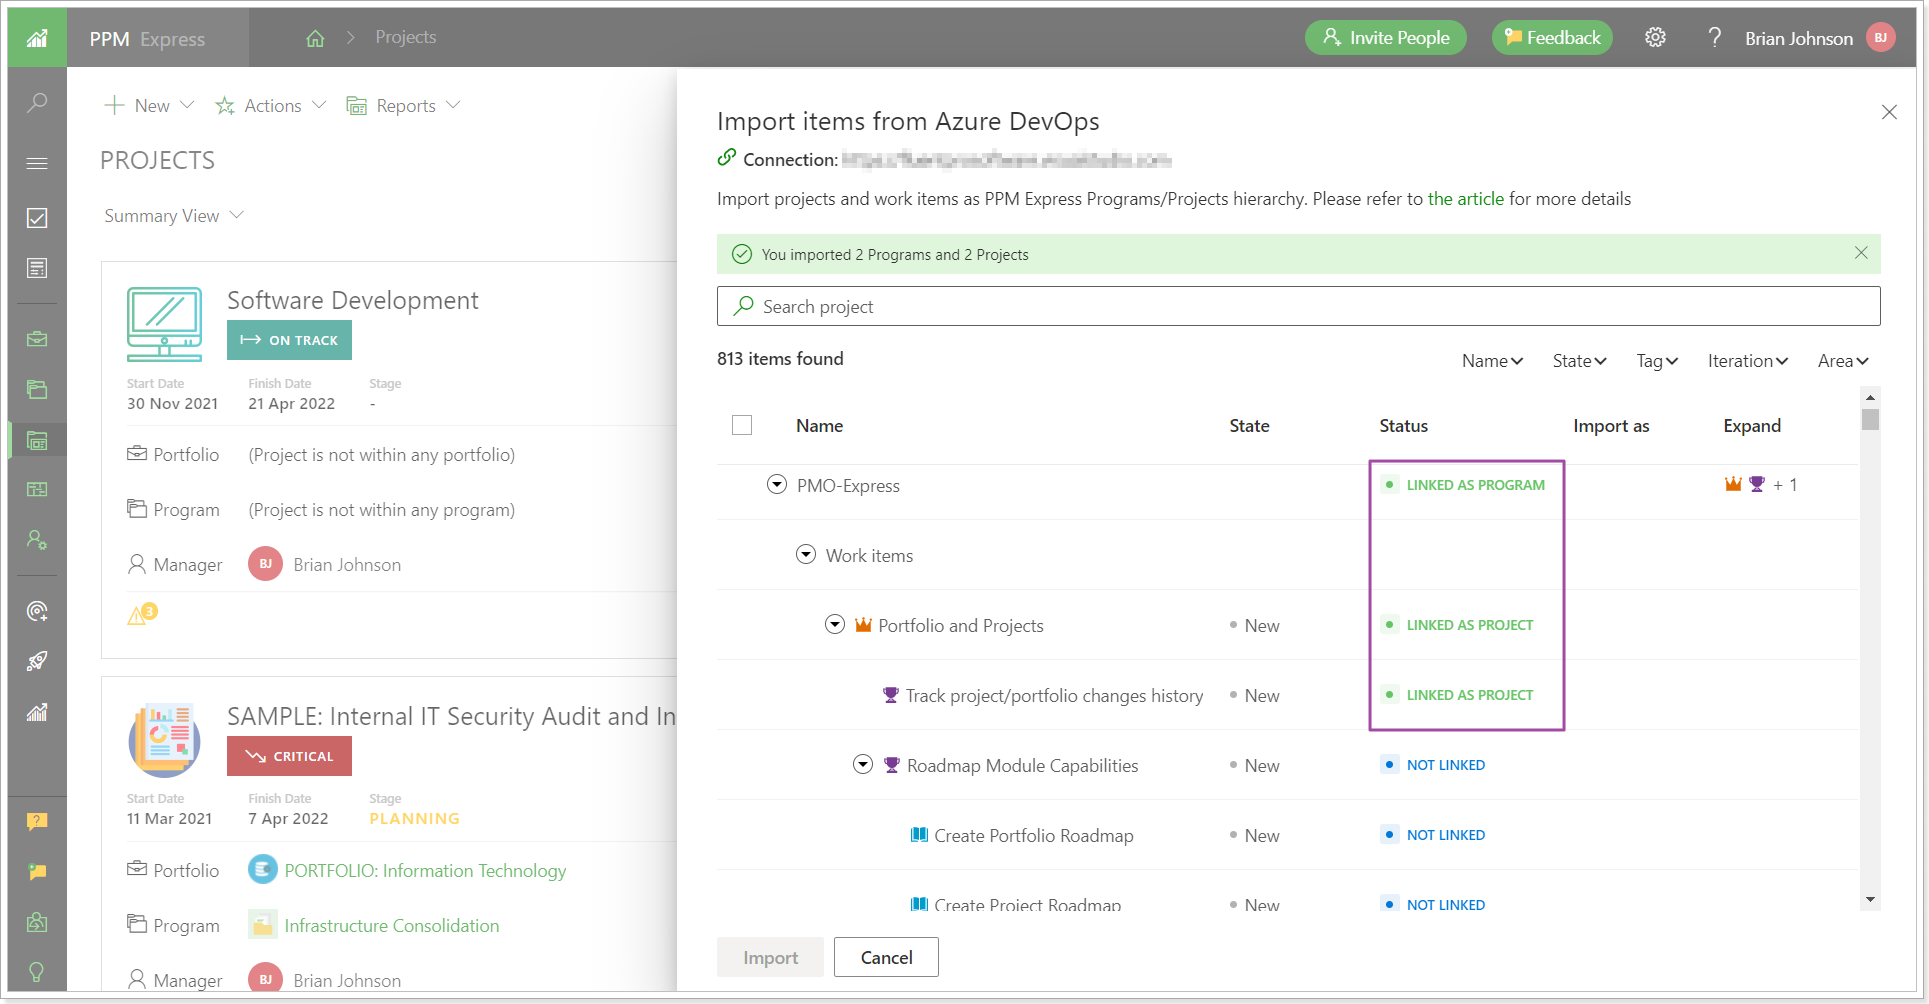
Also, it is now possible to apply filters to sort the work items out and easily find the ones you need.
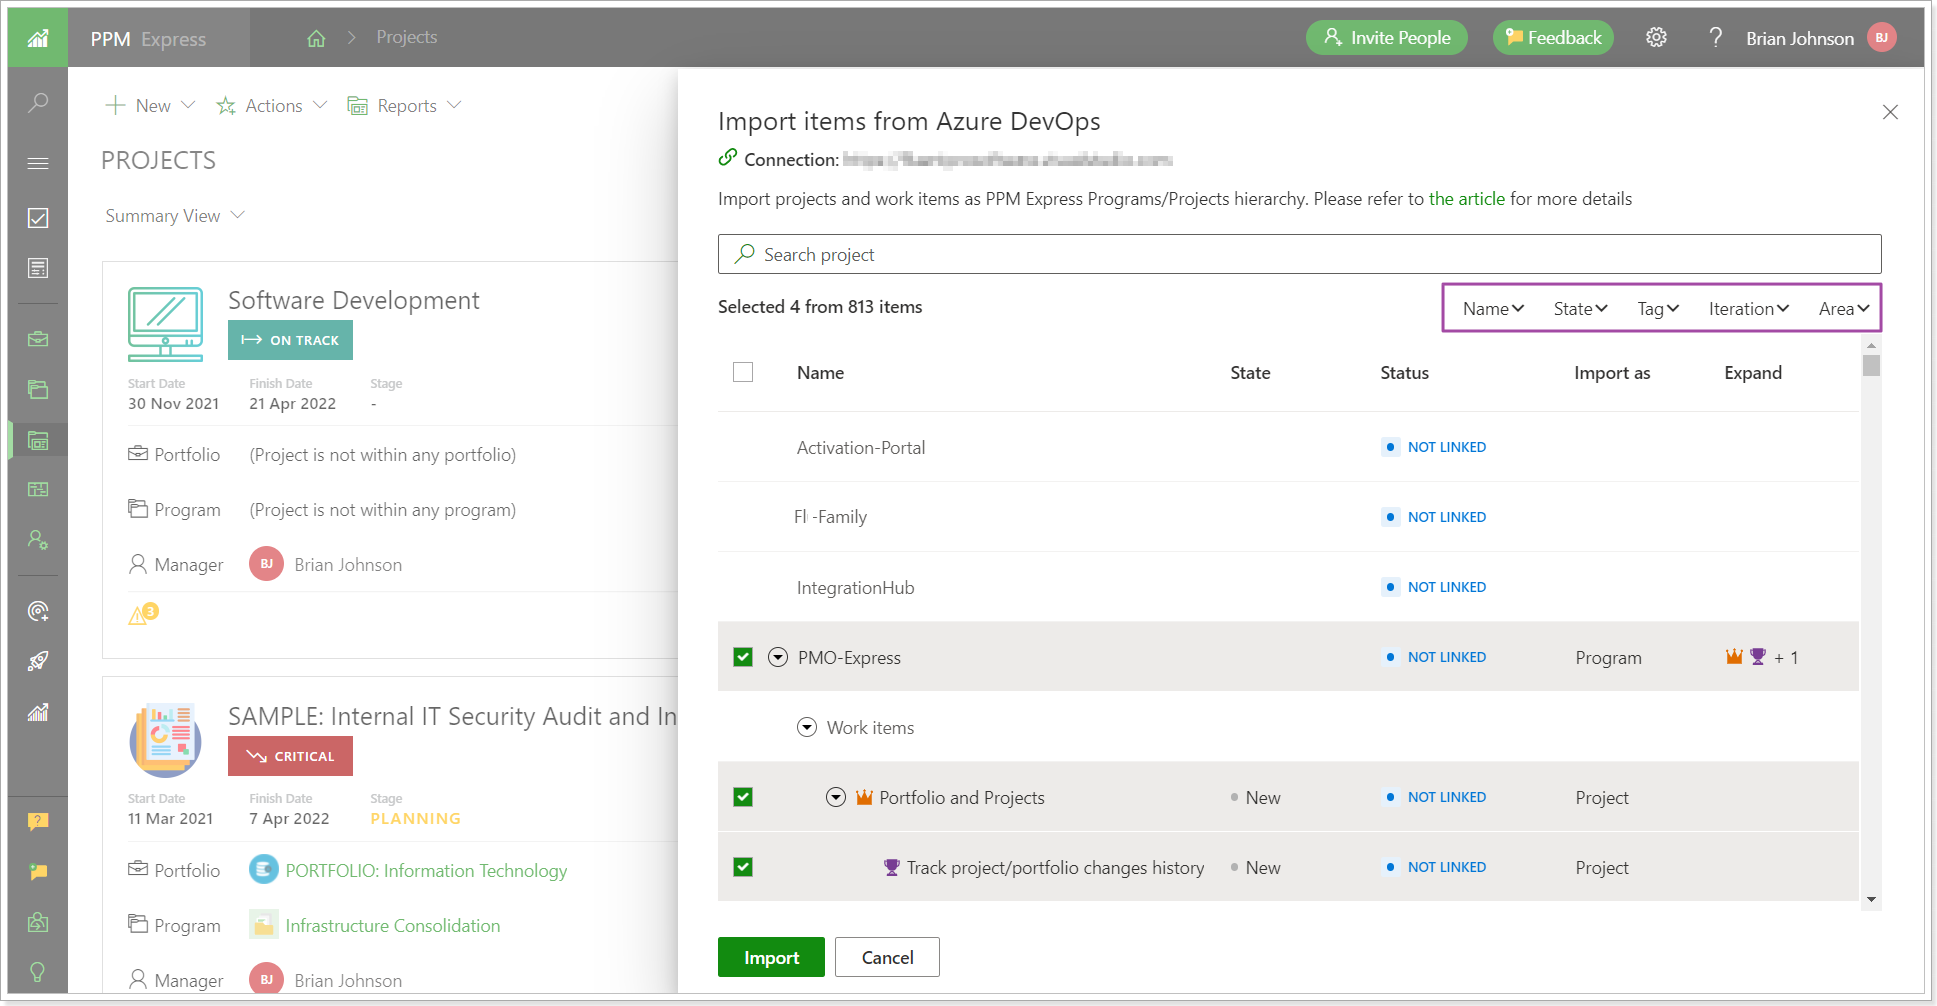
Release Notes 10.20 @ May 23, 2022
1. It is now possible to create PPM Express items from the Roadmap key dates and bars.
From now on PPM Express provides an ability to create items from the Roadmap bars (Projects, Programs, Tasks, Objectives, Ideas, etc.) and key dates (Key date, Milestone, Release).
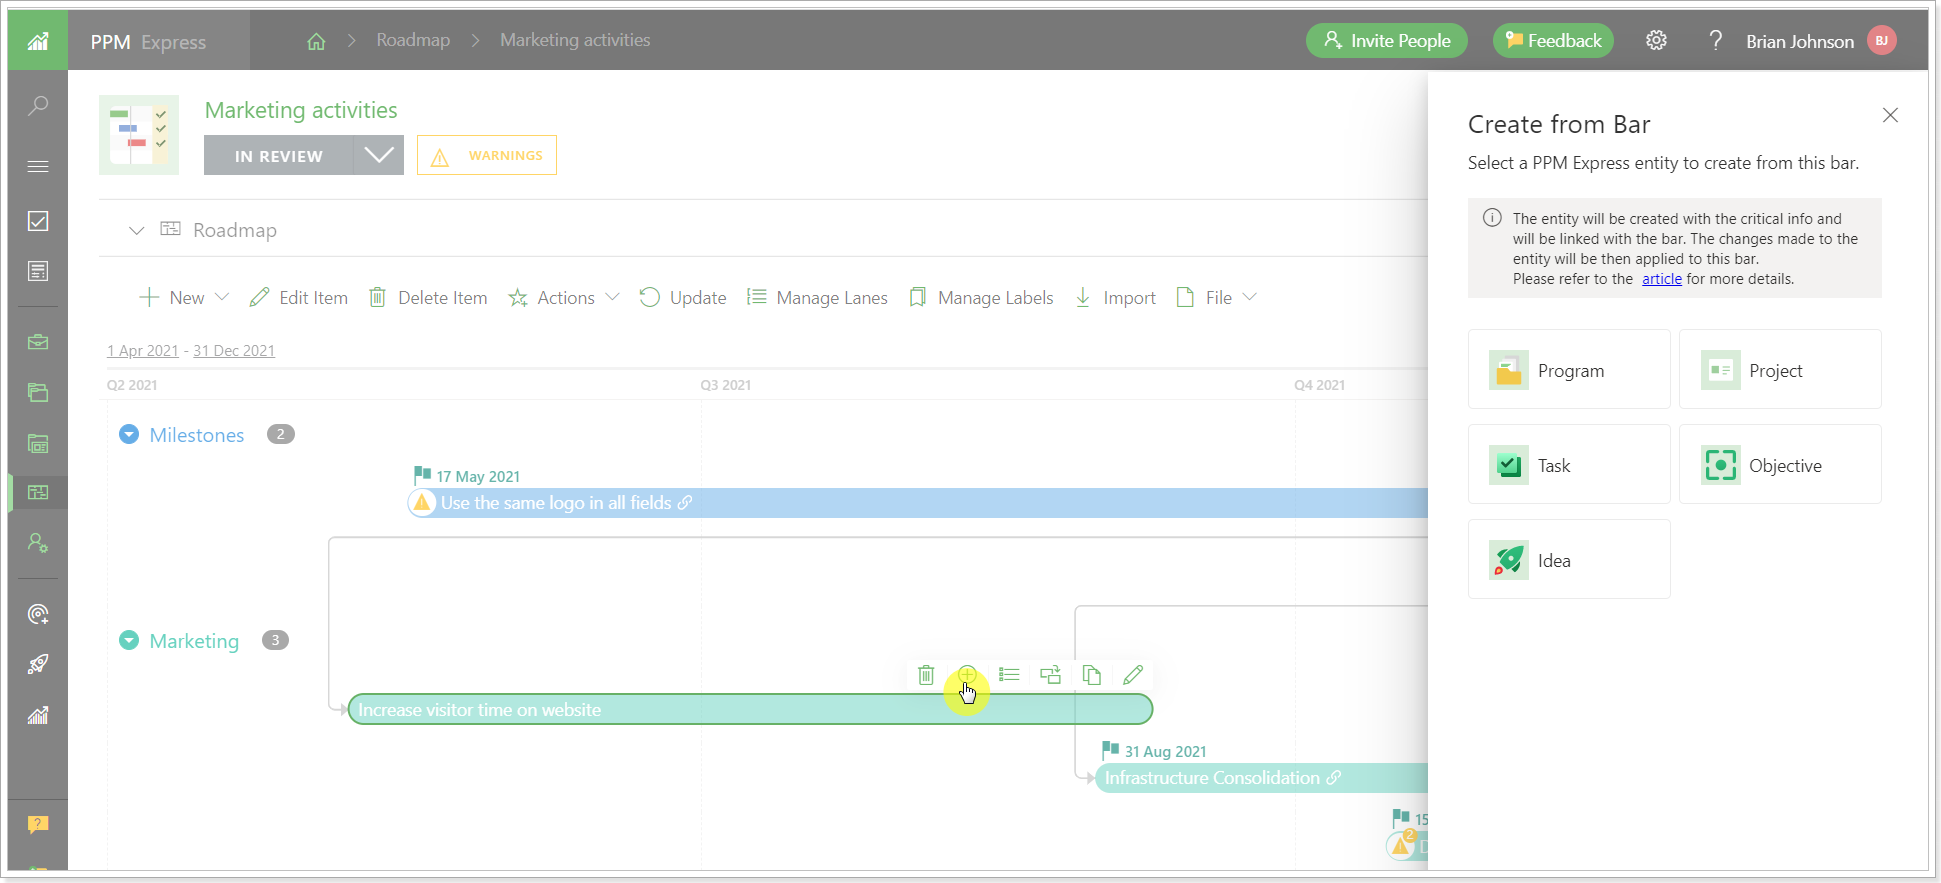
Items can be created for the manually created bars and kye dates, imported key dates and bars items cannot be used to create new PPM Express items.
Also, to create items it is required to have corresponding permission, for example, to create a project, it is required to have permission for creating projects, to create a key date, it is required to have permission for editing the selected project, etc.
When a new item is created, the following fields may be copied over: Name, Start date, Finish date, Status (if auto-calculation is disabled), Progress, Description, Assigned to.
Data from the Roadmap key dates or bars fields will be copied over during item creation. Later on, the information will be synchronized from the created item back to the Roadmap key date or bar (but not in the opposite direction).
The Roadmap bar or key date can be used to create a PPM Express item only once.
2. The synchronization of the 'Tags' field for key dates based on tasks mapping was added.
Before: 'Tags', 'Description', and other custom fields could be edited manually for the key dates imported from external systems.
Now: 'Tags', and 'Description' fields for the imported key dates are synchronized from the external systems, based on the task mapping performed on the Import page (task mapping fields rules will be also applied to the imported key dates). This applies to key dates imported from Azure DevOps and Jira. For the key dates imported from Planner, only the 'Tags' field can be synchronized. For the key dates imported from Project Online both 'Tags' and 'Description' fields will remain editable (will not be synchronized).
Also, this rule applies to the key dates created from tasks in PPM Express (marked with a flag ‘Is Milestone’). 'Tags' and 'Description' field values for the task set as milestone will be synchronized and will not be editable.
Release Notes 10.17 @ May 4, 2022
1. The logic of saving the last selection choice of how the information is displayed on the Roadmap Dashboard page changed.
Before: When you selected a column width/ views/ timescales/ timeframe/ sorting/ filters on the Roadmap Dashboard page, these changes were reset to default when you closed PPM Express and re-opened it.
Now: When you make a change to a column width/views, etc. on the page, these changes will be saved no matter if you switch between the pages or re-open the PPM Express application itself.
The following changes will be saved from now on: Timeline View: Timescales (Days, Weeks, Months, Quarters, Years), Timeframe (date range), Style Settings, Filters. List View: Columns width, Sorting, View, Filters.
These changes are saved per user and per page. If you open PPM Express on a different device or browser the changes will be saved as well.
Release Notes 10.16 @ April 27, 2022
1. It is now possible to set a baseline for internal PPM Express tasks.
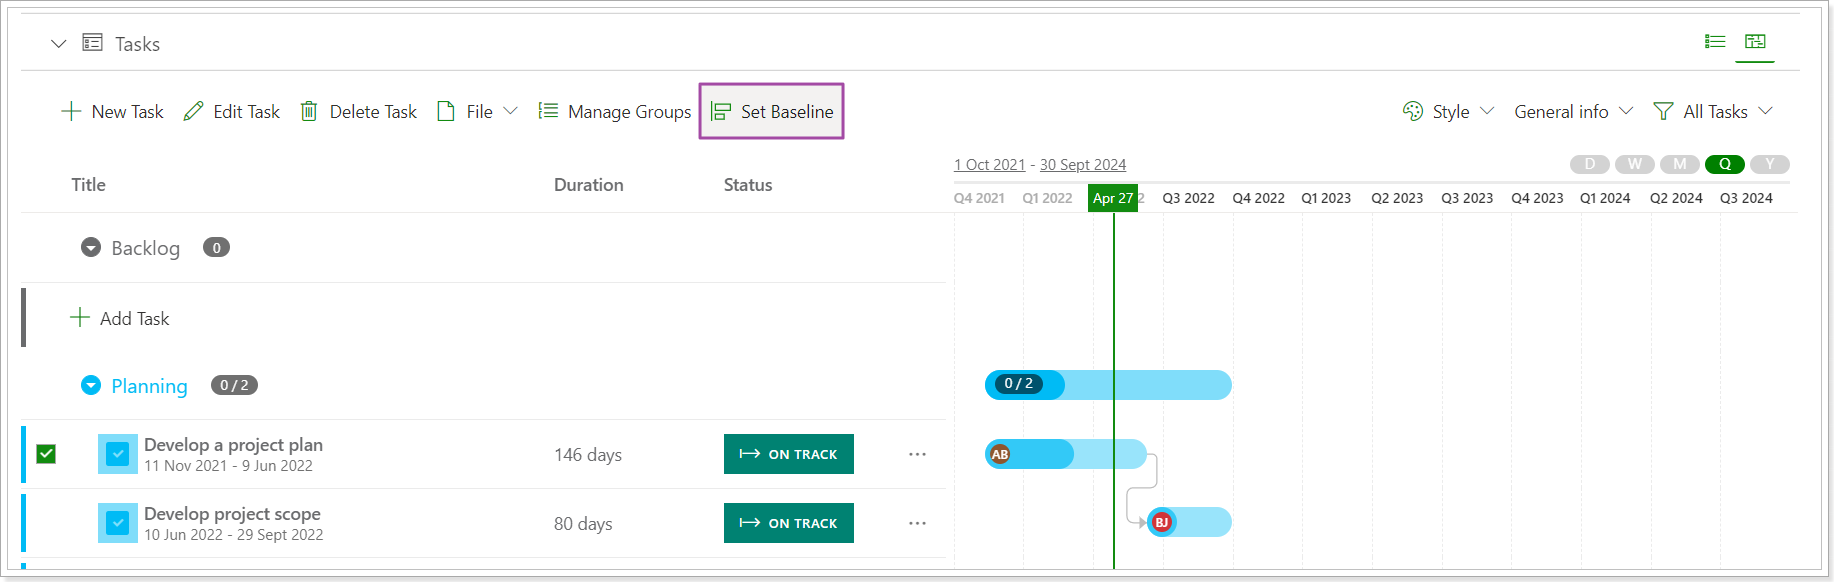
It allows taking a snapshot of your schedule that includes information about the Start Date, Due Date, Duration, Effort, and Original Estimate. If the information for these fields is changed, the baseline won't be changed and will remain the same, as it was set initially. If the task dates are changed and you need to change the baseline, you can use the 'Set Baseline' option again and it will be changed.
You can hide the Baseline from the timeline using the 'Style' menu.
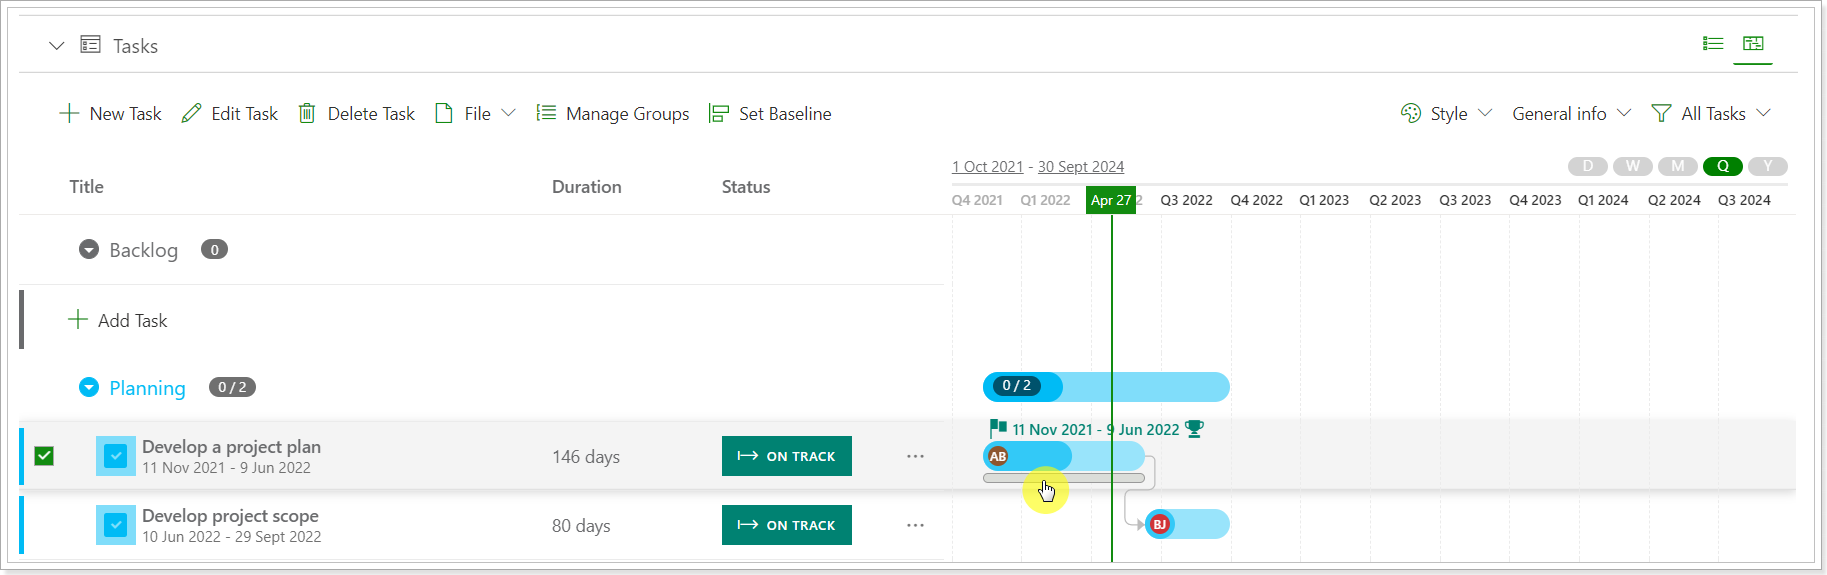
Also, you can review the current information for these fields and compare it to the baseline in the Baseline section, when the task is opened for editing.
Also, you can add these fields to the List/Timeline view and review the information for all tasks there.
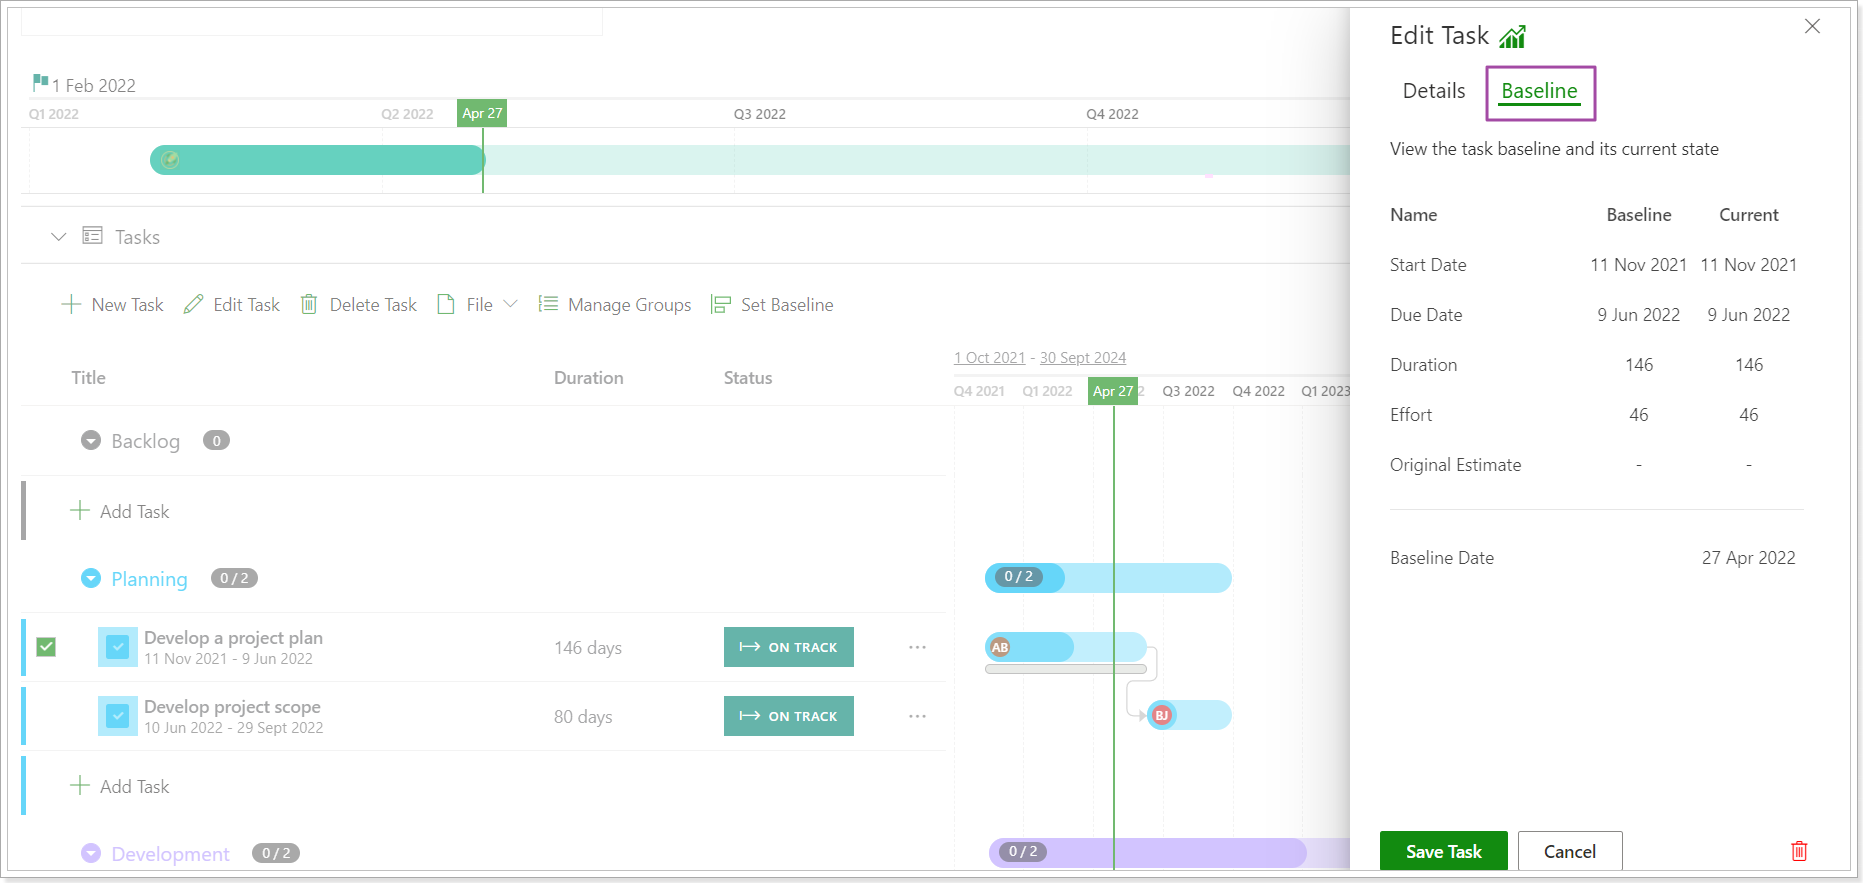
2. Improvements to the Resource Plan:
- Total Planned and Total Actual columns were added to the Resource Plan project section, Resource Utilization, etc.
- The calculated total fields ‘Estimated Cost’, and ‘Estimated Revenue’ were added to all pages and sections related to Resource Management.
- Committed resources can be now set back to Proposed using the 'Uncommit' option.
- The ‘Plan’ on the Resource Dashboard was renamed to Resource Planning and Utilization.
- It is now possible to group data by projects on the Resource Planning and Utilization page.
- ‘Hours View’ is now set as default in all pages and sections related to Resource Management.
- Standard views (Hours, Percent, FTE, Chart) were added to the Resource page.
- The warning was added to Resource Plan if a resource is allocated outside of project dates.
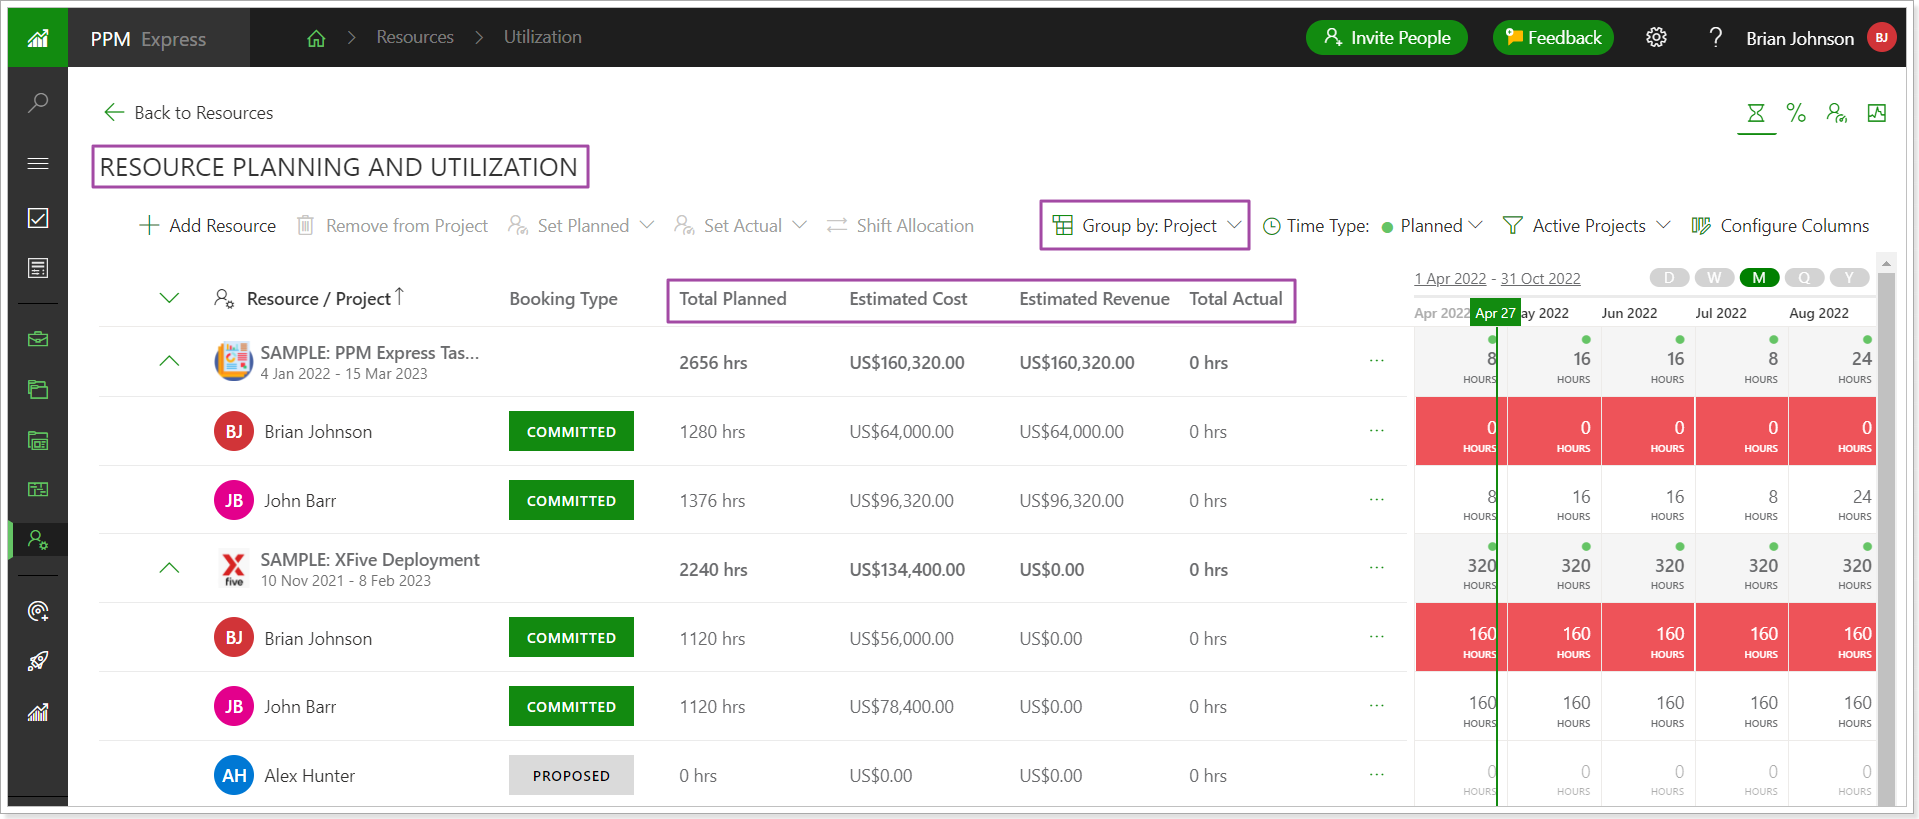
Release Notes 10.15 @ April 20, 2022
1. The 'Shift Allcoation' option is available.
The "Shift Allocation' option allows moving the hours planned for a resource(s) if the resource starts working on the project earlier or later than planned initially. As an example, this may be useful for cases when the start date for the project was changed and it is required to move the resources planned to the start date of the project.
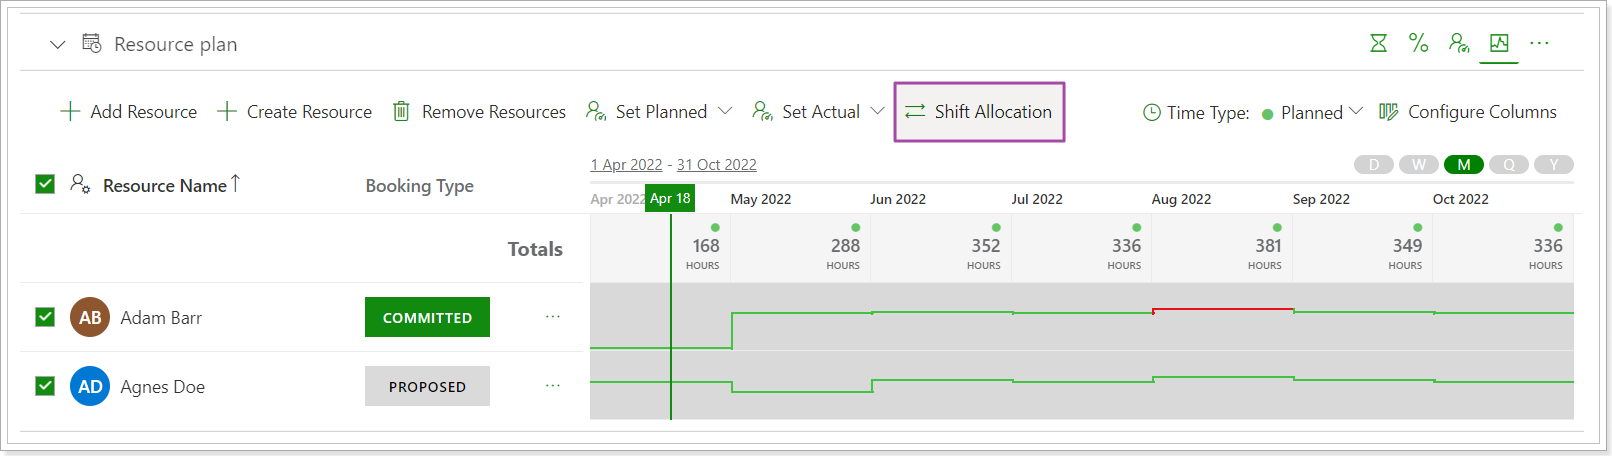
2. The 'Configure Connection' screen on the Projects/Programs Dashboard Page was redesigned.
The design of the 'Configure Connection' screen was changed for easier navigation.
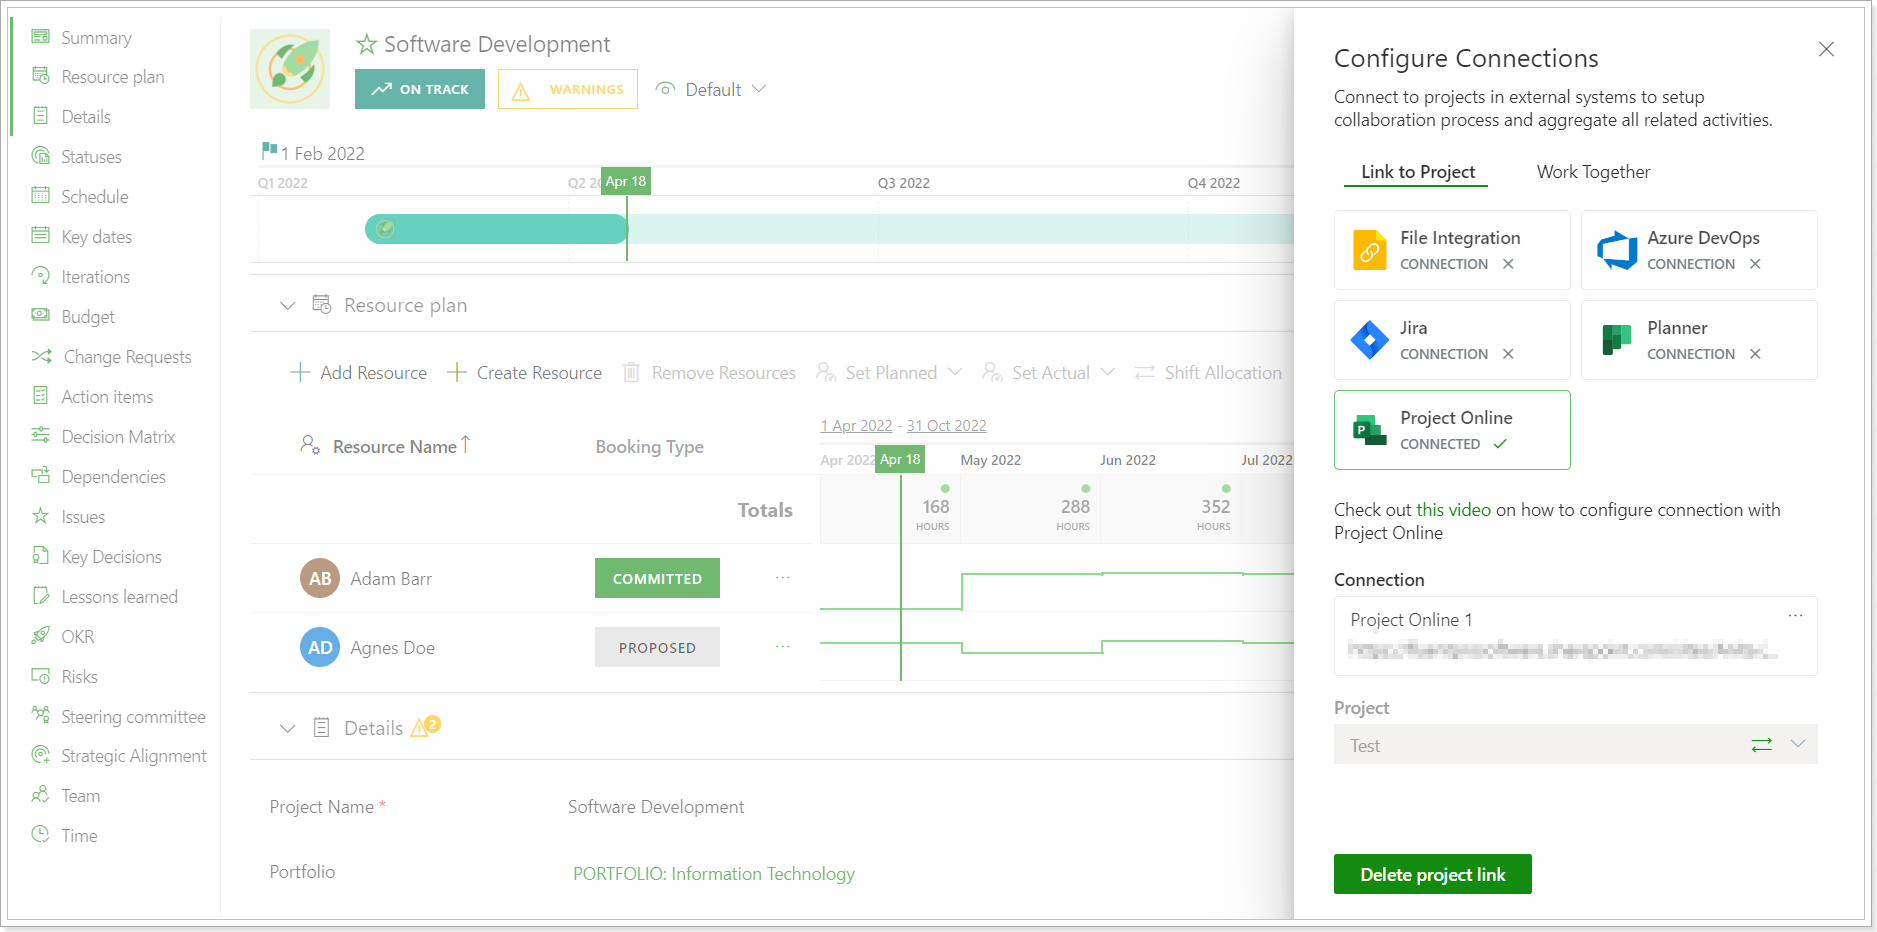
Release Notes 10.14 @ April 11, 2022
1. Capacity and Actual Hours were added to the Resource Plan.
It is now possible to set and review the Capacity and Actual hours for Resources in addition to the Planned hours.
You can decide by switching the corresponding checkboxes if you need to review Capacity and Actual Hours or not. The Planned Hours toggle is switched to ON by default but you can change it as required.
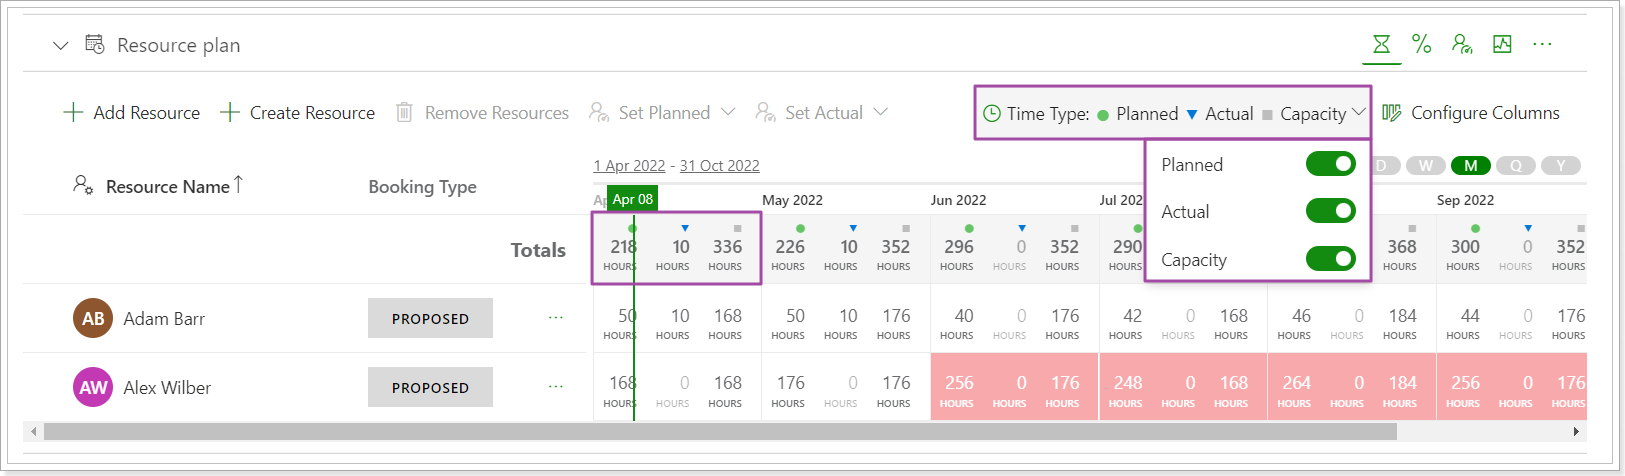
This functionality was added to all pages where you can plan resource availability (Resource Plan project section, Resource Utilization, etc.).
To set the Planned or Actual hours, you can double-click on the required column (hours) and type in the hours. Also, you can use the Set Planned and Set Actual buttons on the top. These buttons are also available from the tooltip for each resource.
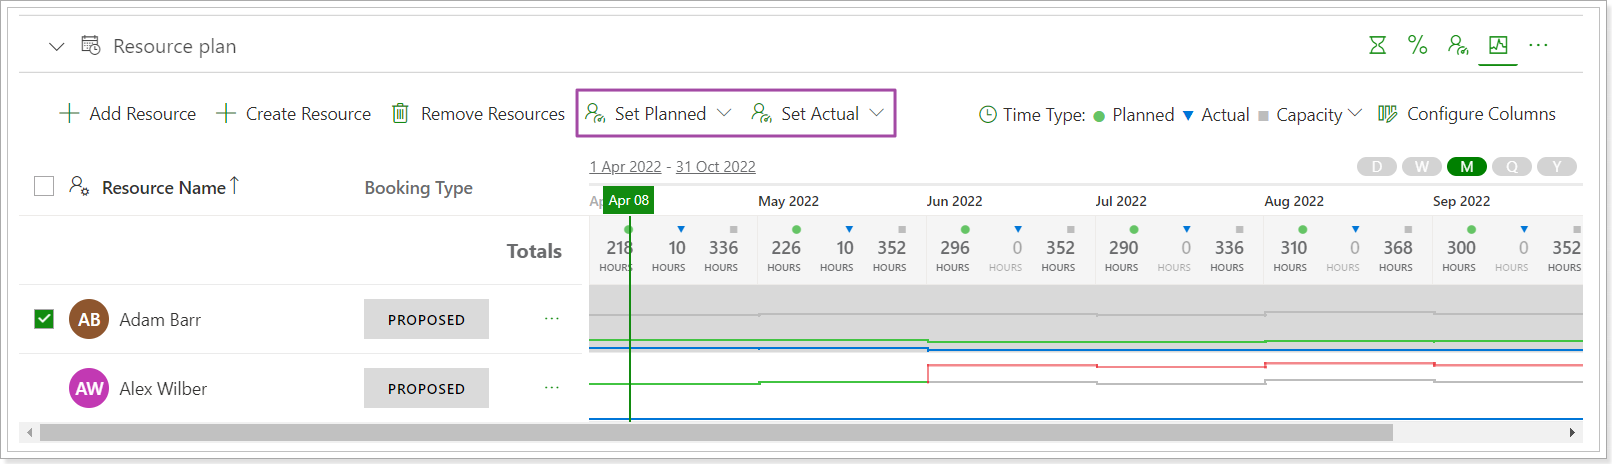
Release Notes 10.10 @ March 28, 2022
1. Billing Settings page was redesigned and the subscription plans were changed.
PPM Express Professional plan was renamed to PPM Express Portfolio to better indicate positioning on project portfolio management. A new PPM Express Product Management plan was added.

2. The Projects Import page was redesigned.
On the first step of this page, you can select the connection and review the list of available connections added before.

3. Improvements for Roadmap Dependencies.
It is now possible to open a roadmap item for edit by double-clicking on the required one.
Also, you can delete dependencies between roadmap items directly from the timeline. For this, you need to click on any arrow that outlines a dependency and use the Bin icon on it.
Also, if you select an item on the roadmap or several ones using the Ctrl button, their Dependencies are highlighted for a better view.
Release Notes 10.9 @ March 17, 2022
1. People Management page was redesigned and new features will be added.
1) The Regular license type was renamed to User License.
2) It is possible to create a default set of permissions for new users on the People Management page.
When the new users join PPM Express, the created default set of permissions is applied to such users according to their license type.
Also, if you switch the license type for the user, the default set of permissions is also applied.

3) Bulk edit of user permissions for the existing users was added.
Using the bulk edit functionality it is possible to set the required permissions for a number of users at once.
If you select both the Team Members and the Users for bulk edit, the set of permissions will be limited to the Team Members' permissions.
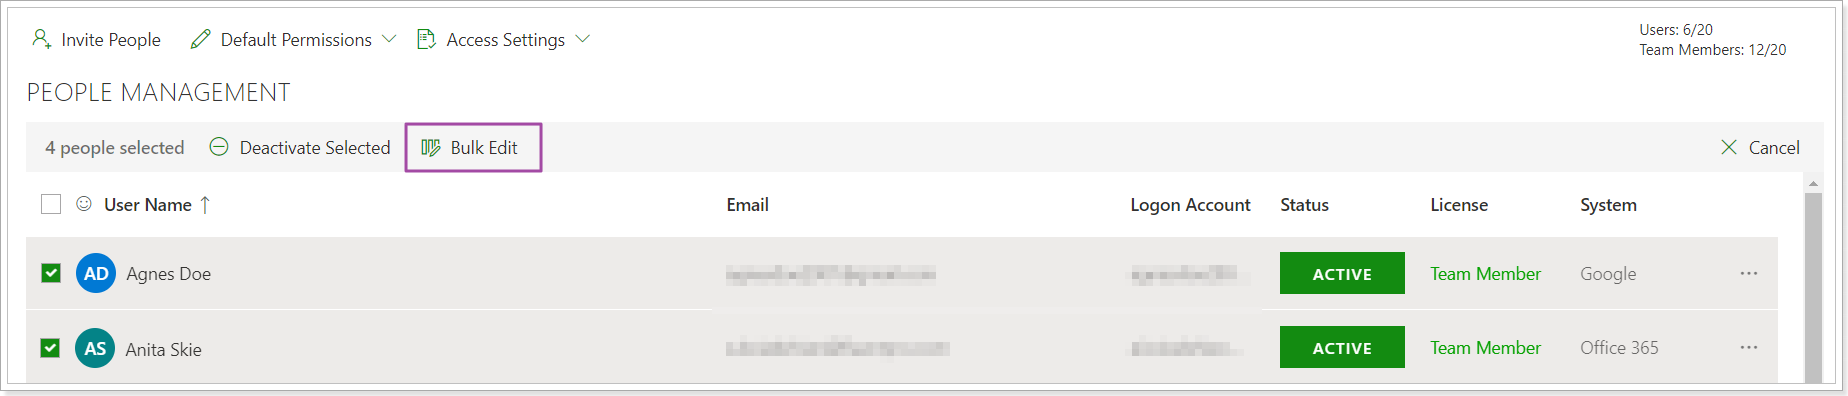
4) The 'Allow auto-registration' and 'Allow Everyone To Invite New Users' settings were moved to the 'Access settings' menu.

2. Resource Plan section is now visible for everyone.
Before: Resource Plan section was visible and editable to users with the 'Manage Resources' permission only.
Now: Resource Plan section is available for all users with edit/view permission for the project in the 'View only' mode. Only users with the 'Manage Resources' permission and permission to edit the project in question will be able to edit it.
Release Notes 10.8 @ March 10, 2022
1. A new field 'Hyperlink' was added to all PPM Express entities.
This field allows adding a link to any external system. When the link is added you can use it to open the site from the PPM Express project, portfolio, program, key date. etc.
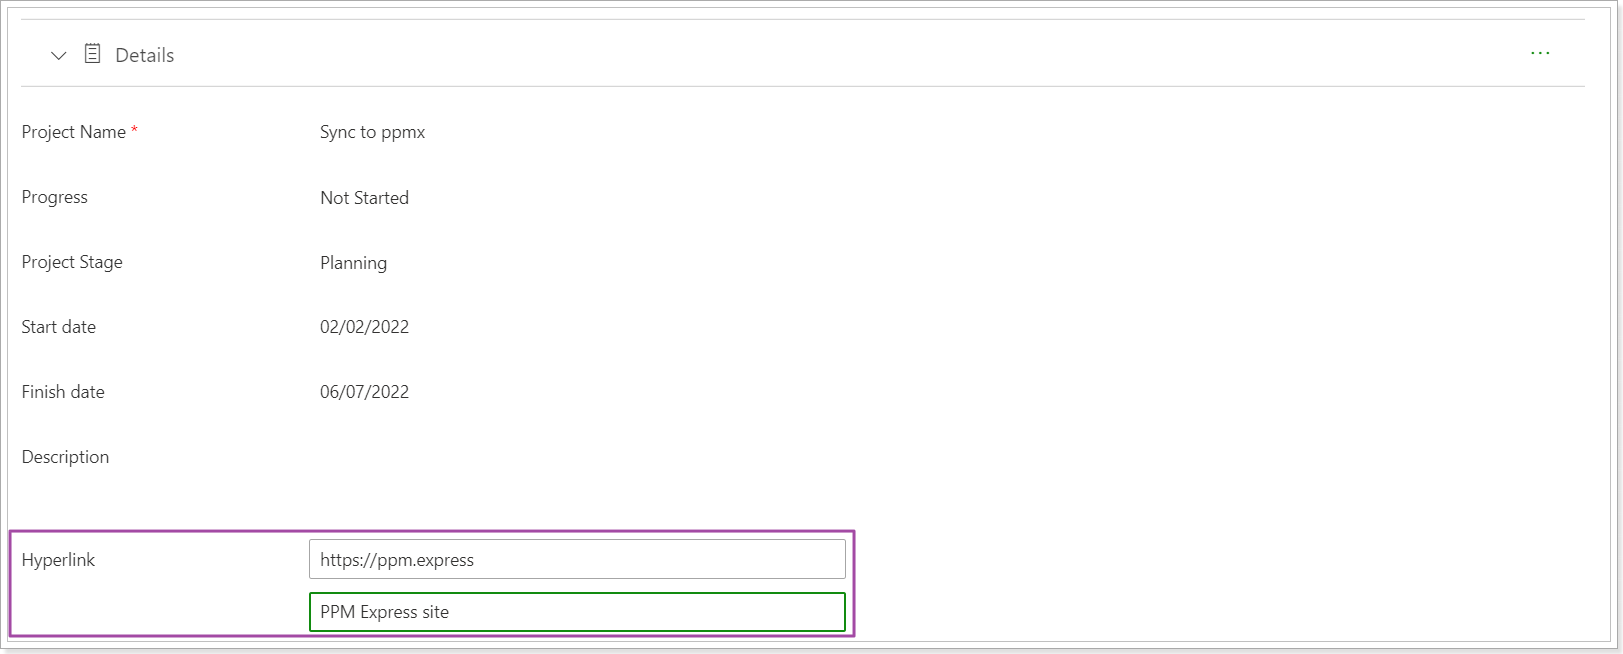
You can hide the link address and type in the name for it instead.

2. Assignment field for Risks and Issues is now a multichoice field.
You can now add more than one assignee to the Risks and Issues across PPM Express.
3. Description field was added to the PPM Express My Space page.
Release Notes 10.7 @ February 22, 2022
1. An action to create dependencies was added to the Roadmap timeline bar directly.
You can now create dependencies from the timeline bars directly without opening the item for editing.
Click the 'Create Dependency' button on the required item and select the item it should depend on.
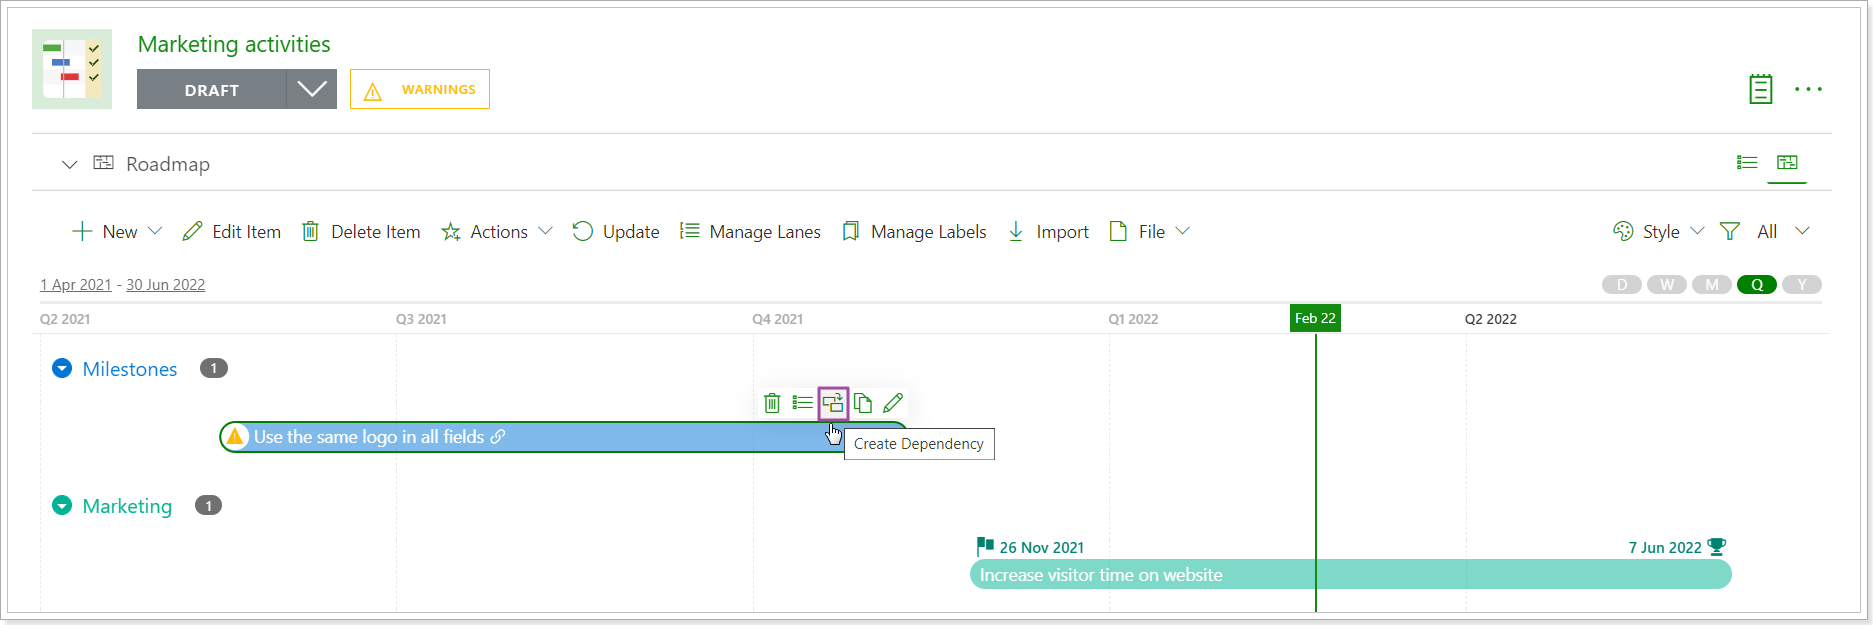
2. The 'Show link' option was added to the Style menu of the Roadmap timeline.
Using the 'Show link' toggle you can add an indicator to the Roadmap timeline and show if the items were manually created or imported.
If the item was imported from an external system, the external system icon will be also displayed.
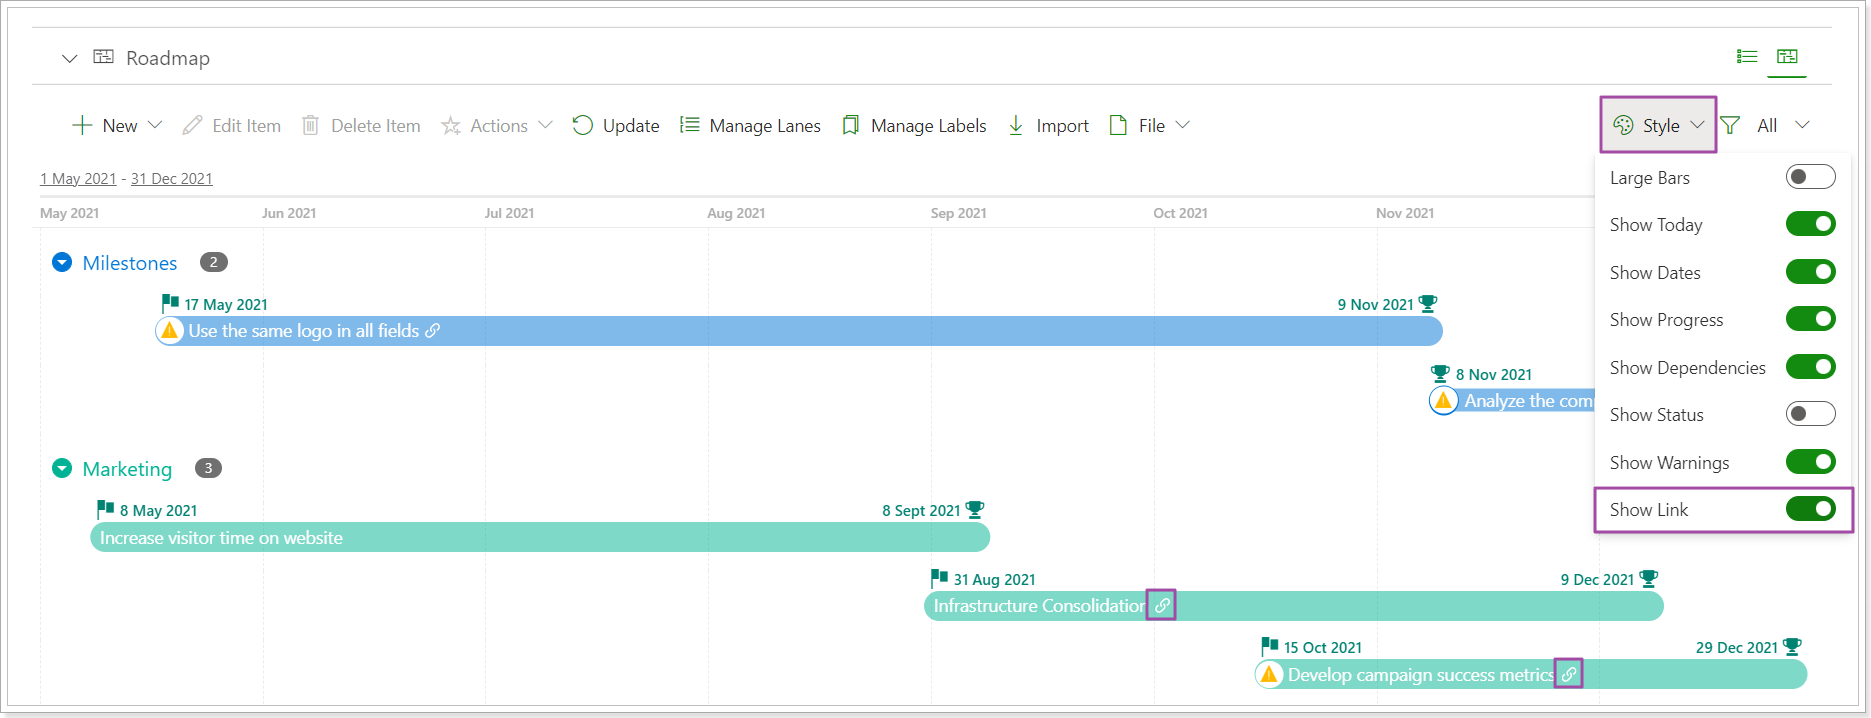
3. It is now possible to update items imported to the Roadmap in a bulk.
Before: To update the Dates, Progress, and/or Status of the imported items according to their source values, the items were opened for editing one by one and the values were updated according to the source using the 'Apply' button next to these fields.
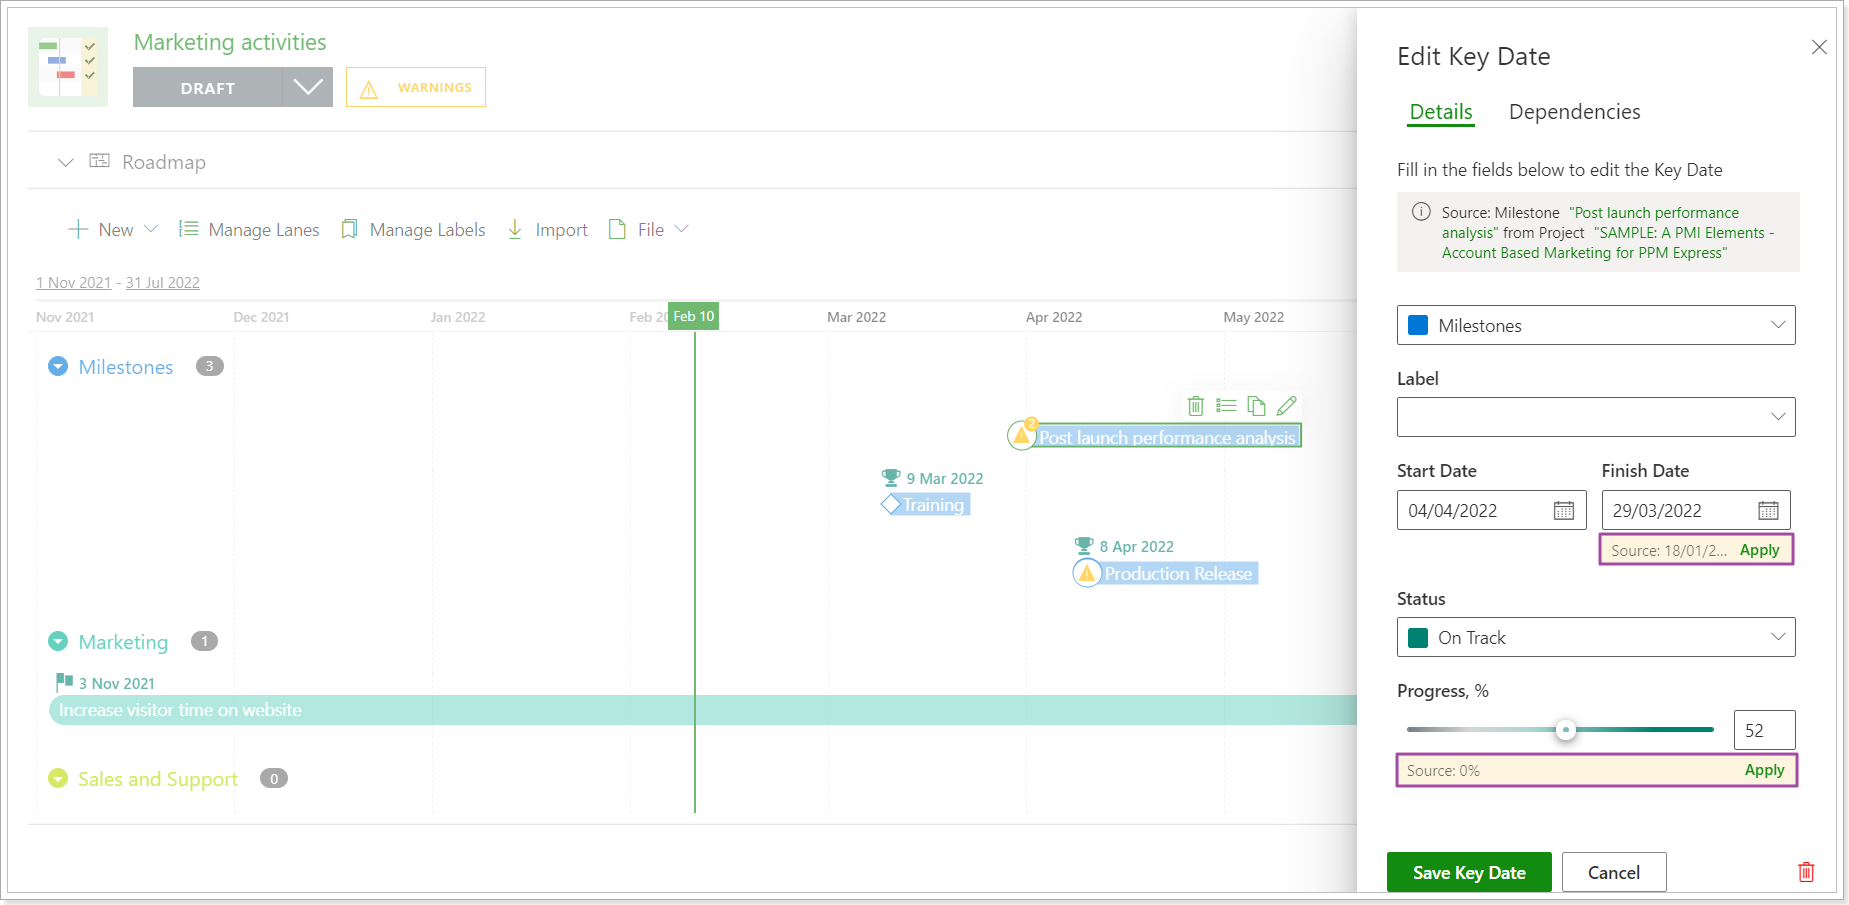
Now: An Update button was added to the list of actions to update the values for the imported items according to their source values faster and in a bulk.
To update one item, click on the required item and hit the Update button. Choose the information you need to update for this item and click Update.
To update several imported items at once, hold the Ctrl button and click on the required items on the timeline to select them, then hit the Update button. Choose the information you need to update for the selected items and click Update. The Dates, Progress, and/or Status values will be updated for all selected items at once according to their source values.
Please note: You can update the Dates, Progress, and/or Status of the imported items according to their source values in the same way as you did before, Update button is an additional, easier way to update the items.
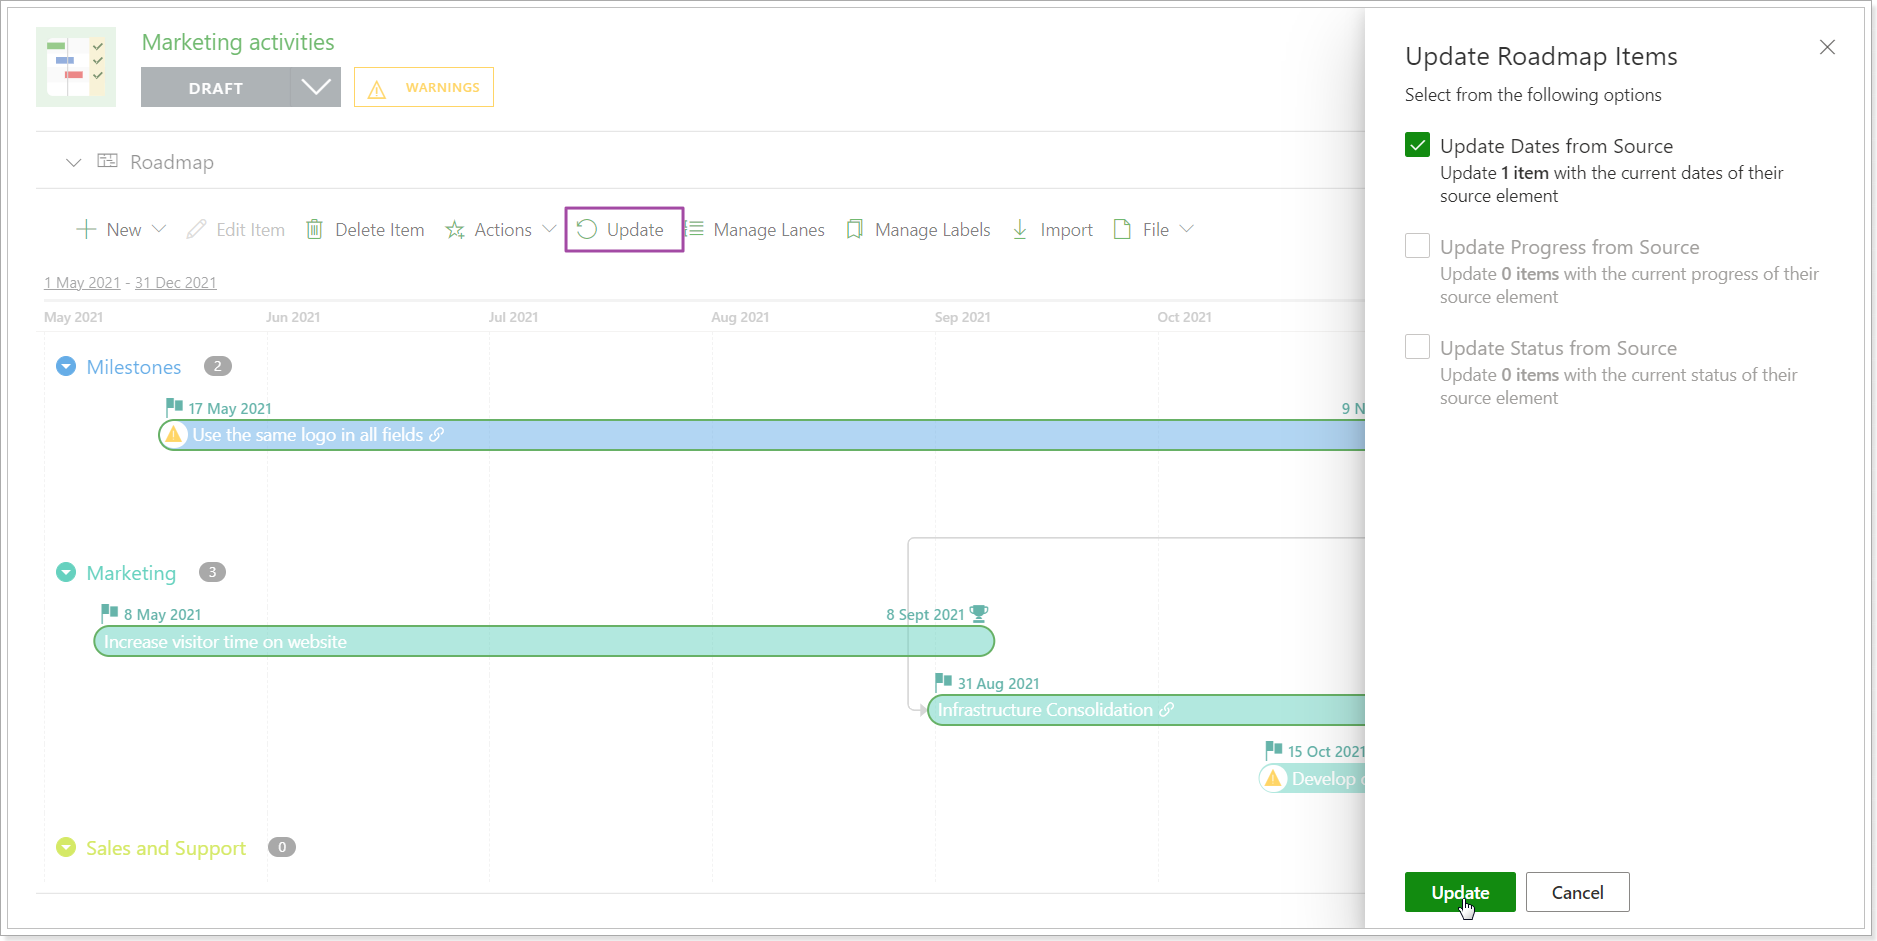
Release Notes 10.6 @ February 17, 2022
1. Linking is now available for Programs.
It is now possible to link your PPM Express programs to a project from an external system (Project Online, Jira, Azure DevOps, Planner). Connection on the Program level can be used for quick navigation to the external system project. No data will be synchronized to the PPM Express program.
The linking process is very similar to projects, the connections are added in the very same way.
.png)
Please refer to the following articles for more details:
- Linking Project Online project to PPM Express program
- Linking Planner plan to PPM Express program
- Linking Jira project to PPM Express program
- Linking Azure DevOps project to PPM Express program
Release Notes 10.5 @ February 10, 2022
1. Export/Import to CSV file option was improved for all entities.
Before: When exporting PPM Express items to the CSV file and then importing it back to PPM Express, the entities were not updated according to the changes in the CSV file, new entities were created instead.
Now: When exporting PPM Express items to the CSV file and editing the items there (change duration, progress, predecessors, etc.) these changes will be applied to items on importing the information from the CSV file back to PPM Express (the items will be updated with the information from the CSV file).
Please note: The items are found by UIDs and updated accordingly. If the UID is deleted from the CSV file or updated there, new items will be created in PPM Express when importing data from this CSV file.
Please note: Changes made in the CSV file for the imported items from external systems will be ignored. Also, if any invalid data was provided in the CSV file, it will be ignored when importing to PPM Express.
2. Roadmaps can now be added to MS Teams channels if the PPM Express app was installed for MS Teams.
Before: You could connect PPM Express to Teams channels and add PPM Express projects, programs, portfolios, my space page, and challenges to the required Teams channels and manage them from Teams directly.
Now: It is also possible to add PPM Express Roadmaps to the required Teams channels to open manage them there according to your permissions.
.png)
3. The view of the Roadmap actions for items was redesigned on the timeline.
Before: To open the item for editing, clone it or delete the item from the timeline view you navigated to the item and selected the required action from the list.
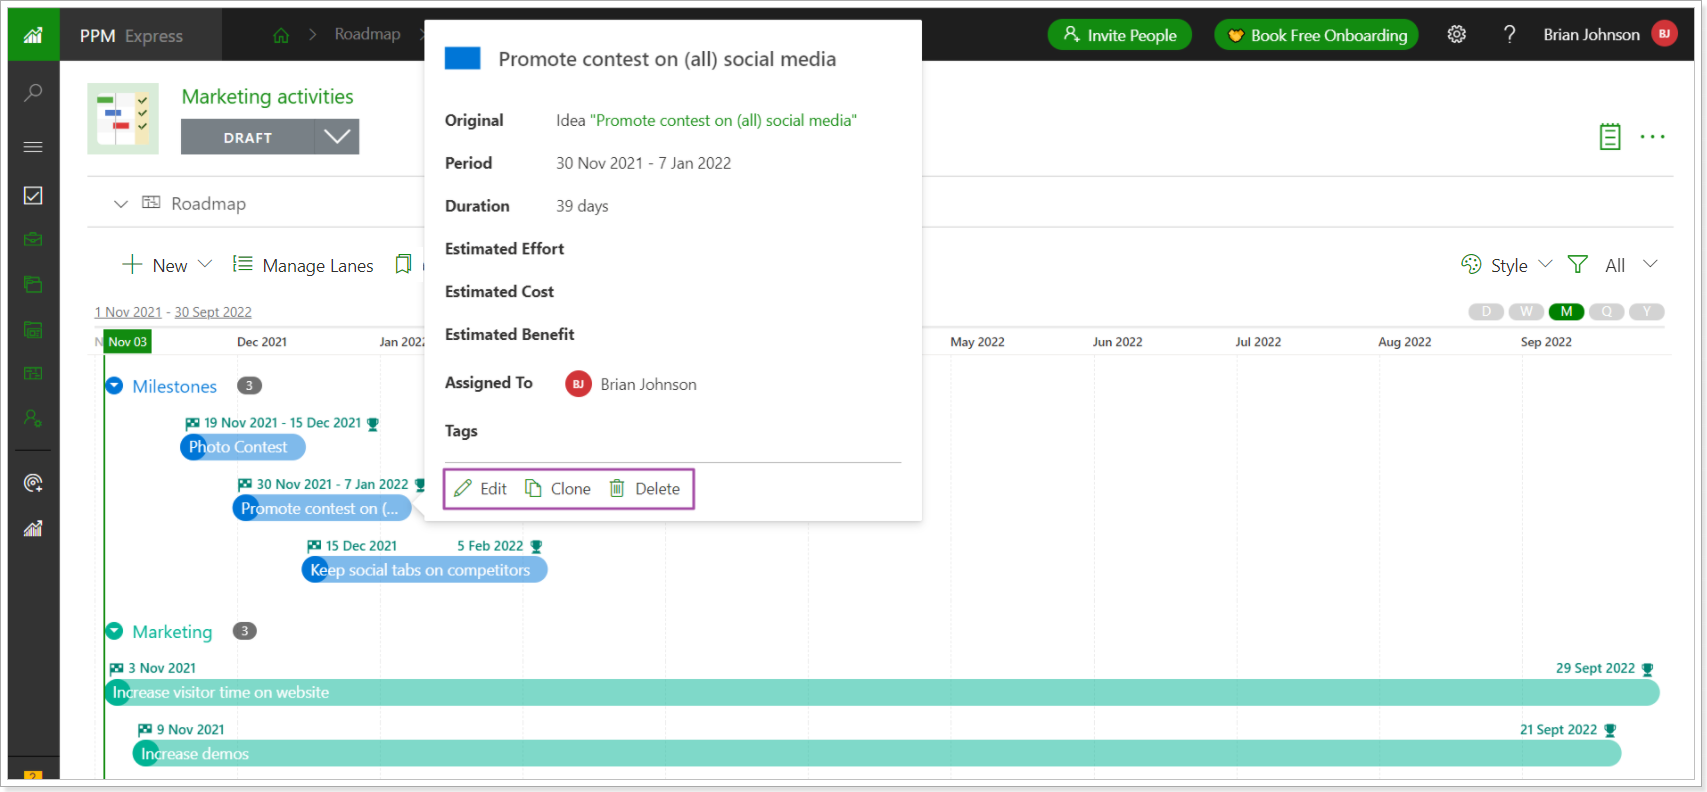
Another way to open the item for editing was to click on the item on the timeline.
Now: To perform actions to the item: edit, delete, move to the backlog, clone it, you should select the item by clicking on it and then select the required action from the list in the top right corner of the item bar.

4. Warnings were added to the Roadmap dashboard.
If there are any items imported to the Roadmap dashboard and their start/due dates, progress and/or status was changed (differs from the original item) a warning will be shown for such items both on the timeline and table view of the Roadmap dashboard. The warning number will indicate if all three values differ from the original ones or only one/two.
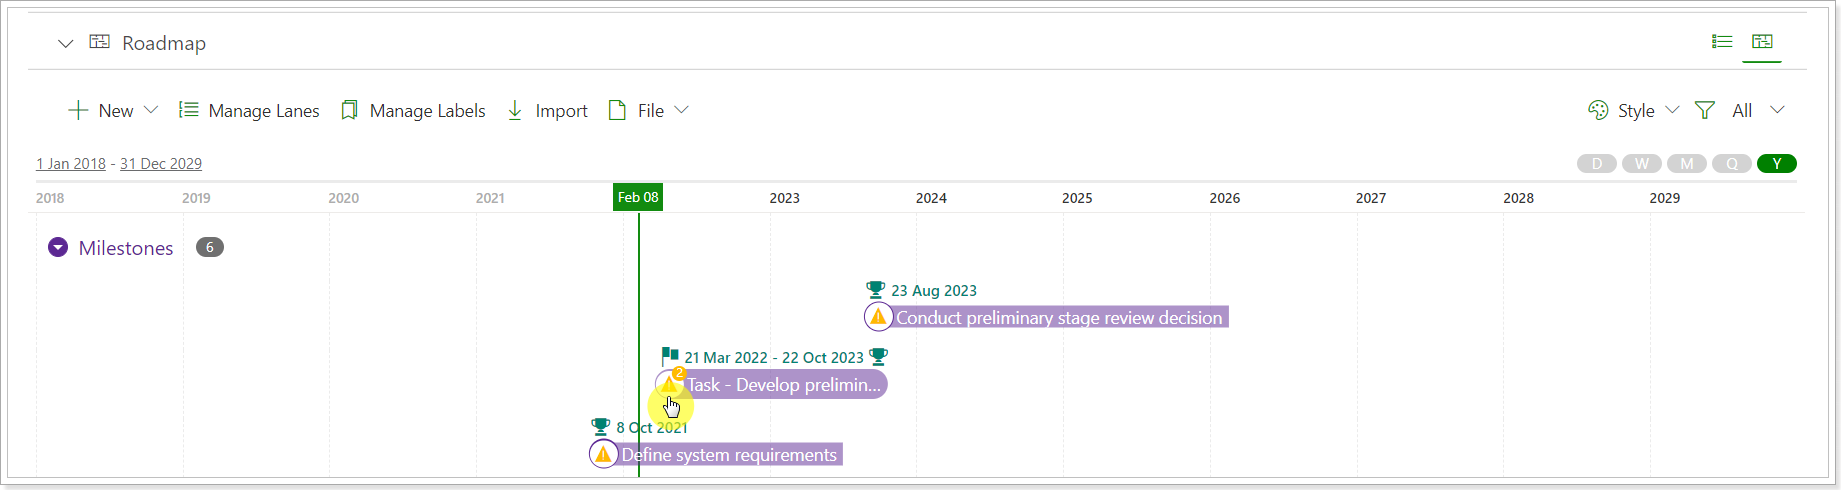
The total number of items with warnings will be shown at the top of the page.
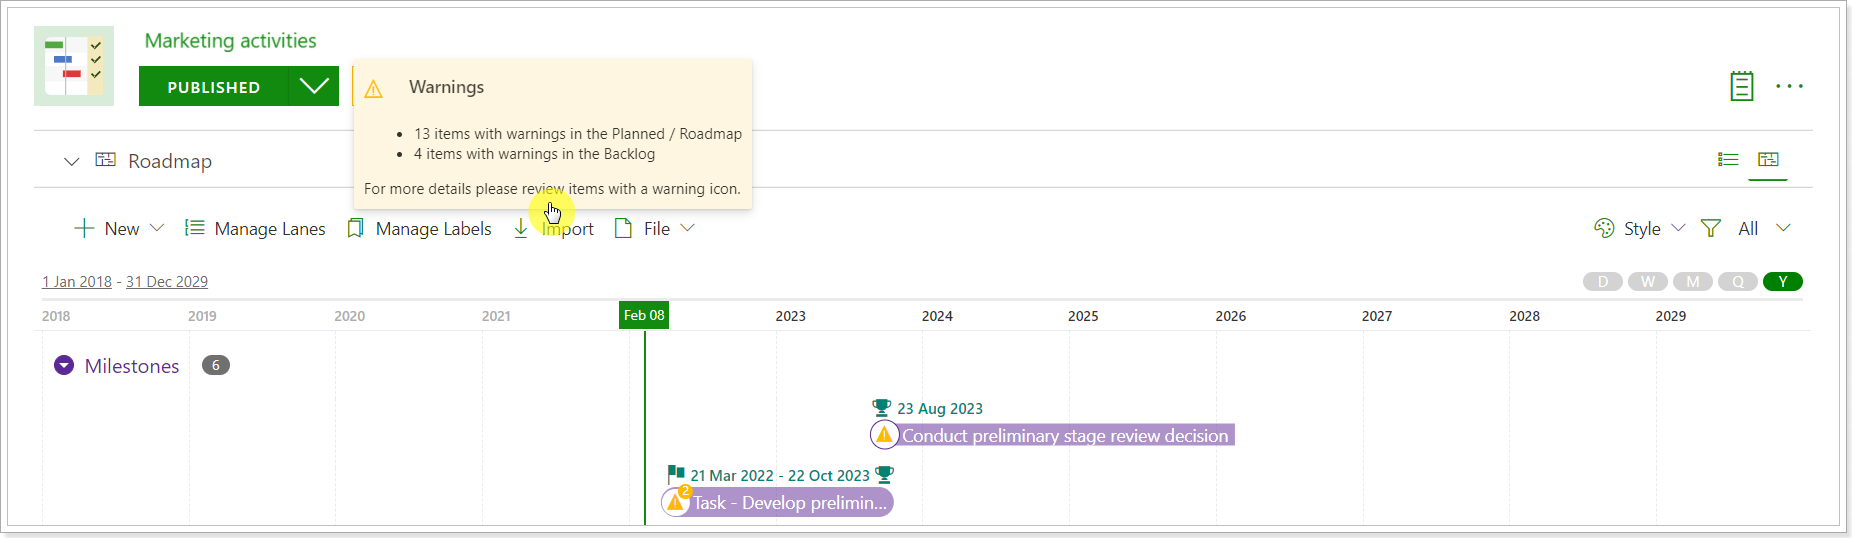
Also, you can use a filter to show the items with warnings only and use the Style menu to hide the warnings from the timeline view.
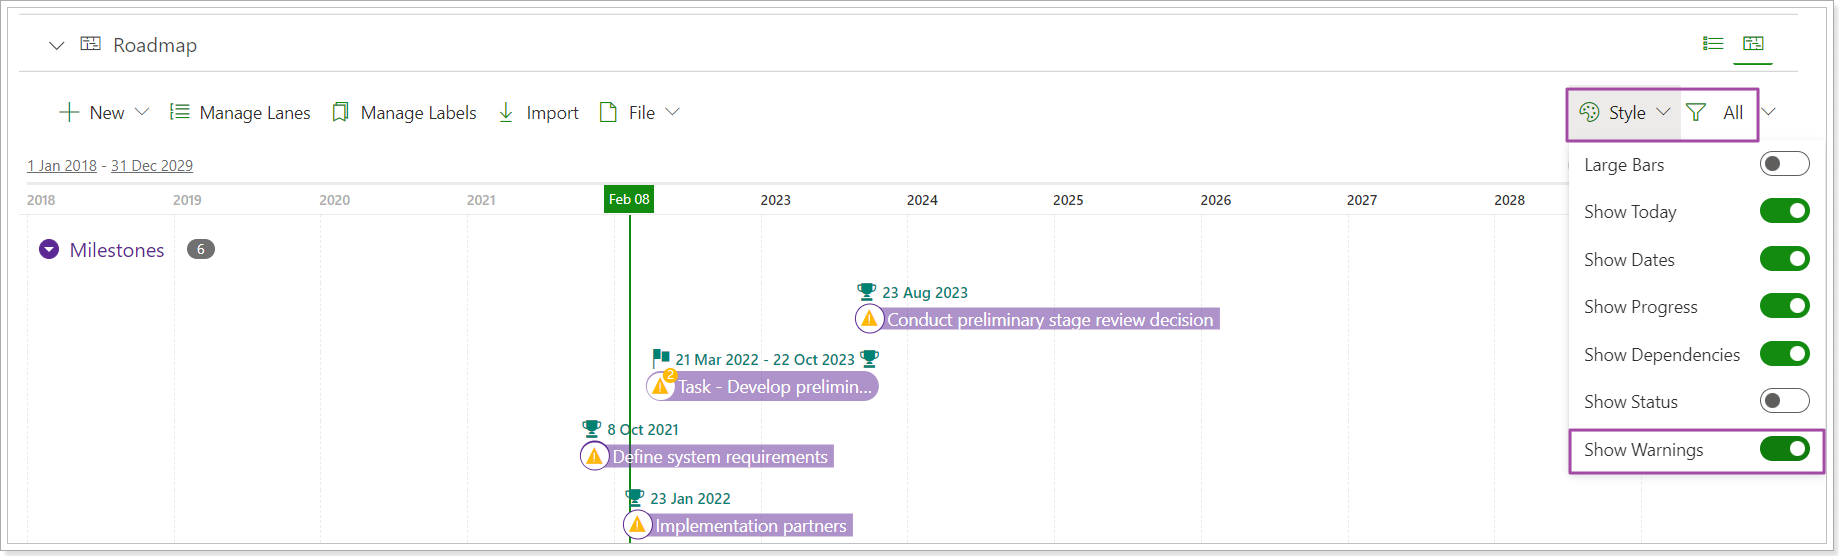
Release Notes 10.4 @ January 19, 2022
1. Dependencies were added to the roadmaps and can be now displayed on the Roadmap Timeline.
It is now possible to establish Dependencies between roadmap items and visually display them on the Roadmap Timeline.
To establish dependencies, click on the required item to open it for editing, switch to the Dependencies page and assign dependencies as required. Save the changes.

The ‘Show Dependencies’ option was added to the ‘Style’ menu that allows showing the dependencies on the Roadmap Timeline.
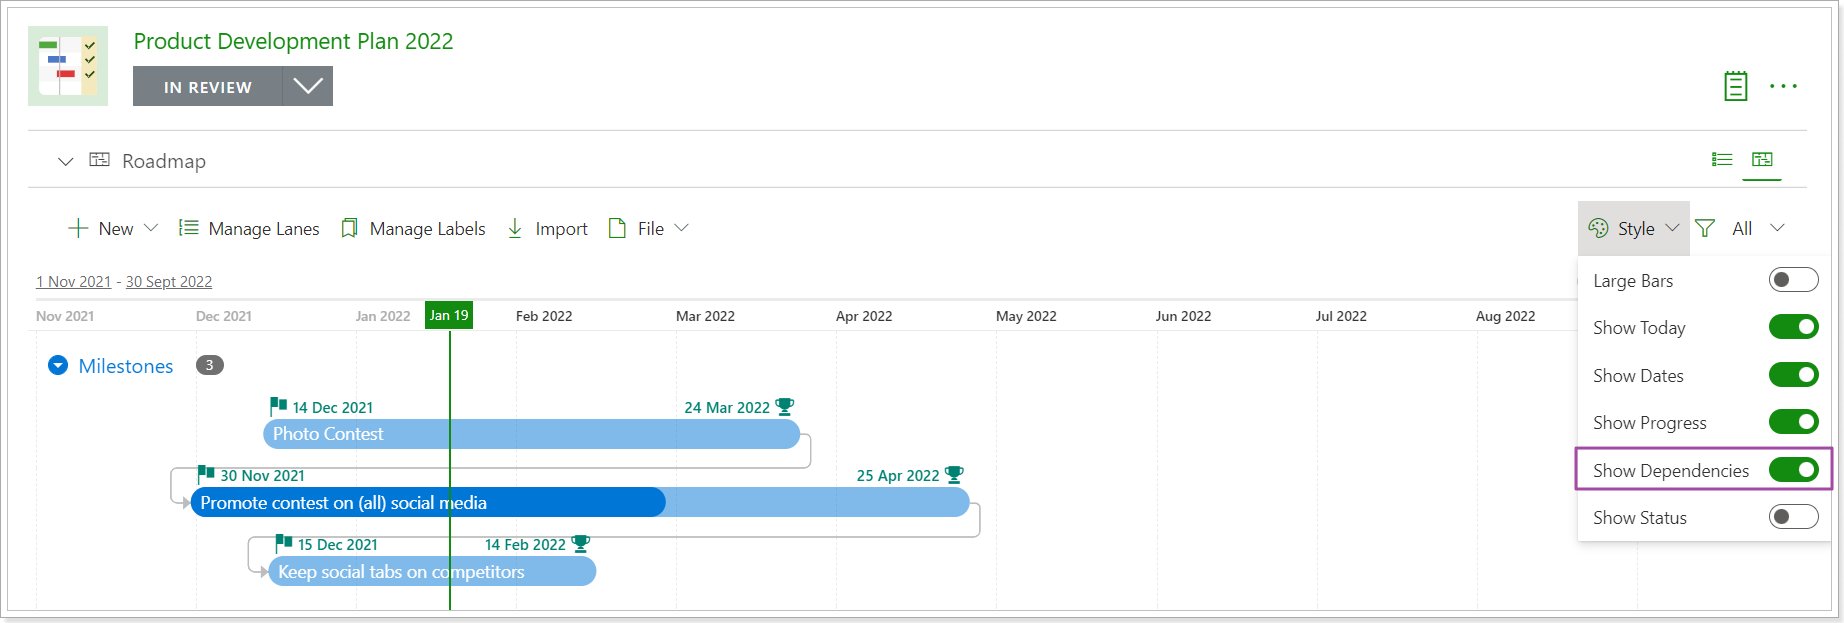
2. Progress and Status value is now transferred from the source element when the item is imported to the roadmap.
Before: Only Start date and Finish date values were imported with items to the roadmap.

Now: Progress and Status values are also imported to the roadmap with the items.
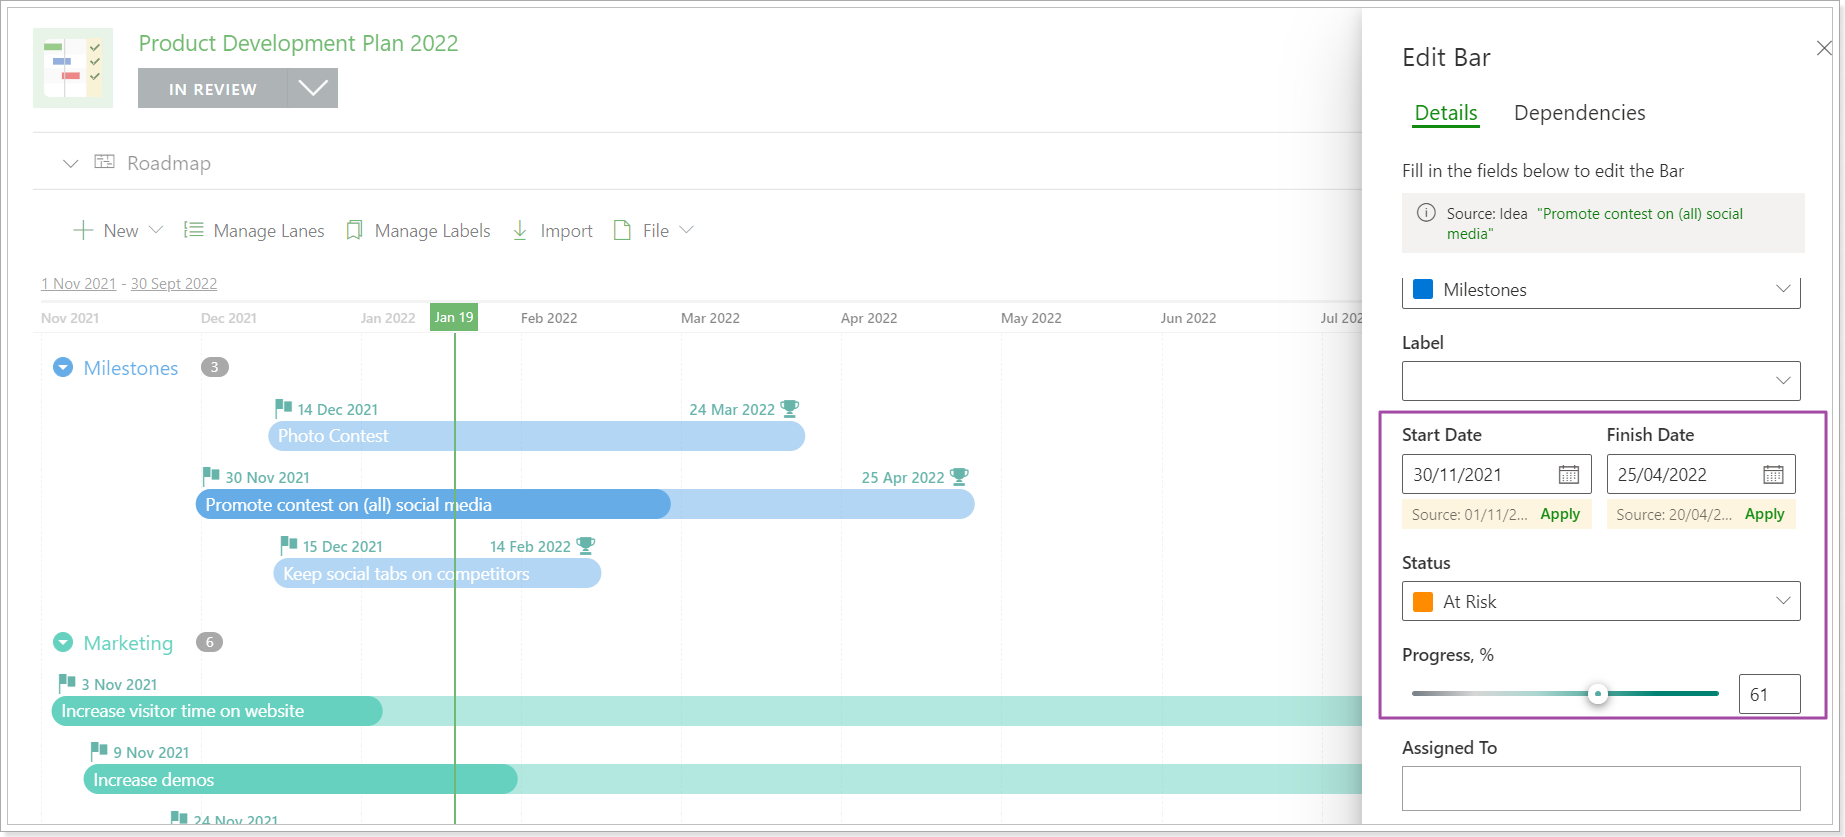
Progress value will be imported for key dates, tasks, and objectives.
Status value will be imported for programs, projects, tasks, key dates, and objectives.
The ‘Show Status’ option was added to the ‘Style’ menu that allows to color roadmap items with the color of the Status instead of the lane color.
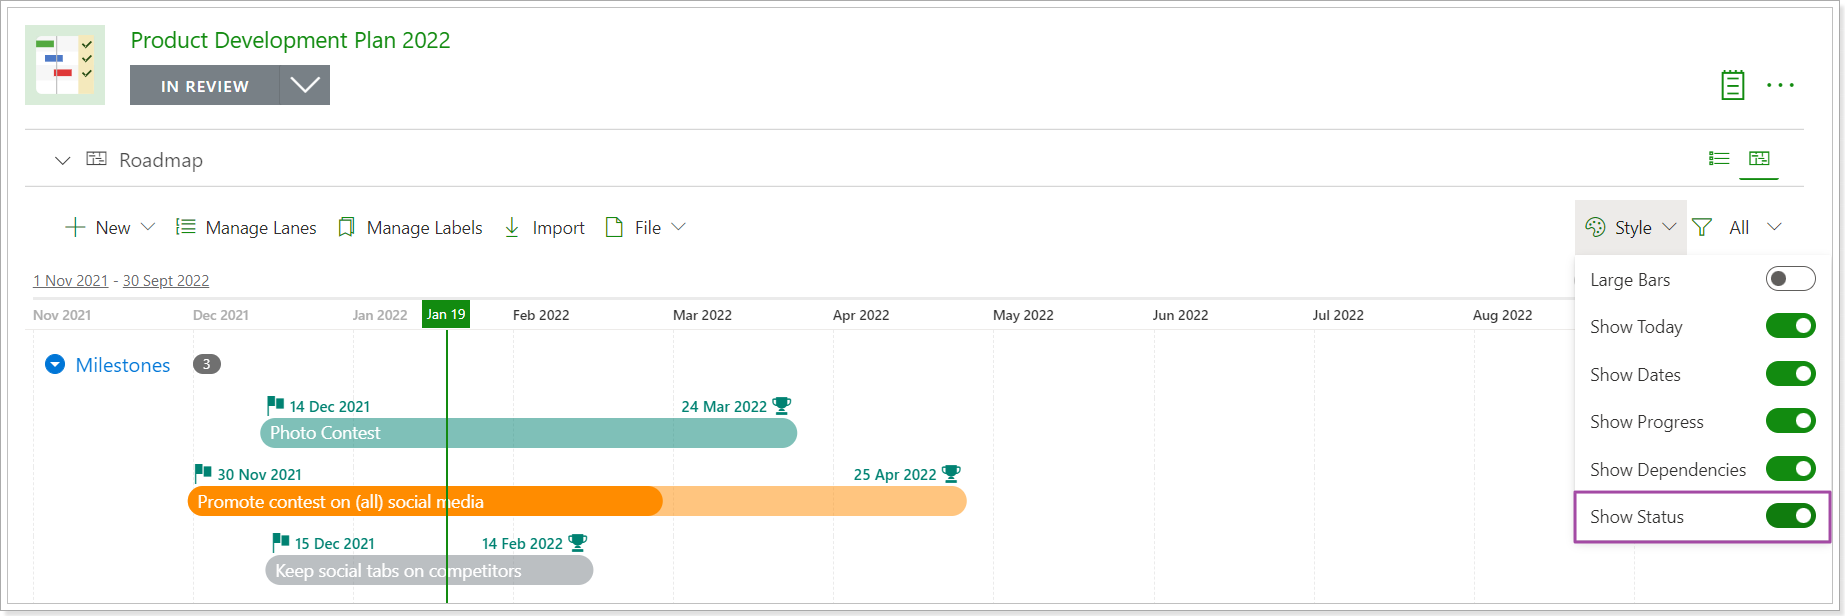
Release Notes 10.3 @ January 13, 2022
1. Table view was added to the Roadmap dashboard.
You can now switch between the table and timeline view on the Roadmap dashboard.
Table view includes two groups: Planned and Backlog.
All items added or imported to the roadmap from the table view are added to the Backlog group first. Items added to the Planned group appear on the timeline view.
Table view allows reviewing details for the roadmap fields and taking actions to the selected items in a bulk (delete, move, clone, set progress, assign the selected items).
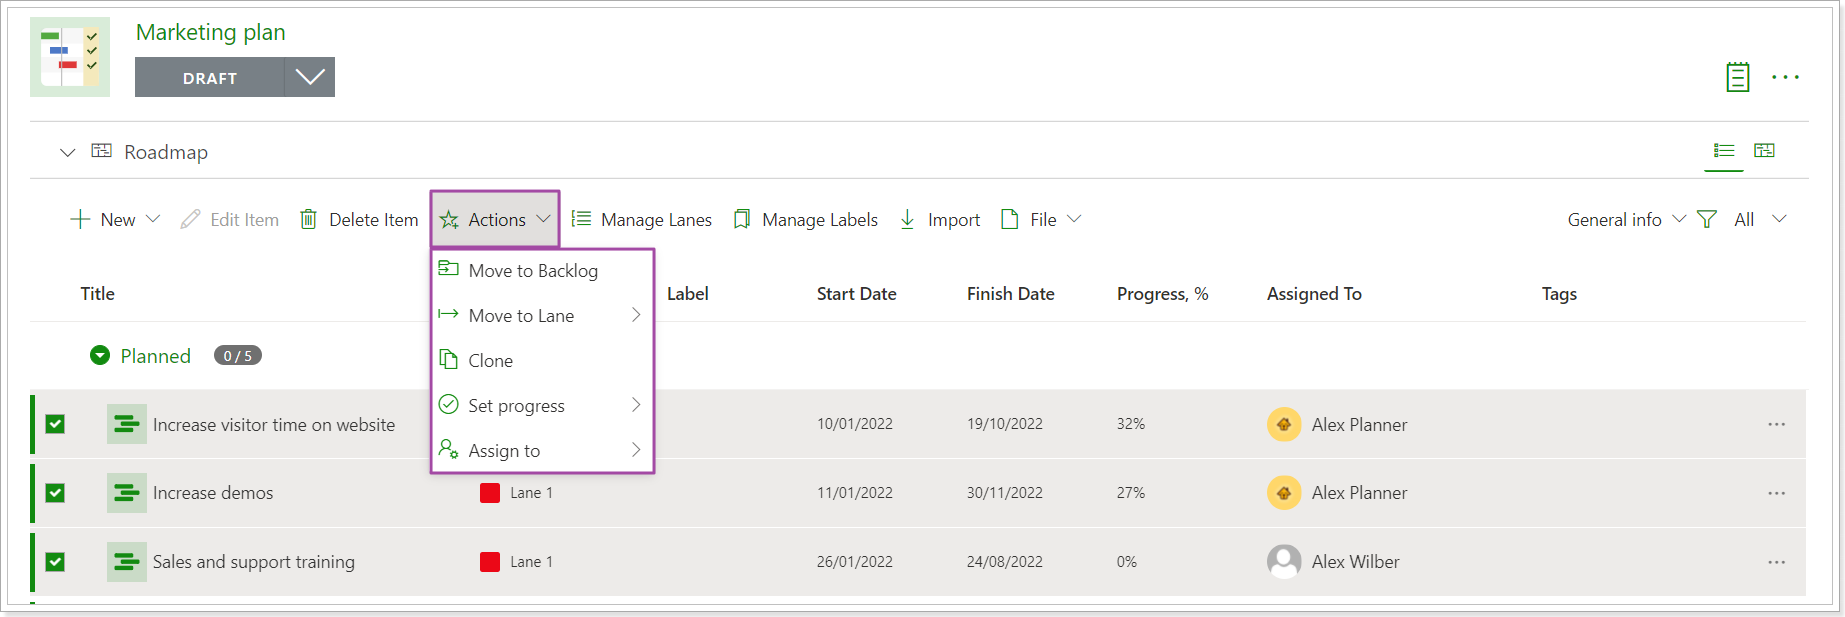
2. Prioritization of roadmap items is now available within the table view on the Roadmap dashboard.
It is now possible to prioritize features, projects, ideas that you may have within your roadmap and determine which features and initiatives should be put on the timeline view of the roadmap and completed as soon as possible.
There are several default views that you can use to prioritize your items. You can also create your own ones as required.
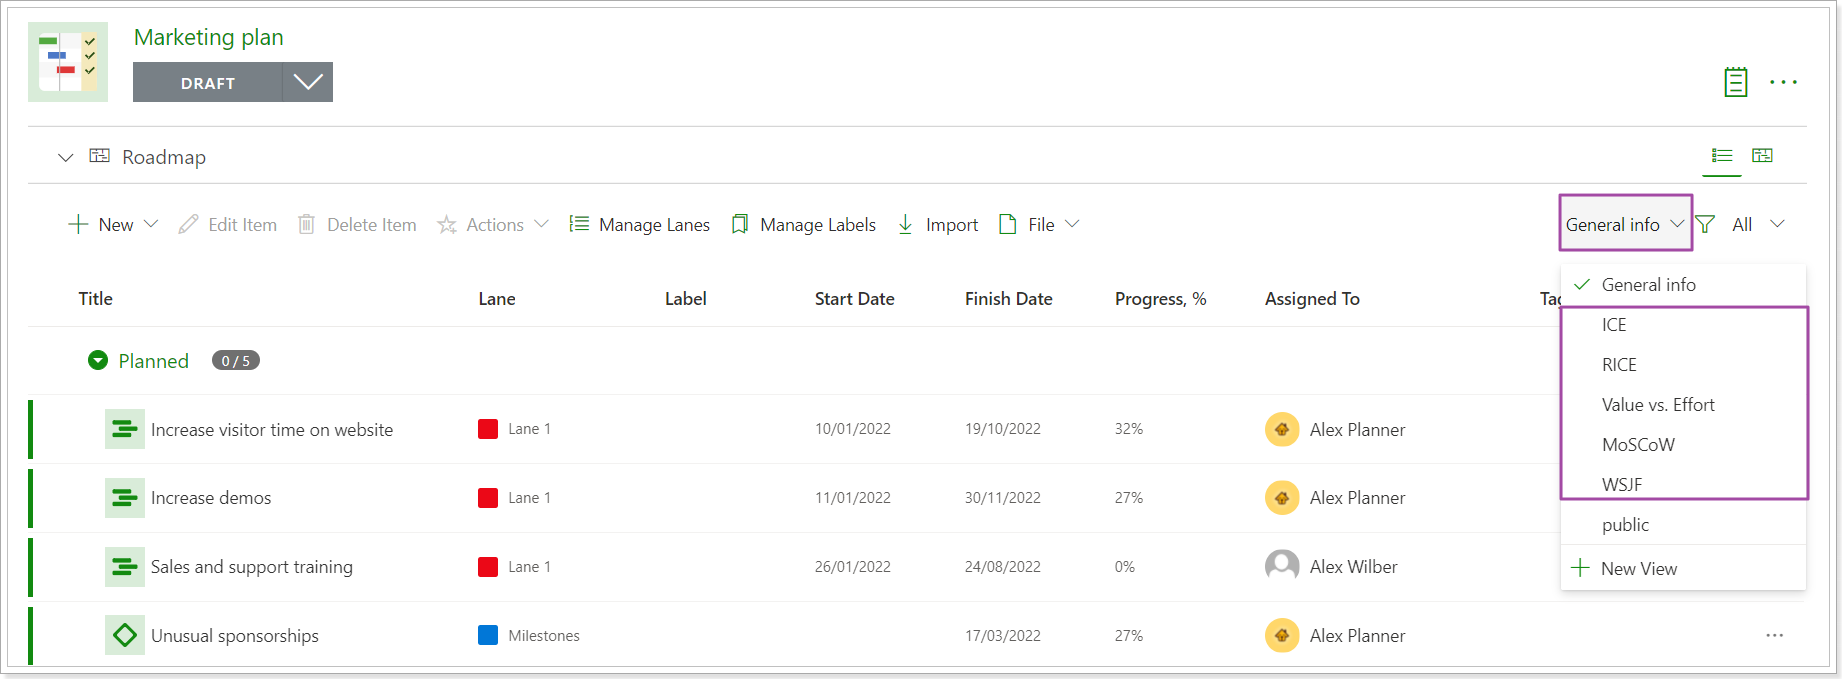
Release Notes 10.0.2 @ December 16, 2021
1. PPM Express Public API
PPM Express exposes REST API that allows integrating PPM Express with your existing tool ecosystem to automate processes and workflows. You can use it to build add-ons for PPM Express or develop integrations between PPM Express and other applications.
Access to the API is granted via personal tokens. Please refer to the Automation settings in PPM Express and Configuring Public API articles for detiled information about public API in PPM Express.
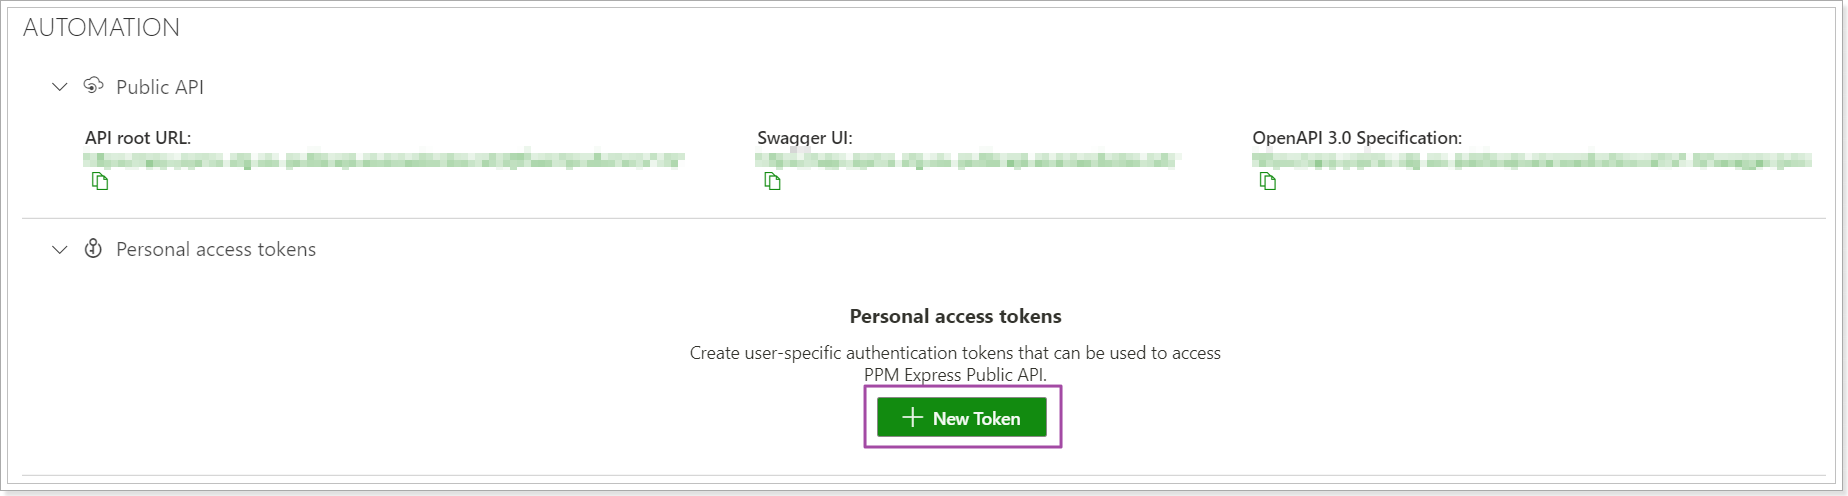
2. 'Style' menu was added to PPM Express Roadmap.
It is now possible to configure the style of the Roadmap bars using the 'Style' menu. You can now make the bars larger, show or hide Dates and/or Progress from the bars.
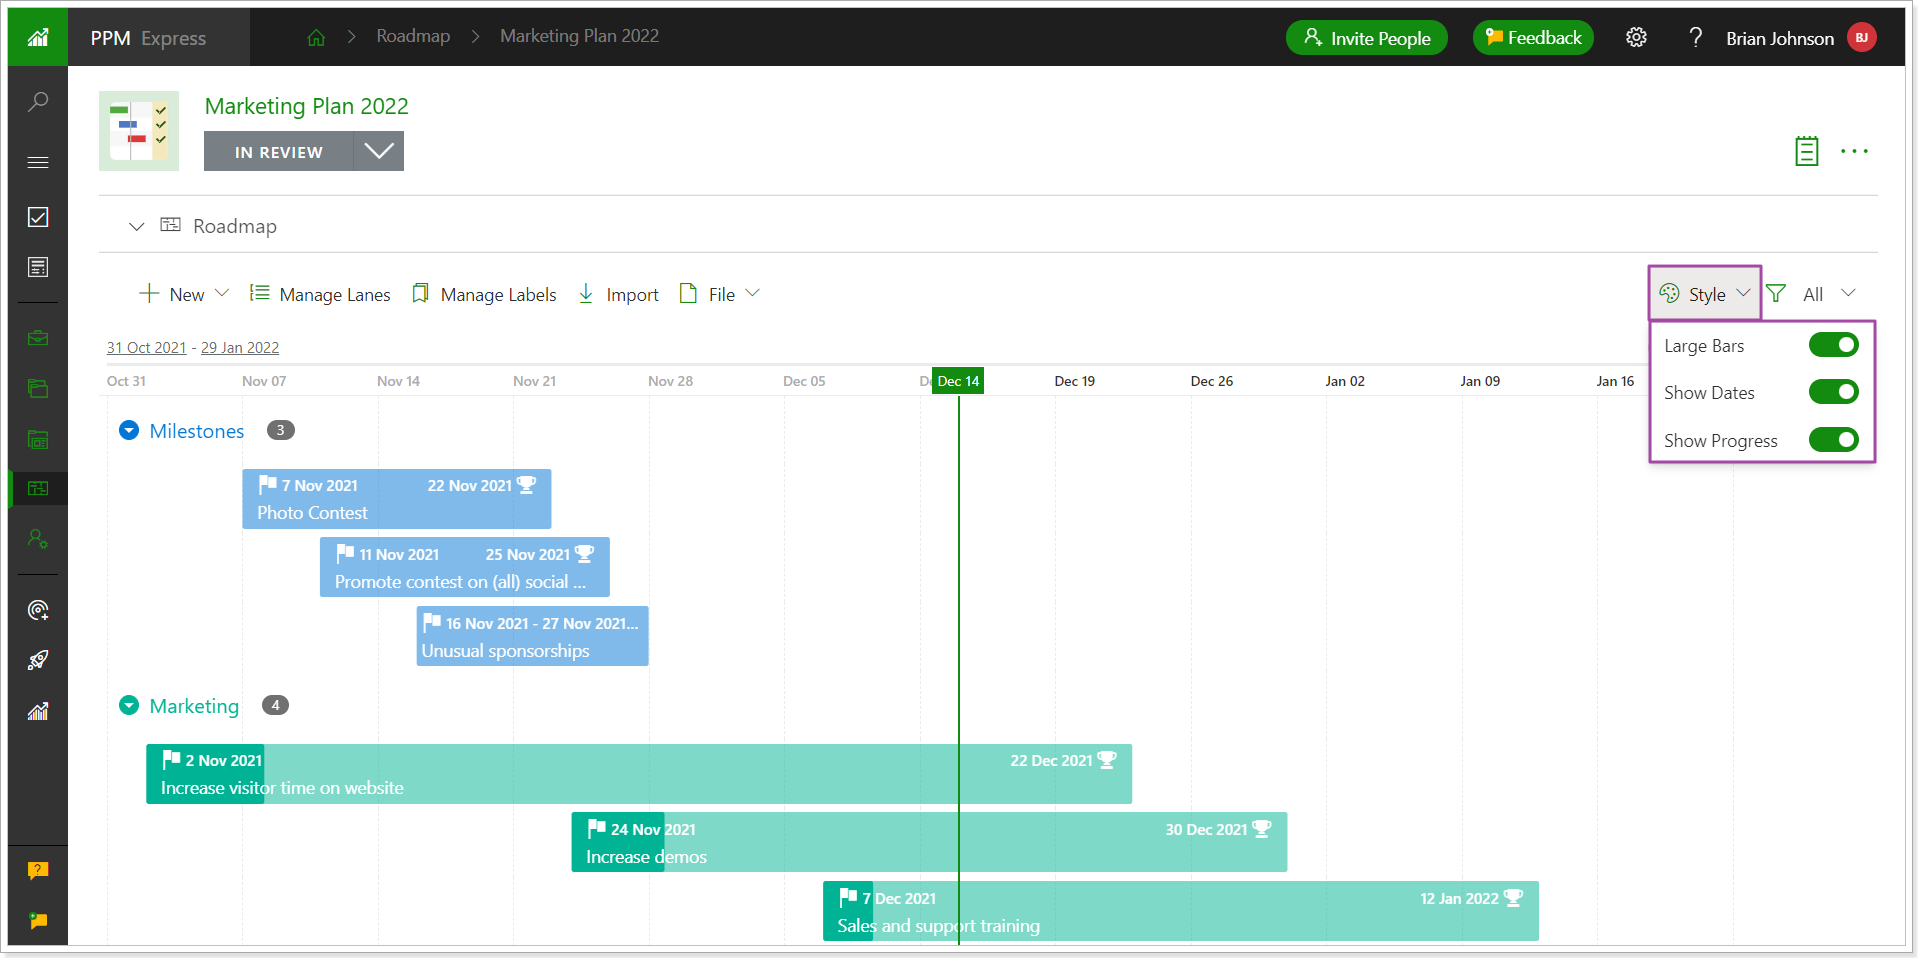
3. 'Export to PNG' option was added to PPM Express entities.
You can now export PPM Express entities to PNG files and use them for reporting purposes or add them to your presentations:
- portfolios
- programs
- projects
- resource
- roadmaps
- tasks
- key dates
- risks
- Projects section of Programs
- Programs and Projects section of Portfolios
- issues
- action items
- iterations
- lessons learned
- key decisions
- change requests
- dependencies
This option is available from the 'Actions' menu of PPM Express pages (table and timeline/swimline views).
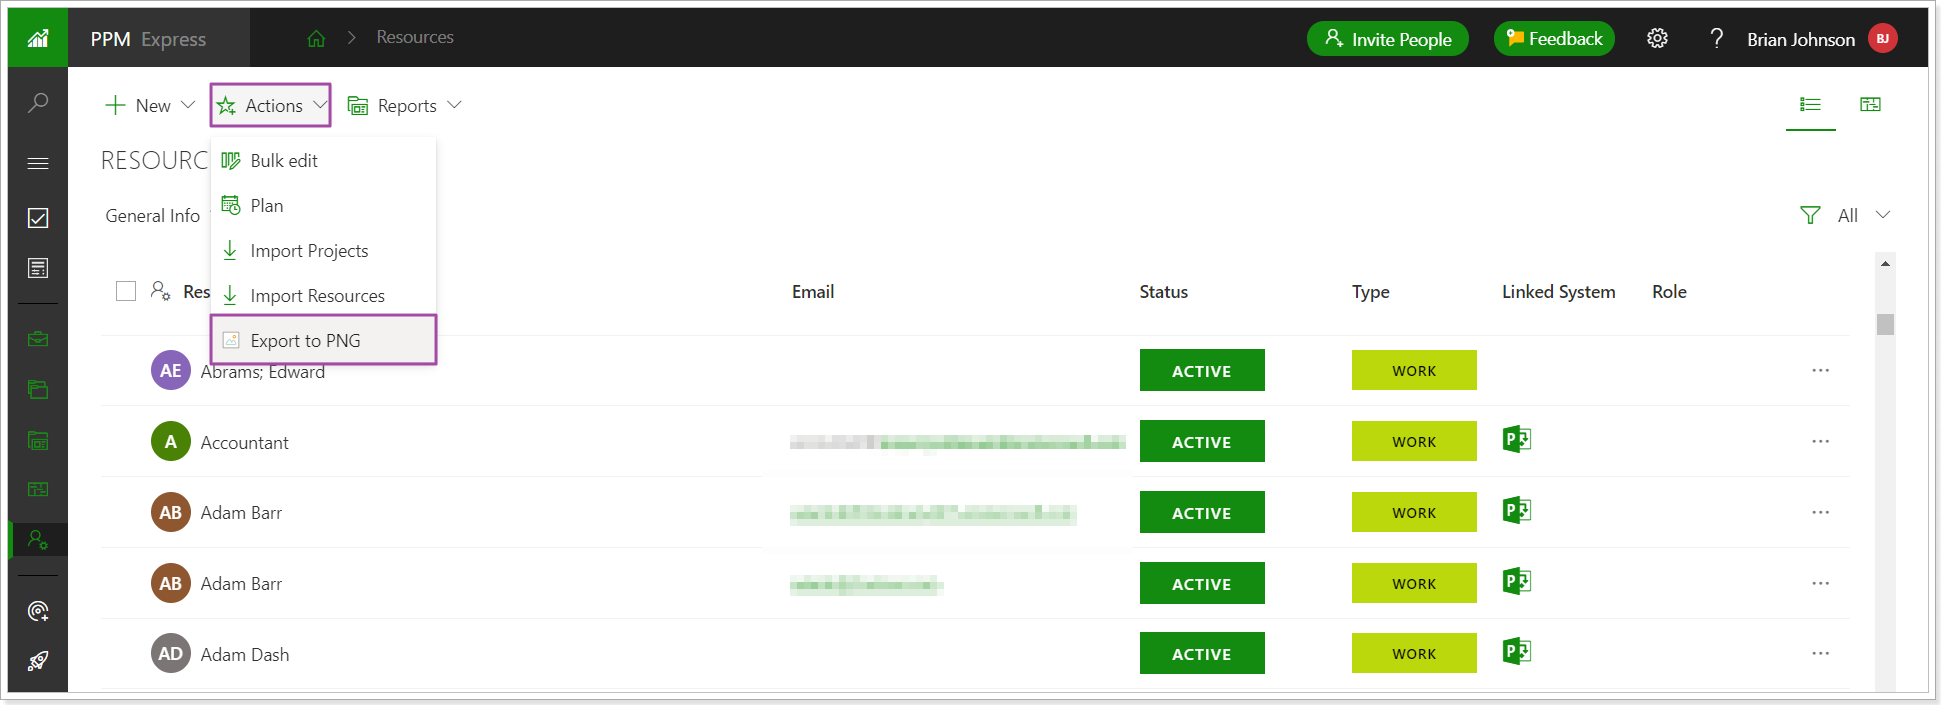
You can also use this option from the File menu of the entities listed above.
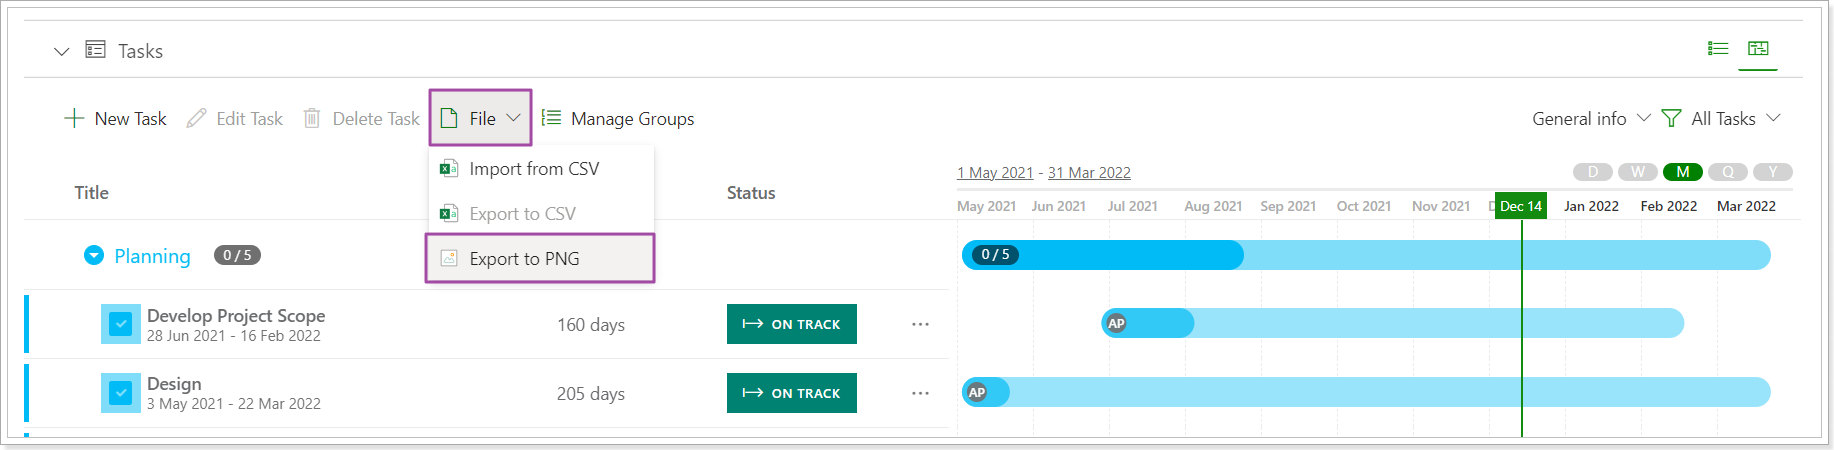
Release Notes 9.5 @ December 9, 2021
1. Duration field was introduced in Project Tasks.
Duration is represented as the number of working days.
Start Date, Due Date, and Duration fields are now interconnected, if there are any changes to one field, the values for other fields will be recalculated accordingly.
By default Start and Due date values are filled in automatically on tasks creation taking into account the Project Start date (or the current date) and the Duration is set to one day (if you do not set your own values).
Tenant Calendar Settings and Exceptions are taken into account when the Duration is calculated to display an accurate number of working days in your organization.
As defining task duration is an important step in the task planning process, the Duration field will now be a part of the default views in Tasks.
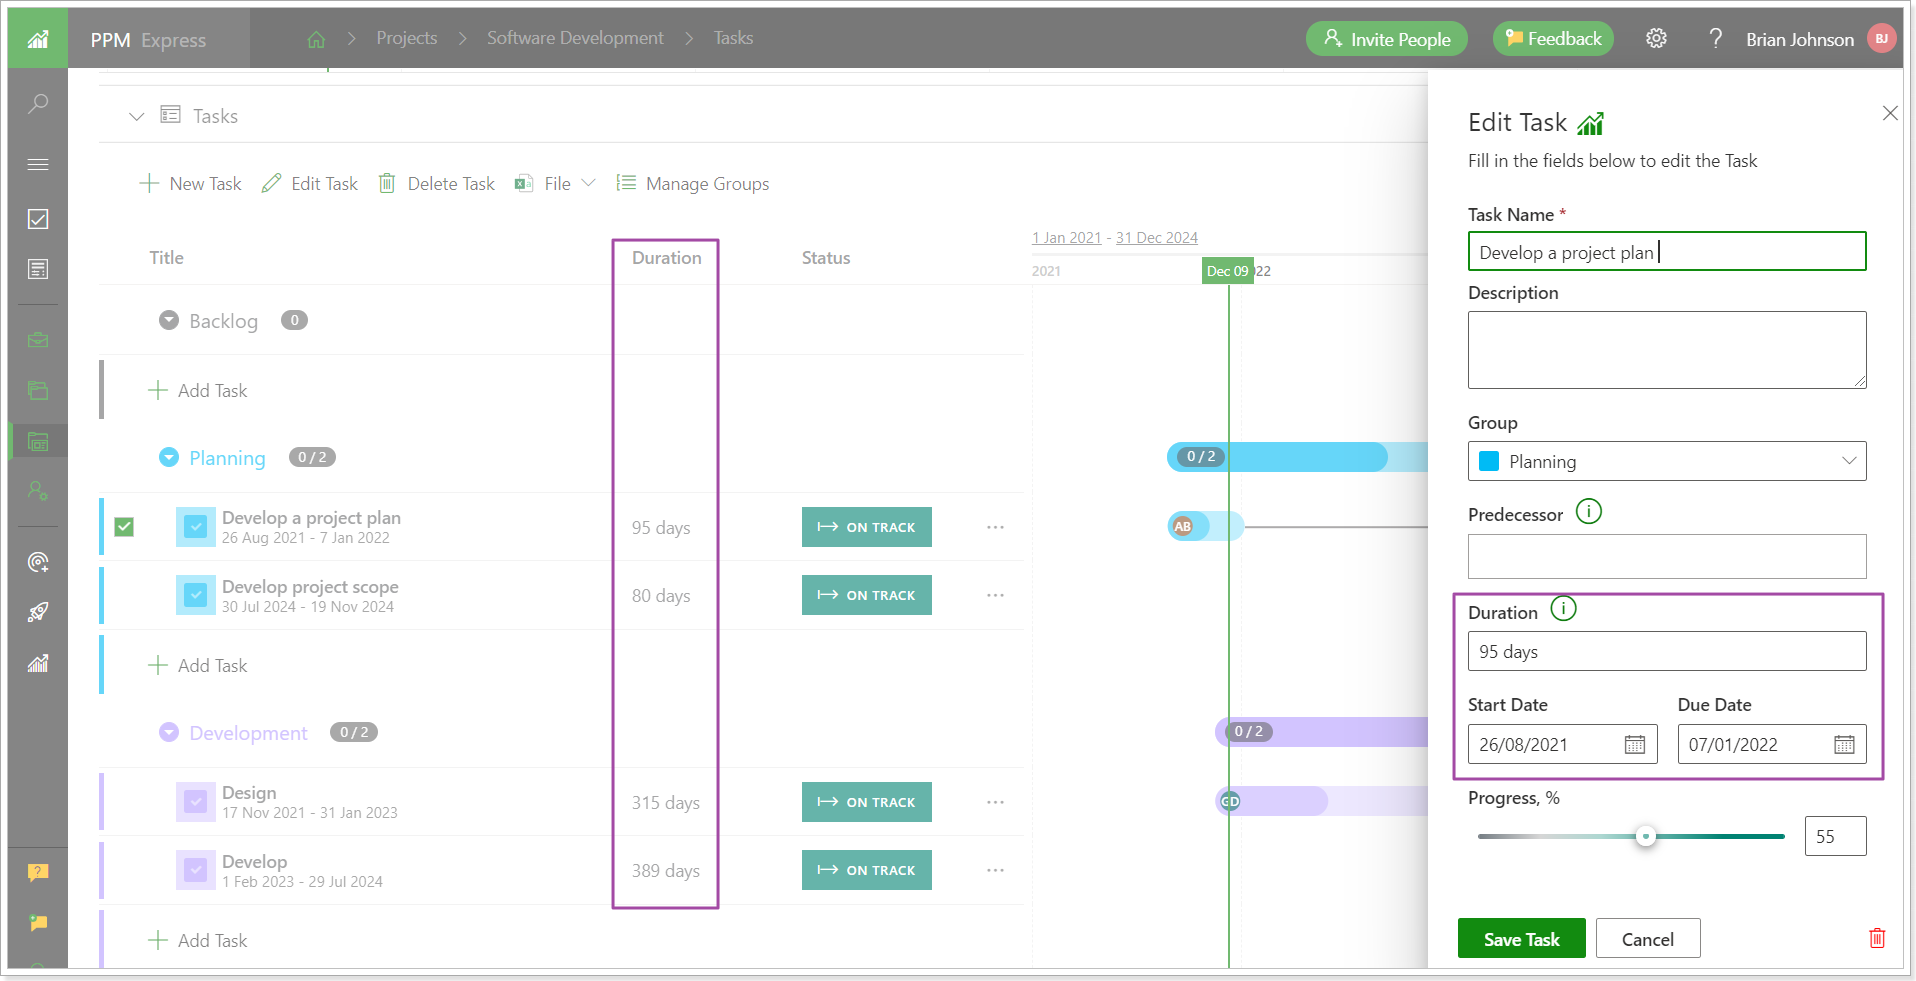
Please note: If there was a custom Duration field created for your tasks, it will be automatically renamed to Duration (Custom) after the release.
Please note: Duration field value will be set automatically only for those existing tasks that have both Start and Due dates.
2. Key Dates will not be deleted automatically in PPM Expres when they are deleted in the External system.
Before: When the imported Key Dates were deleted in the external systems, they were also automatically deleted from PPM Express after data synchronization.
Now: The Key Dates imported from the external systems (Azure DevOps, Jira, and Planner only) will not be deleted from PPM Express after data synchronization, even if they were deleted in the external system. A warning will be shown for such Key Dates instead, notifying that this item was deleted there (or the item has no dates set).
Please note: If you disable warnings for the project, these warnings will not appear for the deleted Key Dates.
3. The link was disabled for resources that do not exist in PPM Express but were added to the Time project section (synchronized from PPM Express Time).
Before: The resources were clickable in the Time project section. When clicking on such resource a window was opened notifying that the user was not found.
Now: This link is disabled for resources that do not exist in PPM Express but were added to the Time project section during data synchronization from PPM Express Time. If a resource is created in PPM Express, it will be linked with the resource in the Time section and the link will lead to the Resource Dashboard.
Release Notes 9.2.1 @ November 22, 2021
1. The Report settings page was redesigned to include the list of available report packs.
Before: Users downloaded and configured the PPM Express Power BI Report packs from the help center.
When the report pack was configured, users could paste the report home page URL to PPM Express 'Home page report URL' field to navigate to this report from PPM Express pages (Portfolios, Programs, Projects pages as well as Portfolio, Programs and Project dashboards). However, users could add only one pack to be displayed on these PPM Express pages.
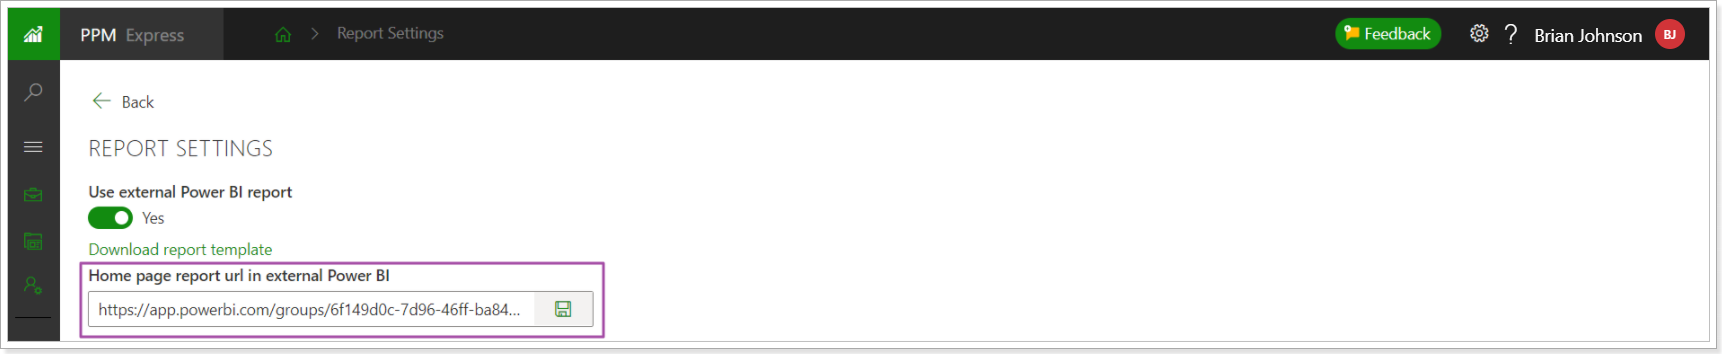
Now: The report packs are available for download from the Report Settings page directly.
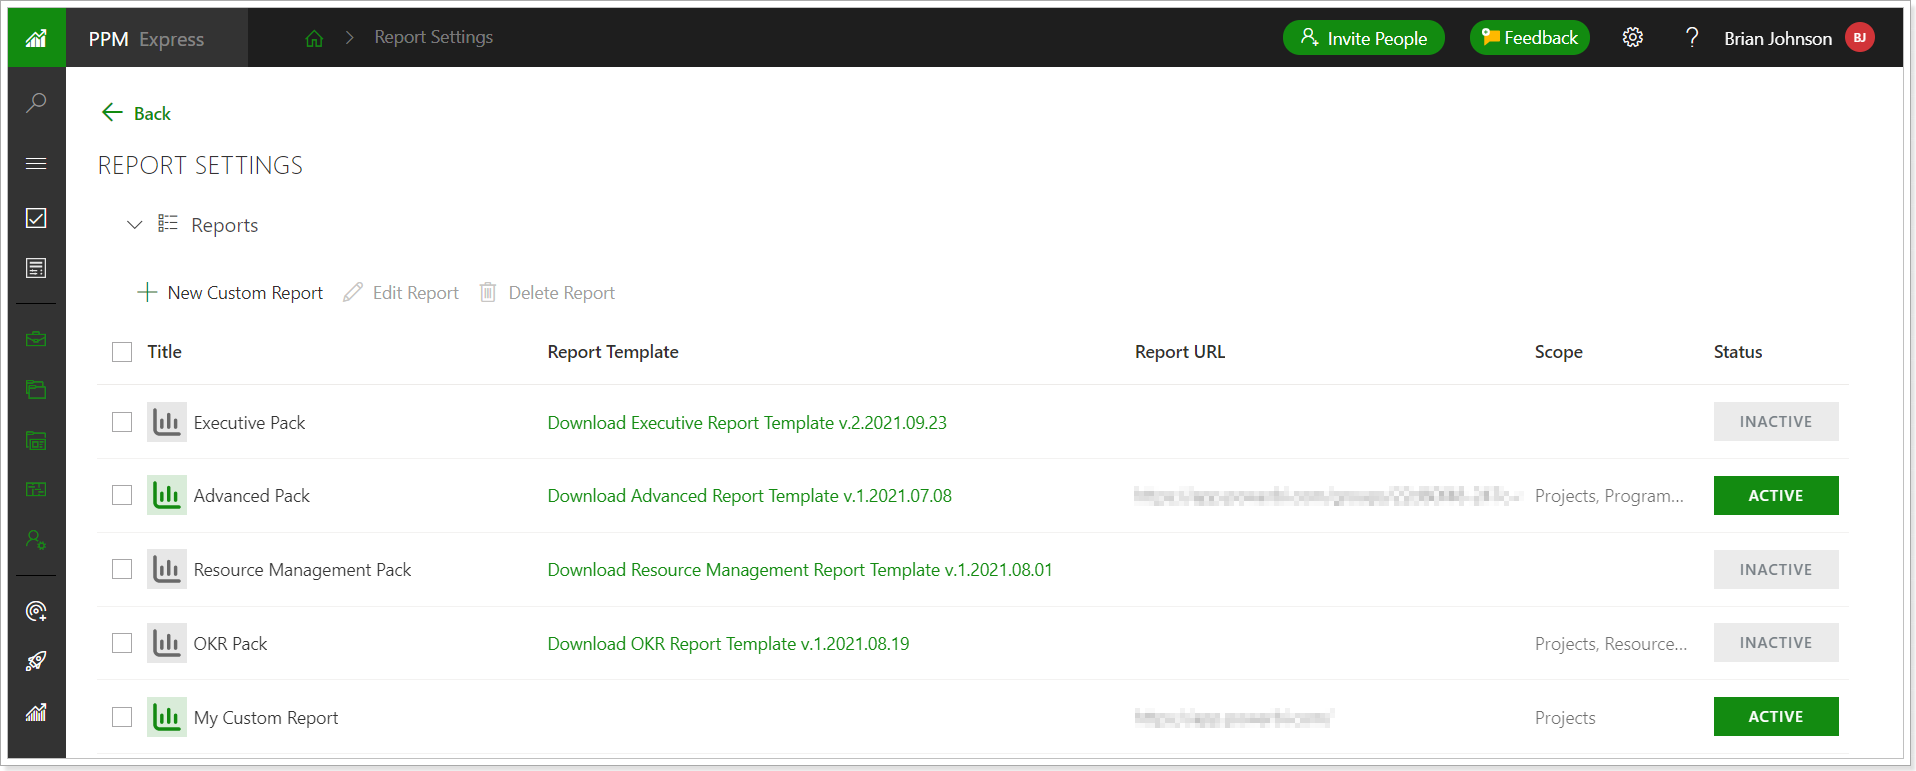
Also, the 'Report URL' and the 'Scope' fields were added to each pack on the Report Settings page.
Users can now download each pack from PPM Express directly, configure them and then paste the home page Report URL of each pack to PPM Express. As the Report URL is added to PPM Express, users can select the scope (PPM Express pages) where these reports will become accessible.
Users can add custom reports to the Report Settings page and make them accessible from other PPM Express pages for easier navigation.

Users can now access their reports (PPM Express report packs and custom reports) from PPM Express pages directly.
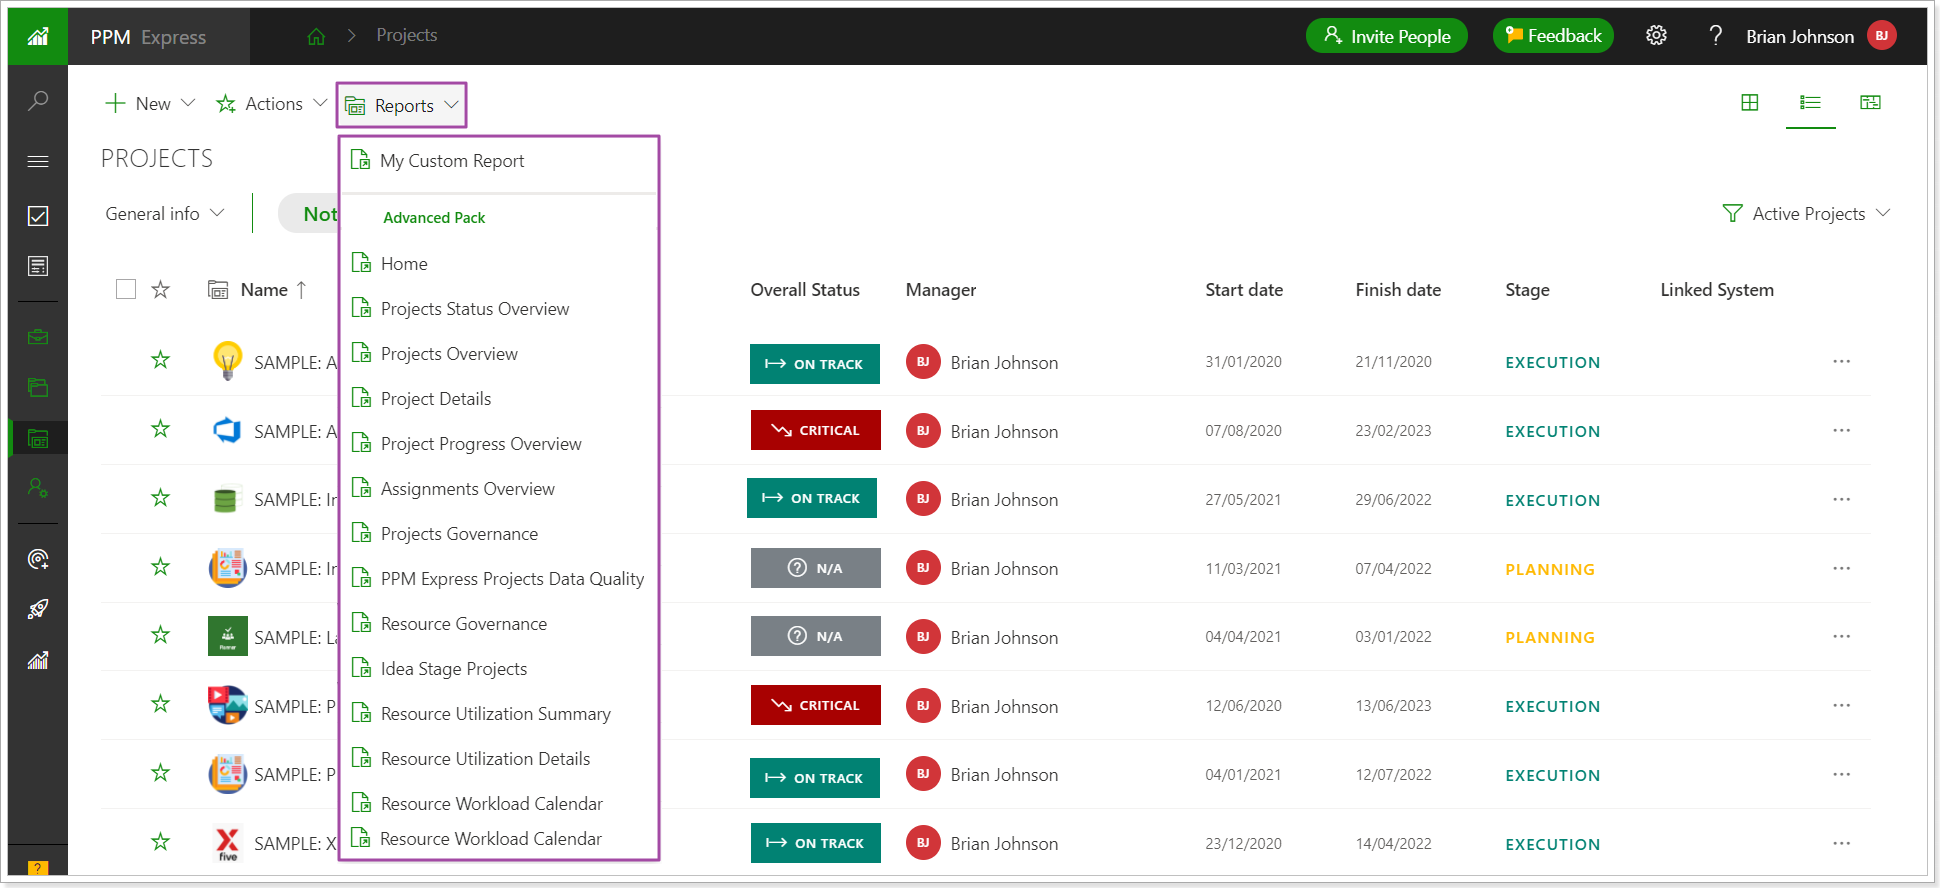
Please note: PPM Express Planner and Azure DevOps report packs can be also added to PPM Express report settings as custom reports.
Please note: If you have configured the Advanced report pack and added the report URL to PPM Express, it will be preserved with the new release.
If you have configured any other report pack before this release and added its URL to PPM Express 'Home page URL' field, it is required to open the Report Settings after the release and add the report pack home page URL to the 'Report URL' of the required report pack.
Release Notes 9.1 @ November 11, 2021
'Days of week' section was added to calendar exceptions.
Both tenant-wide and resource calendar exceptions were updated with a new 'Days of week' section.
Before: When you created an exception and provided the start and finish dates, this exception was applied for the whole period selected.
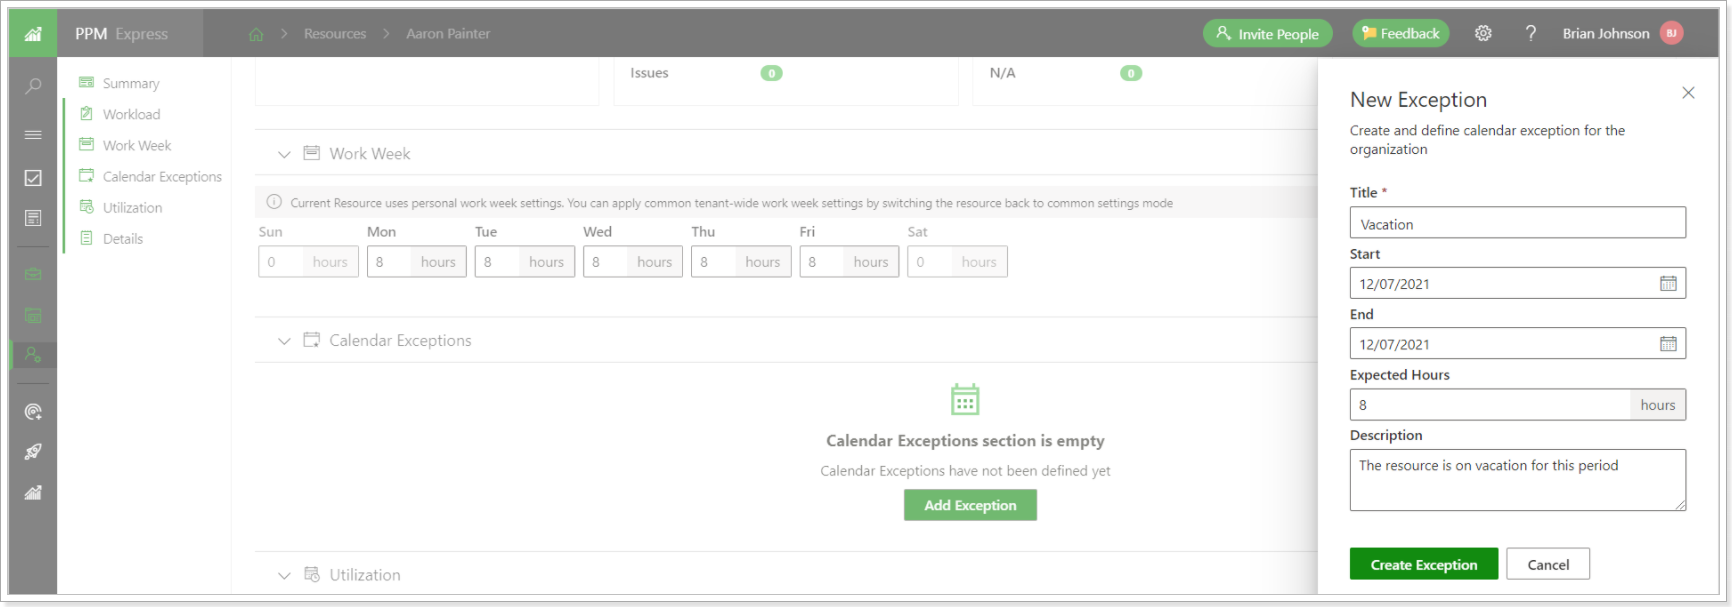
Now: When you create an exception and provide the start and finish dates, you can also specify the days of the week for which this exception should be applied. Thus, you can exclude the days of the week that should have regular hours or apply another exception for these days.
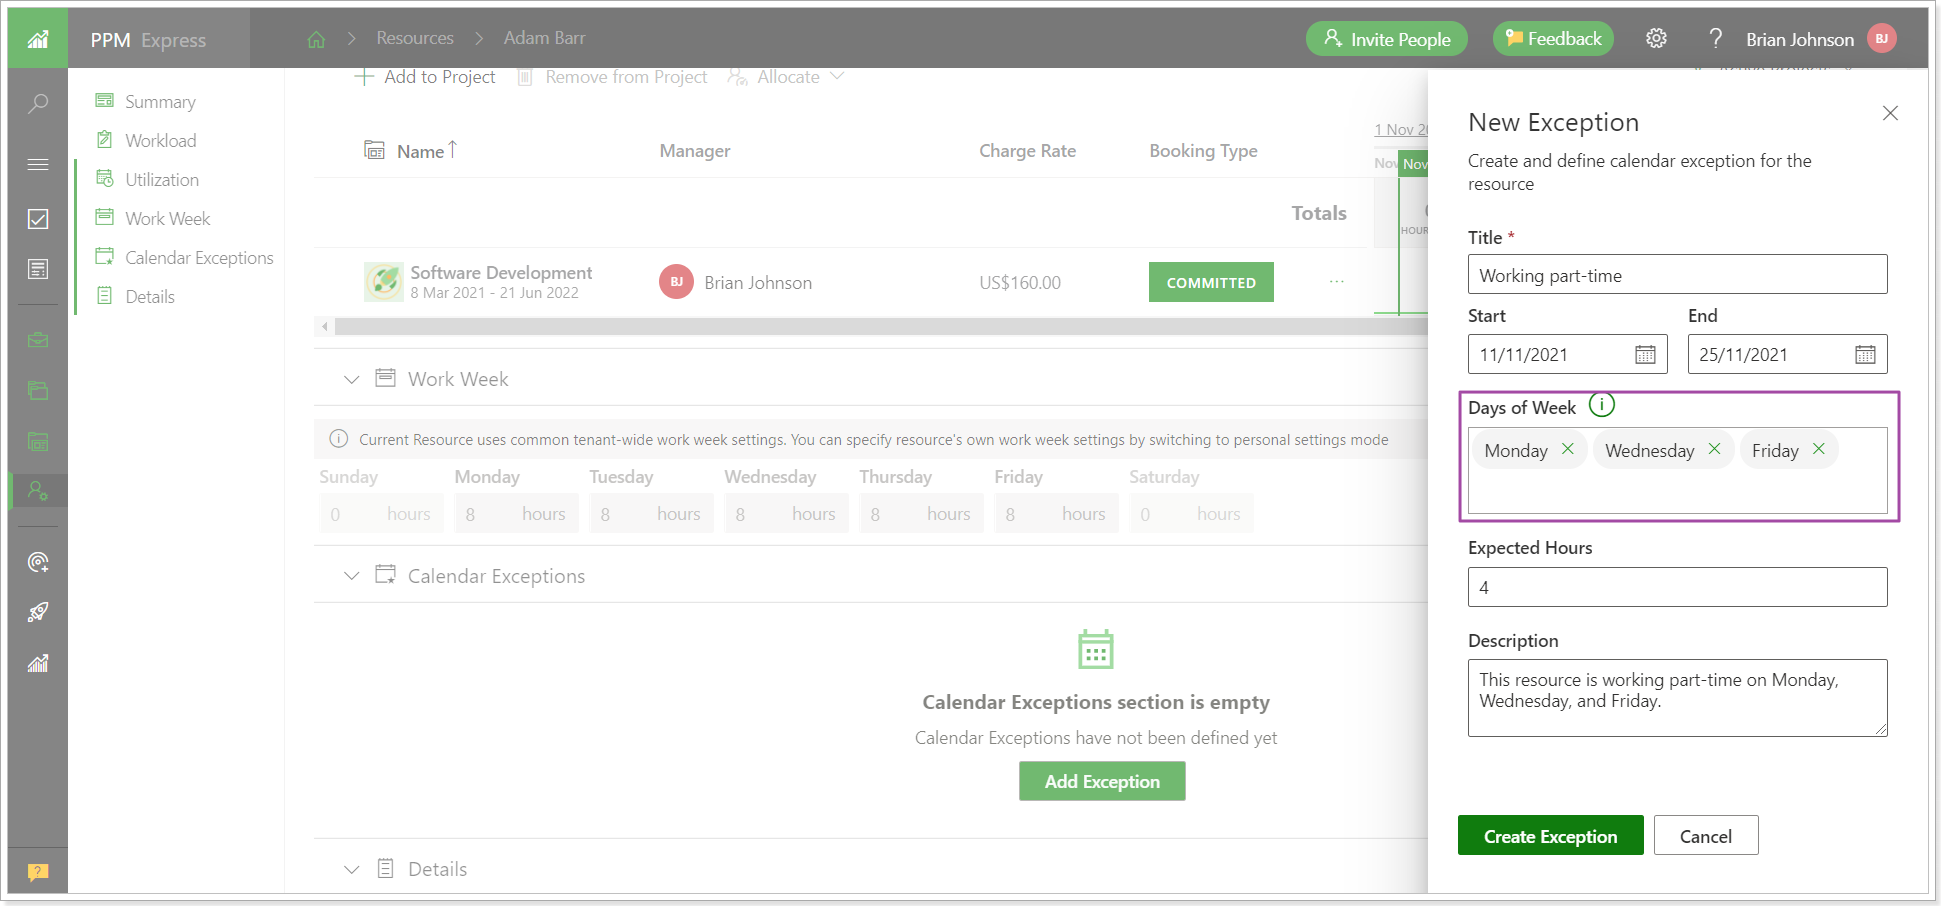
Release Notes 9.0 @ November 4, 2021
1. A new Roadmaps module was added to PPM Express to visualize your company and team strategies, plans and communicate major steps and milestones. The Roadmaps module option is currently available as a Preview for customers on PPM Express Professional and Professional Enterprise plans.
The Roadmap consists of a series of tasks and milestones that are assigned to different teams or stakeholders. A roadmap allows decision-makers to plan and track their company's progress at the macro level by combining team-specific roles and business objectives.
You can now create Roadmaps, create groups and labels within the Roadmap, and add items either manually or by importing them from PPM Express Projects, Portfolios, Programs, Tasks, Objectives, Key Dates, Ideas.
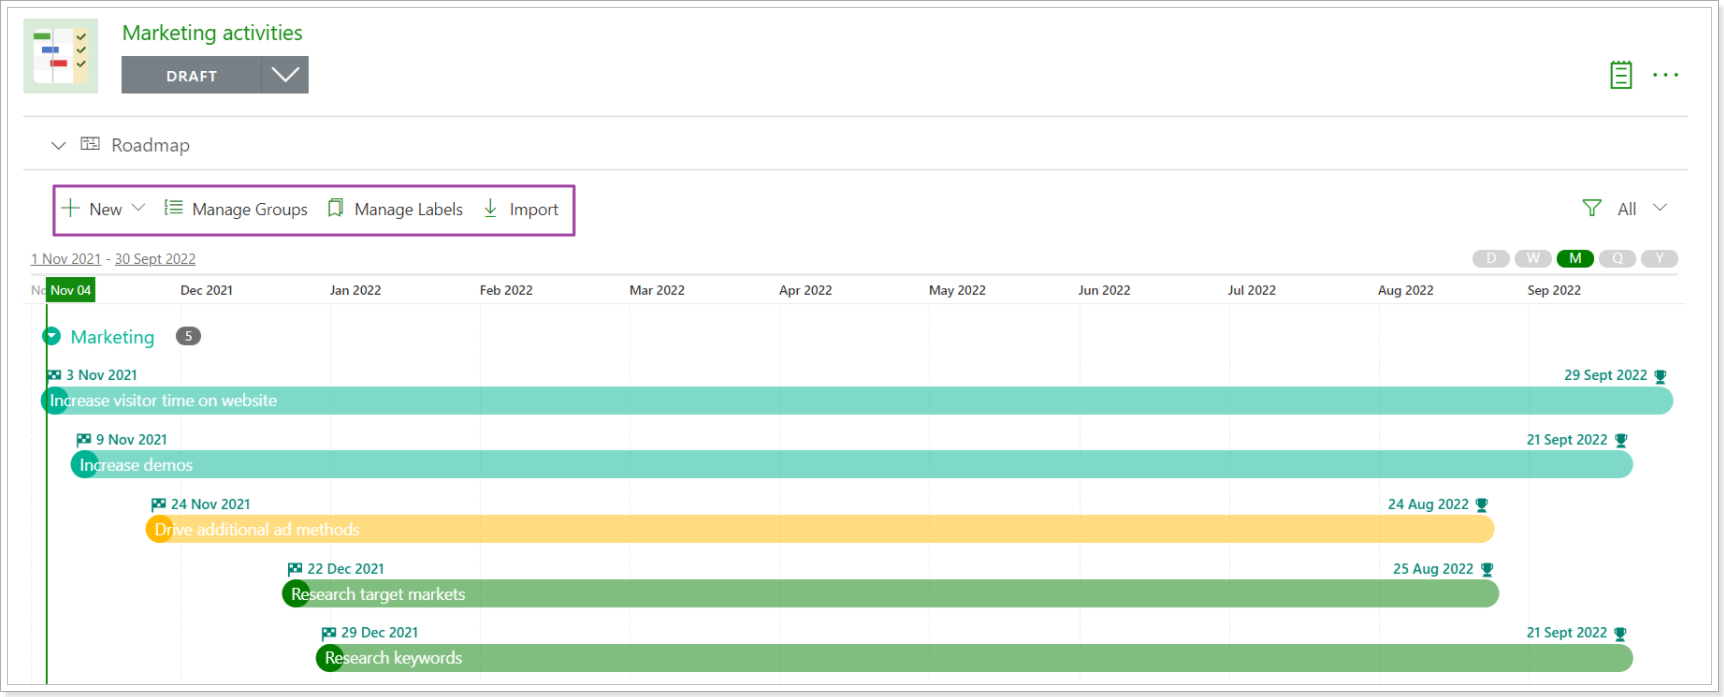
When the items are added you can add them to the required groups, change the position of the items on the timeline directly using the drag and drop functionality.
It is also possible to change the timeframe for the item by dragging it to the required date on the timeline.
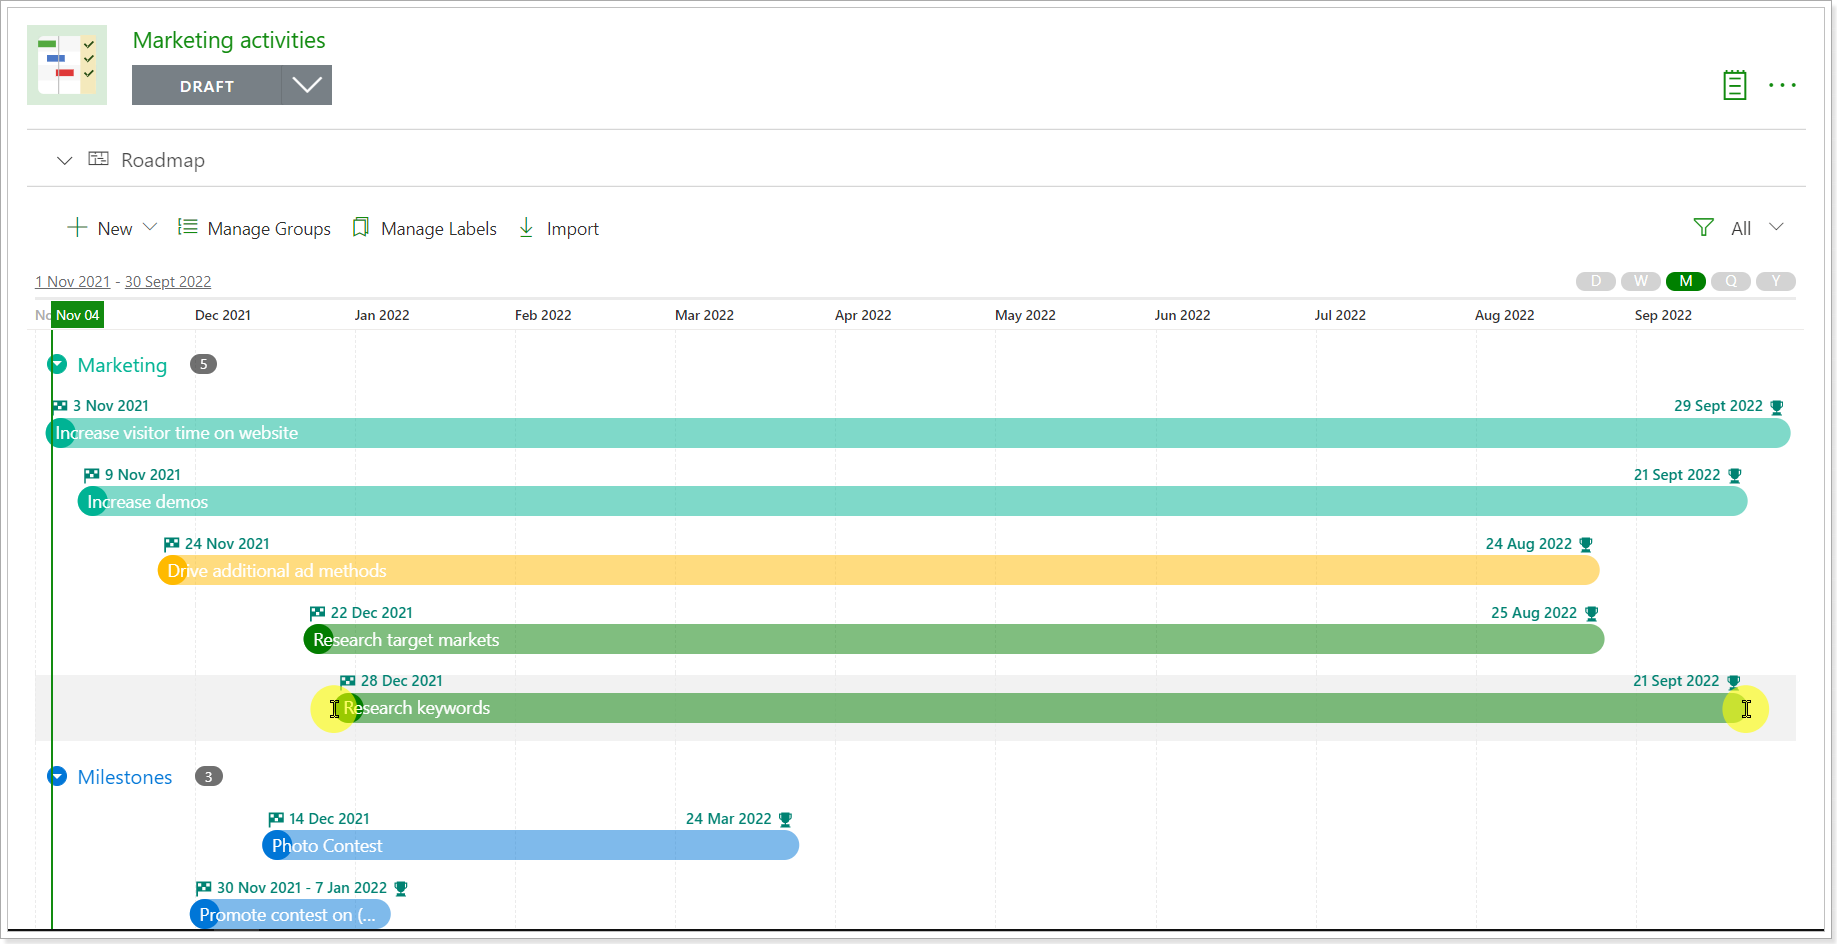
All Roadmaps can be viewed on the Roadmaps page that includes a list of all Roadmaps and allows creating and managing Roadmaps within the organization.
Similar to other PPM Express pages, the Roadmaps page may be viewed as cards or a configurable table. Use filters to quickly find the required roadmap.
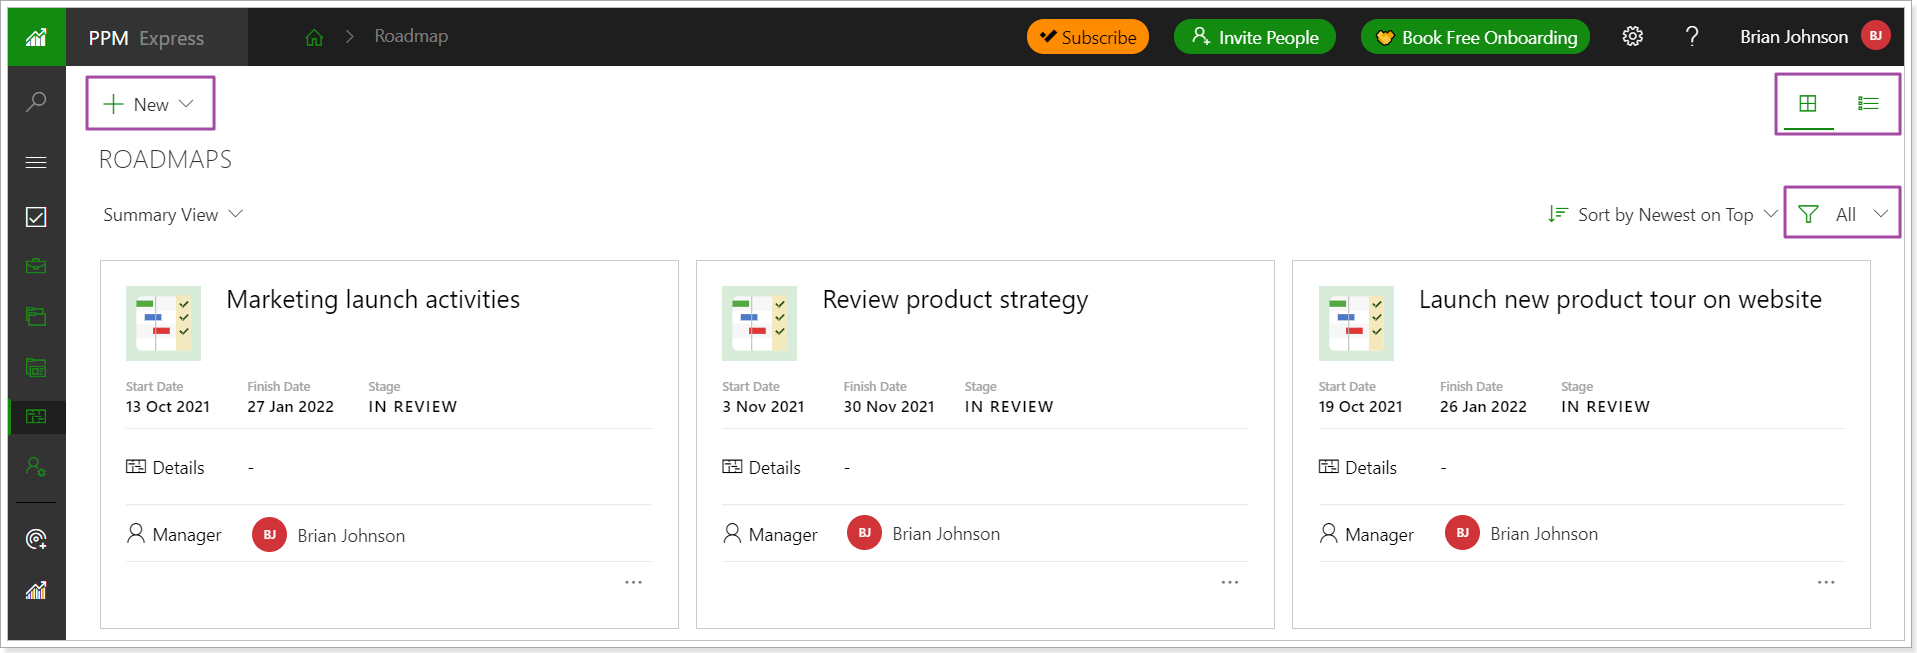
2. The scroll option was added to the Tags field to review all available tags at once.
Before: Only the first 10 tags were available in the Tags field. To find tags, users could start typing the tag name and select the required one.
Now: All tags are available in the Tags field. The scroll option was added to the Tags field allowing to find the required tag if users don't know its name.
3. People Management page was redesigned for easier navigation.
The Roadmaps permission section was added to People Management to assign permissions to view, edit and create roadmaps.
User Settings page was redesigned for easier navigation.
Before: Common settings, Project, Program, Portfolio permissions were open and displayed on the User Settings page.
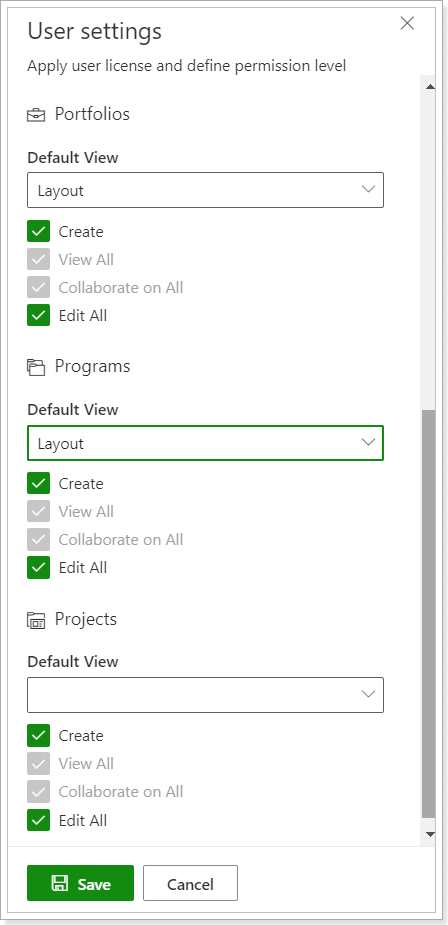 Now: Common Settings, Project, Program, Portfolio, and Roadmap permissions are hidden. To assign permissions for a user as required, click on permission to open it first. You don't need to scroll down to the required permission, just select it from the list and open it.
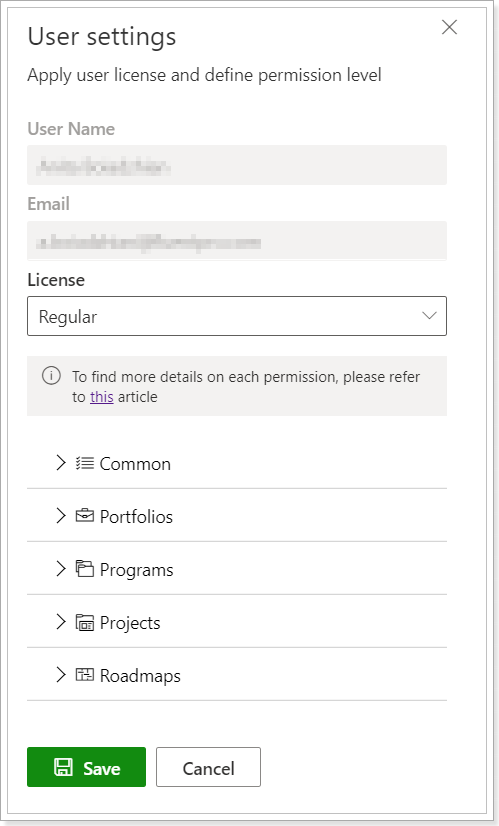
4. The items can now be deleted from the Edit Item Page directly using the red bin button.
Before: To delete PPM Express items, users selected the item in question and clicked the Delete item button.

Now: A red bin button was added to the Edit Item page and users can now delete items from this page as well.
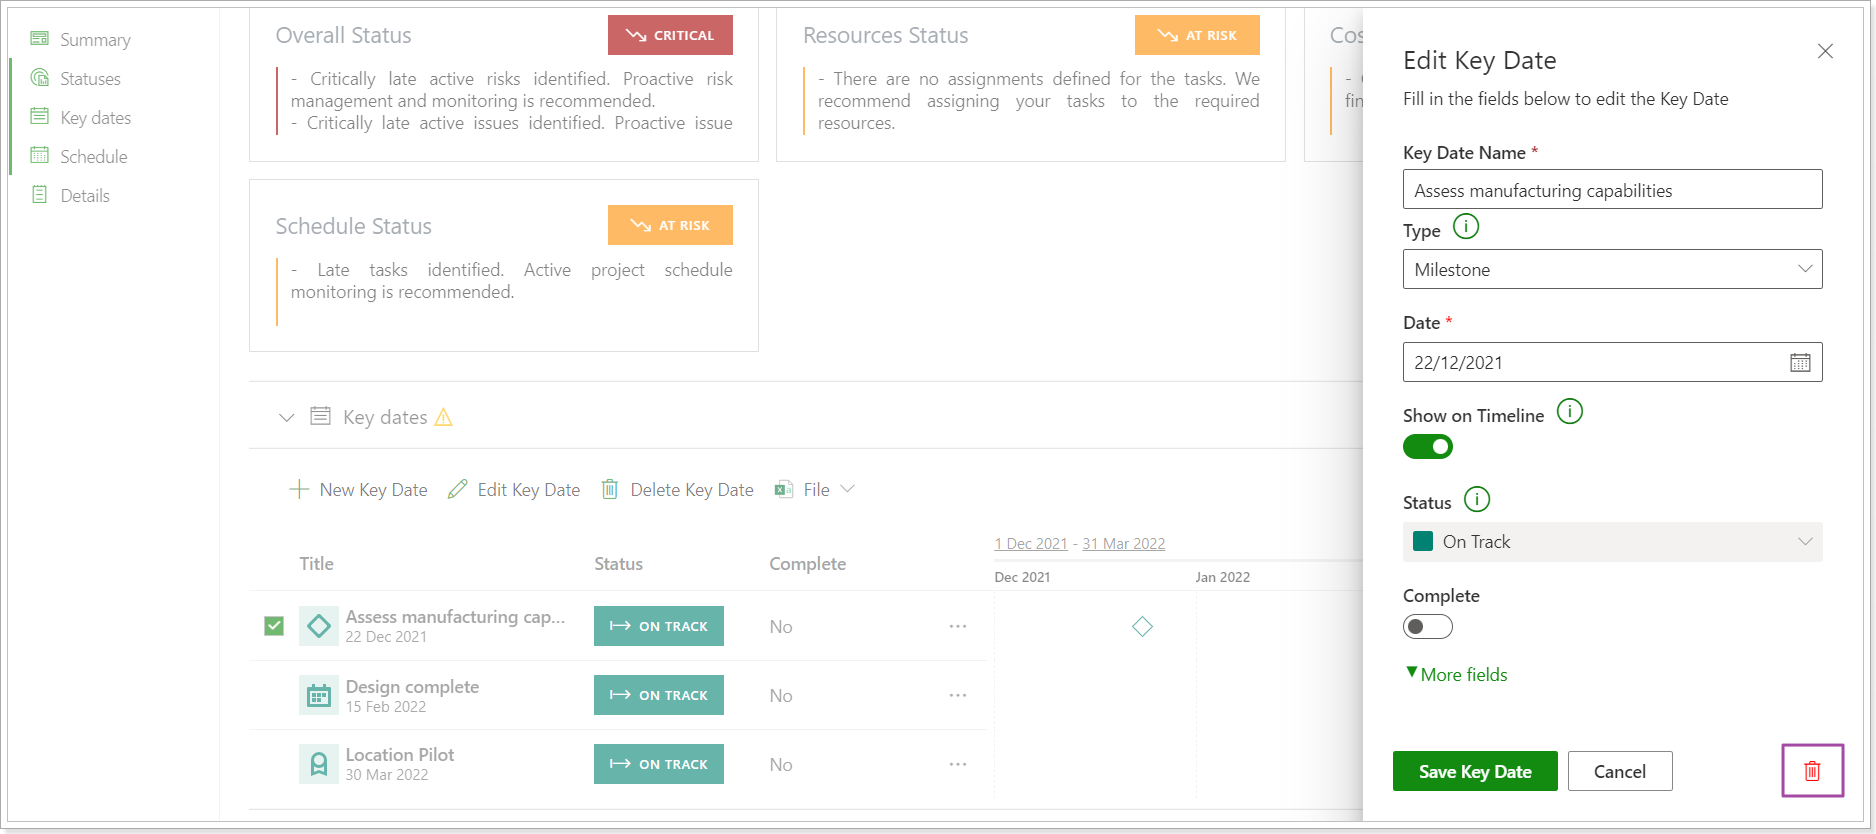
Please note: For Risks, Issues, and Iterations imported from external systems, this option is not available as they are deleted from the external systems.
Release Notes 8.3.1 @ August 31, 2021
A new section “Dependencies” is added to the Projects dashboard. Using this section, as a Project Manager, you can specify and manage both internal and external activities that relate to your project.
They are things that should start or finish so your project can progress. They might also be other projects or activities that rely on your project as input.
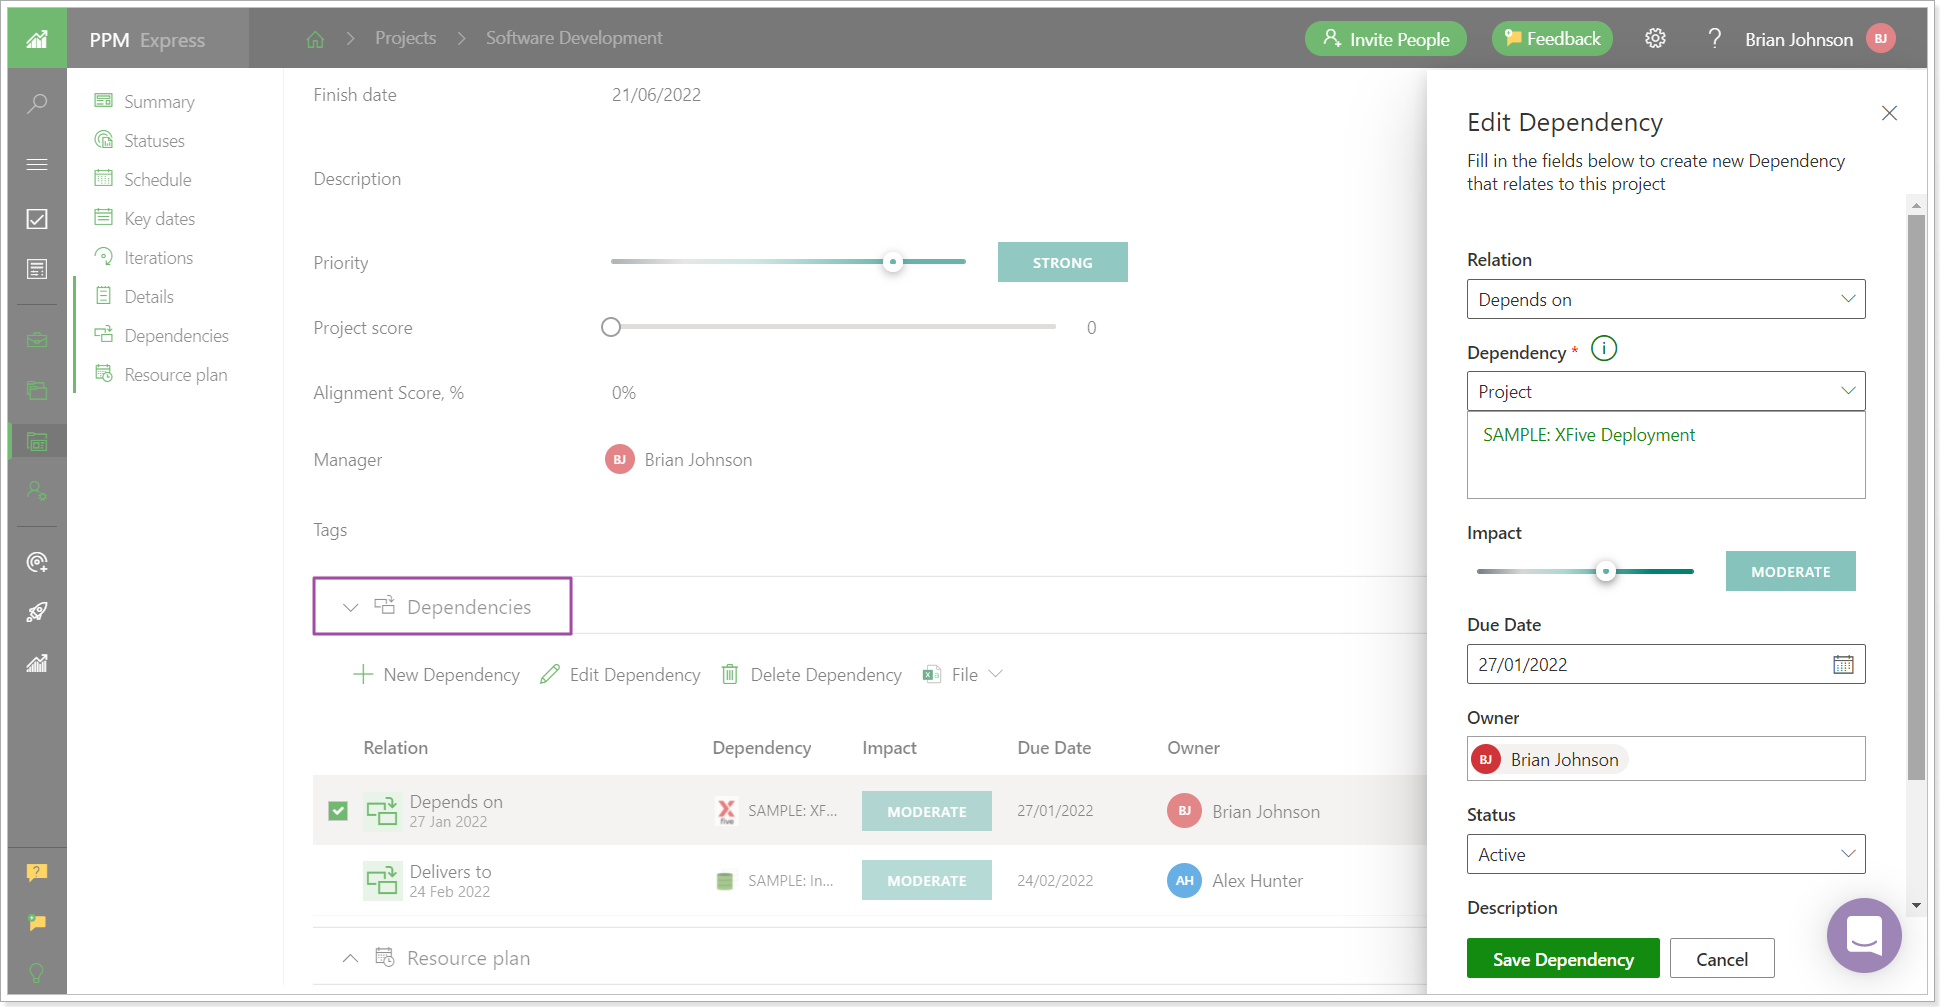
Currently, you can select a PPM Express Project, Idea, or any external activity as a dependency type and specify their relation to your project.
Select “Depends on” relation type if the current project is dependent on another project or activity. Select “Delivers to” relation type if another project or activity cannot start before you finish a current project or some activity, such as task, key date, etc. in it. “Related to” relation type can be selected for ideas, projects, or external activities that relate to your Project but are not necessarily interdependent.
For the “Project” type we recommend using “Depends on” and “Delivers to” relation types, as when any of these types is selected, a corresponding arrow will be drawn from your project to another one or vice versa. The arrows will be displayed on all Timeline views, such as Portfolios/ Programs/ Projects timelines or “Projects” section inside Portfolio or Program.
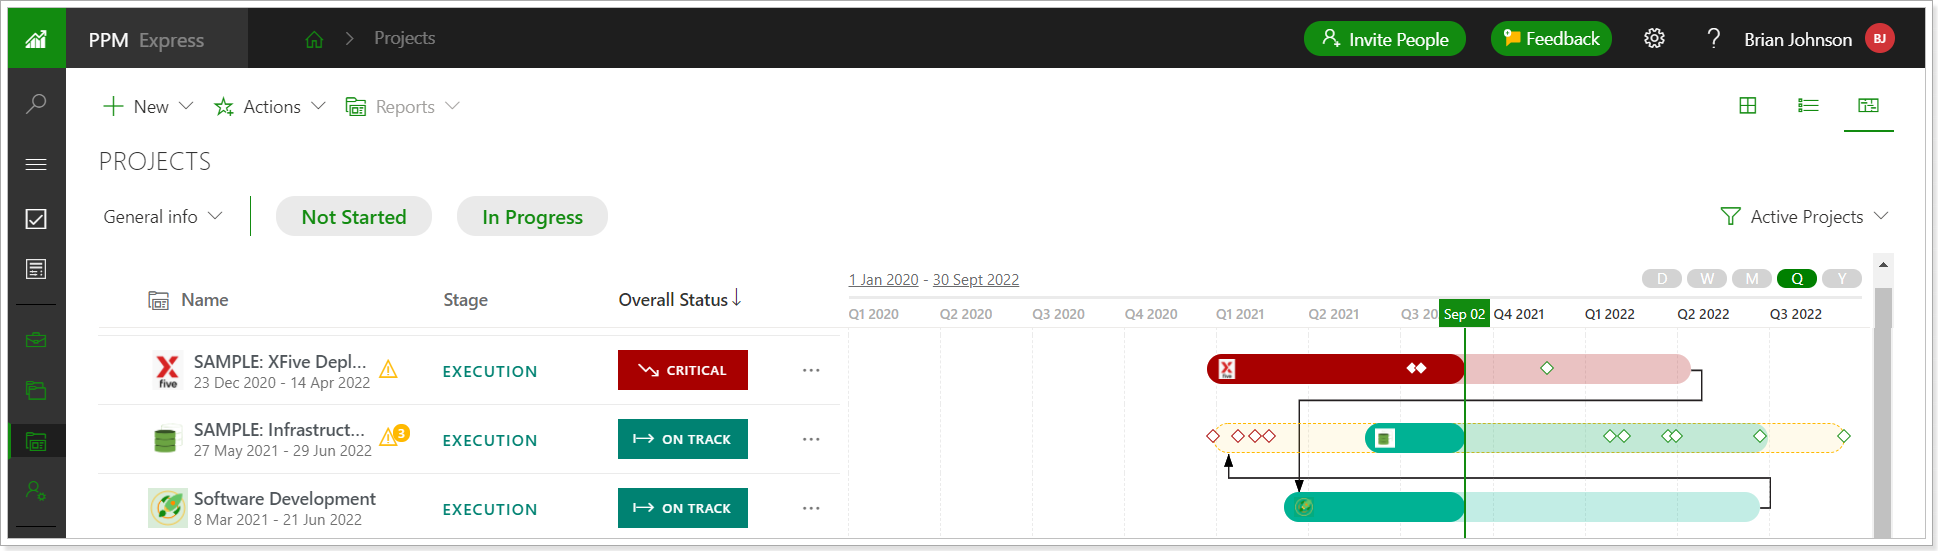
As usual, you can use default filters or create your own one, as well as configure columns and new fields that are relevant for your projects.
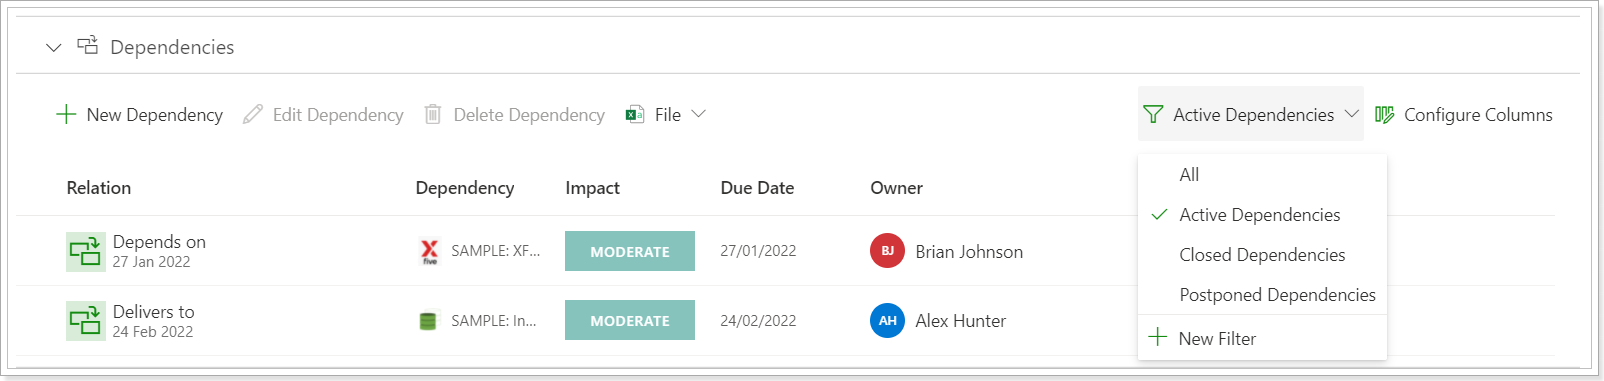
Release Notes 8.2 @ August 19, 2021
1. A new option to deactivate resources was added to PPM Express.
Before: All resources listed in PPM Express had an “Active” status by default. It was not possible to easily filter out resources who left the company or are currently engaged with other activities not related to PPM Express projects.
Now: It’s now possible to make a resource in PPM Express inactive and hide it from all ongoing activities where resources are involved. Only active resources can be assigned for tasks, key dates, risks, issues, etc. Inactive resources do not appear in the list of available resources when assigning them.
If an active resource is assigned for tasks, as an example, all assignments will be preserved for this resource if it becomes inactive for history purposes (the time allocated for this resource in the Project Plan section will be also preserved). If needed, a resource manager can then replace inactive user with an active one to continue working on the task, issue, etc.
The status for resources can be changed per resource (or if the linked user is deactivated) and in a bulk as required. Active/Inactive filters are now available for your convenience to quickly sort the resources by their status.
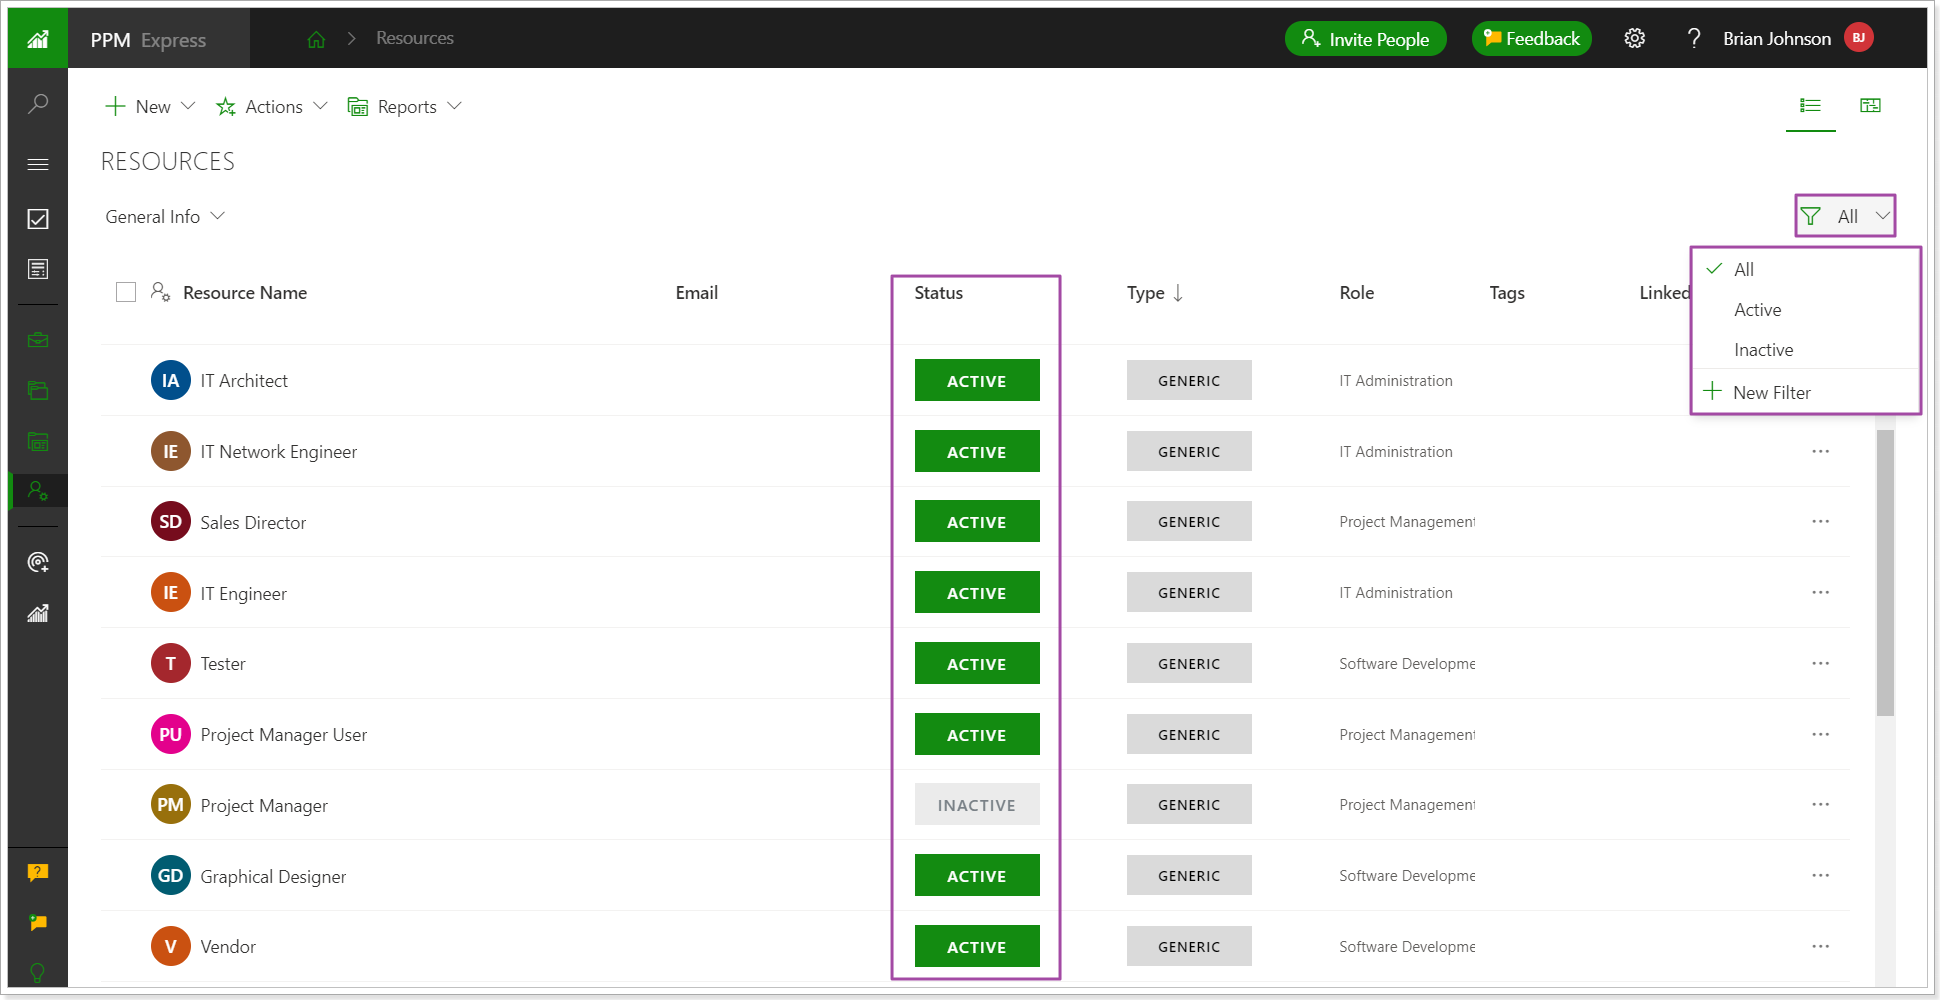
Release Notes 8.1 @ August 12, 2021
1. A possibility to select the required email when joining the PPM Express tenant was added.
Before: A user could accidentally join the PPM Express tenant with another login email. This could happen in case the invitee was logged in under another account in the browser when the invitation was accepted.
Now: Before joining the PPM Express tenant, the invitee can verify which login account is currently in use. In case of necessity, the user can “Log in with another account”, by selecting a corresponding option.
2. A new Resource Management Power BI report pack was added to PPM Express.
A new Resource Management pack allows reviewing information for the resources allocation as well as overallocation details, workload heatmap, resource pool details, resource time details, etc.
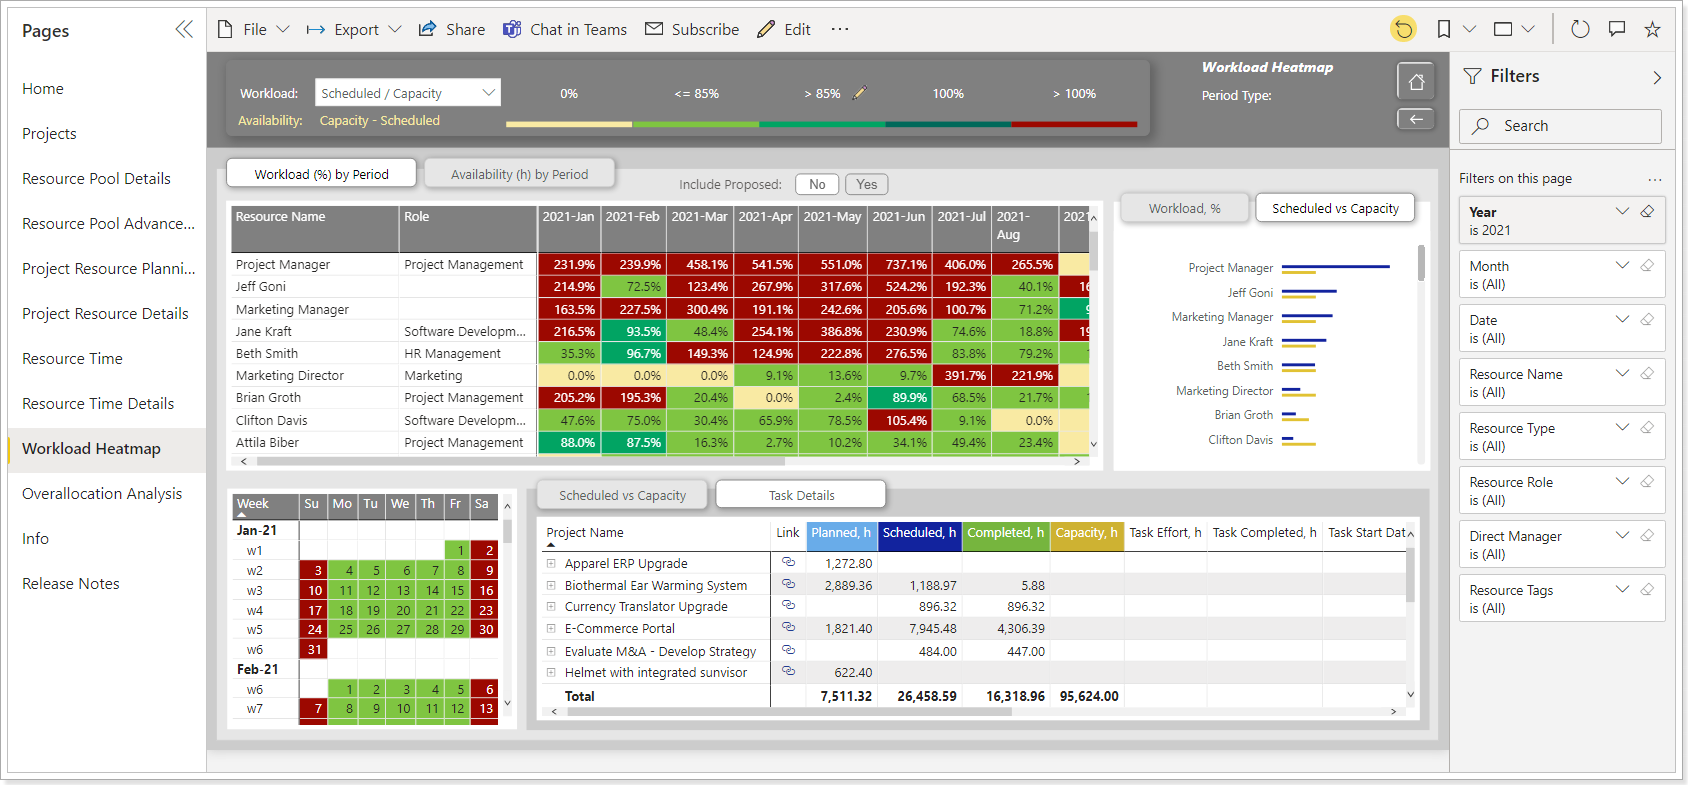
Please go to the 'How to configure Resource Management report pack' article to download the Resource Management pack and get step-by-step instructions on how it is configured.
3. A new option ‘Report My Time’ was added to “Tasks” and “My Space”. This option allows users to report their time spent on PPM Express tasks during the current day to PPM Express Time.
Please note: It is required to establish a connection between PPM Express and PPM Express Time to use this option and link the required projects within these two systems.
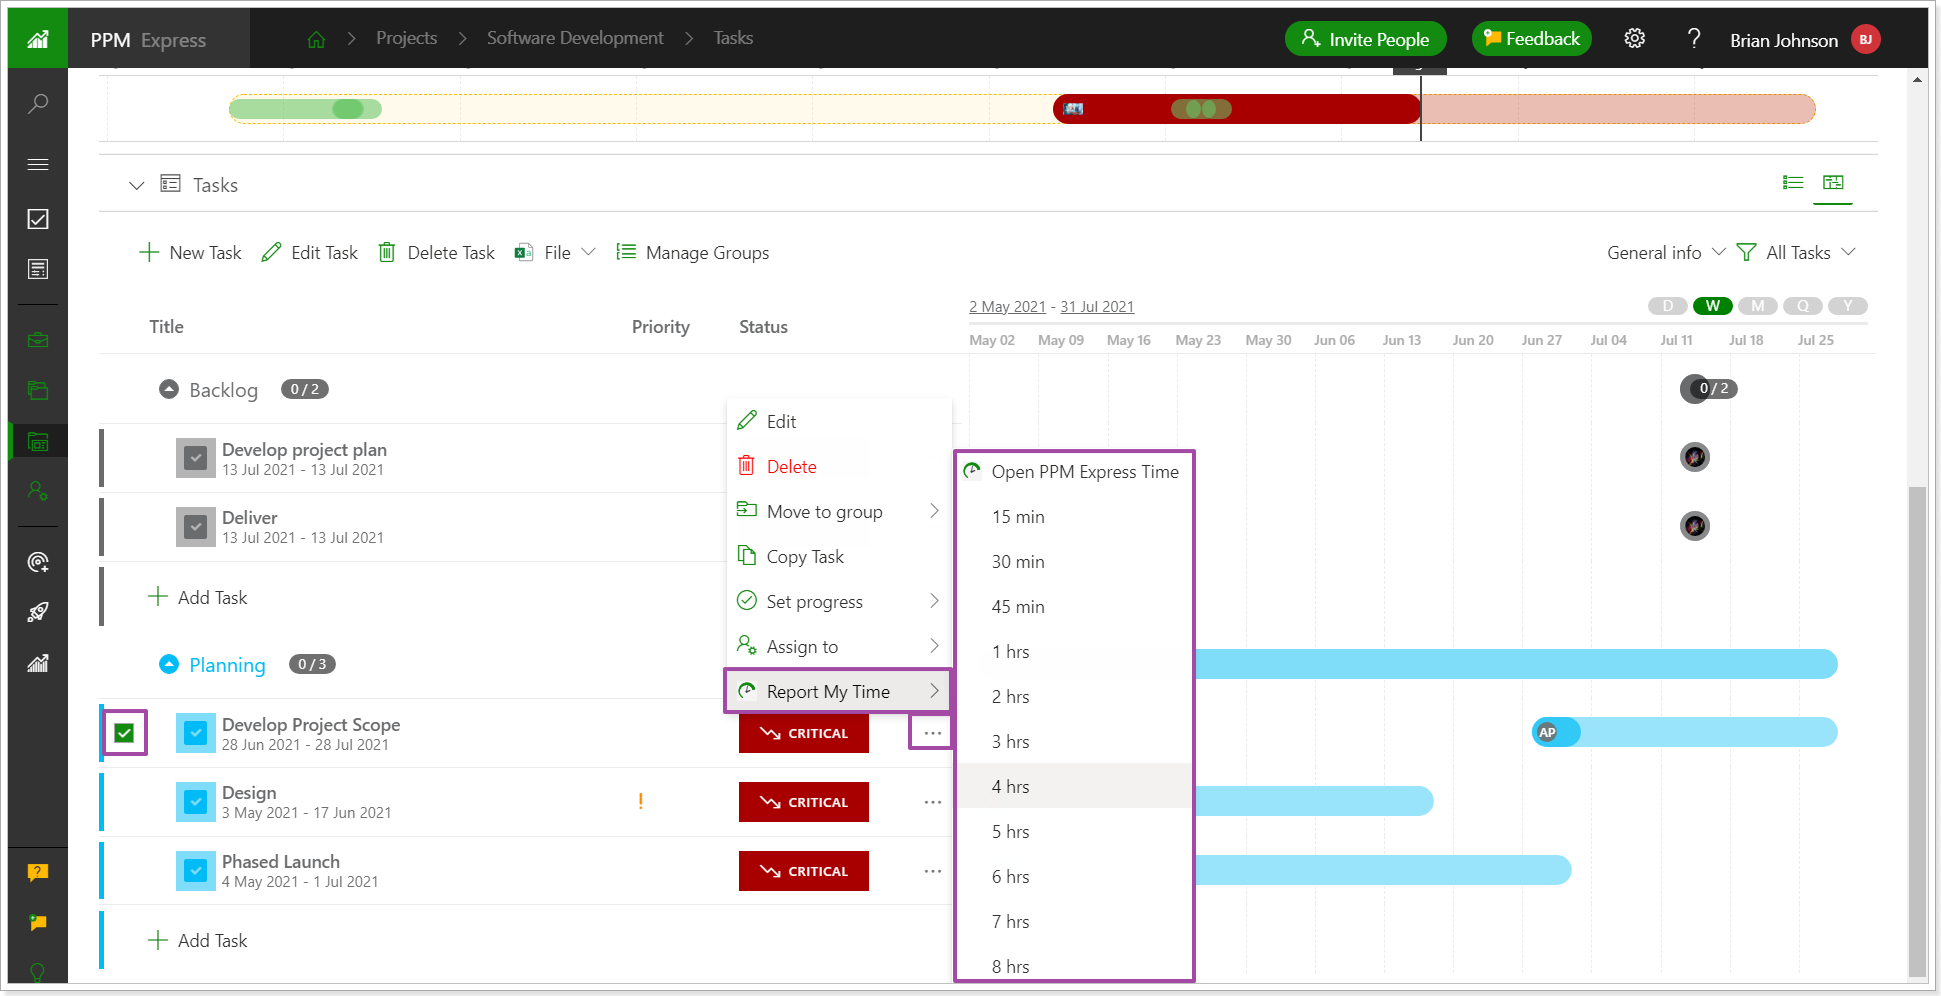
4. Project filter is added to the Resource Utilization page and Utilization Resource dashboard section.
Before: All projects were listed on the Resource Utilization page without the ability to filter inactive or completed projects, and we know that it was hard for you to work with active ones.
Now: The project filter is now added to the Resource Utilization page (as well as to the Utilization Resource dashboard section). It allows filtering projects to review the information for active projects only and hide the inactive ones, etc. Custom filters can be also created for your convenience.
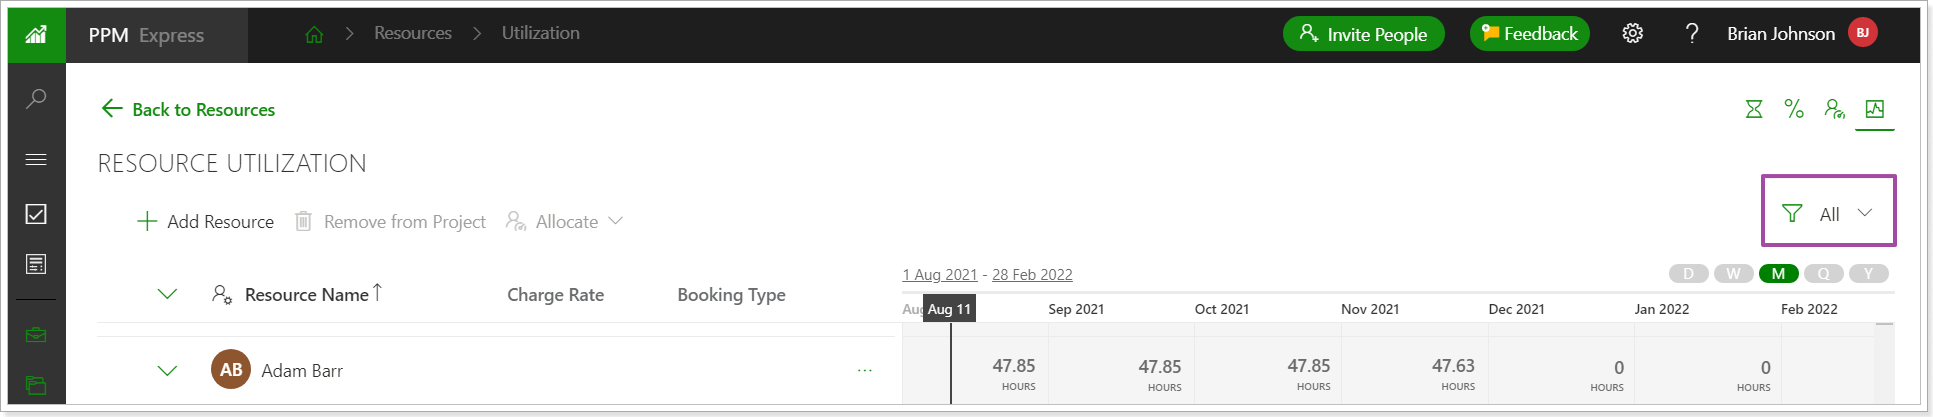
Release Notes 8.0 @ August 5, 2021
We are happy to announce that we have released a new PPM Express module: Programs. You can now organize a group of Projects to Programs to manage them in a coordinated way and add your Projects and Programs to Portfolios or just keep them separately from Portfolios for easy coordination.
For example, if you have a Portfolio: Developing New Product, you can organize your Projects to Programs first: Market Research, Concept Development, IT Security, Product Development, etc., and then add them to your Portfolio.
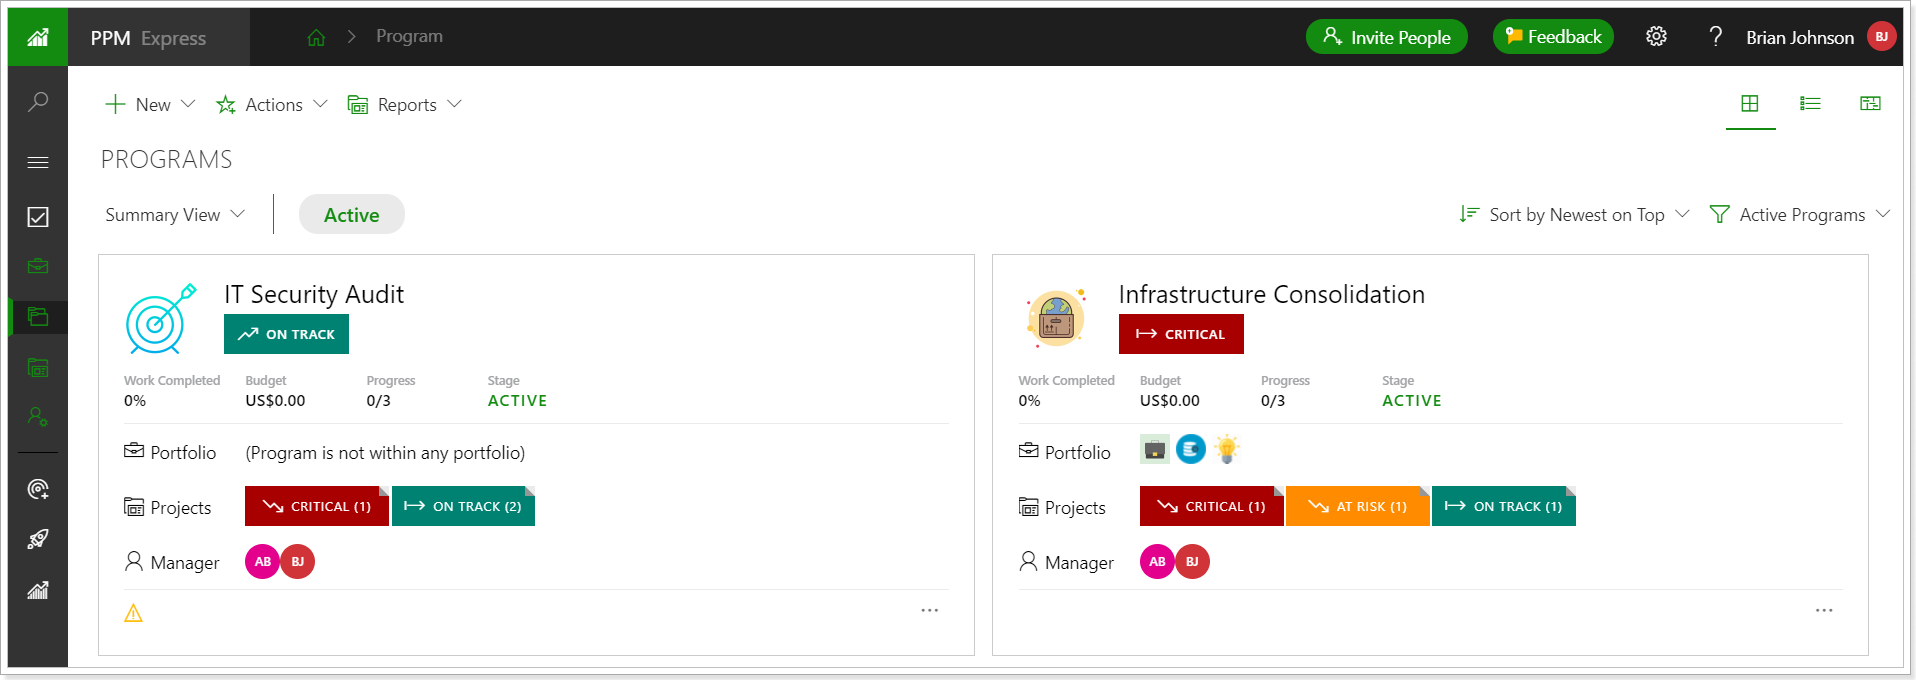
When the Program is created you can add Projects to it or create new Projects from the Program Dashboard.
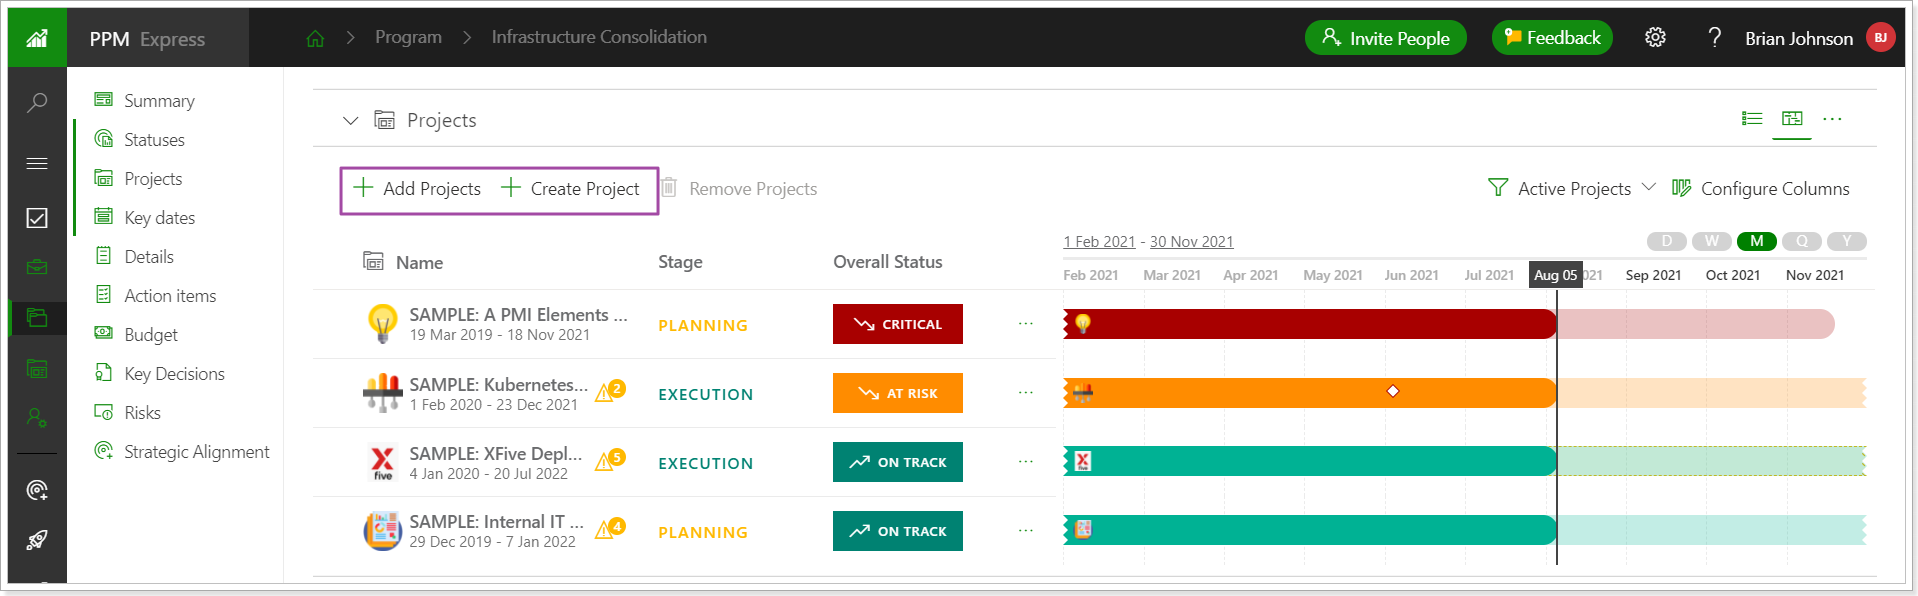
Also, you can add Project to Programs from the Details project section. For this, open the Project dashboard, navigate to the Details section. Open the Configure Fields menu by clicking on the ellipsis button and enable the Program field.
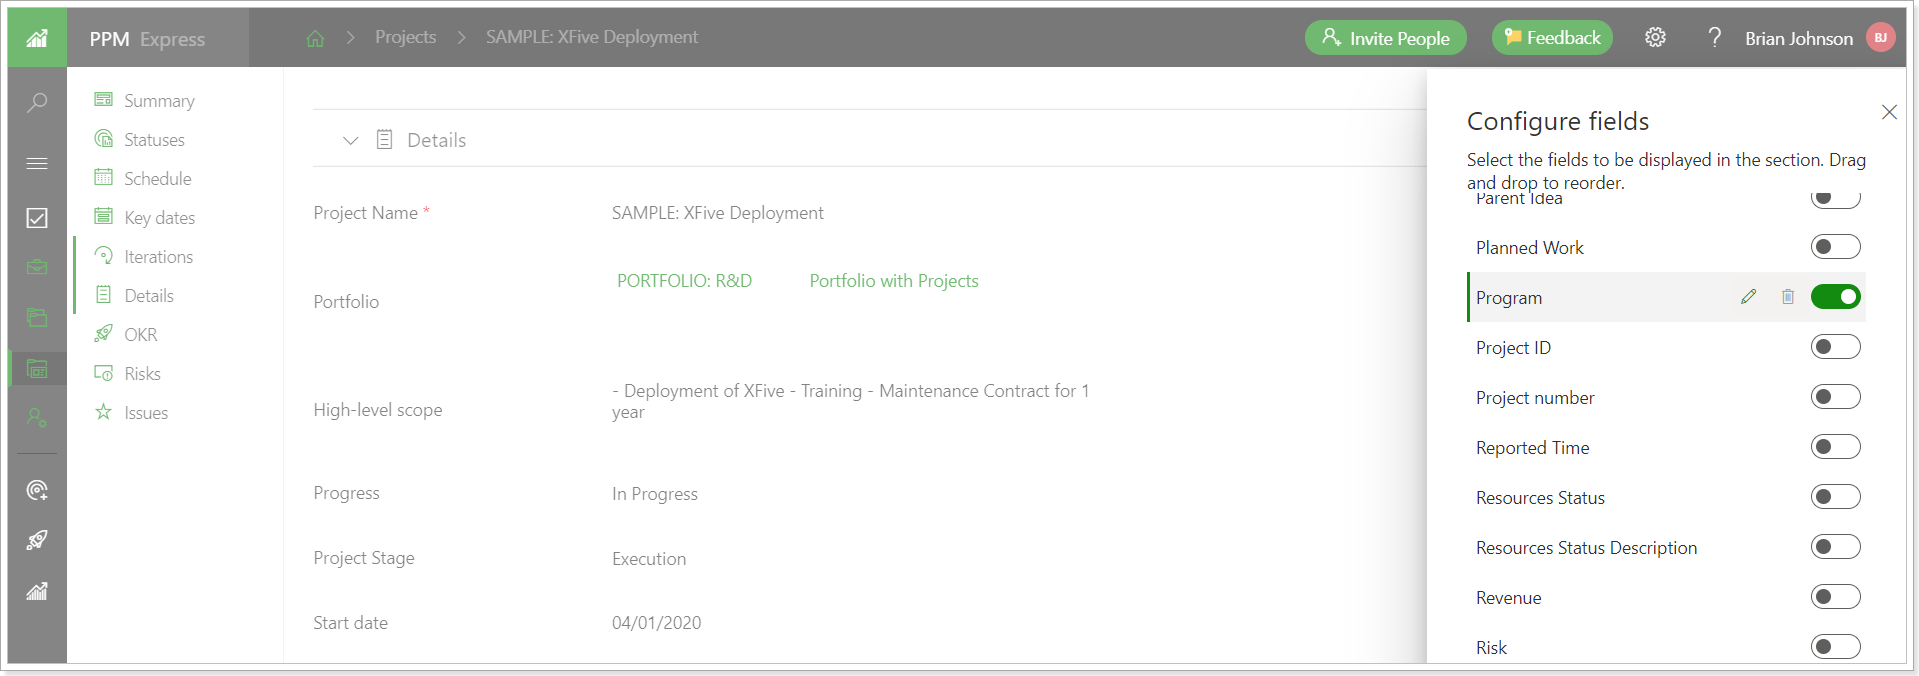
Next, add the Program or several Programs where this project needs to be included.

We made the Programs module flexible and can't wait for you to start using it and give us your feedback.
Release Notes 7.8 @ July 22, 2021
1. Onboarding videos on how to configure connections are now added to the 'Configure Connection' menu of each external system (Azure DevOps, Jira, MS Planner, Project Online, Office 365 Group).
Users who configure connections to external systems can now review video guides on how to configure connections. The links to these videos are added to the 'Configure Connection' menu of each connection.
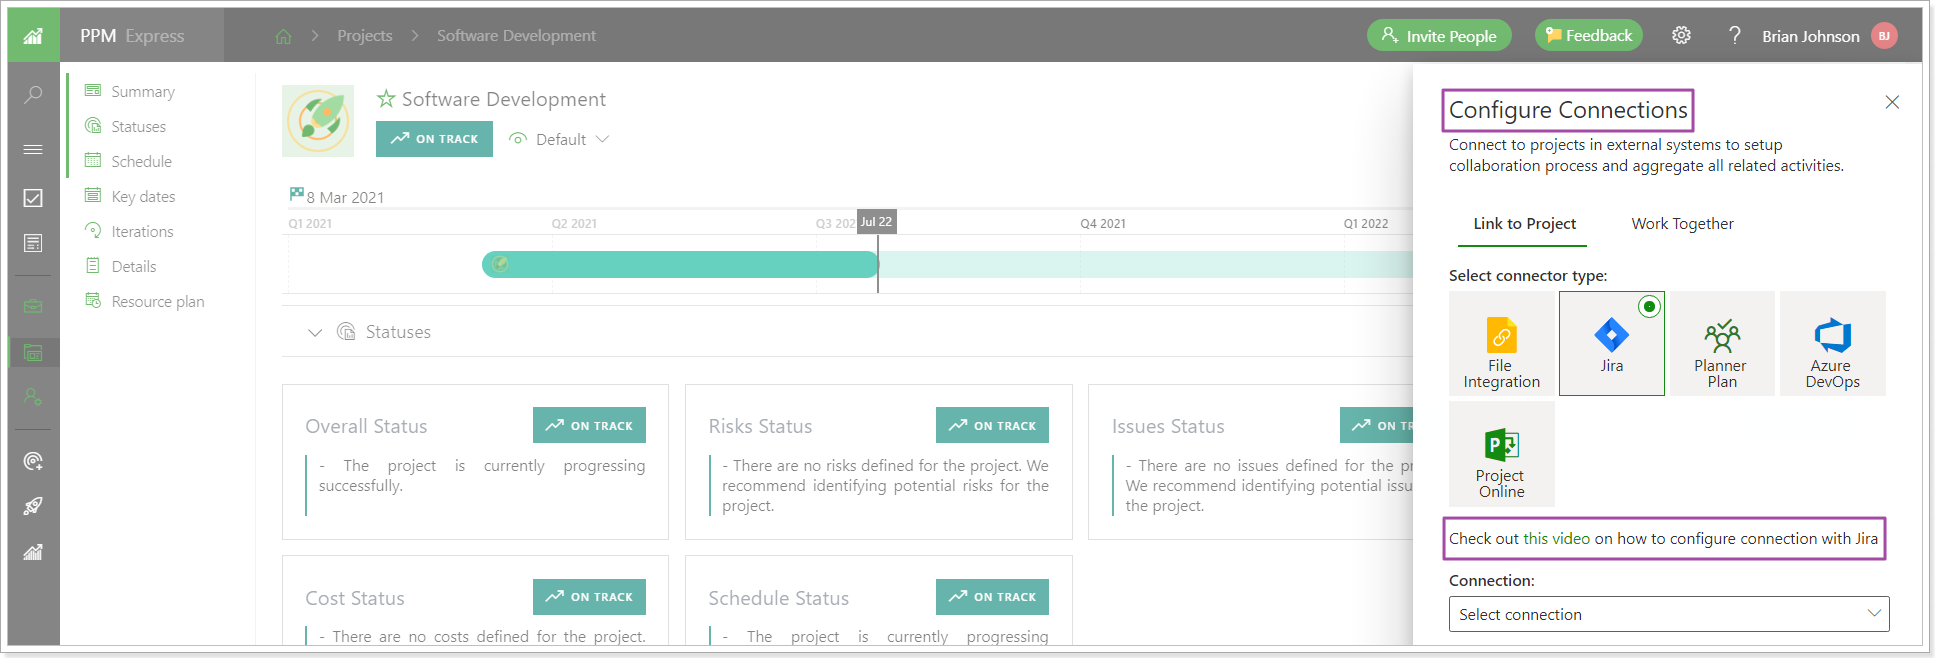
Also, there are video guides for configuring Executives Report Pack, Objectives and Key Results module, and for Installing PPM Express App for MS Teams.
2. Task Management – default descriptions are added to native task fields.
Information buttons were added to all native task fields. Users can now review the descriptions for native task fields and quickly get information on how each field is used.
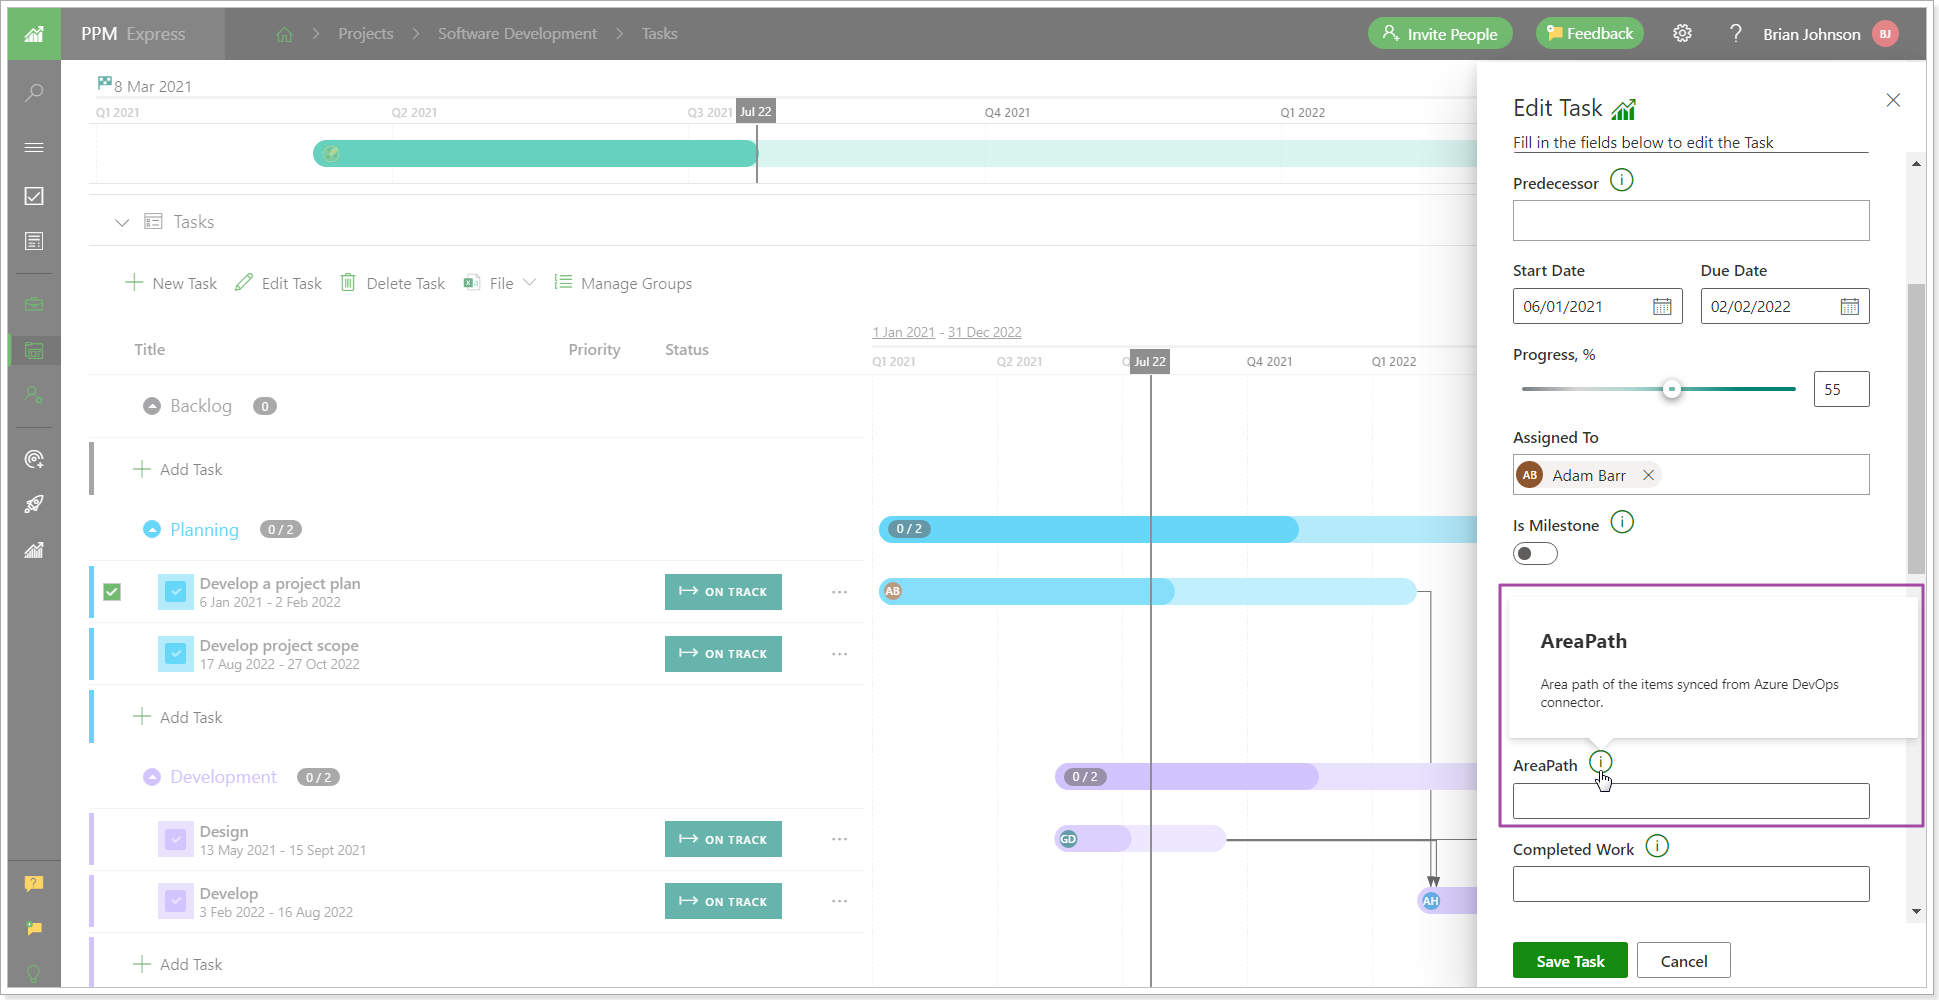
These descriptions can be edited if needed. For this, open the field for editing (e.g. open any view for editing and click on the pencil-like button next to the required field) and add your own description.
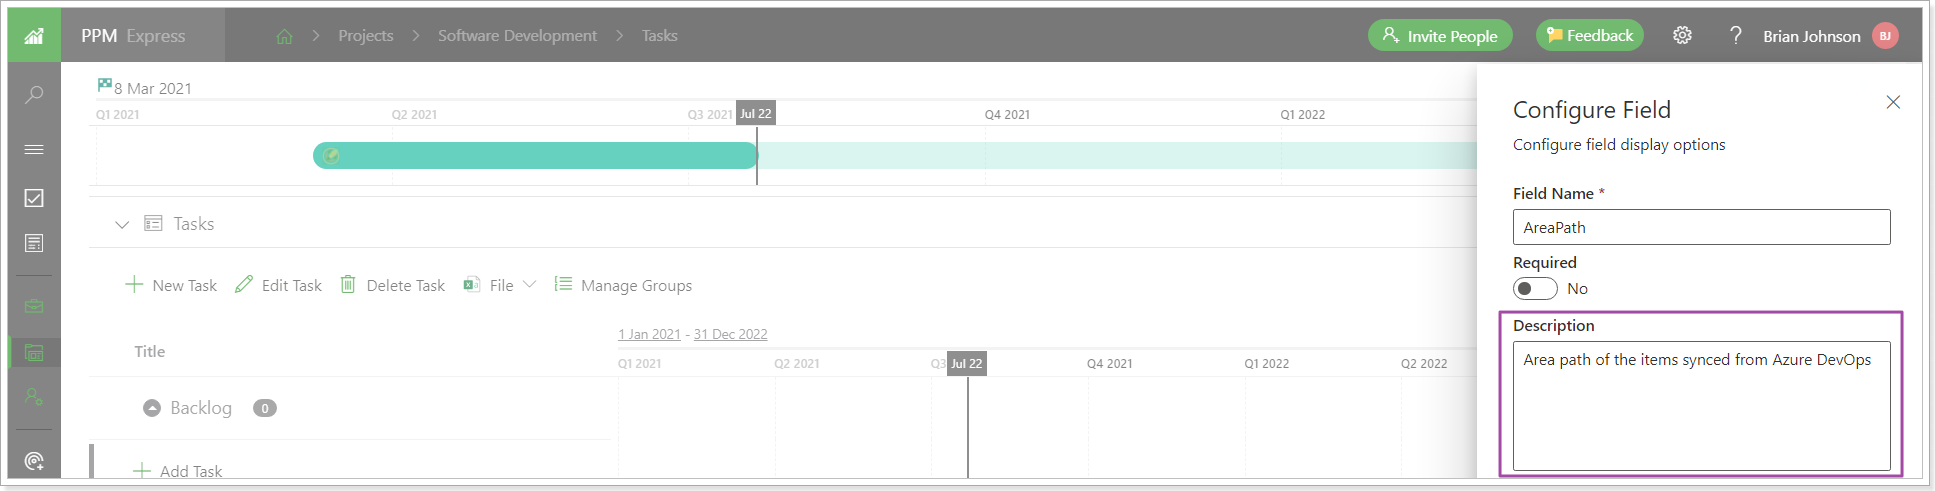
Release Notes 7.7 @ July 14, 2021
Users who use PPM Express Time for time reporting and established connection between PPM Express Time and PPM Express can now synchronize totals from PPM Express Time to PPM Express 'Completed work' task field.
It is required to enable the 'Write totals to PPM Express completed work' feature in PPM Express Time projects that are linked to PPM Express.
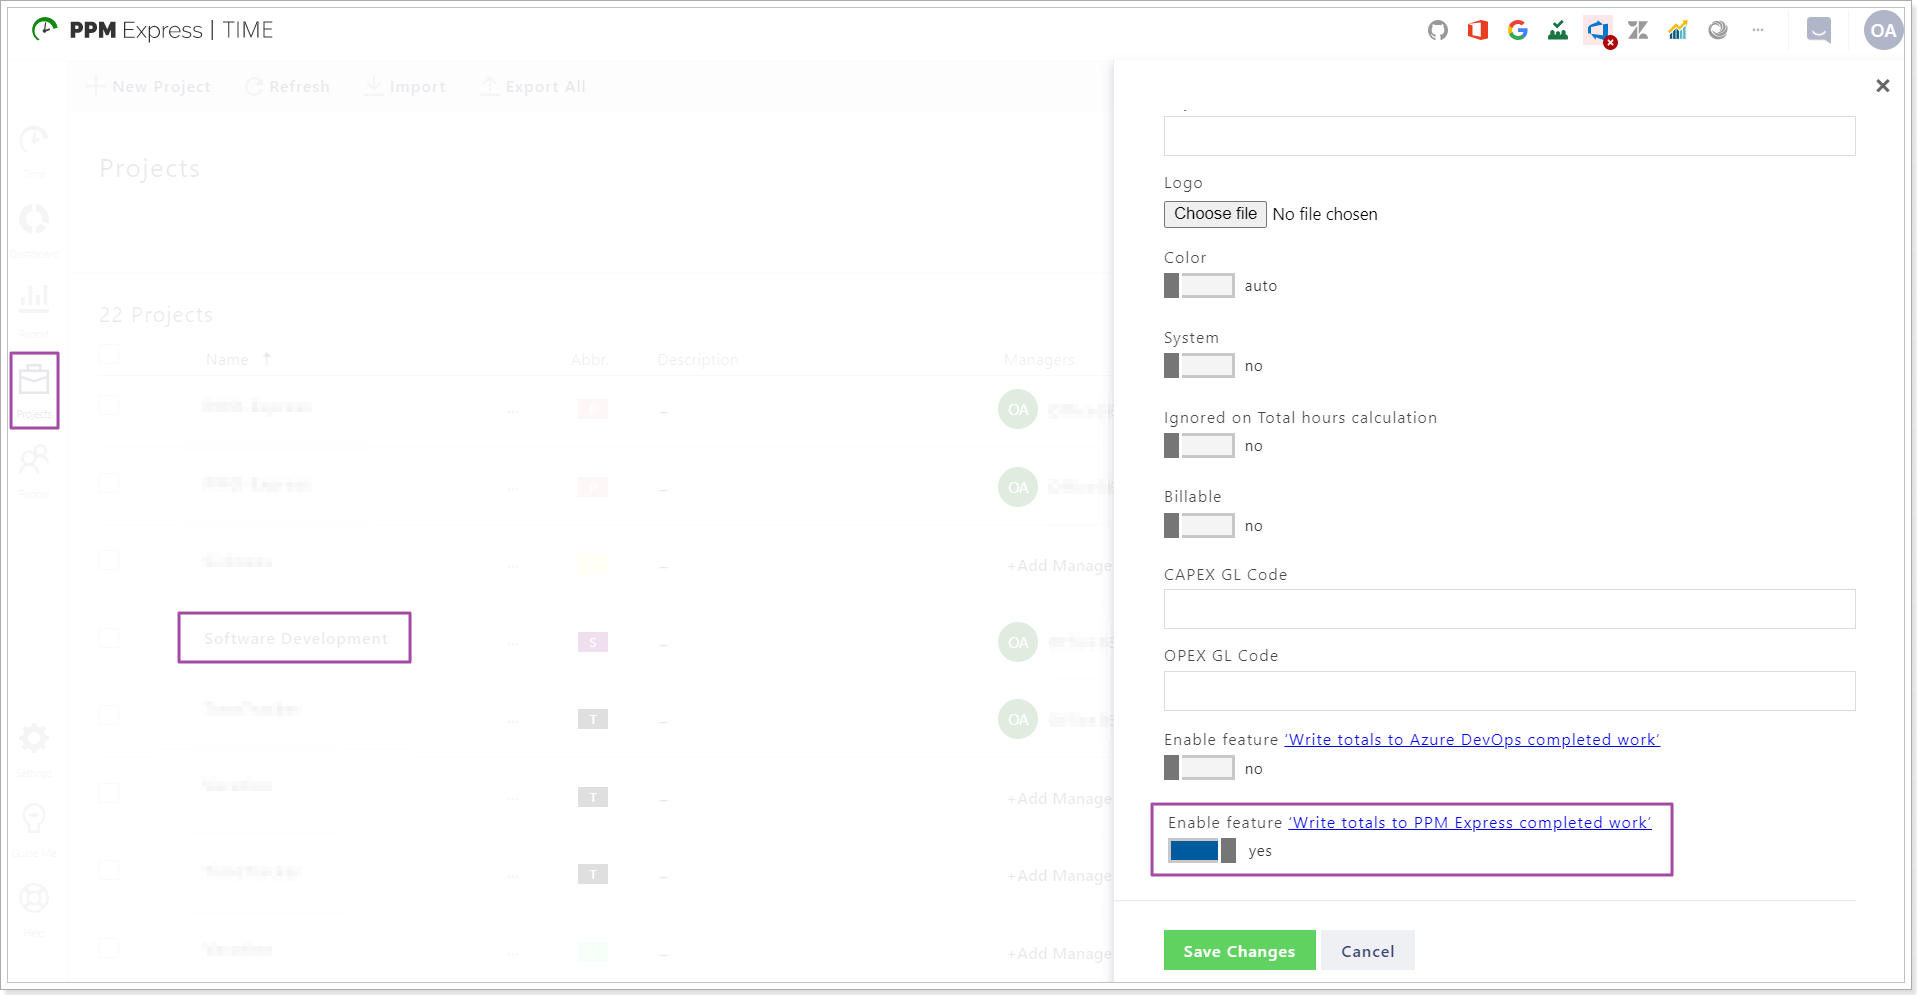
If the projects from PPM Express and PPM Expres Time are linked, tasks from PPM Express will appear as suggested time entries in PPM Express Time when the feature is enabled.
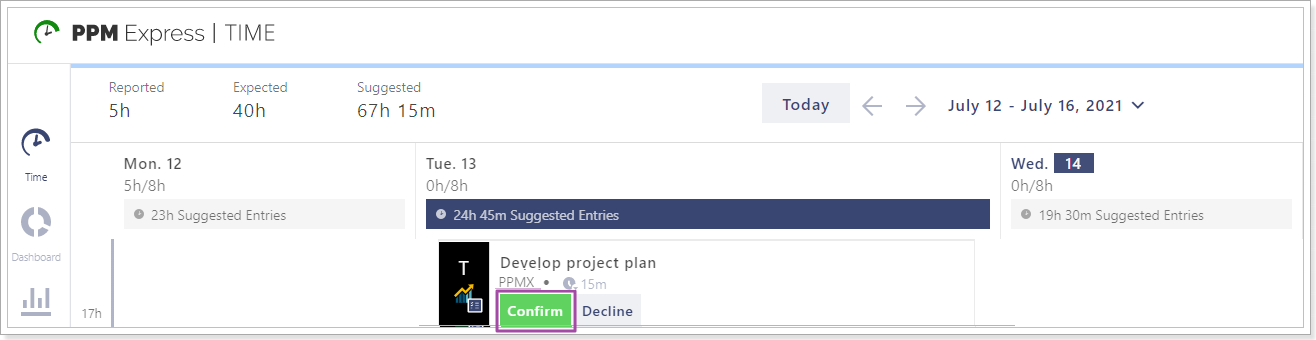
When the time is reported (confirmed work) for these entries, the values will appear in the PPM Express 'Completed work' task field.
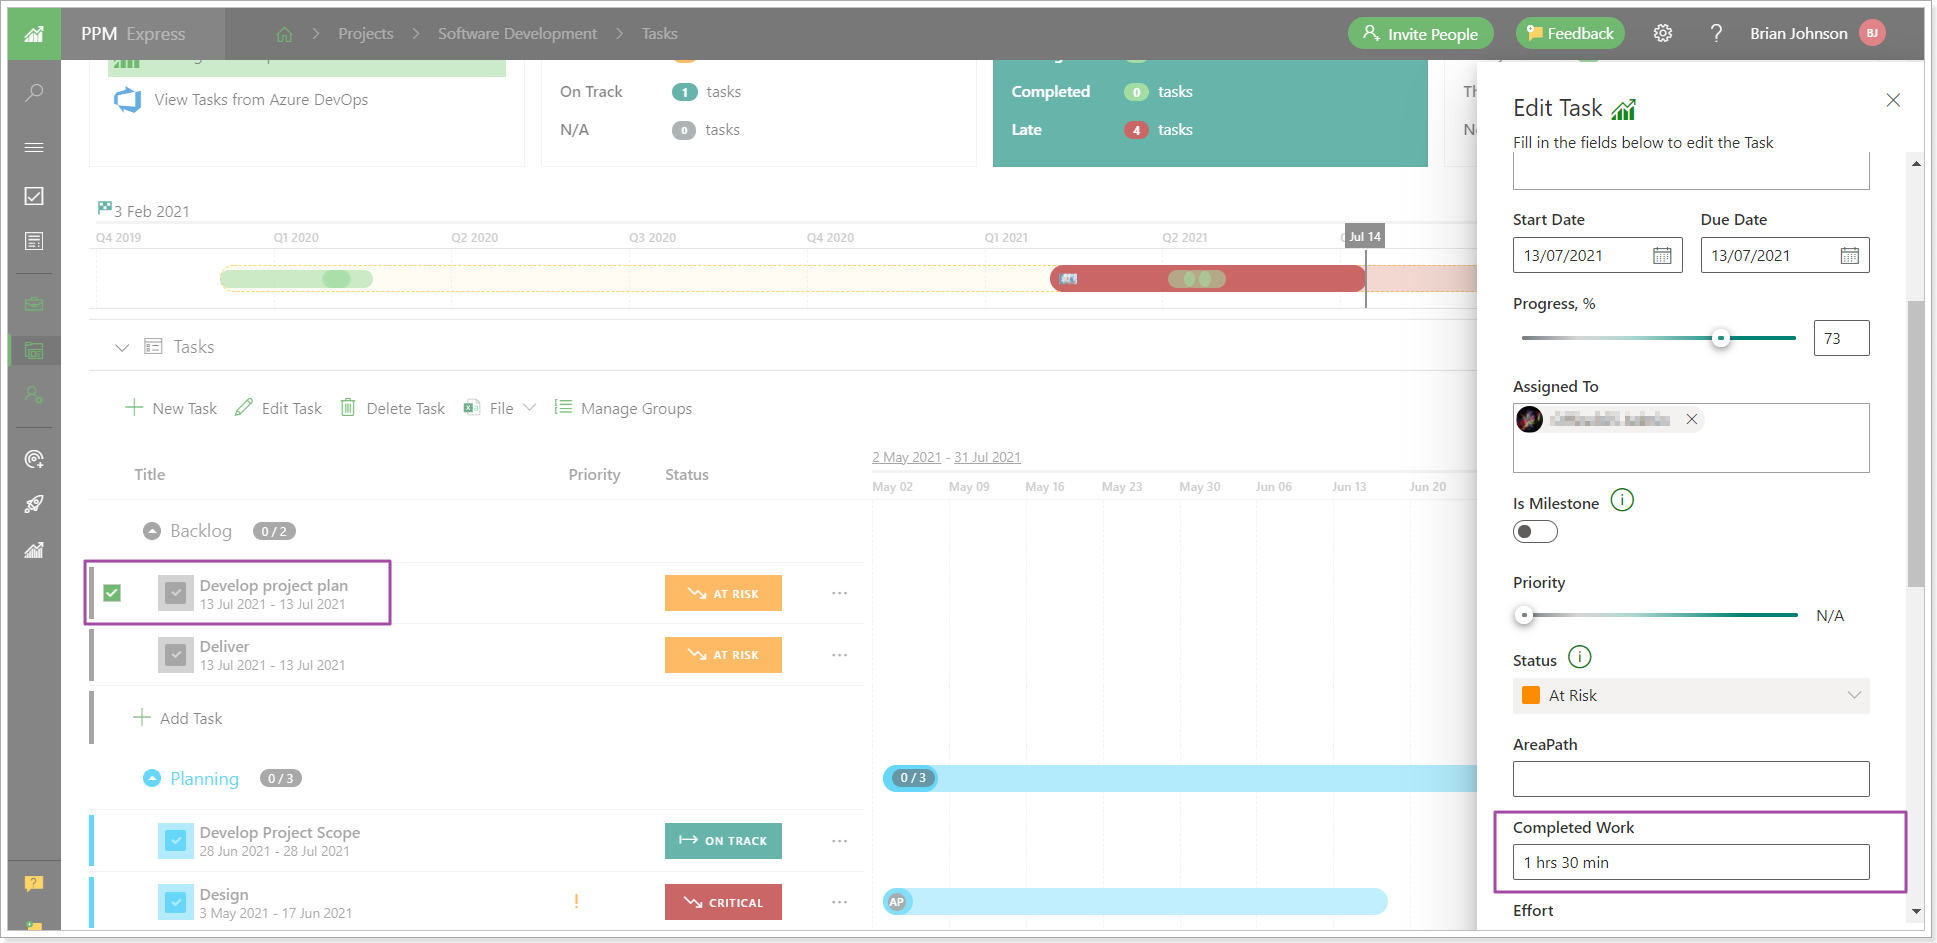
Release Notes 7.6 @ July 8, 2021
A new section ‘Workload’ will be added to the Resource dashboard.
As a Project and Resource Manager, you can review all assignments for the selected resource across PPM Express and plan the Resource workload accordingly.
The ‘Workload’ section shows the Tasks, Action Items, Risks and Issues that are due this month or late as well as all assignments by status.
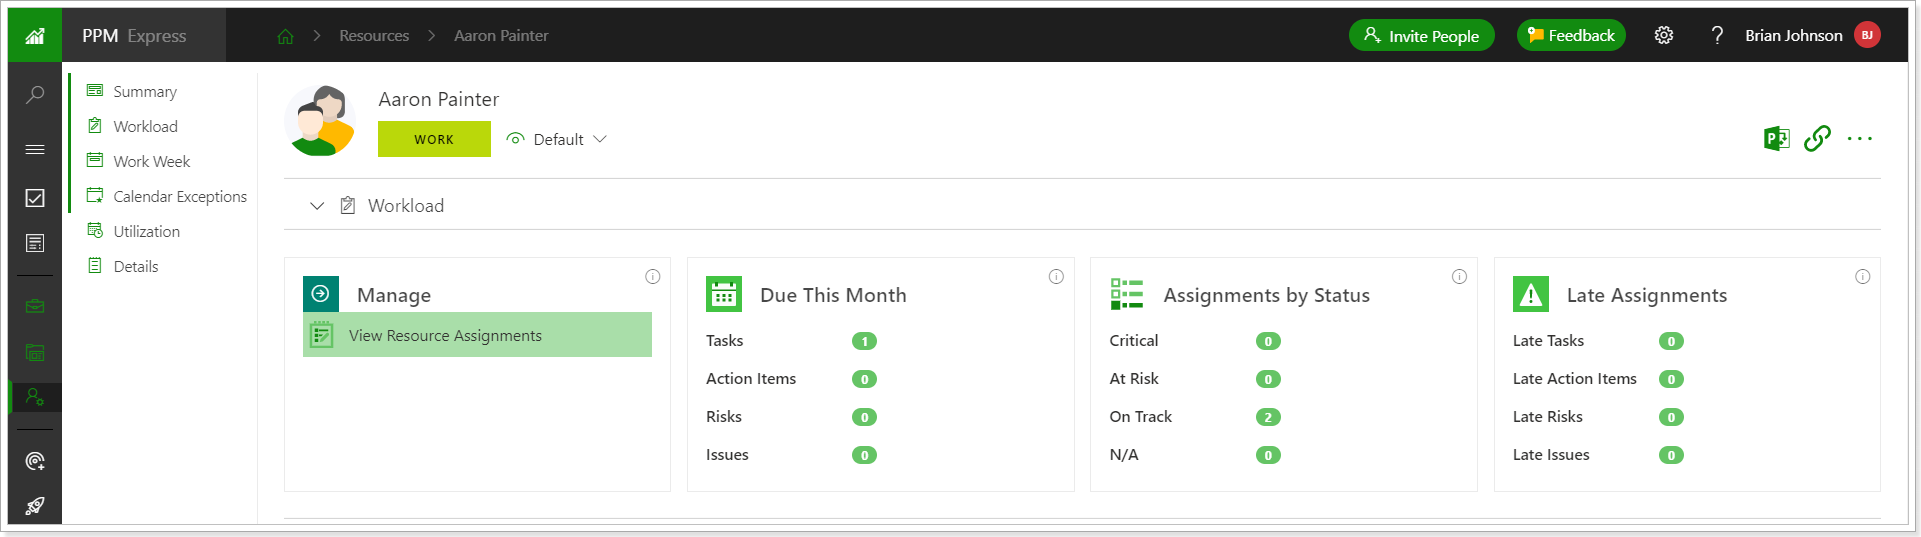
If you click the ‘View Resource Assignments’ button, the Workload page will be opened where you can review all resource assignments in detail.
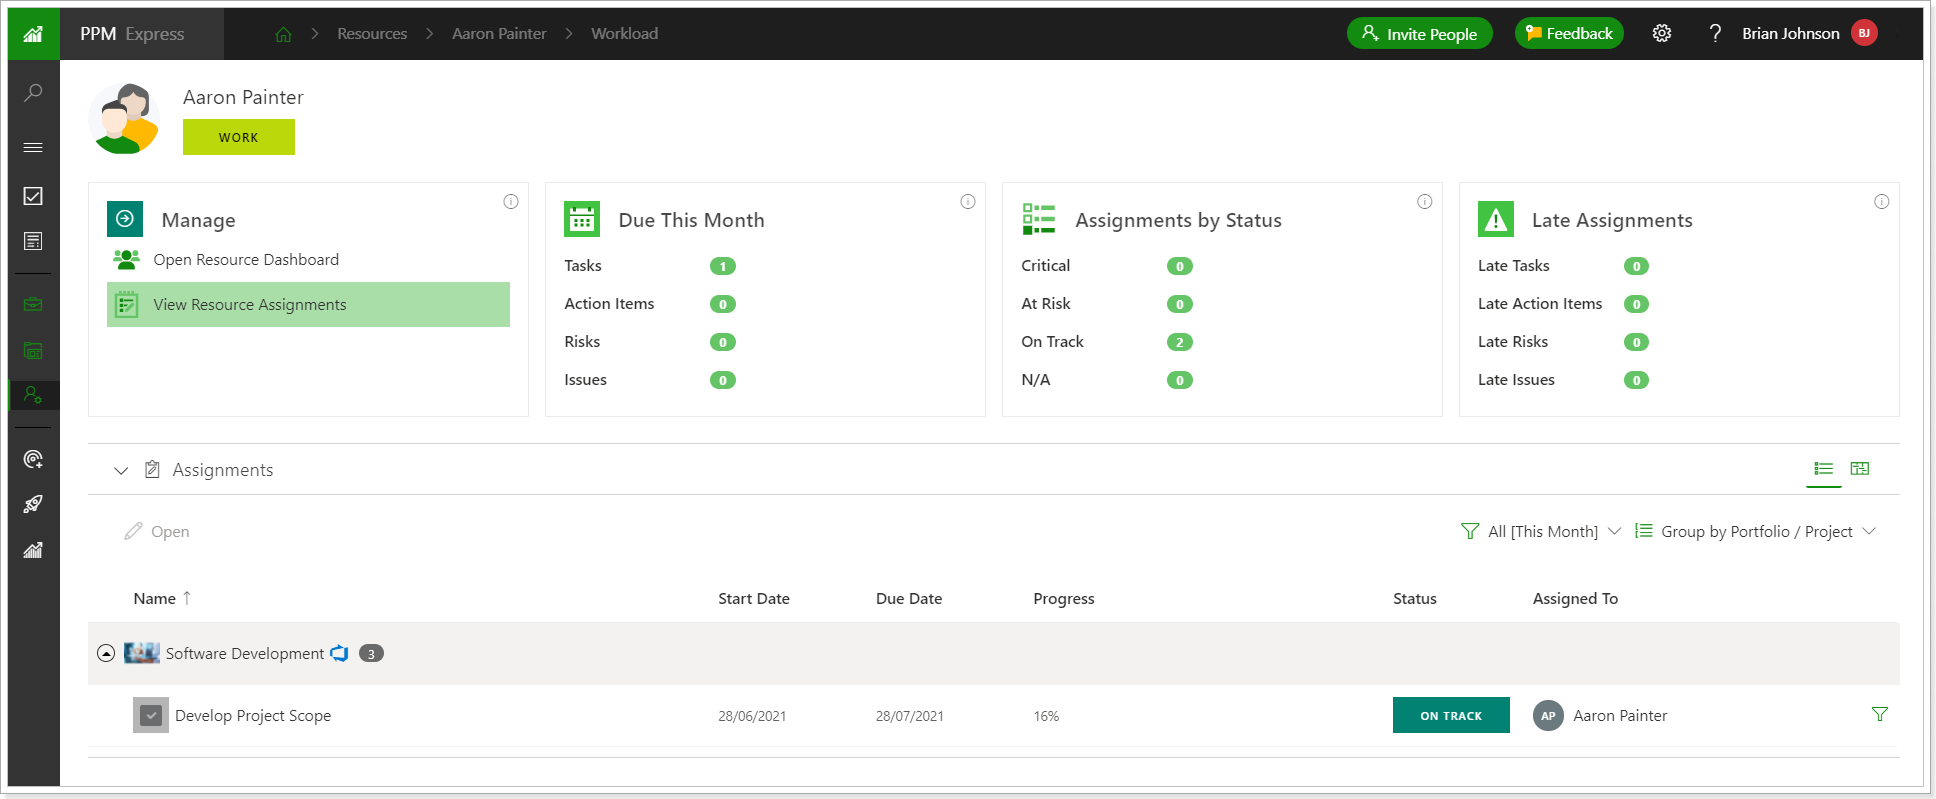
Release Notes 7.5.2 @ July 5, 2021
1. A layout is now available for selection when creating new Portfolios, Projects, etc.
The changes will apply to the following entities:
- Portfolio
- Project
- Resource (if created from Resource menu)
- Business Challenge
Before: When you created a new Portfolio or other entity listed above, the dashboard sections were displayed on the Portfolio/Project/ Resource/ Business Challenge creation screen and could be selected one by one for the newly created entity. A layout could be selected only after a new Portfolio, Project, or other entity was created.
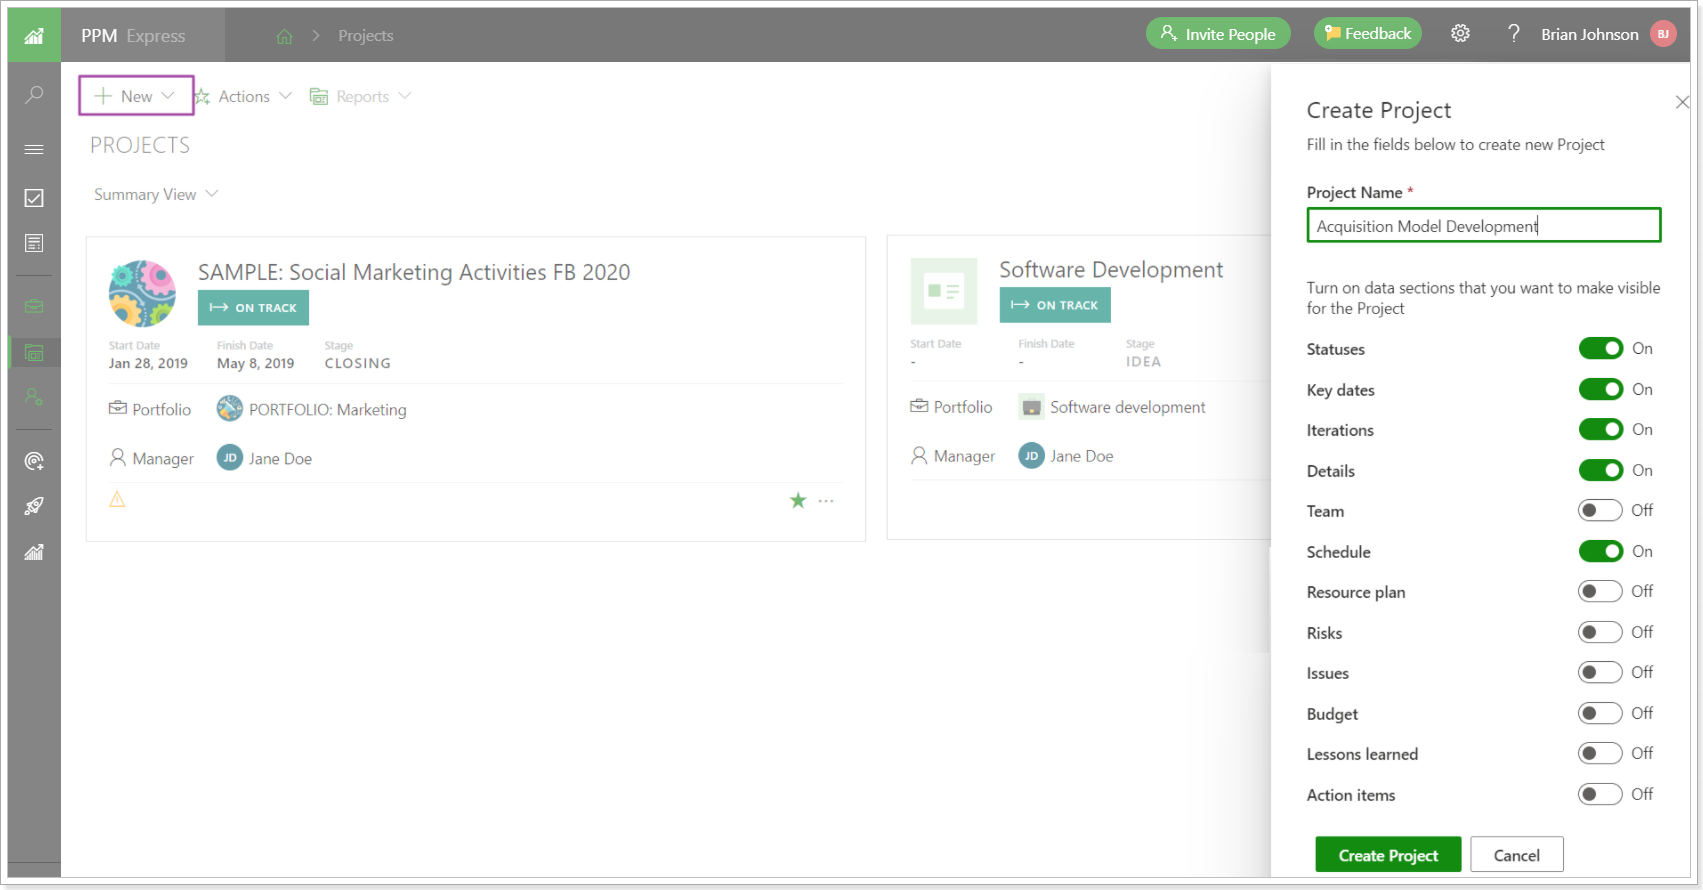
Now: When you create a new Portfolio, Project, etc. you can select a layout on the creation screen. The “default layout” is displayed by default. At the same time, it is possible to expand sections and customize them before you create Portfolio, Project, etc.
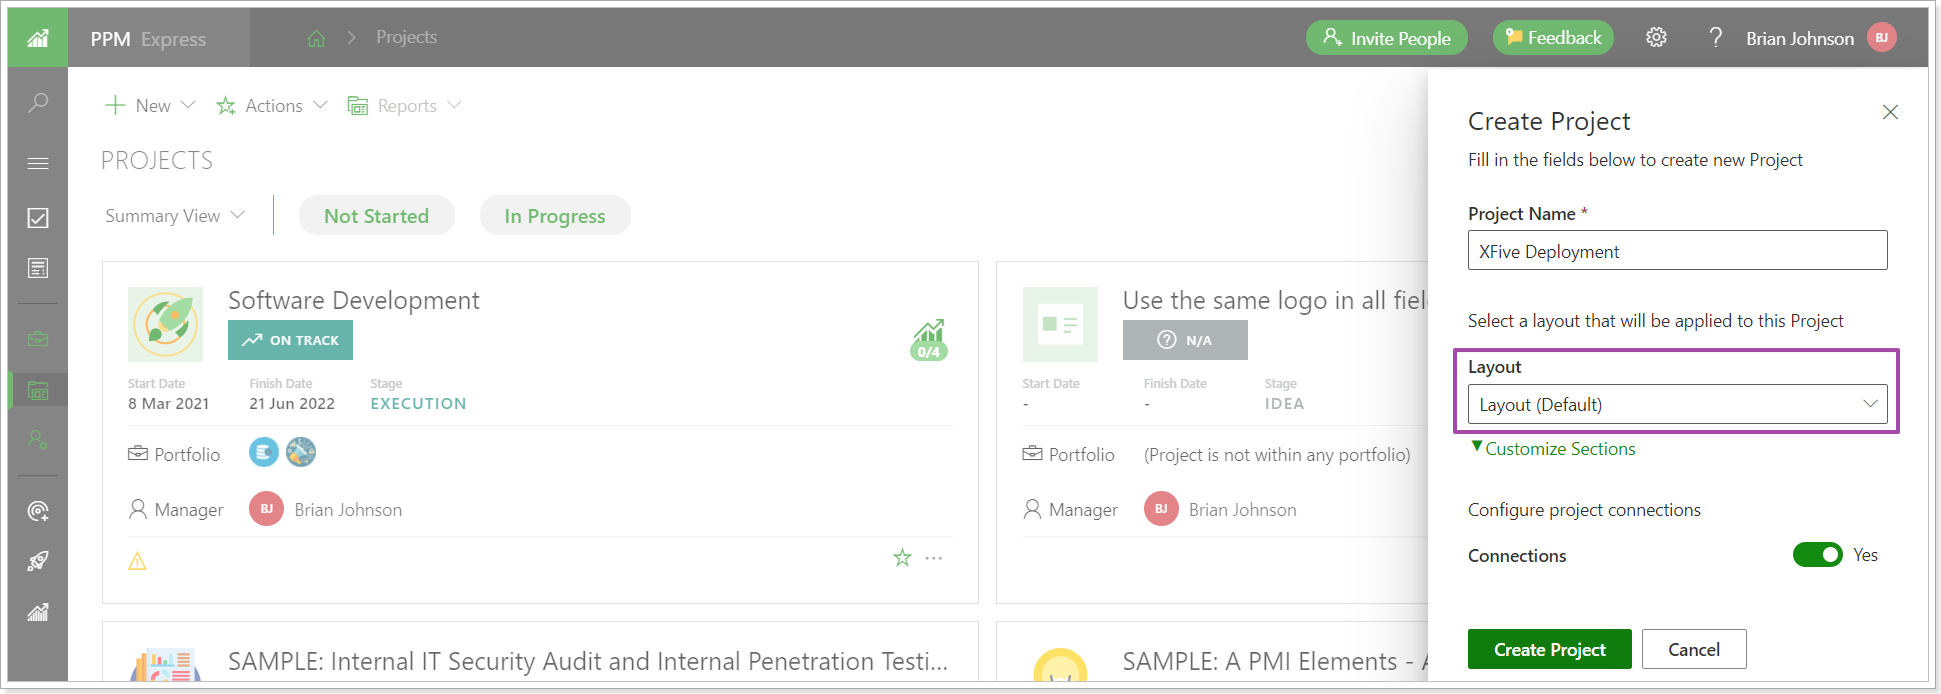
2. Import of key dates and risks is now possible from Project to Portfolio level.
Before: Key dates and risks on project and portfolio levels were added and managed independently. It was not possible to add project key dates or risks to the portfolio level.
Now: As a Portfolio Manager you can now import key dates or risks from related Projects for viewing in your Portfolio. Using connection icons next to a key date or risk you can easily navigate to an original linked element in PPM Express. As key dates can be imported from external systems you can also navigate to an external key date directly from your Portfolio. Use a column “From” to view a project from which a key date or risk was imported and manage all important key dates or risks from all your related projects on a single page.
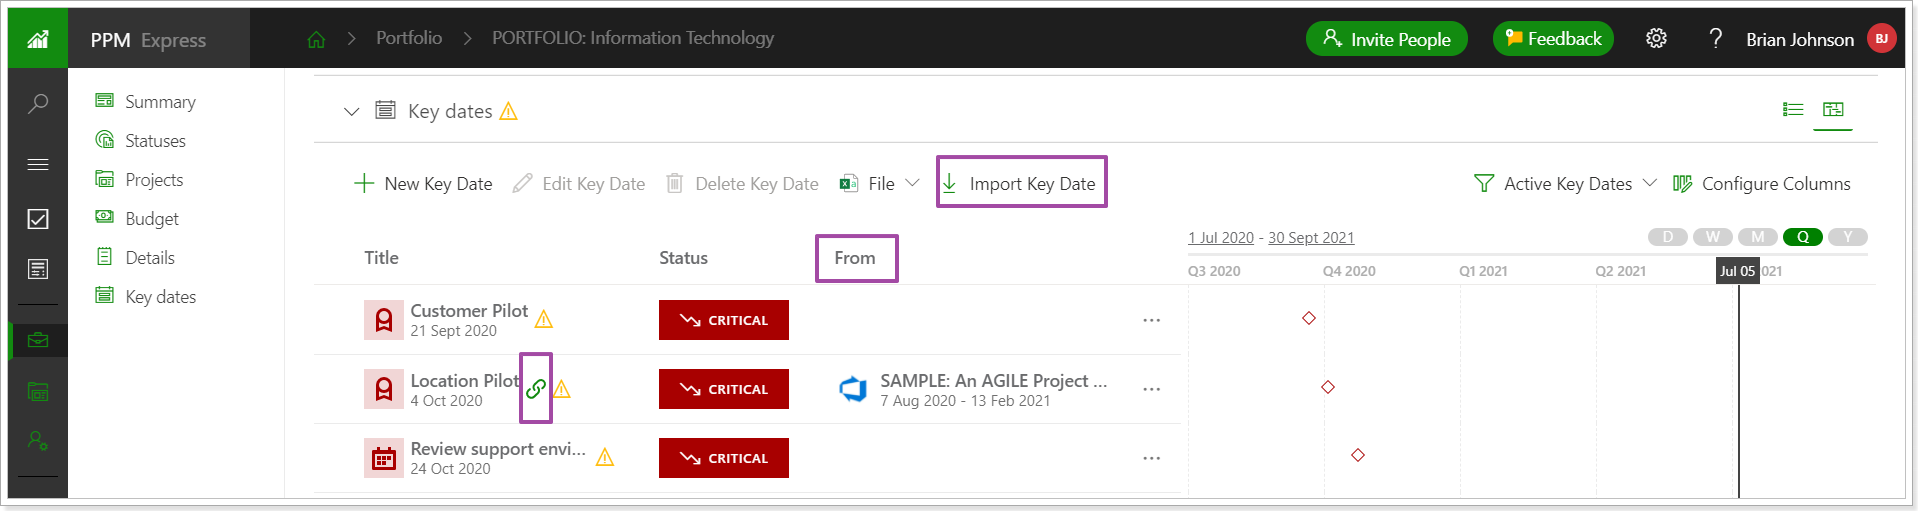
Release Notes 7.4 @ June 17, 2021
1. Manage Budget permission was changed and renamed to Manage Financial Details.
Before: Manage Budget permission granted access to Project or Portfolio budgets for the user account. If this permission was disabled, the user could not see or edit the budget (a placeholder was shown instead in the Budget section).
Now: Manage Budget permission was changed and renamed to Manage Financial Details. If this permission is disabled for the user, not only the Budget section content is hidden from this user, but also all Cost fields (OOB and custom) become disabled across Projects, Resources and Portfolios (N/A status is shown for these fields). OKR and Challenges & Ideas modules are excluded from this rule.

Please refer to the People Management article for more details.
2. OAuth authentication type is now available for Jira Server connection.
Before: Only Basic authentication type was available for Jira Server connection.
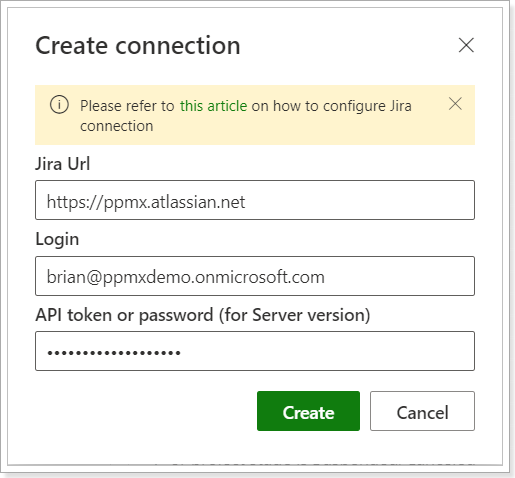
Now: The OAuth authentication type is available for selection as well for Jira Server connection.

3. One Project can now be added to multiple Portfolios.
Before: Users could add one Project to one Portfolio only.

Now: Users can add the same Project to multiple Portfolios.

Release Notes 7.3.1 @ June 10, 2021
1. The logic of saving the last selection choice of how the information is displayed on PPM Express pages changed.
The changes apply to the following pages:
- Portfolios Views
- Projects Views
- Resources page
- Business Challenges Views
- Company Objectives Views
Before: When you selected a column width/ views/ timescales/ timeframe/ sorting/ filters on the pages listed above, these changes were reset to default when you closed PPM Express and re-opened it.
Now: When you make a change to a column width/views, etc. on the pages listed above, these changes will be saved no matter if you switch between the pages or re-open the PPM Express application itself.
The following changes will be saved from now on:
- Columns width;
- Views (Cards, Timeline, Configurable table);
- Timescales (Days, Weeks, Months, Quarters, Years);
- Timeframe (date range);
- Sorting;
- Filters.
These changes are saved per user and per page: Portfolios, Projects, Resources, Challenges and Ideas, Company Objectives.
If you open PPM Express on a different device or browser the changes will be saved as well.
